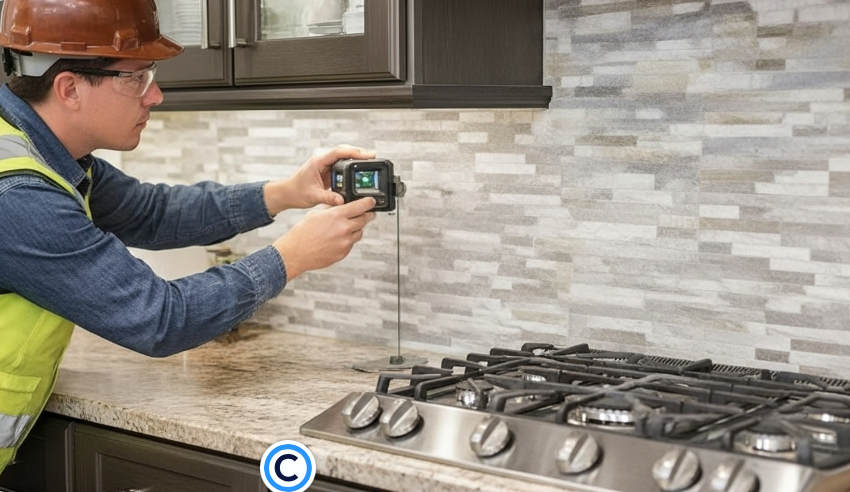
Back-Buttering Mastery serves as the primary defense against catastrophic stone delamination and the massive liability claims that follow structural failures in commercial masonry. When installers skip this step, they leave the entire project vulnerable to moisture infiltration and bond fatigue that can cause heavy panels to detach without warning. These failures often result in costly litigation, safety hazards for pedestrians, and the complete loss of a firm’s professional reputation in a competitive market.
This guide establishes a technical standard for achieving a permanent bond by focusing on the mechanics of mortar suction and substrate preparation. We examine the specific trowel techniques needed to eliminate air pockets, the risks of the common spot bonding shortcut, and the requirements for 100% mortar coverage on rugged stone surfaces. Following this protocol ensures that every installation meets the high-performance demands of modern commercial building envelopes.
What is Back-Buttering and Why is it the Gold Standard for Masons?
Back-buttering transforms a mechanical connection into a structural bond by forcing mortar into the microscopic pores of natural stone, ensuring the installation survives environmental stress that causes standard methods to fail.
The Mechanics of Keying Mortar into Stone Surfaces
Professional installers refer to back-buttering as “keying” or “burning” the mortar into the stone. By using the flat side of a margin trowel to force a thin layer of thin-set into the back of the panel, masons physically bond the adhesive to the stone’s mineral structure. This breaks the surface tension and ensures the mortar does not simply sit on top of dust or smooth sections of the natural cleft.
- Masons use the flat side of a trowel to force mortar into the natural pores and crevices of the stone.
- This process breaks the surface tension and ensures the adhesive “grabs” the material effectively.
- Keying the mortar creates a cohesive bond that prevents the stone from sliding during the curing process.
Achieving 95% Coverage for Structural Integrity
Natural stone panels typically weigh between 8 and 13 lbs per square foot, creating a constant downward shear force on the adhesive. Modern architectural specs in 2026 demand a minimum of 95% coverage for exterior and high-performance projects. Back-buttering provides the necessary insurance that nearly every square inch of the stone makes contact with the setting bed, meeting these rigorous safety standards.
- Natural stone panels exert significant downward force on the bond due to their substantial weight.
- Back-buttering guarantees that 95% or more of the stone surface contacts the mortar, meeting high-performance architectural specs.
- Full coverage supports the weight of the stone without relying solely on the suction of the wall mortar.
Eliminating Voids and Potential Freeze-Thaw Damage
Air pockets behind a stone wall are more than just weak spots; they are moisture traps. In exterior facades, water collects in these voids and expands when it freezes, exerting enough internal pressure to pop the stone off the wall. Applying a dedicated layer of mortar directly to the panel back fills these irregular textures, which standard wall-troweling often misses.
- Empty pockets behind a stone can trap moisture, leading to mold or structural failure in modern climate-controlled designs.
- In exterior applications, eliminating air pockets prevents water from freezing and popping the stone off the facade.
- A solid mortar bed distributes impact and pressure evenly across the entire panel system.
Preventing Stone Lippage and Alignment Errors
Back-buttering allows for real-time micro-adjustments on the job site. Since natural stone thickness fluctuates slightly between batches, installers can add a few extra millimeters of mortar to the back of a thinner panel to keep the face of the wall flush. This technique is mandatory for Z-shape and interlocking panels where a tight, seamless finish is the primary aesthetic goal.
- Adding a controlled amount of extra mortar to the panel back helps level the stone against adjacent pieces.
- This technique is vital for interlocking Z-shape panels to maintain a seamless, grout-free appearance.
- Properly buttered stones stay in place immediately, so installers spend less time adjusting individual units.
Does Interior Installation Really Require 100% Mortar Coverage?
While 80% coverage meets the technical minimum for dry interiors, professional masons target 100% to support the 12-lb-per-square-foot load of natural stone panels and eliminate the hollow spots that lead to impact failure.
Building codes and ANSI A108 standards specify a minimum of 80% mortar coverage for dry interior installations. This margin exists because achieving total contact is labor-intensive, yet it remains the “safe” floor rather than the ideal target. For high-density materials like natural stone ledger panels, which weigh between 8 and 13 lbs per square foot, relying on the bare minimum increases the risk of the bond shearing under the weight of the stone.
Top Source Stone products, including our Alaska Gray and Midnight Slate series, feature rugged, split-face backs that demand more than a simple swipe of adhesive. Masons who aim for 100% coverage ensure that the interlocking Z-shape connections remain structurally sound, preventing the panels from shifting or sagging as the building naturally settles.
Risks of Inadequate Coverage in Residential Spaces
Insufficient mortar application creates trapped air pockets behind the stone. These voids result in a “hollow” sound when the wall is tapped, a common red flag for inspectors and homeowners that suggests poor craftsmanship. Beyond acoustics, these gaps compromise the impact resistance of the wall. In a residential setting, a panel backed by an air pocket is much more likely to crack if struck by furniture or during a renovation than a panel supported by a solid bed of mortar.
- Vulnerability to Cracking: Gaps behind natural slate or marble panels leave the stone unsupported, making it brittle under pressure.
- Uneven Weight Distribution: Incomplete bonding forces the entire weight of a 6″ x 24″ panel onto a few contact points, stressing the substrate.
- Edge Lifting: Without full corner and edge support, panels can begin to curl or de-bond, especially in environments with slight temperature fluctuations.
Techniques for Verifying Mortar Contact on the Job Site
Professional installers verify their coverage by periodically pulling a panel off the wall immediately after setting it. This “pull test” reveals whether the mortar ridges on the substrate have collapsed into a uniform, continuous layer. If the back of the stone shows dry spots or untouched stone, the installer must adjust the trowel notch size or increase the mortar’s moisture content to ensure proper suction.
Back-buttering remains the most reliable method for achieving 100% contact. By applying a thin “skim coat” of mortar to the rear of the stone panel before pressing it into the notched ridges on the wall, the mason fills the natural irregularities of the stone. This dual-application technique ensures that the ridges collapse completely, bridging the gap between the wall and the stone and creating a permanent, fail-safe bond that exceeds 2026 industry standards.
Premium Factory-Direct Stacked Stone Ledger Panels

How to Apply Mortar to the Stone vs. the Wall for Maximum Suction?
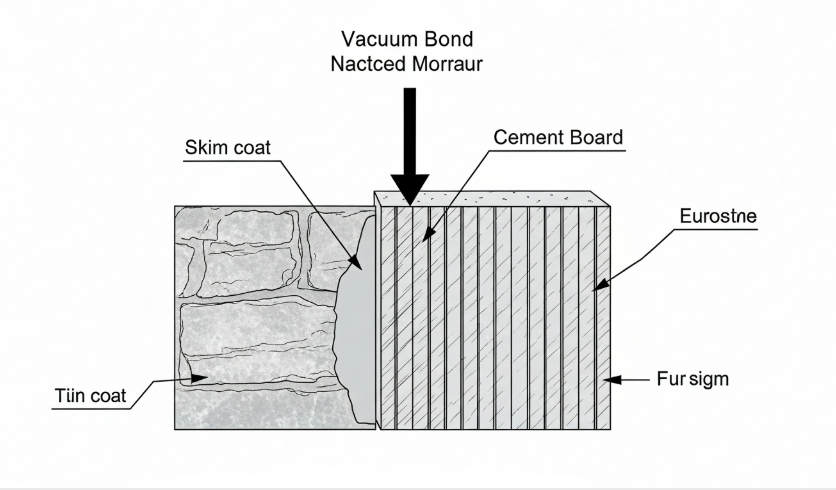
Achieving a permanent bond for heavy stacked stone panels requires a dual-surface mortar strategy that creates a vacuum effect to lock the material into place.
Substrate Side Troweling for Foundation Grip
Applying mortar to the wall substrate serves as the primary mechanical key for the entire assembly. We select the notch trowel size based on the specific panel series; for instance, our “Rough” series requires a deeper bed than the “Flat” series to accommodate natural variations. Straight, horizontal combing is the only reliable method for this step. Swirling motions trap air, which creates pockets that weaken the bond and provide channels for moisture to settle.
- Use a 1/2″ x 1/2″ square notch trowel for most 6” x 24” panels to ensure adequate depth.
- Comb mortar in straight lines to allow air to escape horizontally when the stone is pressed home.
- Limit mortar spreading to what can be covered within 10 to 15 minutes to avoid “skinning over.”
- Clean the substrate thoroughly; even minimal dust on cement board can act as a bond-breaker.
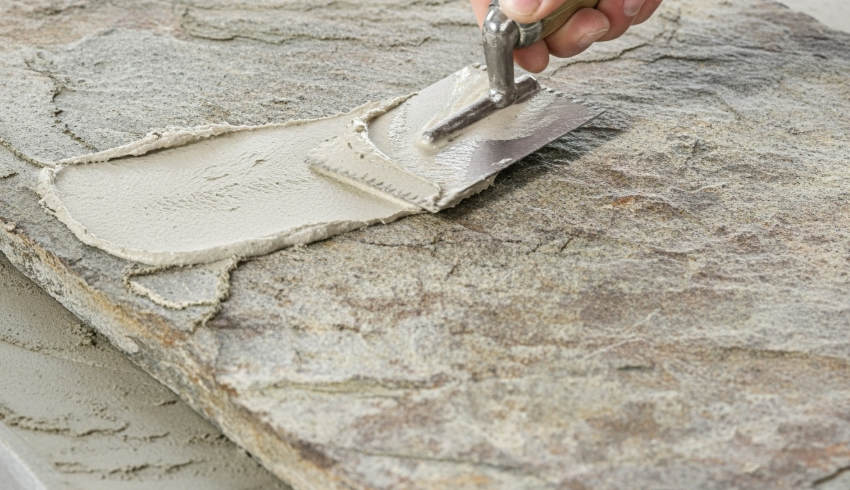
Back-Buttering Techniques for Natural Stone Voids
Natural stone like slate and quartzite contains micro-pores and irregularities that a wall-only mortar application cannot reach. We force a thin skim coat of mortar—roughly 1/8 inch thick—directly onto the back of the stone panel. This “burning in” process ensures the mortar engages with the natural texture and fills any gaps left by the epoxy resin used during the panel’s manufacturing. Without this step, the panel only sits on top of the mortar ridges rather than becoming part of the wall structure.
- Apply firm pressure with the flat side of the trowel to engage the stone’s pores.
- Ensure 100% coverage on the back of the stone to prevent hollow spots.
- Focus on the edges and corners to prevent delamination or cracking at the joints.
- Coordinate the back-butter thickness with the wall ridges for a total mortar bed of 1/4″ to 3/8″.
Collapsing Ridges to Achieve Maximum Suction
The actual suction occurs when the back-buttered stone meets the troweled wall. By setting the panel and moving it slightly perpendicular to the mortar ridges, we collapse the peaks into the valleys. This movement eliminates the air channels and creates a vacuum-tight seal. For panels weighing 8-13 lbs/sqft, this mechanical suction is the only thing preventing the stone from sliding before the mortar cures.
| Performance Metric | Substrate Only | Dual-Surface (Back-Butter) |
|---|---|---|
| Effective Coverage | 65% – 80% | 95% – 100% |
| Bond Mechanism | Surface Friction | Suction & Mechanical Key |
| Freeze-Thaw Risk | High (Due to air voids) | Minimum (Solid bed) |
- Apply even pressure across the 6” x 24” surface to distribute weight.
- Verify the bond by pulling back a random panel; the back should be fully “wetted” with mortar.
- Use a rubber mallet to seat panels into the mortar bed without damaging the natural cleft.
- Aim for the 2026 industry standard of 95% coverage for all stone veneer installations.
Managing Absorption and Environmental Conditions
The rate of suction is heavily influenced by how quickly the substrate or stone absorbs moisture from the mortar. In dry summer conditions, a thirsty substrate will pull water out of the mortar too fast, killing the chemical bond before it can cure. We monitor the ambient temperature and substrate porosity closely to adjust our workflow, ensuring the mortar remains “open” long enough to collapse the ridges and achieve the required transfer.
- Dampen highly porous concrete or masonry substrates to prevent rapid moisture loss.
- Adjust mortar consistency for wind-exposed exterior walls to prevent surface skinning.
- Use pH-neutral cleaners to remove squeeze-out from the stone face before it hardens.
- Stay within the manufacturer’s temperature range to ensure the polymer additives cure correctly.
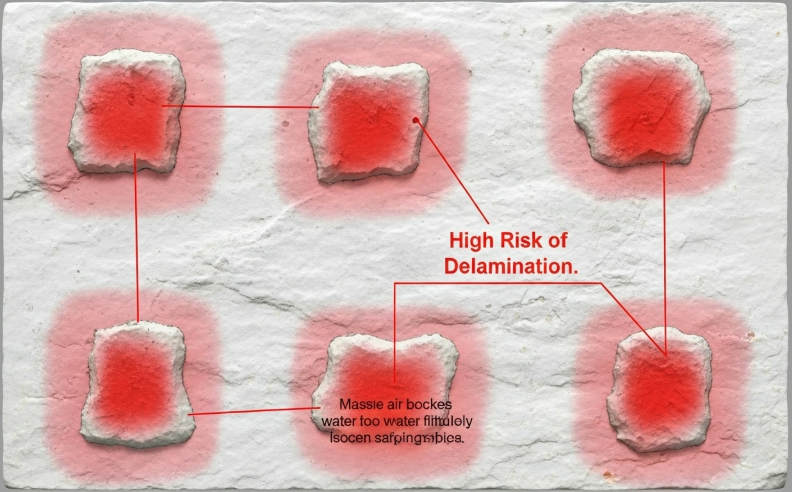
Why “Spot Bonding” is the Most Expensive Mistake in Stone Masonry?
Spot bonding, or “five-spotting,” bypasses essential mechanical bonds and creates hollow voids that inevitably trap moisture, leading to systemic wall failure and catastrophic liability for contractors.
Structural Risks of Hollow Voids and Air Pockets
Empty cavities behind stone panels act as reservoirs for moisture. In exterior applications, this water undergoes 2026 freeze-thaw cycles, expanding with enough force to crack natural stone or shear it clean off the substrate. These hollow points significantly reduce the impact resistance of the wall. A natural stone panel that should withstand physical contact becomes vulnerable to damage from even minor bumps because it lacks a solid bed of mortar to distribute the force.
- Trapped water in air pockets causes expansion and stone delamination during temperature shifts.
- Hollow points make 8-13 lb panels susceptible to cracking from minor physical impact.
- Lack of full coverage prevents weight from distributing evenly across the vertical substrate.
Adhesive Failure and Stone Delamination
Standard cement-based mortars naturally shrink as they cure. When you apply mortar in isolated “spots,” the material pulls away from the edges as it dries from the outside in. This curling destroys the initial bond, leaving the stone held by only a fraction of the intended surface area. While specialized epoxy bonding works for specific cladding, using traditional mortar in a spot pattern fails to meet the weight-bearing requirements of premium heavy-weight panels.
}
| Bonding Method | Mortar Coverage % | Primary Risk Factor |
|---|---|---|
| Spot Bonding (Cement) | Less than 50% | Shrinkage & Bond Destruction |
| Standard Troweling | 80% – 85% | Voids on Rugged Backs |
| Dual-Surface Application | 95% – 100% | Negligible (ASTM Certified) |
Compliance with ANSI and TCNA Installation Standards
Professional masonry requires strict adherence to industry standards that mandate specific mortar coverage. ANSI A108 standards require 95% mortar coverage for all exterior and wet area stone installations. TCNA guidelines explicitly restrict cement-based spot bonding because the failure rate is nearly 100% over the life of the building. Following these established 2026 industry protocols protects contractors from warranty claims and ensures the safety of building occupants.
- ANSI A108 mandates 95% coverage for exterior stone to guarantee long-term durability.
- TCNA guidelines restrict spot bonding due to liability and systemic failure risks.
- Adhering to 2026 protocols eliminates the “ticking time bomb” effect of poor adhesion.
Long-Term Costs of Remediation and Repair
Attempting to save time through spot bonding often results in total system replacements. Repairing a failed wall is never a simple patch job; it typically requires removing all stone and grinding the substrate clean. Labor costs for remediation in 2026 far exceed the initial project budget. Failures from improper bonding destroy the professional reputation of designers and contractors, leading to lost business that costs far more than the initial mortar savings.
We provide CNC diamond-blade precision panels that require full-bed adhesion to maintain their seamless appearance. Using correct dual-surface bonding techniques ensures that our 100% natural stone—whether slate or quartzite—remains UV stable and structurally sound for decades, rather than falling off the wall within the first few seasons.
How to Identify and Prevent Air Pockets Behind Large Stone Panels?
Voids behind stone panels act as failure points that compromise structural integrity and invite moisture-driven delamination.
Air pockets behind stone panels compromise the bond between the stone and substrate, leading to bubbling, edge lifting, and eventual failure. To ensure long-term durability, installers must eliminate these voids through precise application techniques and material selection.
Achieving Full-Coverage Adhesion
Eliminating voids starts by ensuring every square inch of the contact surface receives mortar. A dual-surface application strategy—applying mortar to both the substrate and the back of the stone panel—creates a continuous bond that distributes stress across the entire assembly. This method forces out trapped air as the two surfaces meet.
- Apply mortar or adhesive to both the stone panel and the substrate to create a continuous bond.
- Distribute stress evenly across the panel to prevent edge lifting and bubbling.
- Avoid spot-bonding techniques that naturally leave gaps where air becomes trapped.
Selecting Specialized Polymer-Modified Mortars
The chemical composition of the adhesive determines how effectively it maintains a pocket-free bond. Polymer-modified thin-set or polymer-fortified Type S mortars provide the high suction and bond strength required for large-format natural stone. Consistency in the mixture ensures that no uneven drying occurs, which can pull the stone away from the substrate and create new air pockets.
- Use polymer-modified thin-set or polymer-fortified Type S mortar for higher suction and bond strength.
- Apply the mixture consistently across the entire surface to maintain a uniform thickness.
- Utilize wet film gauges to measure coating thickness during application for professional-grade consistency.
Pressure-Controlled Joint Filling
Managing how grout enters the gaps prevents air from being sealed behind the stone surface after it is set. A plastic piping bag provides the control necessary to regulate the speed and pressure of the grout. This technique fills the joints from the back to the front, effectively pushing air out as the material moves forward.
- Use a plastic piping bag to control the speed and pressure of grout application.
- Wait until the initial adhesive is semi-dry before filling joints to ensure material flow without displacement.
- Minimize air entrapment by filling joints from the back to the front.
Panel Acclimation and Moisture Control
Environmental factors and stone preparation prevent the formation of voids during the curing process. Stone panels require a minimum 24-hour acclimation period at the installation site to stabilize their temperature and moisture content. If the stone remains dry during installation, the mortar bonds correctly without creating pockets of vapor that expand and contract.
- Acclimate stone panels at the installation site for at least 24 hours to prevent expansion-related gaps.
- Ensure the stone remains dry during the process, as moisture interferes with adhesion and traps air.
- Maintain clean hands and tools to prevent debris from creating unintended material displacement.

The Impact of Proper Wetting: Does Your Stone Need to be Dampened?
Controlling the moisture profile of natural stone panels prevents the substrate from prematurely extracting water from the mortar, ensuring the chemical hydration process reaches full structural maturity.
Preventing Rapid Moisture Loss in Mortar
Natural stone and cementitious substrates are inherently porous. When bone-dry panels meet fresh mortar, they act like sponges, instantly pulling water out of the mix. This rapid suction disrupts the chemical hydration process required for the cement to cure. If the mortar loses its water content too quickly, it cannot form the microscopic crystalline structures that lock into the stone’s pores, resulting in a brittle, weak bond.
Pre-dampening the stone back ensures the adhesive retains its internal moisture for the duration of the cure. This practice is vital for 8-13 lbs/sqft panels, where the bond must support significant vertical weight. By maintaining correct moisture levels, we prevent the mortar from becoming “chalky” and failing under environmental stress or the dead load of the stone itself.
Removing Quarry Dust to Improve Bond Integrity
Manufacturing processes, especially precision CNC diamond-blade cutting, leave a fine residue of quarry dust on the back of every ledger panel. This dust acts as a high-efficiency bond-breaker. If you apply high-strength thin-set directly over this residue, the mortar bonds to the loose particulates rather than the actual stone surface. Over time, this leads to delamination as the dust layer separates from the solid stone.
- Use a damp sponge or a light mist to clear away loose particulates before the mortar hits the stone.
- Focus specifically on Slate and Quartzite series, which produce higher volumes of fine dust during the interlocking Z-shape cutting process.
- Ensure the back of the stone is clean enough that no gray or white residue transfers to your hand when wiped.
Achieving the Saturated Surface Dry (SSD) Condition
Installers must target the “Saturated Surface Dry” (SSD) state. This means the stone has absorbed enough water to stop it from “drinking” the mortar, but the surface itself has no visible standing water or glistening pools. If the stone is dripping wet, the water acts as a lubricant. This causes panels to sag or slide during installation, ruining the alignment of seamless Z-shape joints.
Properly dampened stones create a vacuum-like suction when pressed into mortar ridges. This physical suction, combined with the chemical bond, secures the panels immediately. Achieving SSD status allows masons to stack multiple courses of natural stone without waiting for the bottom rows to “set up,” significantly increasing jobsite efficiency.
Temperature Management for 2026 Outdoor Installations
Environmental factors in 2026 projects, particularly for exterior facades in high-heat regions, require active thermal management. Applying mortar to a sun-baked concrete or CMU substrate causes the adhesive to “skin over” in minutes. This dry skin prevents the stone panel from ever making a true connection with the wet mortar underneath.
Wetting the substrate and the stone lowers the surface temperature and extends the “open time” of the adhesive. This flexibility is essential when aligning interlocking corners and matching the texture of different panels from the same quarry vein. For exterior installations exposed to direct sunlight, this temperature control is the difference between a lifetime bond and a catastrophic failure during the first freeze-thaw cycle.
How to Use a Trowel to Create the Perfect Ridges for Suction?
True suction is a mechanical vacuum created when directional ridges are collapsed to purge air, achieving the 95% coverage required for heavy natural stone panels.
Achieving high-performance adhesion with natural stacked stone requires more than just “spreading mud.” Because stone panels have irregular backs—unlike flat-back ceramic tiles—the trowel technique must compensate for varied depths while facilitating air escape. If air remains trapped behind the panel, the bond depends solely on the mortar’s stickiness rather than atmospheric pressure and structural integration.
Selecting the Correct Notch Size for Ledger Panels
Proper ridge height starts with choosing a trowel that provides enough mortar volume to bridge the natural, uneven back of the stone. Masons typically select a 1/2-inch by 1/2-inch square-notched trowel for Top Source Stone standard panels weighing between 8 and 13 pounds per square foot. This notch depth ensures that once the ridges are compressed, the final mortar bed maintains a thickness of at least 1/4 inch, reaching into every recessed area of the stone’s texture.
| Trowel Notch Size | Application Weight/Type | Bond Performance |
|---|---|---|
| 1/4″ x 1/4″ Square | Thin-veneer trim only | Insufficient coverage for stone |
| 1/2″ x 1/2″ Square | Standard 6″ x 24″ Panels | 95%+ ANSI Compliant |
| 3/4″ x 3/4″ Square | Rough/Premium Thick Panels | Maximum structural suction |
- Use a 1/2-inch by 1/2-inch square-notched trowel for standard stacked stone panels weighing 8 to 13 pounds per square foot.
- Ensure the notch depth allows for a final thin-set thickness of at least 1/4 inch after the ridges collapse.
- Replace worn trowels immediately to prevent shallow ridges that fail to reach the stone’s recessed areas.
Maintaining a Consistent 45-Degree Application Angle
The angle of the trowel during the combing process determines the uniformity and height of the mortar ridges. Holding the trowel at a steady 45-degree angle to the wall surface creates ridges of maximum height and width. If the trowel is held too flat, the notches cannot move the full volume of mortar, resulting in weak, thin ridges that fail to support the stone’s weight.
- Hold the trowel at a steady 45-degree angle to the wall surface to create ridges of maximum height and width.
- Avoid “flat-troweling” during the combing phase, as this creates thin, weak ridges that cannot support the weight of the stone.
- Apply enough pressure to feel the trowel teeth touching the substrate, ensuring the ridges are anchored to the cement board or masonry.
Executing Straight Directional Combing
Combing mortar in straight, parallel lines is a 2026 industry standard. This technique provides clear channels for air to escape when the panel is pressed into the wall. Circular or “swirl” patterns trap air in pockets, which prevents the ridges from collapsing fully and creates weak spots in the installation. When back-buttering, align the ridges on the back of the stone in the same direction as the ridges on the wall to prevent crossing patterns that trap air.
- Comb the mortar in straight, parallel lines rather than circular or “swirl” patterns.
- Straight ridges provide clear channels for air to exit when the stone panel is pressed against the wall.
- Align ridges in the same direction for both the wall and the back of the stone if back-buttering to prevent crossing ridges from trapping air.
Collapsing the Ridges to Create the Suction Bond
Suction occurs when the air between the ridges is forced out, creating a vacuum that locks the panel in place. Installers achieve this by pressing the ledger panel into the mortar and moving it slightly in a direction perpendicular to the ridges. This sliding motion collapses the “peaks” of the mortar into the “valleys,” filling all air gaps and ensuring 95% to 100% coverage. A correctly installed panel will resist removal through atmospheric pressure and mortar grip immediately after placement.
- Press the ledger panel into the mortar and move it slightly in a direction perpendicular to the ridges.
- Use a firm, sliding motion to collapse the “peaks” of the mortar into the “valleys,” filling all air gaps.
- Verify suction by trying to pull the panel away; a correctly installed panel should resist removal through atmospheric pressure and mortar grip.
Conclusion
Adopting back-buttering as a standard practice ensures full mortar coverage and permanent bond strength for every stone panel. This method eliminates air pockets and the risk of delamination, protecting both the safety of the site and the structural integrity of the project. Consistency in these technical steps leads to durable, high-performance walls that meet rigorous commercial masonry standards.
Audit your team’s current application methods to confirm they align with these professional requirements for natural stone. For technical support or to browse our inventory of project-ready stone panels, visit topsourcestone.com or contact us for a product sample.
Frequently Asked Questions
Why is back-buttering mandatory for exterior stacked stone?
Back-buttering is critical for exterior applications to eliminate voids where water can collect. In outdoor environments, moisture trapped behind a stone panel will undergo freeze-thaw cycles; as the water expands into ice, it creates “ice wedging” pressure that will pop the stone off the substrate. Industry standards require at least 95% mortar coverage for exterior installations to prevent this failure and ensure the bond can withstand thermal expansion and contraction.
Can I skip back-buttering for small interior feature walls?
While interior environments are less harsh than exterior ones, skipping back-buttering is not recommended. Stacked stone is significantly heavier than standard ceramic tile; back-buttering ensures a mechanical bond that supports this weight and prevents “hollow spots.” Skipping this step often results in poor adhesive transfer, increasing the risk of individual stones or entire panels loosening over time due to building vibrations or natural settling.
How thick should the mortar be on the back of a stone panel?
The mortar applied during back-buttering should be a “skim coat” approximately 1/8″ to 1/4″ thick. The goal is not to create a massive bed of mud on the stone itself, but to “key” or “burn” the mortar into the stone’s surface. This thin layer fills the natural pores of the stone, providing a wet-on-wet connection when pressed against the notched mortar on the wall, which maximizes the total bond strength.
How to ensure 100% coverage on stones with very rugged backs?
To achieve 100% coverage on rugged or cleft-back stones, you must use the “parging” technique. Use the flat side of a trowel to force the mortar firmly into all the deep indentations and irregularities of the stone’s back before setting it. This “buries” the topography of the stone in adhesive, ensuring that no air pockets are trapped between the stone and the substrate, which is essential for a permanent, high-strength bond.
Why does “spot bonding” lead to stone panels falling off years later?
Spot bonding—applying small “daubs” of mortar to the corners—creates large, hollow voids behind the stone. Over several years, these voids allow for moisture accumulation and provide no structural support against the natural expansion and contraction of the building. As the adhesive spots age and become brittle, they cannot handle the concentrated stress of the heavy stone, leading to a complete shear failure where the stone detaches cleanly from the wall.
