
الممرات الحجرية التي تغرق أو تتحول أو تتضخم بعد موسم واحد فقط تحبط حتى أصحاب المنازل الأكثر صبرًا. إن ما ينبغي أن يكون ميزة دائمة للمناظر الطبيعية غالبًا ما يصبح صداعًا متكررًا للصيانة عندما لا يتم اتباع تقنيات البناء المناسبة من البداية.
إنشاء أ حجر فضفاض يتطلب المسار الذي يصمد أمام اختبار الزمن أكثر من مجرد نثر الصخور عبر حديقتك. يكمن المفتاح في اختيار مواد عالية الجودة، وإعداد الأساس المناسب، وتنفيذ استراتيجيات التصميم الذكية التي تمنع المشكلات الشائعة مثل غرق الحجارة، ونمو الأعشاب الضارة، والتآكل. سيرشدك هذا الدليل الشامل خلال الخطوات الأساسية لبناء مسار حجري فضفاض متين يعزز المساحة الخارجية الخاصة بك مع الحد الأدنى من متطلبات الصيانة.
تخطيط المسار الحجري الفضفاض: اعتبارات التصميم والمواد
إنشاء أ حجر فضفاض يمكن أن يحول المسار مساحتك الخارجية ، مع إضافة كل من الوظائف والجاذبية البصرية إلى المشهد الخاص بك. قبل الاستيلاء على مجرفة الخاص بك ، يضمن التخطيط السليم أن يقف مسارك في اختبار الوقت مع استكمال جمالية منزلك. دعنا نستكشف الاعتبارات الأساسية لتصميم مسار الحجر المثالي.
يوازن مسار الحجر الفضفاض المصمم جيدًا من الجاذبية الجمالية مع المتانة العملية ، مما يتطلب تخطيطًا مدروسًا للتخطيط والمواد وتقنيات التثبيت لضمان الرضا على المدى الطويل.
تحديد أسلوبك: مطابقة المسار مع منزلك وحديقتك
يجب أن يشعر طريقك الحجري الفضفاض بأنه امتداد طبيعي لأسلوب منزلك المعماري. بالنسبة للمنازل المعاصرة ، فكر في قائمة أنيقة أو الحصى الموحد. تنقل المنازل التقليدية بشكل جميل بحجر الأعلام غير المنتظم أو صخرة النهر المستديرة. استلهم من عناصر المناظر الطبيعية الحالية - لا ينبغي أن يشعر طريقك كطريقة لاحقة ولكن “ملاءمة مثالية” مع التصميم الكلي في الهواء الطلق.
النظر في كيفية استخدام المسار. هل هو ممر أساسي يربط المناطق الرئيسية؟ أو مسار حديقة متعرج؟ تتطلب المساحات ذات الحرائق العالية اختيارات حجرية أكثر متانة وإعدادًا مناسبًا للقاعدة ، بينما توفر المسارات الزخرفية المزيد من المرونة في المواد.
لوحة الألوان مهمة بشكل كبير. حدد الحجارة التي تكمل أو تتناقض بشكل مدروس مع ميزات المناظر الطبيعية الخارجية في منزلك. عادة ما توفر نغمات الأرض الطبيعية جاذبية خالدة ، في حين أن الألوان الأكثر جرأة يمكن أن تخلق نقاط محورية مذهلة.
قياس ورسم الخرائط: تقييم منطقة المسار والمتطلبات
ابدأ بتخطيط مسار المسار الخاص بك ، باستخدام خراطيم الحديقة أو الحبل لتصور التدفق. بالنسبة للمنحنيات الجذابة بشكل طبيعي ، تجنب الأشكال الهندسية المثالية - الخطوط المتدفقة ، تخلق الخطوط المتدفقة أكثر جماليات ممتعة. تتراوح عرض المسار القياسي من 18-36 بوصة لمسارات الحديقة إلى 48-60 بوصة للممرات الرئيسية.
احسب لقطاتك المربعة بعناية لتحديد كميات المواد. قياس الطول والعرض ، ثم اضرب هذه الأرقام. أضف 10-15 ٪ إضافية لحساب التخفيضات والكسر والإصلاحات المستقبلية. بالنسبة للمسارات الحجرية الفضفاضة ، ستحتاج أيضًا إلى حساب مواد قاعدة مثل الحجر أو الرمال المكسرة.
اختيار الحجر: أنواع الحجارة والألوان والقوام
الحجر الذي تختاره يؤثر على كل من الوظائف والمظهر. تشمل الخيارات الشائعة للمسارات الحجرية الفضفاضة الجرانيت المتحللة ، الحصى البازلاء ، الحجر الجيري المسحوق ، صخور النهر ، وقطع من الحجر. كل منها يجلب خصائص فريدة لتصميمك:
| نوع الحجر | التكلفة النموذجية (لكل قدم مربع) | تصنيف المتانة | مستوى الصيانة | أفضل التطبيقات | التوافر الإقليمي |
|---|---|---|---|---|---|
| الجرانيت المتحلل | 0.50 دولار-1.50 دولار | واسطة | معتدل (يتطلب تجديدًا عرضيًا) | مسارات الحديقة غير الرسمية ، المناظر الطبيعية التي تتحمل الجفاف | متوفر على نطاق واسع في المناطق الغربية |
| الحصى البازلاء | 1.00 دولار-3.00 دولار | متوسطة | منخفض (التشويش السنوي/التسوية) | مسارات صديقة للعائلة ، تصاميم البحر الأبيض المتوسط | متاح عالميا |
| الحجر الجيري المسحوق | 0.75 دولار-2.25 دولار | عالي | منخفضة (مضغوط جيد مع مرور الوقت) | المناطق ذات العبور العالية ، حدائق رسمية | شائع في المناطق الأوسط/الشرقية |
| صخور النهر | 2.50 دولار-5.00 دولارات | عالية جدا | منخفض جدا (التنظيف العرضي) | مناطق الصرف الصحي ، حدائق مستوحاة من الآسيوية | التسعير المتميز في المناطق الصحراوية |
| حجر عشوائي فضفاض | 3.00 دولار-7.50 دولار | عالية جدا | منخفضة (إعادة وضع عرضية) | مداخل رسمية ، مسارات عرض | الموردين المتخصصين مثل قائمة المصدر العليا |
تقدير تكاليف المواد: الميزانية لمشروعك
ما وراء الحجر نفسه ، الميزانية للمواد الأساسية الضرورية. يتطلب المسار الحجري الفضفاض الذي تم إنشاؤه بشكل صحيح 2-4 بوصات من القاعدة الحجرية المكسورة المضغوطة ، تليها 1-2 بوصات من الرمال أو الحصى الناعم ، ثم مغطاة بالمواد الحجرية المختارة.
لا تتجاهل قيود الحافة - سواء كانت المعدن أو البلاستيك أو الحجر أو الطوب - مما يمنع انتشار خطوط طريقك والحفاظ عليها. هذه عادة ما تكلف 1 دولار-3 دولارات لكل قدم خطية ولكن تمديد عمر مسارك بشكل كبير. يمنع نسيج المناظر الطبيعية من الدرجة المهنية أسفل مسارك (0.10 دولار-0.30 دولار للقدم المربع) نمو الأعشاب مع السماح الصرف الصحي.
للحصول على اختيارات الحجر المخصصة التي تتطابق تمامًا مع رؤية التصميم الخاصة بك ، ضع في اعتبارك موردين متخصصين مثل قائمة المصدر الأعلى. توفر عروضهم الحجرية الفضفاضة العشوائية متانة استثنائية مع أبعاد مخصصة وتشطيبات لتلبية متطلبات المشروع المحددة والأهداف الجمالية.
من خلال التخطيط الدقيق لتصميم ومواد مسار الحجر الفضفاض الخاص بك ، ستقوم بإنشاء ميزة خارجية تعزز المشهد الخاص بك مع توفير سنوات من الاستخدام العملي مع الحد الأدنى من الصيانة.
دليل خطوة بخطوة لبناء مسار حجري فضفاض متين
لا يجب أن يكون إنشاء مسار حجري جميل وظيفة احترافية للمناظر الطبيعية. من خلال المواد والتقنيات المناسبة ، يمكن لأي مالك منزل بناء مسار حجري فضفاض متين يعزز مساحته الخارجية مع الحاجة إلى الحد الأدنى من الصيانة. هذا الدليل ينقسم العملية إلى خطوات يمكن التحكم فيها تضمن نتائج طويلة الأمد.
يتطلب المسار الحجري السائب الذي تم إنشاؤه بشكل صحيح تحضيرًا شاملاً للمواقع ، ومواد عالية الجودة ، وتقنيات التثبيت الاستراتيجية لإنشاء ممر مستقر مقاوم للأعشاب يستمر لسنوات عديدة مع الحد الأدنى من الصيانة.
إعداد الموقع: المقاصة والتصنيف والتسوية
تبدأ مسارات الحجر الناجحة بإعداد الموقع المناسب. ابدأ بوضع علامة على حدود مسارك باستخدام المخاطر والسلسلة أو خرطوم الحديقة لتصور الشكل النهائي. العرض القياسي لمسارات الحديقة هو 3-4 أقدام ، مما يسمح بالمرور المريح للأشخاص وأدوات الحديقة.
امسح المنطقة الملحوظة تمامًا ، وإزالة جميع الغطاء النباتي والصخور والحطام. التنقيب على عمق 6-8 بوصات لاستيعاب مواد الأساس الخاصة بك. هذا العمق أمر بالغ الأهمية لإنشاء قاعدة مستقرة تمنع التسوية في المستقبل وتحويلها من أحجارك.
صفية المنطقة المحفورة مع ميل طفيف (حوالي 1-2 ٪) بعيدا عن أي هياكل لضمان الصرف الصحي المناسب. استخدم خطًا وخط سلسلة للتحقق من منحدر ثابت. قم بمضغوط التربة باستخدام عبث يدوي أو ضاغط لوحة لإنشاء سطحي قوي “قفل في” مواد الأساس الخاصة بك.
وضع الأساس: تثبيت حاجز الأعشاب الضارة والمواد الأساسية
الأساس المستقر هو سر بناء مسارات الحجر التي تقف في اختبار الزمن. ابدأ بوضع نسيج المناظر الطبيعية الاحترافية في جميع أنحاء المنطقة المحفورة بأكملها ، ويمتد من 3 إلى 4 بوصات إلى ما وراء حوافك المخططة. هذا الحاجز الحرج يمنع الأعشاب الضارة مع السماح لتصريف المياه ، ومعالجة صداع الصيانة الشائع.
بعد ذلك ، أضف طبقة 3-4 بوصات من الحجر أو الحصى الخشن (عادةً ما يكون ¾ بوصة) كمواد أساسية. انتشر بالتساوي وضغط جيدًا مع ضاغط اللوحة ، مما يجعل تمريرات متعددة لتحقيق أقصى قدر من الكثافة. توفر هذه الطبقة الأساسية تصريفًا حاسماً وتمنع الصقيع في المناخات الباردة.
قم بتغطية القاعدة بطبقة 1-2 بوصة من الرمل الخشن أو الحجر المسحوق الناعم. وهذا يخلق سريرًا ناعمًا ومتساويًا لأحجارك مع الحفاظ على نفاذية التصريف. قم بالضغط بخفة وتحقق مرة أخرى من التصنيف المناسب لضمان تدفق المياه بعيدًا عن الهياكل.
وضع الحجر: تقنيات الاستقرار والجماليات
| نوع الحجر | الوزن لكل قدم مربع | سمك نموذجي | تباعد الفجوة | علاج الحافة | تصنيف الملمس السطحي |
|---|---|---|---|---|---|
| حجر العلم | 12-15 رطل | 1-2 بوصة | 0.5-2 بوصة | قطع أو طبيعي | متوسطة الخام |
| لائحة | 10-13 رطل | 0.5-1 بوصة | 0.25-1 بوصة | قطع نظيفة | سلسة متوسطة |
| الحجر الجيري | 11-14 رطل | 1.5-2.5 بوصة | 0.5-1.5 بوصة | قطع الخام | واسطة |
| الجرانيت | 15-18 رطل | 1-3 بوصة | 0.5-1 بوصة | منشورة أو حرارية | خشن |
| الكوارتزيت | 13-16 رطل | 1-2 بوصة | 0.5-1 بوصة | طبيعي أو مقطوع | متوسطة الخام |
عند وضع الحجارة ، ابدأ من أحد طرفي المسار والعمل بشكل منهجي نحو الآخر. بالنسبة للترتيبات الطبيعية ، تختلف أحجام الحجر مع الحفاظ على فجوات متسقة بين القطع. نستله كل حجر بحزم في الفراش الرملي ، مما يضمن أنه يجلس بشكل مسطح دون التذبذب.
استخدم مطرقة مطاطية للاستفادة برفق الحجارة في مكانها ، والتحقق بشكل متكرر بمستوى للحفاظ على سطح متساوٍ. من أجل الاستقرار الأمثل ، تأكد من أن كل حجر لديه ثلاث نقاط على الأقل من الاتصال بالأحجار المحيطة أو الحواف. تهدف إلى فجوات من ½ إلى 1 بوصة بين الحجارة - على نطاق واسع بما يكفي للسماح بالتسوية الطبيعية ولكن ضيقة بما يكفي لمنع مخاطر التعثر.
تأمين المسار: التحول والاستقرار
التثبيت تعد الحواف المناسبة أمرًا بالغ الأهمية لطول عمر المسار الحجري الفضفاض. تشمل الخيارات شرائط الحواف المعدنية، أو الحواف البلاستيكية للمناظر الطبيعية، أو حدود الطوب، أو الحجارة الأكبر حجمًا. قم بتأمين مادة الحواف التي اخترتها بقوة في التربة المحيطة، بحيث تمتد بعمق 4 بوصات على الأقل لمنع تحول وانتقال مواد المسار الخاص بك.
بمجرد تثبيت الحواف، املأ الفجوات بين الحجارة بالمواد التي اخترتها، حيث يعد الجرانيت المتحلل أو الحصى الناعم أو غبار الحجر من الخيارات الممتازة. قم بمسح المادة في جميع الشقوق، ثم قم برشها قليلًا بالماء لمساعدتها على الاستقرار. تمنع مادة الربط هذه حركة الحجر مع الحفاظ على النفاذية.
للحصول على نتائج ذات جودة احترافية تقلل من الصيانة المستقبلية، احصل على أحجارك من الشركات المصنعة مثل Top Source Slate، المعروفة بالجودة المتسقة ومواصفات الأبعاد الدقيقة. تضمن مراقبة الجودة الصارمة على مرحلتين أحجارًا موحدة تتشابك بشكل طبيعي، مما يقلل من الاستقرار والتحول بمرور الوقت. مع فترات زمنية قياسية تتراوح من 20 إلى 30 يومًا، يمكن تزويد مشاريع المسارات الكبيرة بأحجار مطابقة تخلق سطحًا متماسكًا وثابتًا.
سيؤدي اتباع هذه الخطوات لبناء الممرات الحجرية إلى إضافة جميلة ومتينة إلى المناظر الطبيعية الخاصة بك والتي تتطلب الحد الأدنى من الصيانة لسنوات قادمة.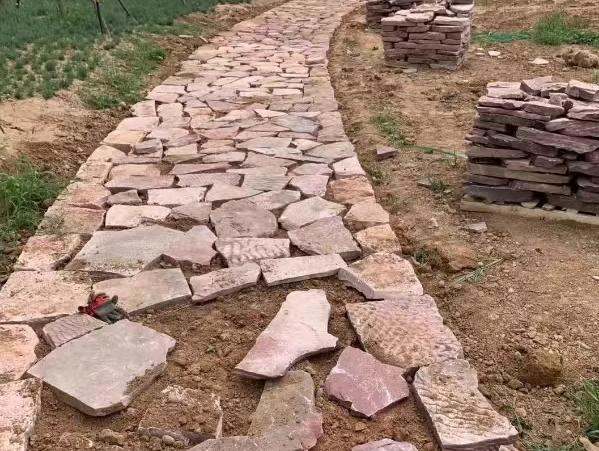
الحفاظ على مسارك الحجري السائب: الرعاية طويلة الأمد واستكشاف الأخطاء وإصلاحها
يمكن للمسار الحجري السائب المبني جيدًا أن يعزز المناظر الطبيعية الخاصة بك لسنوات مع الصيانة المناسبة. في حين أن هذه الممرات الطبيعية توفر سحرًا ريفيًا ومتانة، إلا أنها تتطلب اهتمامًا منتظمًا للحفاظ على جمالها ووظيفتها. يغطي هذا الدليل استراتيجيات صيانة المسار الحجري الأساسية للحفاظ على مظهر المسار الخاص بك رائعًا خلال المواسم المتغيرة والظروف الصعبة.
تعمل الصيانة المنتظمة للممرات الحجرية السائبة على إطالة عمرها الافتراضي بشكل كبير، مع كون التدابير الوقائية مثل الحواف المناسبة والتنظيف الموسمي والإصلاحات السريعة أكثر فعالية من الحلول التفاعلية للمشكلات الرئيسية.
مكافحة الحشائش: استراتيجيات فعالة للوقاية والإزالة
الأعشاب الضارة هي الشكوى الأكثر شيوعًا بين أصحاب الممرات الحجرية. يبدأ أفضل دفاع أثناء التثبيت باستخدام قماش عالي الجودة للمناظر الطبيعية أسفل طريقك. بالنسبة للمسارات المحددة، فكر في هذه التدابير الوقائية وخيارات العلاج:
ضع مبيدات الأعشاب قبل ظهورها على المسار مرتين سنويًا (أوائل الربيع والخريف) لمنع إنبات البذور دون الإضرار بالنباتات المحيطة. للحصول على بديل صديق للبيئة، استخدم محلول الخل (1 جالون من الخل الأبيض، 1 كوب ملح، 1 ملعقة كبيرة من صابون الأطباق) يقتل الأعشاب الضارة الموجودة بشكل فعال دون إدخال مواد كيميائية إلى حديقتك.
بالنسبة للأعشاب العنيدة التي تنمو بين الحجارة، استخدم أداة إزالة الأعشاب ذات مقبض طويل لإزالة نظام الجذر بالكامل بدلاً من قطع الجزء المرئي فقط. يمنع كنس المسار المنتظم تراكم الحطام حيث يمكن أن تتجذر بذور الحشائش. تذكر أن متسقة “علاج البقع” تتطلب إزالة الحشائش الناشئة جهدًا أقل من معالجة الإصابة الكاملة.
معالجة الحجارة الغارقة: تقنيات الرفع والتسوية
مع مرور الوقت، يمكن أن يؤدي الترسيب الطبيعي والتآكل إلى غرق الحجارة أو تحركها. وهذا يخلق أسطحًا غير مستوية ومخاطر تعثر محتملة. عندما تلاحظ وجود حجر غائر، قم بمعالجته على الفور لمنع المزيد من التدهور:
| خطورة المشكلة | طريقة الإصلاح | الأدوات المطلوبة | الاحتياجات المادية | الوقت المقدر | نطاق التكلفة المهنية |
|---|---|---|---|---|---|
| غرق طفيف (0.25-0.5″) | رفع بسيط & يملأ | شريط نقب، العبث اليدوي | رمل زاوي (0.5 قدم مكعب) | 15-30 دقيقة لكل حجر | 10-25 دولارًا للحجر الواحد |
| غرق معتدل (0.5-1.5″) | إعادة تعيين الحجر الكامل | شريط نقب، العبث، المستوى | رمل خشن / حجر مكسر (1 قدم مكعب) | 30-45 دقيقة لكل حجر | 25-40 دولارًا للحجر الواحد |
| غرق شديد (>1.5″) | إعادة بناء القاعدة | مجرفة، العبث، المستوى | قاعدة الحصى + الرمل (2+ قدم مكعب) | 1-2 ساعات لكل قسم | 40-75 دولارًا لكل قسم |
| فشل الحجر المتعدد | استبدال القسم | مجموعة أدوات كاملة + ضاغط | مواد أساسية كاملة + أحجار جديدة | 3-4 ساعات لكل 10 قدم مربع | 150-300 دولار لكل 10 قدم مربع. |
| الفشل المتعلق بالصرف الصحي | تركيب الصرف تحت السطح | معدات الحفر | أنابيب الصرف الصحي والحصى والنسيج المناظر الطبيعية | 4-8 ساعات | 300-600 دولار |
لإجراء تعديلات طفيفة، ارفع الحجر الغارق بعناية باستخدام قضيب أو مجرفة، وأضف مادة مضغوطة تحته (الرمل الزاوي يعمل بشكل أفضل)، ثم قم بدك المادة بقوة قبل استبدال الحجر. افحص مستوى الحجر بالنسبة للأحجار المحيطة به، واضبطه حسب الحاجة حتى يصبح السطح مستويًا.
منع التآكل: إدارة جريان المياه واستقرار التربة
الماء ضروري لحديقتك ومن المحتمل أن يكون مدمرًا لمسارك الحجري. تتضمن الصيانة الفعالة للمسارات الحجرية إدارة تدفق المياه لمنع التآكل. تركيب قنوات صرف أو مصارف فرنسية بجانب المسارات في المناطق ذات الأمطار الغزيرة أو سوء الصرف.
راقب المناطق التي يلتقي فيها مسارك بالعشب أو أسِرَّة الحديقة، فهذه المناطق الانتقالية معرضة بشكل خاص للتآكل. فكر في تركيب حواجز أو مستنقعات صغيرة لتوجيه المياه بعيدًا عن المسار الخاص بك. للمسارات على المنحدرات، قم بإنشاء صغيرة “مطبات السرعة” من الحجر كل بضعة أقدام لإبطاء تدفق المياه وتقليل أضرار التآكل.
الصيانة الموسمية: الاستعداد لفصل الشتاء والصيف
تمثل المواسم المختلفة تحديات فريدة لـ الحجر الطبيعي مسارات. في الخريف، قم بإزالة الأوراق المتساقطة بانتظام لمنع التحلل والبقع. قبل فصل الشتاء، تأكد من أن جميع الحجارة مستوية ومستقرة، حيث أن دورات التجميد والذوبان يمكن أن تؤدي إلى تفاقم المشاكل الموجودة.
لإزالة الثلج، استخدم المجارف البلاستيكية بدلًا من المعدن لتجنب خدش الحجارة أو تقطيعها. تجنب استخدام أملاح إزالة الجليد النموذجية، التي يمكن أن تلحق الضرر بالحجر الطبيعي - وبدلاً من ذلك، استخدم الرمل أو أسيتات المغنيسيوم والكالسيوم (CMA)، وهو ألطف على كل من الأسطح الحجرية والنباتات المحيطة.
في الربيع، قم بإجراء فحص شامل بعد الصقيع الأخير لمعالجة أي ضرر في الشتاء على الفور. يجب أن تركز الصيانة الصيفية على مكافحة الحشائش والشطف العرضي لإزالة الغبار وحبوب اللقاح التي يمكن أن تضعف الأسطح الحجرية.
بالنسبة للمسارات التي تم إنشاؤها بمواد متميزة من موردين مثل Top Source Slate، غالبًا ما يتم تقليل متطلبات الصيانة بفضل الجودة المتسقة ومواصفات الأبعاد الدقيقة للأحجار. يمتد التزامهم بالتواصل سريع الاستجابة واستشارة الخبراء إلى ما هو أبعد من الشراء، حيث يقدمون إرشادات حول تقنيات الرعاية المناسبة الخاصة بمنتجاتهم، مما يضمن احتفاظ مسارك بجماله لسنوات قادمة.

خاتمة
من السنوات التي أمضيتها في تجارة الحجر، تعلمت ذلك دائمًا حجر فضفاض لا يقتصر المسار على الحجارة نفسها فحسب، بل يتعلق بالأساس والتخطيط والصيانة. قد يؤدي تخطي الخطوات إلى توفير الوقت في البداية، ولكنك ستدفع ثمنه لاحقًا من خلال الصداع والعمل الإضافي.
في Top Source Slate، نرى هذه المسارات أكثر من مجرد عناصر وظيفية؛ إنها استثمار في جمال منزلك وقيمته. إن القيام بذلك بشكل صحيح يعني اختيار مواد عالية الجودة وفهم كيفية أدائها بمرور الوقت. يتعلق الأمر بإنشاء شيء يدوم ويضيف قيمة إلى مساحتك الخاصة.
في نهاية المطاف، فإن بناء مسار حجري رائع يعتمد على القيام بذلك بشكل صحيح من المرة الأولى. إنه استثمار مقدم إلى حد ما، ولكن العثور على أحجار موثوقة وبذل الجهد لتثبيتها بشكل صحيح؟ هذا هو ضربة قاضية.
