غالبًا ما تحدد الدقة في تركيب الزاوية ما إذا كان مشروع البناء سينجح أو يتطلب إعادة صياغة باهظة الثمن في الموقع. تؤدي التحولات التي يتم تنفيذها بشكل سيء على حواف واجهة المبنى إلى إنشاء نقاط ضعف هيكلية وتدمير الاستمرارية البصرية التي يتوقعها العملاء التجاريون. المقاولون الذين يتجاهلون الفروق الفنية لهذه المفاصل يخاطرون بفشل عمليات التفتيش وخسارة هوامش الربح بسبب المواد المهدرة وساعات العمل المفرطة.
يقارن هذا الدليل كفاءة الزوايا على شكل حرف L التي يتم إنتاجها في المصنع مع عمليات القطع اليدوية لمساعدة الفرق في الحفاظ على جداول زمنية صارمة للمشروع. نقوم بتفصيل الخطوات اللازمة لتحقيق محاذاة أفقية سلسة واستكشاف أخطاء فجوات الزوايا الداخلية وإصلاحها لتوفير معيار تشغيلي لكل منها تطبيق الحجر المكدسة.
لماذا تحدد الزوايا جودة مشروعك الحجري
تعتبر الدقة في تنفيذ الزوايا بمثابة المعيار الأساسي لأصالة المشروع، حيث تفصل أعمال البناء المعمارية المتطورة عن تطبيقات القشرة منخفضة الميزانية.
تعتمد السلامة المعمارية على الانتقال بين المستويات الرأسية. في تركيب قشرة الحجرالزاوية هي النقطة الأكثر ضعفًا لكل من الجماليات والأداء الهيكلي. يعطي خبراء التركيب الأولوية لدقة الزوايا لأنها تحدد كيفية وصول الضوء إلى السطح وكيفية تعامل المبنى مع الرطوبة طوال دورة حياته.
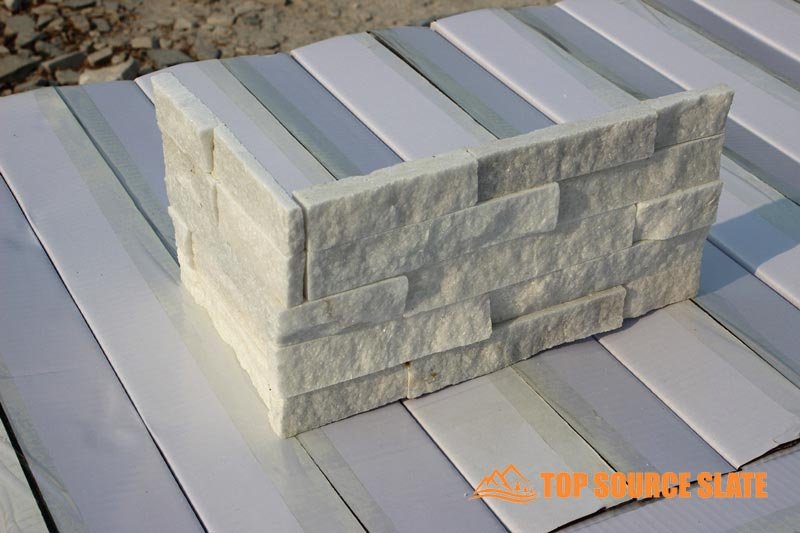
خلق وهم الحجر الطبيعي كامل العمق
تخفي المرتجعات الأصلية على شكل حرف L بشكل فعال سمك 0.75 بوصة إلى 1.75 بوصة الألواح الحجريةمما يخلق الوزن الهيكلي المتوقع في البناء التقليدي. وبدون هذه العوائد، تتعرف العين بسرعة على التركيب كقشرة رقيقة، خاصة على الواجهات الخارجية والأعمدة الهيكلية حيث يمكن رؤية المظهر الجانبي بسهولة.
- يمنع الملمس المتسق عبر انتقال الزاوية الدرزات من التقاط الضوء والكشف عن طبيعة المنتج المغطاة بألواح.
- توفر الزوايا الموزونة بشكل صحيح الجاذبية المعمارية المطلوبة للواجهات السكنية والتجارية الراقية.
- التفاف الحجر بشكل طبيعي حولها تضمن الزوايا 90 درجة أن تبدو الميزة وكأنها هيكل حجري صلب بدلاً من تطبيق سطحي.
حماية غلاف المبنى والركيزة
تعمل الزوايا كمناطق عالية الضغط حيث تحاول الرطوبة والحطام البيئي في كثير من الأحيان تجاوز الطبقة الحجرية. تقلل وصلات الزوايا الضيقة من تعرض المواد اللاصقة الإيبوكسي وركائز الألواح الأسمنتية للأشعة فوق البنفسجية والمطر، والتي يمكن أن تؤدي إلى تحلل عوامل الترابط بمرور الوقت.
- تضمن المحاذاة الاحترافية تساقط المياه بعيدًا عن الهيكل بدلاً من تجمعها في الفجوات بين الألواح.
- إن تقليل الفجوات عند التحولات الزاوية يمنع الأمطار التي تحركها الرياح من اختراق حاجز الهواء، وهو مطلب بالغ الأهمية المظهر الخارجي الحديث المشاريع.
- يؤدي تقليل تعرض المفاصل إلى حماية الركيزة الأساسية من دورات التجميد والذوبان التي يمكن أن تسبب التصفيح.
القضاء على الحواف المقطوعة المكشوفة والنوى المنشورة
غالبًا ما تكشف التحولات الزاوية التي يتم التعامل معها بشكل سيء عن اللب الداخلي المنشور للحجر، والذي يفتقر إلى التجوية الطبيعية وملمس الوجه المنقسم. تركز التقنيات عالية الجودة على إخفاء العلامات الميكانيكية الناعمة التي تتركها معدات القطع بالأشعة تحت الحمراء للحفاظ على المظهر الطبيعي القوي.
- إن استخدام قطع الزوايا المطابقة للمصنع أو القطع الدقيقة الدقيقة يضمن الحصول على مظهر طبيعي “انقسام الوجه” يظل الملمس هو السطح المرئي الوحيد.
- التنفيذ السليم يتجنب “رقعة الشطرنج” فشل بصري ناتج عن نهايات الألواح المكشوفة والألوان الحجرية غير المتطابقة.
- الاهتمام بالتفاصيل يمنع الكشف عن حواف ناعمة ومصنعة تتعارض مع الجمالية العضوية الحجر الطبيعي مكدسة.
تعزيز المتانة طويلة الأجل والسندات الهيكلية
عادةً ما تواجه قطع الركن التأثير الجسدي الأكبر من حركة السير والآلات في البيئات التجارية. تعمل وصلات الزوايا الموضوعة بشكل استراتيجي على توزيع إجهاد التمدد الحراري بشكل متساوٍ عبر سطح الجدار، مما يمنع حدوث تشققات موضعية في الحجر أو الجص.
- يوفر الإعداد الصحيح الدعم المتبادل للألواح المسطحة المجاورة، مما يقلل من مخاطر فك الارتباط على المدى الطويل.
- مستقر المنشآت الزاوية القضاء “عائم” الحجارة المعرضة للتلف في مناطق البيع بالتجزئة أو الضيافة ذات الحركة المرورية العالية.
- تضمن إدارة الإجهاد الحراري الموزع أن ينجو التركيب من التغيرات الشديدة في درجات الحرارة في المناخات الشمالية.
الاختيار الاحترافي: فوائد الزوايا على شكل حرف L الجاهزة في المصنع
تنقل الزوايا L الجاهزة المشروع من صراع البناء اليدوي إلى التجميع المعياري عالي السرعة، مما يضمن اتساق النسيج بنسبة 100% عند كل انتقال 90 درجة.
القطع اليدوي في الموقع يدعو إلى الخطأ. وحتى الانحراف بمقدار درجة واحدة يؤدي إلى فجوات مرئية تدمر استمرارية الواجهة. تعمل الزوايا على شكل حرف L المصنوعة في المصنع على إزالة متغير الخطأ البشري من خلال توفير وحدات مقطوعة بدقة ومكونة من قطعة واحدة. هذا يمنع الحجر التقطيع ويحافظ على سطح الشق الطبيعي سليمًا دون علامات المنشار التي خلفتها المطاحن الميدانية.
- يوفر المقاولون ساعات العمل من خلال تجاوز عمليات القطع الدقيقة البالغة 45 درجة المطلوبة لتجميع التلسين التقليدي.
- تقلل الوحدات الجاهزة بشكل كبير من هدر المواد المرتبطة بتكسير الحجارة أثناء القطع الميداني اليدوي.
- يقدم القائمون على التركيب عائدًا نظيفًا بمقدار 90 درجة يحافظ على الحجر الطبيعي الملمس دون تعريض الركيزة.
| مقياس الأداء | ميتري الميداني اليدوي | زوايا L من المصدر العلوي |
|---|---|---|
| سرعة التثبيت | 15-20 دقيقة لكل قدم طولي | 3-5 دقائق لكل قدم طولي |
| السندات الهيكلية | متغير (لاصق ميداني) | الإيبوكسي الصناعي المقوى |
| النفايات المادية | عالية (التقطيع/القطع الخاطئ) | صفر (حجم دقيق) |
ضغط تكاليف العمالة والجداول الزمنية للمشروع
تسمح المكونات الموحدة للفرق بالتحرك عبر الزوايا المعقدة بنفس سرعة الجدران المسطحة. إن نقص العمالة يجعل الكفاءة مقياسًا للبقاء بالنسبة لشركات البناء الحديثة. باستخدام الجاهزة تسمح الزوايا للطاقم بإنهاء البناء الحجري المشروع أسرع بنسبة تصل إلى 50% من الطرق التقليدية، مما يحمي النتيجة النهائية للمشروع ويزيد القدرة السنوية.
- تعمل الزوايا الجاهزة للتركيب على تقليل متطلبات المهارات الفنية، مما يسمح للطواقم الأقل خبرة بإنتاج نتائج احترافية.
- يتيح سير العمل المبسط معدل دوران أسرع للموقع، مما يزيد من المعدل السنوي حجم المشروع لـ B2B الموزعين والمقاولين.
- يُترجم انخفاض أيام العمل في الموقع مباشرةً إلى انخفاض التكاليف العامة وتحسين الربحية.
السندات الهيكلية متفوقة وطول العمر
غالبًا ما تفشل المواد اللاصقة المطبقة ميدانيًا في الزوايا الرأسية بسبب الضغط البيئي والخلط غير المناسب. نقوم بتصنيع الزوايا على شكل حرف L في بيئات المصانع الخاضعة للرقابة باستخدام راتنجات الإيبوكسي عالية القوة المطبقة تحت ضغط ودرجة حرارة محددة. وهذا يخلق رابطة هيكلية دائمة تقاوم دورات التجميد والذوبان الشائعة في مناخات أمريكا الشمالية وأوروبا.
- يؤدي ربط المصنع إلى التخلص من خطر تساقط الحجارة، وهي نقطة فشل شائعة للزوايا ذات الحواف الميدانية باستخدام مجموعة رفيعة قياسية.
- استخدام 100% يضمن الحجر الطبيعي أن تحافظ الزوايا على ثبات الأشعة فوق البنفسجية ولن تتلاشى أو تتفكك على مدى عقود من التعرض.
- وتفي كل وحدة بمعايير المتانة الصارمة، وتتمكن من البقاء في بيئات عالية الملوحة والرطوبة العالية دون أي تدهور هيكلي.
استمرارية بصرية سلسة
يحدث الفشل الجمالي عندما ينكسر النمط الحجري فجأة عند الزاوية. يتكامل تصميم الزاوية المتشابكة على شكل حرف L بشكل مثالي مع لوحات على شكل حرف Z لتمويه الطبقات العمودية وخطوط الجص. نحن نستورد الحجر من نفس مصدر المحجر لكل طلب، مما يضمن تدفق اللون والملمس عند الزاوية دون حدوث تغيرات غير مكتملة.
- تضمن حواف الشفرة الماسية CNC تشابكًا دقيقًا يخفي ركيزة التثبيت بشكل فعال.
- يمنع العمق وخطوط الظل المتسقة عبر التحولات “مخيط” تبدو نموذجية للنسيج الحجري اليدوي.
- إن استخدام دفعات مطابقة للمصنع يمنع حدوث اختلافات في الألوان، مما يوفر تشطيبًا معماريًا موحدًا للواجهات الراقية.
ألواح دفاتر حجرية مكدسة ممتازة من المصنع مباشرة

كيفية تنفيذ عمليات قطع ميتري مثالية في الموقع (إذا لزم الأمر)
تحقيق مفصل ميتري شعري الحجر الطبيعي يتطلب الانتقال من تقطيع البناء القياسي إلى تقنيات جواهري دقيقة لضمان بقاء الزاوية أقوى نقطة مرئية للتركيب.
الأدوات الأساسية للقطع الميداني الدقيق
غالبًا ما تسبب شفرات القطع الجافة القياسية تقطيعًا مفرطًا على الوجه ألواح الكوارتزيت أو الأردواز. We recommend a high-quality wet saw equipped with a continuous-rim diamond blade. This setup maintains a constant water flow that cools the blade and suppresses dust, which is critical when working with high-density materials like our Carbon Black Slate or Glacier White Quartzite. CNC diamond-blade precision at the factory sets the bar, so your field tools must match that standard to maintain consistency.
- Use a continuous-rim diamond blade to ensure smooth edges without face-chipping.
- Secure a stable, level work surface to prevent panel vibration that leads to “blowouts” at the end of the cut.
- Maintain steady water flow to protect the stone’s structural integrity and minimize silica dust.
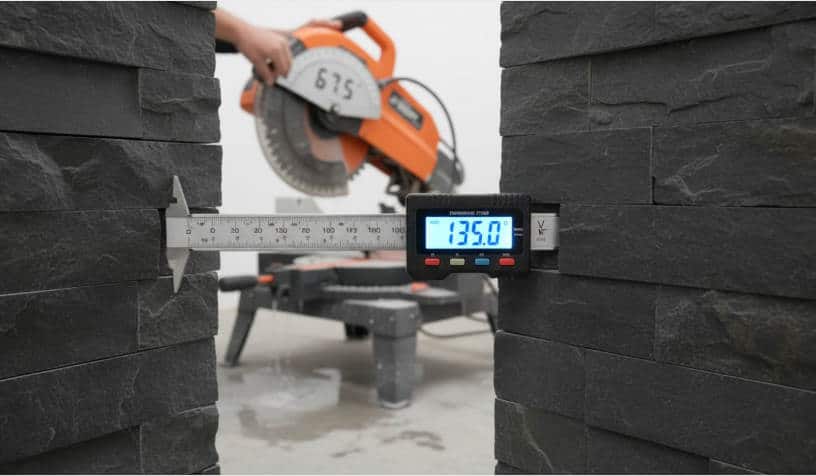
Measuring and Marking for Non-Standard Wall Angles
Field conditions rarely offer a perfect 90-degree angle. Relying on assumptions leads to visible gaps at the corner tip or the heel. Use a digital protractor to capture the actual angle of the wall substrate. Divide this measurement by two to determine your exact saw bevel. For a 90-degree corner, this is 45 degrees, but a 92-degree wall requires 46-degree cuts on both joining panels to close the seam properly.
| Joint Method | Technical Execution | أفضل حالة استخدام |
|---|---|---|
| Standard Miter | Direct 45-degree bevel on both stone edges. | Standard 90-degree outside corners. |
| Back-Miter (Relief) | Inward bevel (46°) to ensure front faces touch first. | Irregular or slightly obtuse wall angles. |
| Butt Joint | Square edge of one panel overlaps the other. | Interior corners or low-visibility transitions. |
- Measure actual corner angles with a digital protractor rather than assuming squareness.
- Mark the cut line on the back of the ledger panel to protect the textured stone face from marking.
- Verify the Z-shape interlocking pattern alignment before making the final cut.
The Back-Mitering Technique for Tight Joins
A successful miter joint relies on the front finished edges making contact first. We recommend “back-mitering,” where you cut the stone at a slight inward bevel (approximately 46 degrees for a 90-degree corner). This creates a small relief gap in the back to accommodate adhesive and prevents the “heel” of the stones from touching and pushing the front seam open. Feed the panel slowly through the blade to avoid blowouts where the stone is thinnest.
- Cut at a slight inward bevel so the front edges meet before the back of the panels.
- Dry-fit every pair of mitered panels to verify a seamless transition before applying mortar.
- Smooth micro-chips along the cut edge with a diamond sanding pad for a professional finish.
Bonding and Sealing the Mitered Corner
Proper adhesive application ensures the joint remains structural and visually cohesive over time. Apply a high-strength epoxy or thin-set mortar specifically formulated for natural stone. Back-butter both mitered edges to ensure 100% coverage. If any hairline gaps remain, mix color-matched stone dust from your cuts with a resin mixture to create a custom filler. This masks the seam and maintains the “Direct Quarry Source” aesthetic of a continuous stone block.
- Butter the back of both mitered edges for a permanent, structural bond.
- Fill hairline gaps with a mixture of stone dust and resin to hide the seam.
- Apply a premium سدادة الحجر الطبيعي للحماية newly exposed cut edges from moisture.
Overlapping Joints: The “Butt Joint” Technique for Beginners
While factory-fabricated L-corners provide the highest efficiency, the staggered butt joint serves as a reliable field technique for creating 90-degree transitions using standard flat panels.
Alternating the Overlap Pattern
Achieving a professional look without pre-fabricated corners requires a staggered overlap method that mimics traditional natural stone masonry. This technique involves alternating which panel extends past the corner at every layer. By swapping the leading edge on every row, we create a “woven” effect that effectively breaks up the vertical seam. This visual interruption prevents the eye from catching a single continuous line, which often betrays a DIY or low-quality installation.
- Swap the leading edge at every layer to create a woven corner effect that hides the vertical seam.
- Ensure the end grain of the لوحة حجرية remains hidden behind the face of the perpendicular panel.
- Avoid aligning vertical joints across multiple rows to maintain structural integrity and prevent a “مكدسة” appearance.
Preparing Clean and Square Edges
The success of a butt joint depends entirely on the precision of the cut and the condition of the stone surface. Even a minor deviation from a 90-degree angle will result in visible gaps that catch light and shadows. We recommend using a wet saw or infrared cutting equipment to ensure every panel edge is perfectly square. Because الحجر الطبيعي can carry dust and quarry debris, cleaning the joining edges is a mandatory step for a tight fit.
- Use a wet saw with a diamond blade to ensure every panel edge is perfectly square at 90 degrees.
- Remove stone dust and loose debris from the joining edges to allow for a tighter fit between panels.
- Dry-fit the panels before applying adhesive to check for gaps caused by natural stone irregularities.
Securing the Connection with High-Strength Adhesive
Butt joints rely on the surface area contact between the end of one panel and the back of another. To meet 2026 safety standards and ensure long-term durability, installers must use high-strength bonding agents specifically formulated for الحجر الطبيعي. Applying adhesive to both the substrate and the back of the ledger panel—often called “double-buttering”—eliminates air pockets and creates a permanent bond that resists environmental shifts.
- Apply a high-strength epoxy resin or stone-specific thinset to ensure a permanent bond between panels.
- Spread adhesive evenly across the substrate and the back of the panel to eliminate air pockets.
- Maintain steady pressure during the initial setting phase to prevent panels from shifting out of alignment.
Solving the Interior Corner Gap Problem
Precision in interior corners depends on compensating for wall deviation through strategic dry-fitting and the application of professional-grade, pH-neutral stone sealants.
Strategic Measuring and Precision Cutting
Gaps in interior corners usually stem from assuming a wall is a perfect 90-degree angle. Real-world construction involves bows and leans that create structural voids if the stone is cut blindly. We mitigate this by using infrared cutting equipment or wet saws fitted with diamond blades, which maintain the integrity of the stone edge and prevent the micro-chipping often seen with standard blades.
- Measure the corner angle at the base, midpoint, and top of the wall to identify tapering issues before the first cut.
- Utilize a wet saw to ensure the vertical edges of the لوحات دفتر الأستاذ remain crisp for a tighter fit.
- Dry-fit every panel in the corner sequence to verify the vertical alignment before applying high-strength epoxy adhesive.
Executing the Overlapping Butt Joint
Interior corners function best with a butt joint, where one panel terminates directly at the wall and the adjacent panel covers that raw edge. This method is more forgiving than a miter cut for inside angles and provides a cleaner visual transition. By overlapping the panels, we hide the vertical seam from the primary line of sight and create the illusion of a continuous stone block.
- Install the first panel flush against the interior corner to establish a solid base for the transition.
- قم بتمديد اللوحة الثانية لتتداخل مع حافة اللوحة الأولى، مما يؤدي إلى إخفاء الوجه المقطوع بشكل فعال.
- يتم ترتيب المفاصل الأفقية عبر الزاوية لمنع التماس المكدس، مما يحافظ على السلامة الهيكلية والمحاذاة التصميم الحديث المعايير.
ملء الفجوات المتبقية بمركبات خاصة بالأحجار
الحجر الطبيعي الملمس، مثل تشطيب الوجه المنقسم الموجود في سلسلة Alaska Gray أو Carbon Black، يخلق بشكل طبيعي فراغات صغيرة عند نقطة الالتقاء. تعتبر مواد السد المطاطية القياسية غير مناسبة لأنها تقلص وتغير لون المعادن الطبيعية مثل الرخام أو الأردواز. وبدلاً من ذلك، نستخدم مركبات ذات درجة احترافية تتوافق مع درجة حموضة الحجر وشكل اللون لضمان ختم دائم ومستقر.
- ضع مواد مانعة للتسرب حجرية مطابقة للون ومحايدة للأس الهيدروجيني على الكسور الشعرية لمنع الغبار والرطوبة.
- Use structural setting compounds for larger gaps to stabilize the corner against building settlement.
- Avoid silicone-based products that can “bleed” oils into the stone, causing permanent staining around the joint.
Compensating for Substrate Irregularities
A successful corner starts with the surface behind the stone. Most drywall is too flexible and rarely square, so we recommend installing cement backer board to provide a rigid, flat substrate. If the wall protrudes, the installer must adjust the stone rather than forcing it, which might require localized grinding of the panel’s rear surface to achieve a flush fit against the corner.
- Install cement backer board over the drywall to minimize wall-flexing that leads to joint separation.
- Shave the back of the ledger stone panel with an angle grinder if a wall high-spot prevents the corner from sitting tight.
- Level each row independently to ensure the corner gap does not widen as the installation moves up the wall.
How to Ensure Horizontal Alignment Across Corner Transitions
Horizontal alignment across corners determines the structural integrity and visual continuity of a القشرة الحجرية project; a deviation of even 1/8 inch at the corner can propagate into visible ‘stair-stepping’ across the entire wall face.
Establishing a Level Baseline with Starter Strips
Horizontal alignment begins at the lowest point of the installation where the first row of panels meets the floor or ledge. Setting a precise foundation eliminates the risk of “row creep,” حيث تصبح الدورات المتعاقبة مائلة بشكل متزايد. يستخدم المثبتون المحترفون شرائح مؤقتة من الخشب أو المعدن لدعم الوزن الساكن للمسار الأولي، مما يضمن بقاء الحجر ثابتًا أثناء معالجة المادة اللاصقة.
- قم بتركيب شريط بداية مؤقت من الخشب أو المعدن يتم تسويته بمستوى رقمي قياسي لعام 2026 لدعم وزن الدورة الأولى.
- قم بوضع خط طباشيري عبر منطقة العمل بأكملها، بما في ذلك الالتفاف حول الزوايا، للتأكد من أن نقطة البداية موحدة على جميع المستويات.
- تأكد من أن قطعة الزاوية الأولى تتوضع بشكل مثالي على شريط البداية قبل المتابعة مع الألواح المسطحة المجاورة.
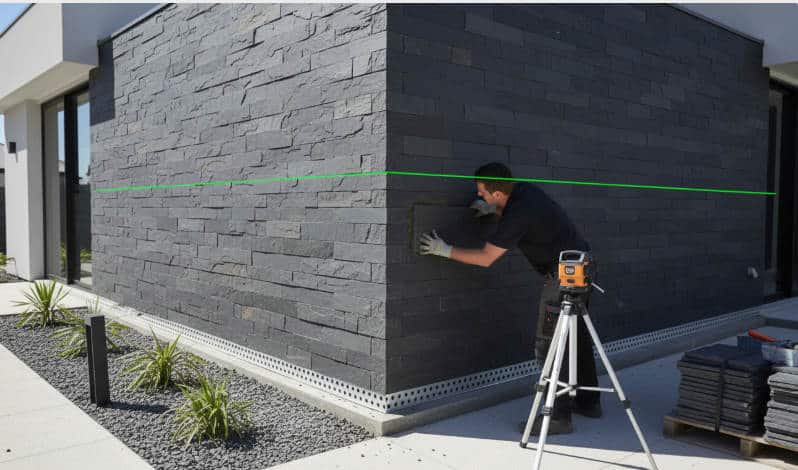
المراقبة المستمرة عن طريق محاذاة الليزر
Using technology prevents cumulative errors where small height differences in one row lead to significant gaps in higher courses. A 360-degree laser level projects a constant horizontal reference line across all walls and corners, serving as a non-negotiable guide for every layer of stone. This is particularly critical for large-scale مشاريع B2B where visual uniformity across multiple exterior corners is a key quality metric.
| Alignment Parameter | Manual On-Site Mitering | Factory Pre-fabricated Corners |
|---|---|---|
| Precision Tolerance | +/- 5mm (Human Error) | +/- 1mm (CNC Precision) |
| Joint Synchronization | Requires manual shimming | المتشابكة “ذكر-أنثى” System |
| سرعة التثبيت | High labor (Slow) | Rapid Assembly (50% Faster) |
- Set up a 360-degree laser level in the center of the room to project a constant horizontal reference line across all walls and corners.
- Check the top edge of every third row against the laser line to catch and correct minor vertical drifts immediately.
- Measure the distance from the laser line to the panel edge at both the corner and the end of the run to maintain parallel rows.
Synchronizing Pre-fabricated Corners with Flat Panels
The height of L-shaped corner pieces must match the flat panels perfectly to prevent a ‘stair-step’ effect. At Top Source Stone, we engineer our matching L-corners using the same CNC diamond-blade precision as our 6″ × 24″ flat panels. This synchronization ensures that when the L-corner wraps the angle, its interlocking Z-shape profile meets the flat panel without vertical offset, maintaining the architectural intent of a seamless finish.
- Dry-fit the L-corner and the adjacent flat panel before applying adhesive to check that the interlocking Z-shapes align without vertical offset.
- Alternate the long and short legs of the L-corners in each row to stagger the vertical joints, which naturally helps stabilize horizontal levels.
- Use plastic shims behind or underneath panels if a specific corner piece is slightly shorter due to الحجر الطبيعي variance.
Compensating for Natural Stone Thickness Variations
الحجر الطبيعي possesses inherent thickness and height tolerances. While our factory standardizes thickness between 1cm and 2.5cm, minor on-site adjustments keep the rows visually straight. Installers manage these variances by manipulating the adhesive bed depth, a technique known as back-buttering. By applying a consistent layer of high-strength epoxy adhesive, you create a uniform cushion that can be compressed or expanded slightly to align the faces of adjacent stones at the corner transition.
- Back-butter the panels with a consistent amount of high-strength epoxy adhesive to create a uniform bed depth across the corner transition.
- Trim the bottom or top of a panel using a wet saw if a row begins to climb or dip more than 1/8 inch from the level line.
- Apply pressure evenly across the corner joint to ensure the stone face remains on the same horizontal plane as it wraps around the angle.
خاتمة
احترافي المنشآت الحجرية rely on precise corner execution to maintain visual continuity and structural integrity across every transition. Using pre-fabricated L-corners or accurate miter cuts eliminates unsightly gaps and protects the wall substrate from exposure. These methods ensure a seamless architectural finish that reflects the quality of the natural stone throughout the project.
Review your project requirements to determine if factory-matched corners or on-site miter cuts best suit your installation timeline and labor budget. Contact أعلى المصدر حجر for technical specifications or to request a sample of our color-matched corner series for your inventory.
الأسئلة المتداولة
Can you achieve perfect corners without miter cutting?
Yes. You can achieve professional-grade corners by using pre-fabricated L-shaped corner pieces or by employing the “weaving” (butt-joint) technique. In a woven corner, you alternate the overlap of the stones, ensuring the factory-finished edge of one stone covers the cut edge of the other. This creates a natural, rugged aesthetic that mimics traditional full-bed masonry while avoiding the structural fragility often associated with thin mitered edges.
How to install stone around a 90-degree corner?
Installation must always begin at the corner and work inward toward the flat wall surface. Apply a high-bond mortar to the back of the corner piece (back-buttering) and press it firmly onto the substrate, ensuring it is perfectly plumb. By starting at the corner, you ensure the most critical visual point of the project is aligned; any necessary small cuts or adjustments can then be hidden in the middle of the wall or at the inside corners where they are less visible.
Do you need special corner pieces for stone panels?
While not strictly mandatory, special corner pieces are highly recommended for stone panel systems. These “L-shaped” units are engineered to eliminate the visible vertical seam that occurs when two flat panels meet. Without corner pieces, the thin profile of the veneer substrate would be exposed, compromising the authenticity of the stone look. If corner pieces are unavailable, you must execute precise miter cuts to maintain visual continuity.
كيف تخفي الحافة المقطوعة في الزاوية الخارجية؟
To hide a cut edge, use an angle grinder with a diamond blade to “dress” or texture the edge so it matches the natural face of the stone. Additionally, applying a color-matched masonry tint or using matching mortar to fill the seam can camouflage the transition. For the best results, always place the cut edge facing away from the primary line of sight or utilize a “weaving” pattern where the natural factory edge of the adjacent stone covers the cut side.
أفضل طريقة لقطع ميتري 45 درجة على حجر دفتر الأستاذ؟
The gold standard is using a professional wet saw equipped with a sliding table and a continuous-rim diamond blade. For a seamless fit, “back-cut” the stone at a slightly steeper angle (roughly 46 or 47 degrees). This ensures the exterior points of the stone touch tightly, leaving a small internal gap for the adhesive. This technique prevents the stones from “bottoming out” against each other in the back, which often causes a visible gap at the front of the miter joint.
