Eckanordnungen stellen eine erhebliche räumliche Herausforderung bei Großprojekten dar, bei denen eine schlechte Positionierung des Kamins zur Verschwendung von Quadratmetern führen und den Marktwert einer Einheit verringern kann. Architekten und Bauunternehmer sind mit technischen Risiken konfrontiert, wenn Steinoberflächen nicht für nicht standardmäßige Winkel berechnet werden, was zu sichtbaren Nähten führt, die auf mangelnde Qualitätskontrolle schließen lassen.
Diese Dokumentation stellt das technische Protokoll für die Bewältigung von 135-Grad-Eckenherausforderungen und die Implementierung einer Ausrichtungsstrategie von der Mitte nach außen für Natursteinplatten bereit. Wir befassen uns mit den spezifischen Mechanismen zum Verbergen vertikaler Nähte, der Steuerung der Lichtbeugung zur Vermeidung von Schattenfallen und den strukturellen Anforderungen für die Montage von Hardware auf unebenen Steinoberflächen.
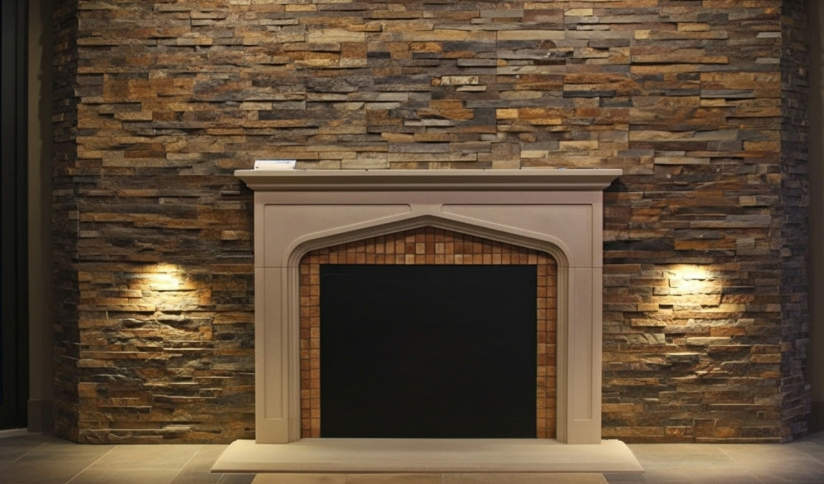
Warum Eckkamine das Nonplusultra sind “Platzsparer” in B2B-Projekten?
Eckplatzierungen verwandeln architektonische Totzonen in hochwertige Brennpunkte und ermöglichen es Entwicklern, primäre Wandfläche für funktionale Verglasungen oder Lagerräume in städtischen Projekten mit hoher Dichte zurückzugewinnen.
Optimierung von Grundrissen in Siedlungen mit hoher Bebauungsdichte
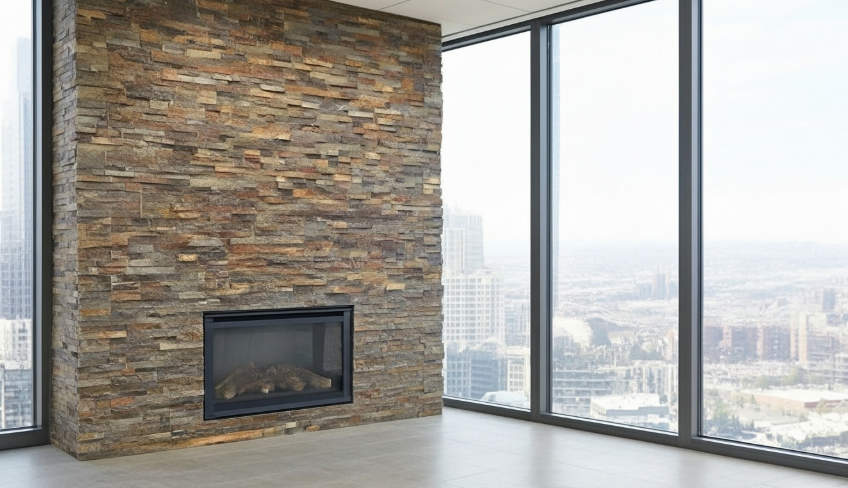
Moderne urbane Wohn- und Gewerbegrundrisse im Jahr 2026 verlangen von jedem Quadratmeter den maximalen Nutzen. Durch die Verlagerung des Kamins in eine Ecke schaffen Architekten primäre Wandflächen für raumhohe Fenster oder integrierte Aufbewahrungssysteme, die gehobene Mieter erwarten. Durch diese strategische Platzierung entsteht ein natürlicher Mittelpunkt, der den zentralen Wohn- oder Arbeitsbereich nicht behindert.
- Architekten nutzen Eckplatzierungen, um großflächigen Verglasungen den Vorzug zu geben natürliches Licht an den Hauptwänden.
- Eckeinheiten verbessern den Verkehrsfluss in kompakten B2B-Umgebungen wie Boutique-Hotelzimmern oder Executive-Suiten.
- Naturstein Die Einfassungen sorgen für eine gehobene Ästhetik, ohne die nutzbare Grundfläche zu beeinträchtigen.
Strukturelle Vorteile von leichten Steinfurnieren
Herkömmliches Mauerwerk erfordert häufig teure Fundamente oder Strukturverstärkungen, insbesondere wenn es in Ecken angebracht wird, wo die Anforderungen an die Tragfähigkeit komplex sind. Top Source Stone ist natürlich gestapelte Steinplatten bieten eine 100 % natürliche Schiefer- oder Quarzitoberfläche mit einem Profil, das nur 8 bis 12 Pfund pro Quadratfuß wiegt. Diese Leichtbauweise ermöglicht den Einbau auf Standard Innenwände ohne die Notwendigkeit von Ziegelleisten.
- Plattengewichte zwischen 8 und 13 Pfund pro Quadratfuß ergeben Ecken Installationen im Standard-Innenraum möglich Rahmen.
- Durch das geringere Gewicht entfällt die Notwendigkeit einer strukturellen Verstärkung, wodurch die Material- und Arbeitskosten erheblich gesenkt werden.
- Naturstein bleibt nicht brennbar und gewährleistet die Einhaltung kommerzieller Brandschutznormen für Kaminumrandungen.
Effizienz bei großen Installationszeitplänen
Bei Mehrfamilien- und Gewerbebauten entscheidet die Geschwindigkeit über die Rentabilität. Unser Stellwerk Z-förmiges Panel Das System verwendet CNC-Diamantklingenpräzision, um ein zu erstellen “männlich weiblich” Verbindung, die vertikale Fugen verdeckt. Dieser modulare Ansatz macht das komplexe Gehrungsschneiden vor Ort überflüssig, das normalerweise den zeitaufwändigsten Teil des Mauerwerks für Eckkamine darstellt.
- Ineinandergreifende Designs sorgen für ein nahtloses Erscheinungsbild über Eckübergänge hinweg, ohne dass diese sichtbar sind “trat” Lücken.
- Vorgefertigt in L-Form Eckstücke machen den Einsatz spezieller Steine vor Ort überflüssig Schneiden.
- Präzise geschnittene Paneele sorgen für eine gleichmäßige Passform bei Hunderten von Einheiten und gewährleisten so die Qualitätskontrolle bei Großprojekten.
Langfristiger Werterhalt für Immobilieneigentümer
Naturstein ist eine Investition in der Haltbarkeit. Anders als hergestellt “falsch” Stein Bei dem Beton und Pigmente werden 100 % natürliche Mineralien wie Quarzit und Schiefer verwendet, die über eine inhärente UV-Stabilität und eine hohe Beständigkeit gegen Salzgehalt verfügen. Für Immobilienverwalter bedeutet dies kürzere Wartungszyklen und eine Oberfläche, die trotz hoher Verkehrsbelastung ihre erstklassige Struktur behält.
- Naturstein widersteht dem Ausbleichen durch UV-Strahlung und verhindert so das Ausbleichen “lückenhaft” Aussehen, das oft bei gealtertem Kunststein zu sehen ist.
- Eine hohe Haltbarkeit führt zu einem geringeren Reparaturaufwand für Immobilienverwalter kommerzielles B2B Einstellungen.
- Echter Stein Oberflächen sorgen für eine messbare Steigerung des wahrgenommenen Vermögenswerts für Immobilieninvestoren.
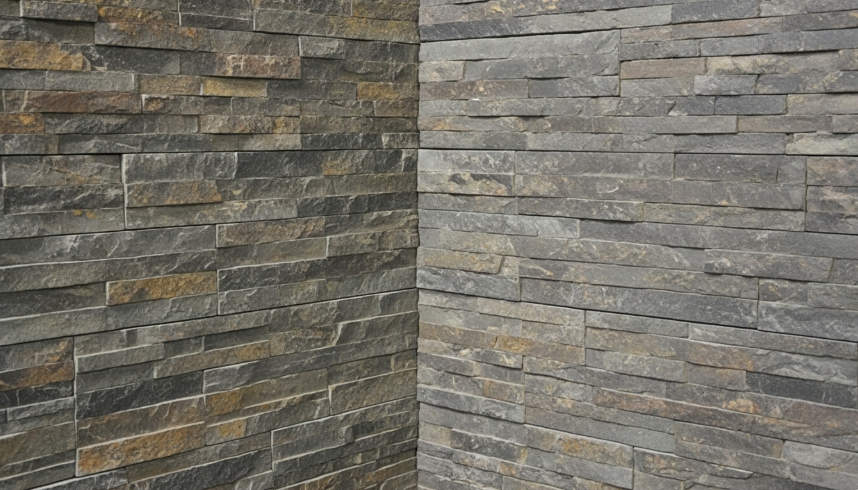
Bewältigung der 135-Grad-Herausforderung: Jenseits der standardmäßigen 90-Grad-Ecken
Um architektonische Kontinuität an 135-Grad-Kaminecken zu erreichen, muss auf vorgefertigte L-Einheiten verzichtet werden und stattdessen auf präzise Gehrungsschnitte und eine spezielle Epoxidklebung zurückgegriffen werden, um eine Trennung der Fugen zu verhindern.
Präzises Gehrungsschneiden für nicht standardmäßige Winkel
Standardmäßig vorgefertigte 90-Grad-Ecken dominieren den Markt, scheitern jedoch völlig, wenn sie auf die 135-Grad-Geometrie von Erkerkaminen oder achteckigen Säulen stoßen. Installateure müssen an jedem Stein präzise 67,5-Grad-Gehrungsschnitte ausführen Panel mit infrarotgeführten CNC-Diamanttrennscheiben, um eine saubere, professionelle Verbindung zu schaffen. Diese Technik stellt sicher, dass die natürliche Spalte unseres Alaska Grey oder Midnight Slate um die Ecke fließt, ohne die strukturellen Lücken, die für erzwungene 90-Grad-Einheiten typisch sind.
- Passen Sie jedes Paneel trocken an, bevor Sie den Kleber auftragen, um sicherzustellen, dass die Texturen an der abgewinkelten Naht ausgerichtet sind.
- Vermeiden Sie für diese Winkel herkömmliche Nasssägen; Verwenden Sie spezielle Brückensägen für eine geradere, splitterfreie Kante.
- Wechseln Sie lange und kurze Felder auf jeder Seite des 135-Grad-Scheitelpunkts ab, um vertikale Linien aufzubrechen und nachzuahmen natürliches Mauerwerk.
Klebestrategien für die Stabilität stumpfer Ecken
Winkel über 90 Grad unterliegen besonderen mechanischen Belastungen. Gebäudevibrationen und die Wärmeausdehnung des Kamins führen häufig dazu, dass dünnflüssiger Standardmörtel an der Gehrungsstelle reißt. Durch die Verwendung von hochfestem Epoxidharz speziell an der Gehrungskante entsteht eine einheitliche strukturelle Verbindung, die sich mit der Wand und nicht gegen diese bewegt. Wir empfehlen, den Untergrund mit Zementplatten zu verstärken, um der spezifischen Gewichtsverteilung dieser individuell abgewinkelten Layouts gerecht zu werden.
| Eckspezifikation | Standardmäßige 90°-Drehung | Stumpfe 135°-Drehung |
|---|---|---|
| Herstellungsmethode | Vorgefertigte L-Eckeinheiten | Benutzerdefinierte Gehrung (67,5° x 2) |
| Installationsgeschwindigkeit | Schnell (Click-and-Set) | Fachkräfte erforderlich |
| Gelenkverklebung | Standard-Polymermörtel | Hochfestes Epoxidharz |
Mischen von Texturen über 135-Grad-Übergänge hinweg
Um den visuellen Fluss über einen stumpfen Winkel hinweg aufrechtzuerhalten, ist eine sorgfältige Arbeit am Panel erforderlich Auswahl. Wir empfehlen die Verwendung unserer Flat-Serie für 135-Grad-Ecken, um tiefe Schatten zu minimieren, die eine individuelle Gehrungsverbindung wie einen strukturellen Fehler aussehen lassen können. Um Mikrospalten zu verbergen, die durch die entstehen Naturstein Varianz: Mischen Sie Steinstaub aus den Installationsschnitten mit einer klaren Versiegelung. Dadurch entsteht eine farblich abgestimmte Paste, die die Naht ausfüllt und bei normalen Lichtverhältnissen verschwindet.
- Stellen Sie sicher, dass alle Steinstücke für die Ecke aus derselben Steinbruchader stammen, um eine Farbtongleichmäßigkeit von 95 % zu gewährleisten.
- Tragen Sie eine abschließende Schicht Versiegelung auf die Gehrungsfuge auf, um die freiliegenden natürlichen Mineralien vor Feuchtigkeit und Staubansammlungen zu schützen.
- Überwachen Sie die Installationsumgebung auf Feuchtigkeit; Überschüssige Feuchtigkeit kann den Aushärtungsprozess von Hochleistungsklebstoffen beeinträchtigen.
Hochwertige, direkt ab Werk hergestellte, gestapelte Steinplatten

Wie richtet man Steinplatten symmetrisch von der Mitte nach außen aus?
Durch die symmetrische Ausrichtung wird das Risiko einer einseitigen Sicht ausgeschlossen Gewicht durch Verankerung der Anlage zu einer gemessenen Mittelachse, wodurch sichergestellt wird, dass gespiegelte Kantenschnitte das architektonische Gleichgewicht auf der gesamten Kaminfläche aufrechterhalten.
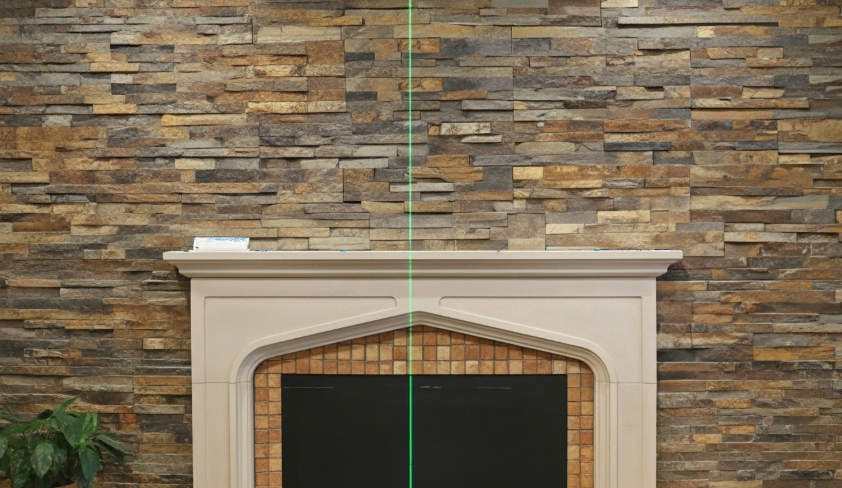
Erstellen einer zentralen vertikalen Referenzlinie
Präzise Symmetrie beginnt mit der genauen Messung der Installationsoberfläche, um den Startpunkt zu definieren. Wir messen die Gesamtbreite der Wand und markieren den genauen Mittelpunkt mit einem vertikalen Lot. Wenn man sich auf die visuelle Einschätzung verlässt, kommt es oft zu kumulativen Fehlern, die deutlich sichtbar werden, sobald der Stein die Decke oder angrenzende Ecken erreicht. Mithilfe eines Lasernivelliergeräts projizieren wir eine konstante Referenz leitet die Platzierung der ersten SteinplattenDadurch wird sichergestellt, dass die Vertikalität der gesamten Baugruppe während des gesamten Projekts erhalten bleibt.
Bevor wir den Kleber auftragen, legen wir eine Reihe von Platten trocken auf den Boden. Mit diesem Schritt können wir visualisieren, wie die Kanten auf die Ecken treffen. Wenn bei einer Trockenverlegung hauchdünne Schnitte an den Rändern sichtbar werden, verschieben wir die Mittellinie leicht, um sicherzustellen, dass die Endstücke stabil und strukturell stabil bleiben. Diese proaktive Anpassung verhindert das “fragmentiert” sieht oft bei Amateurinstallationen aus, bei denen die Planung vernachlässigt wurde.
Ausführen der Mitte-zu-Rand-Installationssequenz
Durch die Platzierung der Platten von der Mitte nach außen wird sichergestellt, dass die geschnittenen Stücke an den Enden eine einheitliche Größe haben. Wir richten das erste Paneel direkt an der Mittelmarkierung aus, um das visuelle Gewicht der Wand zu verankern. Dieser zentrale Stein dient als Grundlage für den gesamten Kurs. Von diesem Anker aus arbeiten wir gleichzeitig nach außen in Richtung der linken und rechten Grenze. Dieser Arbeitsablauf in zwei Richtungen sorgt für das Gleichgewicht und ermöglicht Anpassungen in Echtzeit, wenn das Substrat geringfügige Unregelmäßigkeiten aufweist.
| Ausrichtungsstrategie | Visuelle Symmetrie | Logik schneiden |
|---|---|---|
| Mitte-Außen (B2B-Standard) | Hoch: Verspiegelte Kanten schaffen einen ausgewogenen Fokus. | Einheitlich: Sowohl der linke als auch der rechte Endschnitt haben identische Abmessungen. |
| Von Ecke zu Ecke | Niedrig: Visuelle Gewichtsverlagerung zur Startseite. | Zufällig: Der endgültige Schnitt ist oft ein unangenehmer Splitter. |
| Zufälliger Offset | Moderat: Die Textur verdeckt einige Fehlausrichtungen. | Variabel: Erfordert eine konstante Messung für jede Zeile. |
Wir tragen hochfesten Epoxidkleber oder einen professionellen Dünnschichtkleber auf den Untergrund auf, um die Platten sofort nach der Ausrichtung zu befestigen. Für B2B-Projekte Dabei handelt es sich um unsere ineinandergreifende Z-Form-Serie, die “männlich weiblich” Das Verbindungssystem sorgt dafür, dass jedes Paneel im nächsten einrastet, wodurch der zentrale Ankerpunkt weiter stabilisiert wird.
Überprüfung der horizontalen Ausrichtung mit den Standortstandards 2026
Die aktuellen Baupraktiken im Jahr 2026 priorisieren eine ständige Nivellierung, um dies zu verhindern “Treppensteigen” Effekt, der in Stellwerkssystemen üblich ist. Wir prüfen das Niveau jeder zweiten Reihe, um sicherzustellen, dass die Z-förmigen Steckverbindungen perfekt horizontal bleiben. Selbst eine Abweichung von 2 mm an der Basis kann zu einer massiven Lücke führen, wenn der Stein Augenhöhe erreicht.
- Passen Sie kleinere Untergrundschwankungen mithilfe von Unterlegscheiben an, um die Lagen über die gesamte Spannweite gerade zu halten.
- Überwachen Sie die Nähte zwischen den Naturschiefer- oder Marmorstücke zur Bestätigung der Steine fest sitzen, ohne sichtbare Lücken.
- Verwenden Sie CNC-Diamantklingenkanten für Platten, um eine gleichmäßige Passform zu gewährleisten, sodass kein manuelles Schleifen vor Ort erforderlich ist.
Verwalten symmetrischer Kantenschnitte und Eckübergänge
Finalisierung der Für die Installation sind spiegelverkehrte Schnitte an der Wand erforderlich endet, um das professionelle Erscheinungsbild zu bewahren. Wir messen den verbleibenden Platz an beiden Kanten und Schneiden Sie die Steinplatten auf passende Maße. Diese Liebe zum Detail sorgt dafür, dass der Kamin eher gewollt aussieht als aus Schrott zusammengebaut. Wenn sich die Wand um eine 90-Grad-Drehung erstreckt, integrieren wir passende L-förmige Eckstücke aus unserem Bestand, um einen sauberen, umlaufenden Übergang zu schaffen, der die Synchronisierung von Textur und Farbe beibehält.
Für präzise Kanten, die das werkseitige Finish der Mittelplatten nachahmen, verwenden wir Infrarot-Schneidwerkzeuge oder Hochleistungs-Nasssägen. Dieses Maß an Präzision ist entscheidend bei der Arbeit mit 100 % natürlichen Mineralien wie Quarzit oder Schiefer, bei denen raue Kanten die erstklassige Ästhetik beeinträchtigen können. Durch die Spiegelung dieser Endschnitte erreicht die Installation ein symmetrisches, architektonisch solides Finish, das den höchsten kommerziellen Standards entspricht.
Lässt eine Ecksteinmauer einen kleinen Raum größer oder kleiner erscheinen?
Durch die strategische Platzierung von Ecksteinen wird die wahrgenommene Fläche vergrößert, indem der Blick auf die entferntesten architektonischen Grenzen des Raums gelenkt wird, während dünne Furnierprofile verwendet werden, die die tatsächliche Bodenfläche bewahren.
Einfluss der Steintextur auf die wahrgenommene Quadratmeterzahl
In modernes InnendesignDie Tiefe der Steintextur bestimmt, wie das menschliche Auge Wandgrenzen in begrenzten Bereichen wahrnimmt. Tiefe Texturen, wie sie in unserer Rough-Serie zu finden sind, erzeugen ein deutliches Schattenspiel. Dieses visuelle Gewicht kann dazu führen, dass eine Ecke sich so anfühlt, als ob sie sich in Richtung der Mitte des Raumes bewegt, was eine gemütliche, gemütliche Atmosphäre schafft. “eingewickelt” In größeren Sälen kann es zu einem Gefühl der Sensation kommen, in sehr engen Räumen kann es sich jedoch zu eng anfühlen.
Glatte Oberflächen aus unserer Flat-Serie oder geschliffene Marmoroptionen bieten einen klaren, architektonischen Hintergrund, der eine offene Atmosphäre bewahrt. Diese Panels bieten den Luxus von Naturstein ohne die aggressiven Vorsprünge, die visuelles Volumen verschlingen.
- Die Texturen der Rough-Serie betonen den architektonischen Charakter, erfordern jedoch größere Raumvolumina, um eine zu vermeiden “sich nähern” Wirkung.
- Konsequent 6×Die Größe der 24-Zoll-Paneele sorgt dafür, dass das Auge reibungslos über die Wandoberfläche gleitet, wodurch das Gefühl von Unordnung im Vergleich zu kleinen, unregelmäßigen Paneelen verringert wird Mosaikfliesen.
- Minimalistische Split-Face-Oberflächen bieten gerade genug Tiefe, um Unebenheiten im Untergrund zu verbergen und gleichzeitig das Wandprofil schlank zu halten.
Farbauswahl und Lichtreflexion
Die Farbpalette des Steins bestimmt, wie viel Licht im Raum verbleibt, was sich direkt auf das Raumgefühl auswirkt. Helle Steine wie Alaska Grey oder Glacier White aus unserem Big-10-Inventar reflektieren das Umgebungslicht. Durch dieses Reflexionsvermögen wirken kleine Räume luftiger und großzügiger, da das Licht zurück in den Wohnbereich reflektiert wird, anstatt es zu absorbieren.
Dunklerer Schiefer oder anthrazitfarbener Quarzit ist zwar edel, verleiht ihm aber deutliche Tiefe. Designer müssen diese dunkleren Töne mit strategischer Beleuchtung kombinieren, um zu verhindern, dass sich die Ecke wie eine dunkle Leere anfühlt. Denn unser Natursteinplatten bestehen zu 100 % aus Mineralien und sorgen für eine dauerhafte, lichtbeständige Oberfläche, die den Raum über Jahrzehnte hinweg lebendig aussehen lässt.
Platzsparende Vorteile von dünnem Steinfurnier
Modern Natürliche gestapelte Steinplatten Bieten Sie das Aussehen von Mauerwerk in voller Dicke und beanspruchen Sie dabei nur wenig Platz. Herkömmliche 4-Zoll-Steinblöcke können die nutzbare Grundfläche in einem kleinen Büro oder einer kleinen Wohnung erheblich reduzieren. Im Gegensatz dazu reichen unsere Standardplattenstärken von 0,75 bis 1,5 Zoll, sodass nahezu die gesamte nutzbare Quadratmeterzahl erhalten bleibt.
- Schlanke Paneele ermöglichen Installateure, um hochwertiges Naturprodukt hinzuzufügen Materialien bis hin zu kleinen Wohnungen und Gewerbebüros ohne bauliche Sanierung.
- Durch die leichte Bauweise (8–12 lbs/sqft) sind keine sperrigen Strukturfundamente erforderlich, die andernfalls Bodenfläche beanspruchen würden.
- Unsere CNC-Diamantschneidepräzision sorgt dafür, dass jedes Paneel fest sitzt, und minimiert so den Schnitt “Dickenkriechen” oft bei handgeschliffenen Steinen zu sehen.
Visuelle Verankerung durch Eckplatzierung
Durch die strategische Platzierung von Steinen in einer Ecke entsteht ein Schwerpunkt, der die wahrgenommenen Dimensionen des Raums tatsächlich erweitern kann. Indem die Installation den Blick nach oben und in die Ecken lenkt, wird die gesamte Höhe und Breite des architektonischen Grundrisses hervorgehoben. Das “Verankerung” Der Effekt verleiht einem kleinen Raum ein Gefühl von Beständigkeit und struktureller Stärke.
Um ein professionelles Ergebnis zu gewährleisten, bieten wir zu jedem Modell passende L-förmige Eckstücke an. Diese vorgefertigten Einheiten erzeugen eine solide, umlaufende Optik, die die vertikale Fuge verdeckt. Durch die Fokussierung der Textur auf eine einzelne Ecke wird verhindert, dass der Stein den Raum überwältigt – ein häufiges Risiko, wenn man in kompakten Umgebungen komplette vierwandige Steininstallationen anstrebt.
Einen Eckkamin anzünden: Unschöne Schattenfallen vermeiden
Effektive Ecke Die Kaminbeleuchtung erfordert eine ausgewogene, gerichtete Streifung, um den Stein hervorzuheben Textur und neutralisiert gleichzeitig die “tote Zonen” und harte Schatten, die architektonischen Kreuzungen innewohnen.
Die Beleuchtung einer Eckinstallation stellt einzigartige geometrische Herausforderungen dar. Im Gegensatz zu Flachwandanwendungen kann der Schnittpunkt zweier Steinebenen dunkle Hohlräume oder störende Blendeffekte erzeugen, wenn die Leuchten nicht präzise positioniert sind. Der Erfolg hängt davon ab, zu verstehen, wie Licht mit dem spezifischen Relief der Natur interagiert Steinplatten.
Oberflächenbeweidung zur Texturverbesserung
Wir empfehlen, Deckeneinbauleuchten in einem Abstand von 12 bis 18 Zoll von der Steinoberfläche zu positionieren, um einen optimalen Streifeffekt zu erzielen. Dieser spezielle Abstand ermöglicht es dem Licht, die unregelmäßigen Rippen unserer Paneele der Rough-Serie einzufangen, die Dickenunterschiede von bis zu 1,75 Zoll aufweisen. Durch die Verwendung gerichteter Strahlen anstelle von breiten Flutlichtern können Installateure gezielt Schatten werfen, die die dreidimensionalen Eigenschaften des natürlichen Schiefers und Quarzits betonen.
- Positionieren Sie Deckeneinbauleuchten 12 bis 18 Zoll von der Steinoberfläche entfernt, um einen Streifeffekt zu erzielen.
- Verwenden Sie gerichtete Strahlen, um Licht nach unten über die unebenen Oberflächen von Naturschiefer und Quarzit zu werfen.
- Heben Sie die dreidimensionalen Eigenschaften des Steins hervor, ohne die organischen Farbvariationen auszuwaschen.
Ausgewogene Umgebungsbeleuchtung zur Reduzierung von Schatten
Wenn man sich auf eine einzelne Deckenlichtquelle verlässt, entsteht oft ein Dreieck “Schattenfalle” an der Eckspitze, wodurch der Kamin hohl oder vom Rest des Raumes abgekoppelt wirken kann. Um dieses Problem zu lösen, schlagen wir die Integration seitlicher Lichtquellen vor. Direkt über der Eckspitze platzierte, leistungsstarke Downlights sollten vermieden werden, da sie vertikale Nähte übertreiben und harte Kontraste erzeugen.
- Installieren Sie Wandleuchten an angrenzenden Wänden, um seitliches Licht zu erzeugen, das tiefe Schattentaschen ausfüllt.
- Vermeiden Sie es, leistungsstarke Downlights direkt über der Spitze des Eckkamins zu platzieren.
- Kombinieren Sie Arbeitsbeleuchtung mit dimmbaren Umgebungsschichten, um die gemütliche Ästhetik beizubehalten, die von Innenarchitekturen im Jahr 2026 erwartet wird.
Platzierung der Vorrichtung im Verhältnis zu Steinvorsprüngen
Die physikalischen Abmessungen von L-förmigen Eckstücken erfordern bestimmte Lichtwinkel, um sicherzustellen, dass der Übergang zwischen den Wänden optisch nahtlos bleibt. Ausrichten der Vorrichtungen mit der Mitte des Steinplatten fördert die Symmetrie über die Eckverbindung und verhindert, dass eine Seite heller erscheint als die andere. Für unsere natürlichen Marmor- und Schieferserien verwenden wir Warmspektrum-LEDs im Bereich von 2700 K bis 3000 K, um erdige Pigmente hervorzuheben.
- Richten Sie die Vorrichtungen auf die Mitte aus Steinplatten zur Förderung der Symmetrie über die Ecke gemeinsam.
- Wählen Sie Warmspektrum-LEDs (2700 K–3000 K), um die Erdtöne der Marmor- und Schieferserien zu ergänzen.
- Stellen Sie sicher, dass Lichteinfälle keine Blendung auf den glatteren Oberflächen der Produkte der Flat Series oder Pencil Series verursachen.
Abschluss
Gelungene Ecke Bei Kaminprojekten kommt es darauf an, architektonische und technische Symmetrie in Einklang zu bringen Präzision bei jedem Übergang. Durch die Verwendung werkseitig abgestimmter L-Ecken und ineinandergreifender Paneelsysteme können Installateure eine nahtlose, natürliche Textur beibehalten, während sie sich durch nicht standardmäßige Winkel oder komplexe Layouts bewegen. Dieser integrierte Ansatz rationalisiert den Bauzeitplan und bietet Entwicklern ein konsistentes, hochwertiges Finish bei großen Mehrfamilienprojekten.
Sehen Sie sich unseren aktuellen Bestand an natürlichen Schiefer- und Quarzit-Grundsteinen an, um ein Material auszuwählen, das Ihren spezifischen Projektanforderungen entspricht. Kontaktieren Sie uns, um Produktmuster oder ein Großhandelsangebot für Ihre nächste kommerzielle Entwicklung anzufordern.
Häufig gestellte Fragen
Wie installiert man Stein an einem 45-Grad-Eckkamin?
Zu Installieren Sie den Stein in einer 45-Grad-Ecke, müssen Sie die Rückseite jedes Steins in einem Winkel von 22,5 Grad an der Stelle auf Gehrung schneiden, an der sie sich treffen. Dadurch entsteht ein sauberes, professionelles Ergebnis “Vogelmaul” gemeinsam. Stellen Sie sicher, dass Ihr Untergrund aus einer Zementträgerplatte besteht, die an der Ecknaht mit Dünnschicht- und Glasfasernetzband verstärkt ist. Tragen Sie auf beide eine hochwertige, polymermodifizierte Verdünnung auf Wand und die Rückseite des Steins (Back-Buttering), um eine dauerhafte Verbindung zu gewährleisten, die der einzigartigen Geometrie des Winkels Rechnung trägt.
Benötigen Sie spezielle Eckstücke für Nicht-90-Grad-Kamine?
Am meisten Kunststein Hersteller produzieren nur 90-Grad-Eckumlenkungen. Für nicht standardmäßige Winkel wie einen 45-Grad-Kamin verwenden Sie normalerweise keine vorgefertigten Eckstücke. Stattdessen verwenden Sie “Wohnung” Steine und schneiden sie vor Ort mit einer Nasssäge mit Diamanttrennscheibe individuell zu. Dies ermöglicht eine viel engere Passform und eine natürlichere Ästhetik als der Versuch, ein 90-Grad-Stück in einen flachen Winkel zu zwingen.
Wo fängt man mit dem Steinen eines Eckkamins an: in der Mitte oder an den Rändern?
Sie sollten immer an der Ecke (der Kante) beginnen und sich nach außen in Richtung der Wände oder der Kaminöffnung vorarbeiten. Die Ecke ist der optisch auffälligste Teil der Installation; Indem Sie dort beginnen, stellen Sie sicher, dass die Gehrungsverbindungen perfekt ausgerichtet sind. Sobald die Ecksteine gesetzt und nivelliert sind, können Sie die restlichen Steine zu den Enden hin verlegen, wo Schnitte weniger sichtbar sind oder durch Verkleidungen oder Möbel verdeckt werden können.
Wie lässt sich die vertikale Naht in einer Kaminecke am besten verbergen?
Die effektivste Methode ist “Weberei” der Steine oder mit einem präzisen Gehrungsschnitt. Beim Weben wechseln Sie in jeder Reihe ab, welche Seite des Steins die andere überlappt, sodass keine durchgehende vertikale Linie entsteht. Für ein nahtloses Aussehen bei 45-Grad-Winkeln verwenden Sie eine farblich passende Mauerwerksabdichtung oder -mischung Steinstaub von deinen Schnitten mit einer kleinen Menge klarem Epoxidharz, um eventuelle Mikrospalten an der Gehrungsverbindung zu füllen und die beiden Steine zu einer einzigen zusammenhängenden Einheit zu verschmelzen.
Wie montiere ich einen Fernseher an einem Eckkamin aus Stein?
Für die Montage eines Fernsehers ist eine Sicherung erforderlich Befestigen Sie die Halterung direkt an den Wandpfosten hinter dem Stein. Verwenden Sie zum Durchbohren einen Bohrhammer mit Steinbohrer SteinfurnierVerwenden Sie dann extra lange Zugschrauben (normalerweise 4 bis 6 Zoll), um den Holzrahmen zu erreichen. Für Eckkamine wird eine voll bewegliche Gelenkarmhalterung empfohlen, da Sie damit den Fernseher herausziehen und in Richtung des Sitzbereichs neigen können, um die diagonale Ausrichtung des Kamins auszugleichen.
