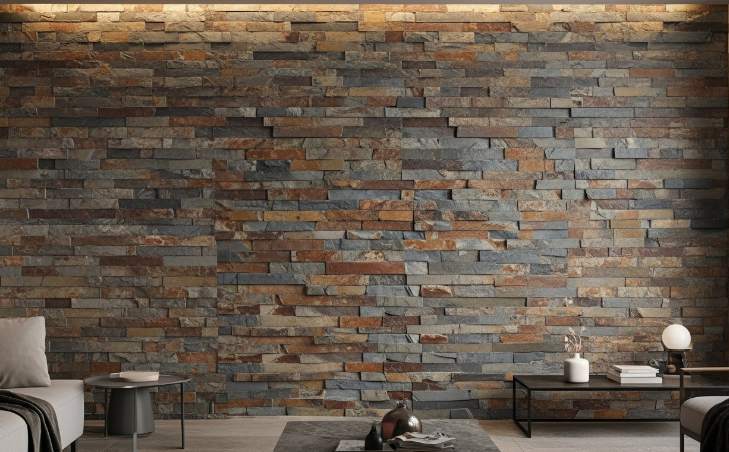
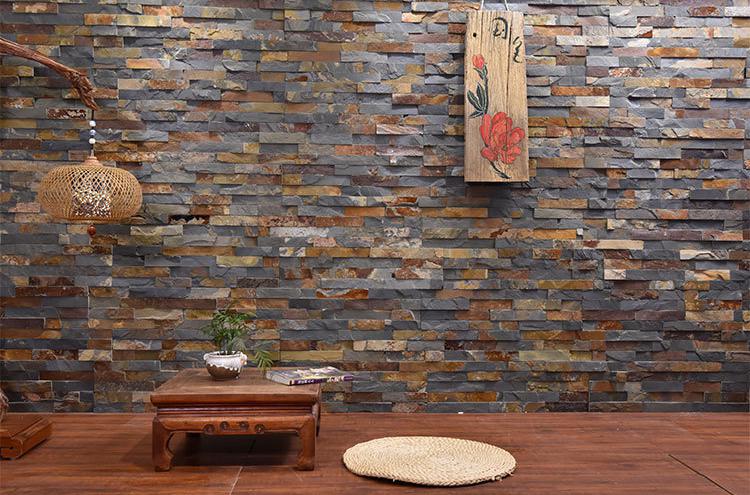
Interior accent walls sourcing directly impacts project margins when cheap materials cause installation flaws and visible seams, leading to costly rework and client dissatisfaction. Inferior stone panels frequently fail to deliver the seamless precision demanded by high-end interiors, eroding dealer reputation and profitability.
This analysis benchmarks Top Source Stone against the same-batch quarry consistency standard, emphasizing CNC diamond-blade precision cutting and minimum 300-square-meter MOQ to ensure scalable supply with superior uniformity, seamless interlocking panels, and matching L-corners for flawless finishes.
Why Interior Accent Walls Require More “Beenden” Than Exterior Siding?
Interior accent walls demand more detailed finishing due to their focus on aesthetic precision, seamless visual integration, and fine craftsmanship, while exterior siding prioritizes protection and durability.
Aesthetic and Functional Differences Between Interior Accent Walls and Exterior Siding
Interior accent walls emphasize visual details like clean edges, texture, and design cohesion. They require seamless panels with careful attention to lighting effects and color harmony, minimizing visible joints.
Exterior siding prioritizes durability and resistance to weather. It must withstand sun exposure, moisture, and temperature changes. The finishes are more functional, accepting structural movement and moisture drainage, resulting in rougher, less refined appearances.
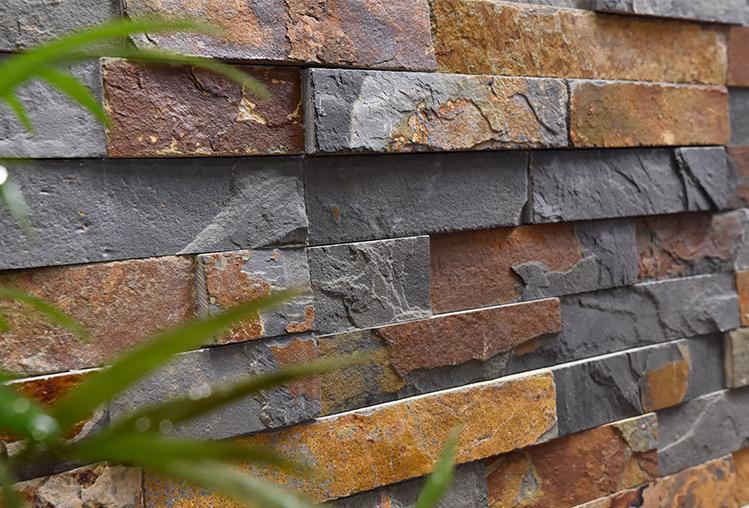
Das nahtlose ineinandergreifende Paneelsystem von Top Source Stone für Akzentwände im Innenbereich
Top-Quelle Stone verwendet ineinandergreifende Paneele in Z-Form und S-Form mit präzise geschnittenen CNC-Diamantklingenkanten. Dieses männlich-weibliche Verbindungssystem verbindet die Paneele fest miteinander und verbirgt vertikale Fugen und den darunter liegenden Untergrund, um ein nahtloses Erscheinungsbild zu schaffen, das für Innenräume unerlässlich ist.
- Steinbruchkonsistenz: Die Paneele stammen aus derselben Charge und derselben Steinbruchader und gewährleisten einen einheitlichen Farbton und eine gleichmäßige Textur, die für die Ästhetik im Innenbereich von entscheidender Bedeutung sind.
- Passende L-Ecken: Vorgefertigte Ecken ermöglichen professionelle Rundum-Abschlüsse ohne aufwändigen Zuschnitt vor Ort.
- Natürliche Spalte & Nahtloses Finish: Verbessert die taktile Tiefe und das visuelle Interesse und eignet sich für gehobene Innenanwendungen.
Dieses System ermöglicht es Händlern und Einzelhändlern, ihren Kunden höchste Präzision zu bieten Akzentwände aus Stein that meet the stricter aesthetic demands of interior environments, versus the more rugged needs of exterior siding.
How to Plan Your Layout to Avoid “Sliver” Cuts at the Ceiling and Floor?
Center and balance cuts on opposite sides, avoid cuts smaller than half a tile, and place cut tiles where molding or sealant conceals them.
Core Principles of Balanced Layout Planning
Start by centering and balancing your tile layout so the size of the cut tile on the left matches the cut on the right, and the top cuts mirror those at the bottom. This symmetry delivers a professional and visually balanced finish.
Avoid creating cuts smaller than half the tile size. These thin “sliver cuts” stand out and detract from the overall look, indicating poor workmanship.
Place cut tiles at the outer edges of the wall where trims, moldings, or sealant joints can hide these less-perfect cuts. Concealing them here keeps the main surfaces clean and aesthetically appealing.
Also, factor in architectural features such as windows, doors, niches, and focal points when choosing your starting position. Positioning a full tile or major feature at these spots helps avoid awkward cuts in high-visibility areas.
Using Quartering Layout and Stone Panel Options to Minimize Sliver Cuts
When working with offset patterns like subway tiles or 12×24 panels, standard centering may produce unwanted sliver cuts. The quartering layout technique shifts the center to the 1/4 or 3/4 tile mark. This distributes cuts across alternating rows, maintaining balance without thin edges clustered in one row.
Top-Quelle Stone offers matching L-shaped corner panels that fit precisely with the rectangular panels. These pre-fabricated corners provide clean, seamless transitions at wall edges, reducing or eliminating the need for custom sliver cuts.
Their interlocking Z-shape and S-shape panels use precise “männlich weiblich” connections engineered with CNC diamond-blade cutting. This technology ensures tight fits without visible gaps, which helps hide minor cutting variances and prevents slivers from showing.
High-precision CNC diamond-blade cutting keeps each piece’s edges clean and consistent. This craftsmanship aids installers in achieving even cuts that look sharp and professional, improving the overall finish and reducing the chance of unsightly sliver cuts.
Premium-Stapelstein für Bauunternehmer

The Impact of Raking Light: How it Hides or Highlights Installation Seams?
Raking light strikes surfaces at low angles, emphasizing even slight seam imperfections. Managing joint orientation, lighting, and finish reduces seam visibility effectively.
How Raking Light Affects Installation Seams Visibility
Raking light hits surfaces at acute angles, casting elongated shadows that magnify minor irregularities such as seams and uneven finishes. Early morning and evening sun angles increase seam visibility dramatically. Wall-mounted uplights and strong white lighting intensify these shadows, making installation faults stand out clearly to observers.
Design and Installation Strategies to Minimize Seam Visibility
To reduce seam visibility under raking light, orient long plasterboard joints parallel to the light direction. This minimizes shadow contrast on seams. Use Top Source Stone’s interlocking Z-Shape or S-Shape panels to conceal vertical joints and create smooth surface transitions. Choose diffused light fixtures and matte, light-colored finishes to soften shadows and hide imperfections. Additionally, skimming surfaces after joint finishing helps minimize seam lines that become pronounced under glancing light.
How to Finish Stone Edges When the Wall Suddenly Ends Without a Corner?
Wann Steinmauern end abruptly without corners, use chipped edges, edging stones, natural end panels, or matched grout to finish cleanly.
Common Techniques for Finishing Stone Edges Without Corners
When a Steinmauer stops without a corner, installers use several effective finishing methods to maintain a professional look and protect the edge.
- Natural chipped edges are made by carefully chiseling stone ends to break the straight line, creating an organic finish that integrates with the stone’s character.
- Edging or border stones form a frame around the perimeter and provide a smooth visual transition, usually crafted from the same or complementary stone.
- Natural end panels come with finished vertical edges designed for mid-wall stops where no corner exists, enabling a clean edge termination.
- Color-matched grout or caulk applied along the edge blends it with surrounding surfaces and seals the gap, especially effective where stone meets drywall.
Choosing among these methods depends on the project’s style and requirements, but all aim to deliver a seamless, polished appearance at abrupt wall terminations.
Top Source Stone Specifications Supporting Edge Finishes
Top-Quelle Stone offers engineered products that simplify finishing edges when walls end without corners, focusing on precision and natural aesthetics.
- Matching L-corners complement every series, providing texture and color consistency for smooth transitions at wall returns and edges.
- Panels are cut with CNC diamond-blade precision, ensuring clean, consistent edges that facilitate a professional finish and easier installation.
- Natural cleft and split-face finishes on panels highlight the stone’s organic texture, especially effective when edges end visibly.
- Natural End Panels are purpose-built for mid-wall terminations without corners, featuring finished vertical edges to eliminate raw cut looks.
These features make Top Source Stone-Platten a reliable choice for dealers and contractors needing consistent, high-quality stone veneers that handle edge finishes professionally.
Can You Safely Install Stone Over Large Mirrors or Glass Features?
Installing natural stacked stone directly over large mirrors or glass is generally unsafe without proper substrates and structural support.
Challenges and Considerations When Installing Stone Over Glass or Mirrors
Naturstein weighs between 8 to 13 pounds per square foot, which glass surfaces typically cannot support directly. This weight mismatch creates a real risk of glass breakage during and after installation. Differences in thermal expansion between stone and glass cause adhesion problems and potential damage. High-strength flexible adhesives are needed but still don’t guarantee long-term bonding on glass. Building codes often restrict mounting heavy finishes on non-structural glass, reflecting safety concerns in these environments.
Recommended Practices and Suitable Alternatives for Stone-Like Finishes Near Glass Features
Instead of applying stone directly to glass or mirrors, install natural stacked stone on stable, suitable substrate walls adjacent to those surfaces. Lightweight Steinfurnierplatten or engineered stone alternatives reduce weight and risk. Interlocking panel systems, such as Z-Shape or S-Shape panels with CNC precision, should be mounted on structural walls—not on glass. Use framed installations with steel or wood backing to safely support stone near reflective elements. Apply sealants and flexible stone adhesives only to compatible substrates, never directly on glass. Always consult structural engineers and follow local codes for safe, lasting installation.
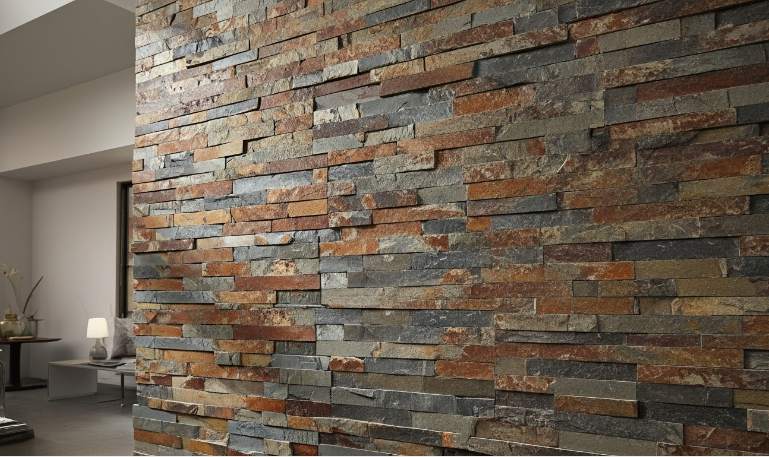
Achieving the “Zero-Joint” Look in High-End Residential Living Rooms
The zero-joint look requires precise material selection and installation methods to create seamless, continuous Natursteinmauer finishes.
| Key Factor | Details |
|---|---|
| Material Consistency | Verwenden Natursteinplatten sourced from the same quarry vein to ensure color and vein uniformity |
| Panel Design | Employ interlocking Z-Shape or S-Shape panels with CNC diamond-blade precision edges to conceal vertical joints |
| Installation Technique | Install panels with tight male-female connections to hide seams and avoid visible gaps |
| Edge Finishing | Use matching L-shaped corners to maintain texture and color flow on wall transitions |
| Panelgröße & Dicke | Standard panels come in 6″ x24″ (150x600mm) or 6″ x22″ (150x550mm) sizes, with thickness from 1cm to 2.5cm |
Material Selection and Consistency
Achieving a zero-joint appearance depends first on Naturstein quality and consistency. Top Source Stone provides panels sourced exclusively from the same quarry layer, ensuring hue uniformity above 95% within each order. This approach reduces noticeable color differences that would otherwise highlight seams on large walls.
Interlocking Panel Design
The zero-joint effect relies heavily on panel shapes engineered to interlock tightly. Top Source Stone’s Z-Shape and S-Shape panels use a “männlich weiblich” connection system precision-cut with CNC diamond blades. This design hides installation substrate and camouflages vertical joints, creating continuous wall surfaces without stepped gaps.
Installation Techniques to Conceal Seams
Precision during installation is critical. Installers must join panels firmly without gaps. Employ the interlocking edges and ensure full contact between panels. Use matching pre-fabricated L-shaped corners for outside corners to sustain seamless texture and color flow. This reduces finishing time and maintains alignment.
Panel Size and Thickness
Standard rectangles typically measure 6″ x24″ (150x600mm) or 6″ x22″ (150x550mm). Thickness ranges from 1 to 2.5cm, with some premium models up to 3.5cm. Heavier panels require proper substrate preparation but enhance depth, reinforcing the zero-joint look’s architectural integrity.
Summary
Use quarry-consistent, interlocking Natursteinplatten, coupled with meticulous installation, to achieve seamless high-end wall finishes with zero visible joints.
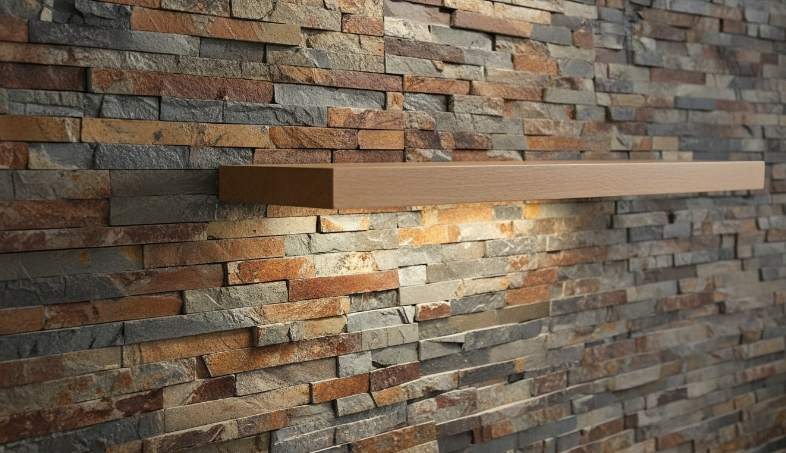
How to Integrate Floating Shelves and Lighting Directly into the Stone Pattern?
Securely mounting shelves and pre-planning electrical wiring behind stone panels ensures stable integration while preserving natural stone aesthetics.
Mounting Floating Shelves on Natural Stacked Stone Walls
Mounting floating shelves on natural stacked stone requires special care due to the wall’s texture and irregularities. Use masonry anchors or concrete screws that expand or thread directly into the stone or mortar joints. Mortar joints are preferable drilling points since they are softer than solid stone, which reduces the chance of cracking.
Because Natürlicher gestapelter Stein surfaces are uneven, place shims behind brackets to ensure the shelf sits level. For walls with highly irregular stone profiles, it may be necessary to notch the stone or first install a backer board to create a flat surface for mounting. Avoid attaching shelves directly to drywall behind the stone veneer; ensure the stone is firmly adhered to a solid backing such as cement board for proper load support.
Incorporating LED Lighting into Stone Accent Walls
Integrate LED lighting by running electrical wiring behind the stone panels during installation. This approach provides a clean, hardwired look without surface clutter. Select floating shelves made specifically for masonry walls, which often include integrated LED strips as part of the shelf structure.
Choose LED color temperatures between 3000 and 4500 Kelvin to enhance the stone’s texture and create a warm yet natural ambient light. Use lighting controls such as remotes or wall switches included in LED kits to adjust illumination as needed. Plan shelf placement to align with the Hauptbuchstein pattern to maintain visual rhythm and avoid disrupting the natural stone texture.
Maintaining Visual Flow: Matching Stone Veins Across Large Walls
Matching stone veins demands same-batch slab selection combined with precise layout techniques like bookmatching and continuous vein alignment for unified large wall visuals.
Techniques for Aligning Stone Veins on Large Surfaces
Different approaches help maintain visual flow across multiple stone panels on large walls. Each has distinct effects on pattern continuity and overall impact.
- Bookmatch technique creates mirrored slabs, producing striking symmetry and bold, coherent vein patterns ideal for feature walls.
- Vein flow method orients all slabs in the same vein direction, providing continuous movement and harmony even without exact pattern replication.
- Continuous vein matching connects panels seamlessly so vein patterns flow as one unbroken design across the entire surface.
- Random match places slabs without forced alignment, maintaining an organic look that accentuates natural variation.
Utilizing Same-Batch Quarry Consistency and CNC Precision in Vein Matching
Material consistency and cutting precision play key roles in achieving high-quality vein matching on large installations.
- Selecting slabs sourced from the same quarry vein limits color shifts and vein inconsistency, ensuring uniform appearance throughout the wall.
- Top Quellstein uses CNC diamond-blade precision edges on Z-Shape and S-Shape panels, enabling tight interlocking joints that hide seams and substrate.
- Matching pre-fabricated L-Corners provide smooth vein continuation around 90-degree wall transitions, eliminating visual breaks.
- Pre-shipment visual verification with photos and videos confirms vein consistency before delivery, protecting your project margin and installation confidence.
Häufig gestellte Fragen
What is the recommended direction to start installing interior natural stacked stone panels?
Start installing from the bottom and work your way up toward the ceiling. This ensures foundation stability, uses gravity to hold stones in place as mortar sets, provides better ergonomic access, and ensures alignment precision starting with a level first row.
How can cut or raw stone edges be effectively hidden on an interior accent wall?
Use grouting to fill gaps and smooth the stone surface, apply painter’s tape before grouting to protect adjacent surfaces, and use strategic cutting techniques such as angled cuts or cutting individual stones to avoid visible seams and create a natural appearance.
What lighting techniques best highlight the texture of natural stone walls?
Graze lighting is most effective for emphasizing texture by placing light directly above the stone so shadows and dimension are enhanced. Uplighting and oblique lighting also add dramatic effects, while backlighting works well with translucent stone varieties.
How should the gap between stone panels and the ceiling be finished?
Prepare the joint by cleaning and widening the gap, then apply a paintable polymer-based sealant or caulk using masking tape for clean edges. Use a foam backer rod for larger gaps, smooth the sealant before it dries, and allow complete curing before painting.
Can stone panels be installed around wall-mounted TVs?
Yes, by either installing the TV mount before laying stone or retrofitting the mount into existing stone. Pre-installation involves mounting on cement board with stone cut around it. Retrofit requires careful cutting or shimming to attach the mount securely to wall studs without drilling into mortar joints.
Abschließende Gedanken
While generic Steinplatten might seem cost-effective upfront, only Top Source Stone’s direct quarry source and CNC diamond-blade precision guarantee consistent hue, seamless interlocking, and durable finishes that protect your brand’s reputation against uneven installations and visible seams. Investing in true same-batch quarry consistency and engineered panel design reduces callbacks and enhances client satisfaction, giving dealers a strong edge in premium interior accent wall projects.
Don’t rely on guesswork—start with a sample kit to experience our product’s perfect fit and natural texture firsthand. Reach out to our team to explore private label options or request detailed catalogs tailored to your project scale and market needs.
SEO
Title: The Design-Led Install: Creating Flawless Interior Accent Walls
Description: Interior accent walls from direct quarry source with CNC precision and MOQ 300sqm. Factory wholesale only, no retail sales.
URL: interior-accent-walls-supplier
Keywords: interior accent walls
