
Los caminos de piedra que se hunden, cambian o se vuelven cubiertos de maleza después de solo una temporada frustran incluso a los propietarios más pacientes. Lo que debería ser una característica de paisaje duradera a menudo se convierte en un dolor de cabeza de mantenimiento recurrente cuando no se siguen las técnicas de construcción adecuadas desde el principio.
Creando un piedra suelta El camino que tiene la prueba del tiempo requiere más que dispersar rocas en su jardín. La clave radica en seleccionar materiales de calidad, preparar una base adecuada e implementar estrategias de diseño inteligentes que impidan problemas comunes como las piedras de hundimiento, el crecimiento de las malas hierbas y la erosión. Esta guía completa lo guiará a través de los pasos esenciales para construir una vía de piedra suelta duradera que mejore su espacio al aire libre con requisitos de mantenimiento mínimos.
Planificación de su camino de piedra suelta: diseño y consideraciones materiales
Creando un piedra suelta La ruta puede transformar su espacio al aire libre, agregando la funcionalidad y el atractivo visual a su paisaje. Antes de agarrar su pala, la planificación adecuada asegura que su camino resistirá la prueba del tiempo mientras complementa la estética de su hogar. Exploremos las consideraciones esenciales para diseñar su camino de piedra perfecto.
Una vía de piedra suelta bien diseñada equilibra el atractivo estético con una durabilidad práctica, que requiere una planificación reflexiva de diseño, materiales y técnicas de instalación para garantizar la satisfacción a largo plazo.
Definición de su estilo: coincidir con el camino con su hogar y jardín
Su camino de piedra suelta debe sentirse como una extensión natural del estilo arquitectónico de su hogar. Para las casas contemporáneas, considere la pizarra elegante o la grava uniforme. Las casas tradicionales combinan maravillosamente con piedra de bandera irregular o roca de río redondeada. Inspirarse en sus elementos de paisaje existentes: su camino no debería sentirse como una ocurrencia tardía sino una “ajuste perfecto” con su diseño general al aire libre.
Considere cómo se utilizará la ruta. ¿Es una pasarela principal que conecta las áreas principales? ¿O un camino de jardín que serpenteante? Las áreas de alto tráfico requieren selecciones de piedra más duraderas y una preparación de base adecuada, mientras que los caminos decorativos ofrecen más flexibilidad en los materiales.
La paleta de colores importa significativamente. Seleccione piedras que se complementen o contrasten cuidadosamente con el exterior de su hogar y las características del paisaje existentes. Los tonos de tierra natural generalmente ofrecen un atractivo atemporal, mientras que los colores más audaces pueden crear puntos focales sorprendentes.
Medición y mapeo: evaluación del área de la vía y los requisitos
Comience por mapear la ruta de su vía, usando mangueras de jardín o cuerda para visualizar el flujo. Para curvas naturalmente atractivas, evite las formas geométricas perfectas: las líneas sutiles y fluidas crean una estética más agradable. Los anchos de camino estándar varían de 18-36 pulgadas para caminos de jardín a 48-60 pulgadas para pasarelas principales.
Calcule sus pies cuadrados cuidadosamente para determinar las cantidades de materiales. Mida la longitud y el ancho, luego multiplique estas figuras. Agregue 10-15% adicional para tener en cuenta los recortes, la rotura y las reparaciones futuras. Para los caminos de piedra suelta, también deberá calcular materiales base como piedra triturada o arena.
Selección de piedra: tipos de piedras, colores y texturas
La piedra que selecciona impacta tanto la funcionalidad como la apariencia. Las opciones comunes para caminos de piedra suelta incluyen granito descompuesto, grava de guisante, piedra caliza triturada, rocas del río y piezas de piedra. Cada uno aporta características únicas a su diseño:
| Tipo de piedra | Costo típico (por pies cuadrados) | Calificación de durabilidad | Nivel de mantenimiento | Mejores aplicaciones | Disponibilidad regional |
|---|---|---|---|---|---|
| Granito descompuesto | $ 0.50- $ 1.50 | Medio | Moderado (requiere reabastecimiento ocasional) | Senderos informales en el jardín, paisajes resistentes a la sequía | Ampliamente disponible en las regiones occidentales |
| Grava de guisantes | $1.00-$3.00 | Medio-alto | Bajo (rastrillado/nivelación anual) | Caminos familiares, diseños mediterráneos | Disponible universalmente |
| Piedra caliza triturada | $0,75-$2,25 | Alto | Bajo (se compacta bien con el tiempo) | Áreas de mucho tránsito, jardines formales. | Común en las regiones del medio oeste y este |
| Rocas del río | $2.50-$5.00 | Muy alto | Muy bajo (limpieza ocasional) | Zonas de drenaje, jardines de inspiración asiática | Precios premium en regiones desérticas |
| Piedra suelta al azar | $3.00-$7.50 | Muy alto | Bajo (reposicionamiento ocasional) | Entradas formales, caminos de exhibición. | Proveedores especializados como Top Source Slate |
Estimación de costos de materiales: presupuesto para su proyecto
Más allá de la piedra en sí, presupuesta los materiales base necesarios. Un camino de piedra suelta construido correctamente requiere de 2 a 4 pulgadas de base de piedra triturada compactada, seguido de 1 a 2 pulgadas de arena o grava fina, y luego cubierto con el material de piedra elegido.
No pase por alto las restricciones de los bordes, ya sean de metal, plástico, piedra o ladrillo, que evitan la extensión y mantienen las líneas nítidas de su camino. Por lo general, cuestan entre $ 1 y $ 3 por pie lineal, pero extienden significativamente la vida útil de su camino. La tela para jardinería de calidad profesional debajo de su camino ($0,10-$0,30 por pie cuadrado) previene el crecimiento de malezas y permite un drenaje adecuado.
Para selecciones de piedra personalizadas que coincidan perfectamente con su visión de diseño, considere proveedores especializados como Top Source Slate. Sus ofertas aleatorias de piedras sueltas brindan una durabilidad excepcional con dimensiones y acabados personalizados para cumplir con los requisitos estéticos y los requisitos específicos del proyecto.
Con una planificación cuidadosa del diseño y los materiales de su camino de piedra suelta, creará una característica exterior que mejorará su paisaje y al mismo tiempo brindará años de uso práctico con un mantenimiento mínimo.
Guía paso a paso para construir un camino duradero con piedras sueltas
Crear un hermoso camino de piedra no tiene por qué ser un trabajo de paisajismo profesional. Con los materiales y técnicas adecuados, cualquier propietario puede construir un camino duradero de piedra suelta que mejore su espacio exterior y requiera un mantenimiento mínimo. Esta guía divide el proceso en pasos manejables que garantizan resultados duraderos.
Un camino de piedra suelta construido correctamente requiere una preparación minuciosa del sitio, materiales de calidad y técnicas de instalación estratégicas para crear un camino estable y resistente a las malezas que durará muchos años con un mantenimiento mínimo.
Preparación del sitio: limpieza, nivelación y nivelación
La construcción exitosa de caminos de piedra comienza con la preparación adecuada del sitio. Comience marcando los límites de su camino usando estacas y cuerdas o una manguera de jardín para visualizar la forma final. El ancho estándar para senderos de jardín es de 3 a 4 pies, lo que permite un paso cómodo para personas y herramientas de jardín.
Limpie completamente el área marcada, eliminando toda la vegetación, rocas y escombros. Excave a una profundidad de 6 a 8 pulgadas para acomodar los materiales de base. Esta profundidad es crucial para crear una base estable que evite que las piedras se asienten y se muevan en el futuro.
Nivele el área excavada con una ligera pendiente (aproximadamente 1-2%) lejos de cualquier estructura para garantizar un drenaje adecuado. Utilice un nivel y una línea de cuerda para comprobar que la pendiente sea constante. Compacte el suelo usando un apisonador manual o un compactador de placa para crear un subsuelo sólido que “encerrar” sus materiales de base.
Colocación de las bases: instalación de barreras contra malezas y materiales de base
Una base estable es el secreto para construir caminos de piedra que resistan el paso del tiempo. Comience colocando tela paisajística de calidad profesional en toda el área excavada, extendiéndose de 3 a 4 pulgadas más allá de los bordes planificados. Esta barrera fundamental previene las malas hierbas y al mismo tiempo permite el drenaje del agua, lo que soluciona un dolor de cabeza común de mantenimiento.
Luego, agregue una capa de 3 a 4 pulgadas de piedra triturada gruesa o grava (generalmente ¾ de pulgada) como material base principal. Distribuya uniformemente y compacte completamente con un compactador de placa, realizando varias pasadas para lograr la máxima densidad. Esta capa base proporciona un drenaje crucial y evita las heladas en climas más fríos.
Cubra la base con una capa de 1 a 2 pulgadas de arena gruesa o piedra triturada fina. Esto crea un lecho suave y uniforme para las piedras y, al mismo tiempo, permanece permeable para el drenaje. Compacte ligeramente y verifique nuevamente que la nivelación sea adecuada para garantizar que el agua fluya lejos de las estructuras.
Colocación de piedras: técnicas de estabilidad y estética.
| Tipo de piedra | Peso por pie cuadrado | Espesor típico | Espaciado de espacios | Tratamiento de bordes | Clasificación de textura superficial |
|---|---|---|---|---|---|
| Losa | 12-15 libras | 1-2 pulgadas | 0.5-2 pulgadas | cortado o natural | Medio-áspero |
| Pizarra | 10-13 libras | 0.5-1 pulgada | 0.25-1 pulgada | corte limpio | Suave-medio |
| Caliza | 11-14 libras | 1,5-2,5 pulgadas | 00,5-1,5 pulgadas | corte preliminar | Medio |
| Granito | 15-18 libras | 1-3 pulgadas | 0.5-1 pulgada | Aserrado o térmico | Bruto |
| Cuarcita | 13-16 libras | 1-2 pulgadas | 0.5-1 pulgada | Natural o cortado | Medio-áspero |
Al colocar piedras, comience desde un extremo del camino y trabaje sistemáticamente hacia el otro. Para arreglos de apariencia natural, varíe el tamaño de las piedras manteniendo espacios consistentes entre las piezas. Coloque cada piedra firmemente en el lecho de arena, asegurándose de que quede plana y sin tambalearse.
Utilice un mazo de goma para golpear suavemente las piedras en su lugar, comprobando frecuentemente con un nivel para mantener una superficie uniforme. Para una estabilidad óptima, asegúrese de que cada piedra tenga al menos tres puntos de contacto con las piedras o bordes circundantes. Trate de dejar espacios de ½ a 1 pulgada entre las piedras: lo suficientemente anchos para permitir el asentamiento natural pero lo suficientemente estrechos para evitar riesgos de tropiezo.
Asegurar el camino: bordeamiento y estabilización
Instalación Los bordes adecuados son cruciales para la longevidad del camino de piedra suelta de bricolaje. Las opciones incluyen tiras de bordes de metal, bordes de plástico para paisajes, bordes de ladrillo o piedras más grandes. Asegure firmemente el material para bordes elegido en el suelo circundante, extendiéndolo al menos a 4 pulgadas de profundidad para evitar el desplazamiento y la migración de los materiales del camino.
Una vez que los bordes estén colocados, rellene los espacios entre las piedras con el material elegido; el granito descompuesto, la grava fina o el polvo de piedra son excelentes opciones. Barra el material en todas las grietas y luego rocíe ligeramente con agua para ayudar a que se asiente. Este material aglutinante evita el movimiento de la piedra manteniendo la permeabilidad.
Para obtener resultados de calidad profesional que minimicen el mantenimiento futuro, obtenga sus piedras de fabricantes como Top Source Slate, conocido por su calidad constante y especificaciones dimensionales precisas. Su riguroso control de calidad en dos etapas garantiza piedras uniformes que se entrelazan de forma natural, reduciendo el asentamiento y el desplazamiento con el tiempo. Con plazos de entrega estándar de 20 a 30 días, incluso los proyectos de caminos grandes se pueden suministrar con piedras a juego que crean una superficie cohesiva y estable.
Seguir estos pasos para construir caminos de piedra dará como resultado una adición hermosa y duradera a su paisaje que requerirá un mantenimiento mínimo en los años venideros.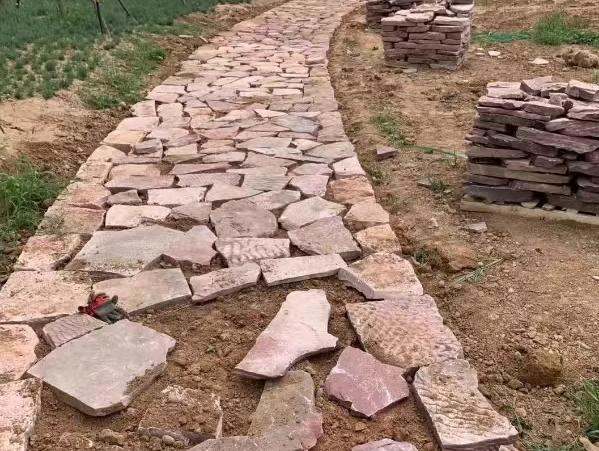
Mantenimiento del camino de las piedras sueltas: atención a largo plazo y solución de problemas
Un camino de piedra suelta bien construido puede mejorar su paisaje durante años con el mantenimiento adecuado. Si bien estos senderos naturales ofrecen un encanto rústico y durabilidad, requieren atención regular para preservar su belleza y funcionalidad. Esta guía cubre estrategias esenciales de mantenimiento de caminos de piedra para que su camino luzca excelente a través de estaciones cambiantes y condiciones desafiantes.
El mantenimiento regular de los caminos de piedra suelta prolonga significativamente su vida útil, y las medidas preventivas como los bordes adecuados, la limpieza estacional y las reparaciones inmediatas son más efectivas que las soluciones reactivas a problemas importantes.
Control de malezas: estrategias efectivas para la prevención y eliminación
Las malas hierbas son la queja más común entre los propietarios de caminos de piedra. La mejor defensa comienza durante la instalación con una tela paisajística de calidad debajo de su camino. Para las vías establecidas, considere estas medidas preventivas y opciones de tratamiento:
Aplique un herbicida preemergente al camino dos veces al año (principios de primavera y otoño) para evitar la germinación de las semillas sin dañar las plantas circundantes. Como alternativa respetuosa con el medio ambiente, una solución de vinagre (1 galón de vinagre blanco, 1 taza de sal, 1 cucharada de jabón para platos) mata eficazmente las malas hierbas existentes sin introducir productos químicos en su jardín.
Para las malas hierbas rebeldes que crecen entre las piedras, utilice una herramienta de mango largo para eliminar todo el sistema de raíces en lugar de simplemente romper la parte visible. El barrido regular del camino evita la acumulación de escombros donde las semillas de malezas pueden echar raíces. Recuerda que consistente “tratamiento localizado” de malezas emergentes requiere menos esfuerzo que abordar una infestación en toda regla.
Abordar piedras que se hunden: técnicas para levantar y nivelar
Con el tiempo, el asentamiento natural y la erosión pueden hacer que las piedras se hunda o se mueva. Esto crea superficies irregulares y posibles riesgos de tropiezo. Cuando notes una piedra hundida, atiéndela lo antes posible para evitar un mayor deterioro:
| Gravedad del problema | Método de reparación | Herramientas requeridas | Necesidades materiales | Tiempo estimado | Rango de costos profesionales |
|---|---|---|---|---|---|
| Hundimiento menor (0,25-0,5″) | Ascensor sencillo & Llenar | Palanca, pisón manual | Arena angular (0,5 pies cúbicos) | 15-30 minutos por piedra | $10-25 por piedra |
| Hundimiento moderado (0,5-1,5″) | Restablecimiento completo de piedras | Palanca, pisón, nivel | Arena gruesa/piedra triturada (1 pie cúbico) | 30-45 minutos por piedra | $25-40 por piedra |
| Hundimiento severo (>1.5″) | Reconstrucción de bases | Pala, pisón, nivel | Base de grava + arena (2+ pies cúbicos) | 1-2 horas por sección | $40-75 por sección |
| Fallo de cálculos múltiples | Reemplazo de sección | Juego completo de herramientas + compactador. | Materiales base completos + piedras nuevas. | 3-4 horas por 10 pies cuadrados. | $150-300 por 10 pies cuadrados. |
| Fallo relacionado con el drenaje | Instalación de drenaje subterráneo | Equipo de excavación | Tubería de drenaje, grava, tela paisajística. | 4-8 horas | $300-600 |
Para ajustes menores, levante con cuidado la piedra hundida con una palanca o una llana, agregue material compactable debajo (la arena angular funciona mejor) y luego apisone firmemente el material antes de reemplazar la piedra. Verifique el nivel de la piedra en relación con las piedras circundantes y ajuste según sea necesario hasta que la superficie esté nivelada.
Prevención de la erosión: gestión de la escorrentía de agua y la estabilidad del suelo
El agua es esencial para su jardín y potencialmente destructiva para su camino de piedra. El mantenimiento eficaz de los caminos de piedra incluye la gestión del flujo de agua para evitar la erosión. Instale canales de drenaje o desagües franceses a lo largo de caminos en áreas con fuertes lluvias o drenaje deficiente.
Controle las áreas donde su camino se encuentra con el césped o los parterres del jardín; estas zonas de transición son particularmente vulnerables a la erosión. Considere instalar pequeñas bermas o cunetas para desviar el agua de su camino. Para caminos en pendientes, cree pequeños “badenes” de piedra cada pocos pies para disminuir el flujo de agua y reducir el daño por erosión.
Mantenimiento estacional: preparación para el invierno y el verano
Las diferentes estaciones presentan desafíos únicos para piedra natural caminos. En otoño, limpie periódicamente las hojas caídas para evitar su descomposición y manchas. Antes del invierno, asegúrese de que todas las piedras estén niveladas y estables, ya que los ciclos de congelación y descongelación pueden exagerar los problemas existentes.
Para la eliminación de la nieve, use palas de plástico en lugar de metal para evitar rascar o astillar las piedras. Evite el uso de sales de desbordamiento típicas, lo que puede dañar la piedra natural: en lugar de la arena o el acetato de magnesio de calcio (CMA), que es más suave tanto en las superficies de piedra como en las plantas circundantes.
En primavera, realice una inspección exhaustiva después de la helada final, abordando cualquier daño invernal de inmediato. El mantenimiento del verano debe centrarse en el control de malezas y el enjuague ocasional para eliminar el polvo y el polen que pueden opacar las superficies de piedra.
Para las vías construidas con materiales premium de proveedores como Top Source Slate, los requisitos de mantenimiento a menudo se reducen gracias a la calidad constante y las especificaciones dimensionales precisas de las piedras. Su compromiso con la comunicación receptiva y la consulta de expertos se extienden más allá de la compra, ofreciendo orientación sobre técnicas de atención adecuadas específicas de sus productos, asegurando que su vía mantenga su belleza en los próximos años.

Conclusión
De mis años en el negocio de la piedra, he aprendido que una duración piedra suelta Pathway no se trata solo de las piedras en sí, se trata de la base, la planificación y el mantenimiento. Saltar los pasos puede ahorrar tiempo inicialmente, pero lo pagará más tarde con dolores de cabeza y trabajo adicional.
En la lista de la fuente superior, vemos estas vías como algo más que elementos funcionales; Son una inversión en la belleza y el valor de su hogar. Hacerlo bien significa seleccionar materiales de calidad y comprender cómo funcionarán con el tiempo. Se trata de crear algo que dure y agrega valor a su espacio.
En última instancia, construir un gran camino de piedra se trata de hacerlo bien la primera vez. ¿Es un poco una inversión inicial, pero encontrar piedras confiables y esforzarse por instalarla correctamente? Esa es una volcada.
