06. Entretien & Soot Science est en première ligne contre l’infiltration de suie dans la pierre naturelle par les pores ; Si rien n’est fait, ce problème entraîne des coûts de nettoyage inattendus, prolonge les temps d’arrêt pour maintenance et expose les installations à des plaintes concernant la qualité de l’air et à des risques réglementaires.
This guide serves as a technical SOP for homeowners and facility managers: it explains why stone pores act like magnets for carbon and dust, flags acidic and other cleaners to avoid, and delivers a step-by-step procedure for removing heavy smoke buildup without damaging veins — the core section. You’ll also get safe methods to restore natural luster, HEPA-vacuum routines to cut airborne particulates, sealing strategies that repel future carbon ash, plus tool lists, dilution ratios, PPE checkpoints, and inspection criteria that make the work repeatable and auditable.
Why Natural Stone Pores Are Magnets for Carbon and Dust?
Porous stone adsorbs soot and fine dust via les forces de surface et le transport par l'eau, choisissez donc des matériaux et des spécifications qui limitent l'adsorption et le budget de maintenance.
Adsorption des micropores : Van der Waals, forces électrostatiques et capillaires
Les micropores et les espaces étroits grain à grain créent une surface interne très élevée où les attractions de Van der Waals, les interactions électrostatiques et les liaisons hydrogène attirent la suie et la poussière submicronique sur les surfaces minérales. Les films d’eau à l’intérieur de ces micropores agissent comme porteurs, déplaçant le carbone en suspension plus profondément dans la matrice et l’enfermant lorsque les liquides s’évaporent ou oxydent le dépôt. Attendez-vous à un assombrissement initial rapide sur les matériaux à porosité ouverte élevée et à des performances variables entre les lots de carrière, à moins que vous ne contrôliez l'approvisionnement.
Specify measurable material metrics up front: require open-porosity and water absorption testing per ASTM C97 on representative quarry-batch samples before approving orders, and prefer denser quartzite variants for high-soot facades. Include a maintenance allowance and inspection schedule in contract documents to address faster early-stage soiling where micropore volume is high.
- Request ASTM C97 open-porosity and water absorption data on representative quarry-batch samples before order approval.
- Specify lower-porosity materials (dense quartzite) for high-soot environments.
- Source from the same quarry vein per order to keep hue and adsorption behavior consistent.
- Budget cleaning and inspection allowances in the project’s maintenance spec for initial darkening.
Pore Architecture and Weathering: Freeze-Thaw, Enlargement and Particle Entrapment
Freeze-thaw cycles and salt crystallization expand transitional and larger pores over time, increasing the stone’s capacity to trap particulate and dissolved carbon. Confirm laboratory or documented field results showing a ‘freeze-thaw resistant’ rating from your supplier for projects in cyclic climates, and plan for how pore enlargement will change cleaning frequency and restoration scope over the building lifecycle.
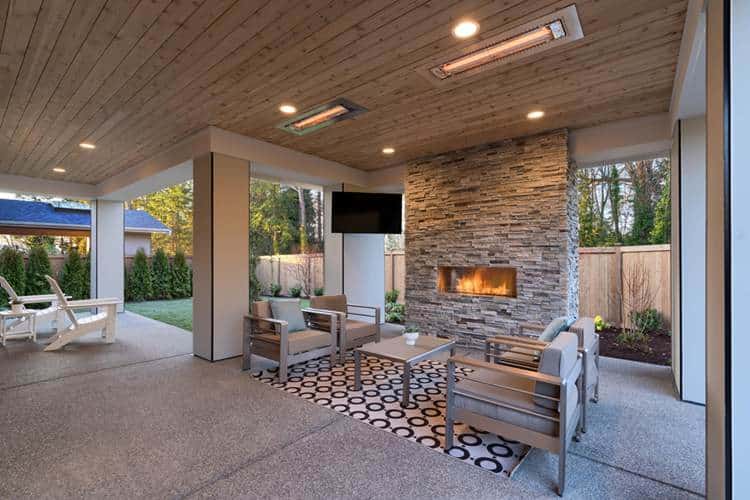
Design to reduce moisture-driven particle transport: use interlocking Z-shape or S-shape panels and matching L-corners to minimize exposed vertical joints and cut direct pathways for water and particles. Schedule condition surveys so you detect pore enlargement early and plan selective re-sealing or panel replacement where porosity increases materially.
- Verify ‘Freeze-Thaw Resistant’ performance data from supplier (lab reports or field case studies) for cold climates.
- Specify interlocking Z/S-shape panels and matching L-corners to limit exposed vertical joints; Top Source Stone offers CNC diamond-blade precision interlocks for tight fits.
- Plan condition surveys at least every 2–5 years in cyclic climates; increase frequency where salt exposure or heavy pollution accelerates weathering.
- Account for panel thickness and handling: standard panels at 150x600mm (6″ x24″) and thicknesses from 1–3.5cm affect replacement logistics and weight per m².
Surface Chemistry, Weathering Crusts and Protection: Cleaning and Sealing Strategies
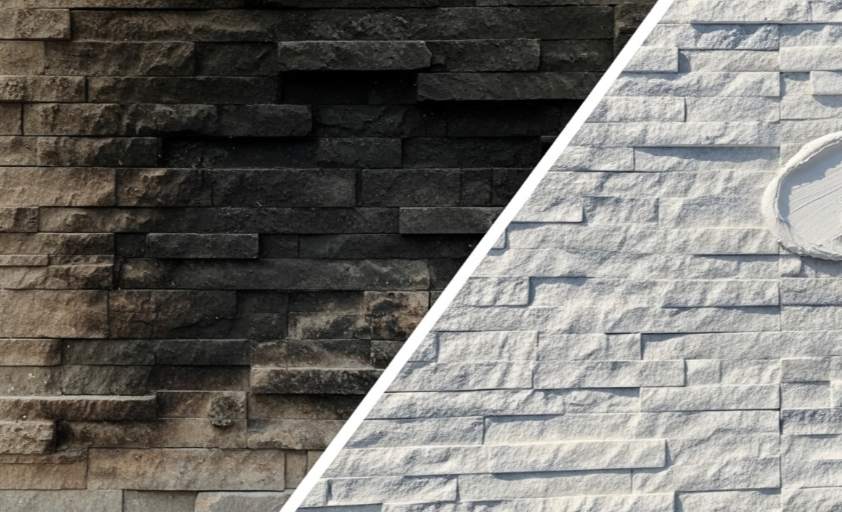
Weathering crusts form a chemically active surface layer rich in organic matter, iron oxyhydroxides and soot; oxidation strengthens particle retention and makes deposits harder to remove. Reduce water-borne particle transport by specifying breathable silane/siloxane water-repellent sealers that maintain vapor permeability; always test sealers on mock-up panels from the same quarry batch before full application.
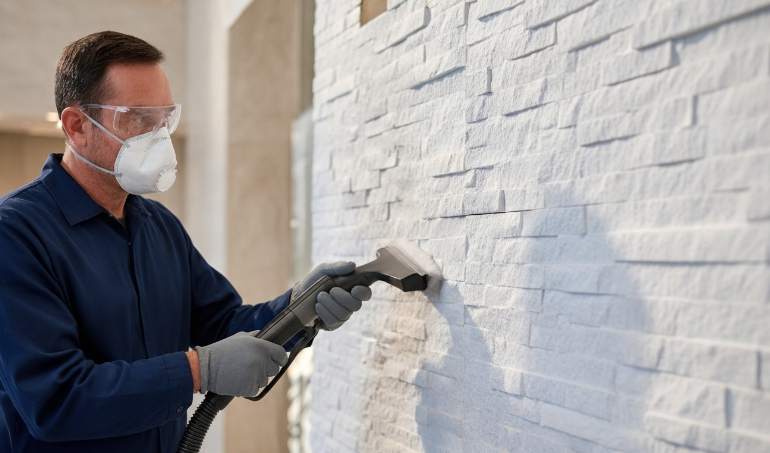
Adopt a conservative cleaning protocol: remove loose debris with HEPA-equipped vacuuming (HEPA traps ~99.97% of particles ≥0.3 μm), then use low-pressure rinsing and neutral pH stone cleaners for routine maintenance. Reserve mechanical grinding or stronger chemical remediation for documented, controlled interventions and avoid acidic cleaners—train crews on SDS requirements, PPE and ventilation. Add contract clauses requiring pre-shipment visual verification of crates and an on-site maintenance schedule tailored to local pollution and salinity conditions.
- Test breathable silane/siloxane sealers on sample panels from the approved quarry batch; verify compatibility and vapor permeability.
- Vacuum loose soot with HEPA-filtered equipment before any wet cleaning to reduce airborne recirculation.
- Use neutral pH cleaners and low-pressure rinsing for routine maintenance; escalate to mechanical or chemical remediation only after documentation and testing.
- Prohibit acidic cleaners on-site without SDS review and PPE protocols; acidic products risk worker injury and surface damage.
- Include pre-shipment visual verification of finished crates and a site-specific maintenance schedule in the purchase contract; plan reseal cycles typically every 1–3 years depending on exposure.
The Danger of Acidic Cleaners: What to Avoid at All Costs
Acidic cleaners rapidly alter surface chemistry on pierre naturelle empilée, driving etching, staining, and costly panel replacement if left unchecked.
Acid–Stone Mechanisms: How acids attack stacked stone pores and minerals
Calcitic stones—marble and limestone—show visible etching once exposed to solutions below pH 4, and strong acids in the pH 0–2 range can remove surface material within minutes. Quartzite and many slates resist direct etching better because of higher silica content, but low-pH exposure still leaches soluble minerals, mobilizes iron, and produces surface dulling and discoloration over repeated contact.
Le liquide pénètre dans la pierre à travers les micropores et les pores de transition ; l'acide chevauche l'eau capillaire et transporte les ions dissous et les polluants profondément dans la matrice où l'oxydation peut convertir le fer piégé en oxyhydroxydes et lier le carbone organique, accélérant ainsi les croûtes sombres et les taches. Les finitions naturelles fendues ou fendues augmentent la surface exposée et les points de contact, augmentant le risque de gravure localisée et de pénétration plus profonde par rapport aux surfaces affûtées. Les épaisseurs de panneau standard (1,0 à 3,5 cm) n'arrêtent pas ces changements chimiques : les dommages commencent au niveau de la face exposée et nécessitent souvent une restauration ou un remplacement du panneau.
Nettoyants acides courants et ingrédients à éviter (pH, effet typique)
Many household and commercial products contain acids with predictable pH ranges and damage profiles; operators must treat these products as high-risk around pierre naturelle empilée. Below are the typical culprits and the effects you will see on calcite-bearing and iron-bearing materials.
- Hydrochloric (muriatic) acid — pH ~0–1: causes rapid dissolution of carbonates, severe surface etching, and harms metal fixings and grout.
- Sulfamic and strong descaler acids — pH ~1–2: remove scale but will dull and etch many pierres naturelles and can leach iron, producing staining.
- Acetic acid (household vinegar) and citric acid cleaners — pH ~2–3: cause slow but visible etching and surface haze on calcite-rich stones and can discolor some slates.
- Commercial lime/scale and toilet cleaners — often highly acidic; treat SDS as mandatory and avoid on any pierre naturelle surface.
Before using any product, read the Safety Data Sheet for active ingredient and pH, perform a 24–48 hour spot test on a hidden sample, and never apply unknown acidic products directly to stacked panels or pre-fabricated L-corners—those details protect warranty, appearance, and project timelines.
Safe cleaning and emergency mitigation protocol for stacked stone panels
Specify neutral pH (6–8) stone cleaners or diluted non-ionic detergent for routine maintenance and ban abrasives, strong alkalis, and acidic concentrates from maintenance specs. Follow manufacturer dilution rates, rinse thoroughly with potable water, and use low-pressure washing only when needed—keep pressure under ~1000 psi and use a wide-angle nozzle to avoid mechanical damage to cleft faces and joints.
- Immediate spill response: stop contact and flush the area with water for 10–15 minutes, then apply a sodium bicarbonate solution (approx. 50–100 g NaHCO3 per liter) to neutralize residual acid; scrub gently with a soft brush and rinse thoroughly.
- Séchage et inspection : prévoir 48 à 72 heures pour un séchage complet (plus longtemps en cas d'humidité élevée). Documentez les panneaux concernés et inspectez les joints Z/S et les coins en L pour détecter tout changement de couleur, perte de texture ou affaiblissement des bords.
- Assainissement : traiter le léger voile de surface avec un produit neutre nettoyant pour pierre; en cas de gravure profonde ou de perte minérale, faites appel à un spécialiste de la restauration de la pierre pour l'affûtage ou le panneau remplacement; traiter les taches de fer uniquement avec des agents chélateurs approuvés sous la direction d’un professionnel.
- Prévention du projet : écrivez les exigences relatives aux nettoyants neutres dans les spécifications de maintenance, exigez des mesures de protection après l'installation pour les joints de verrouillage pendant la construction et imposez une vérification visuelle des finitions avant expédition pour éviter les travaux correctifs sur site.
Pierre empilée de qualité supérieure pour la rentabilité

Step-by-Step: Removing Heavy Smoke Buildup Without Damaging Veins
Controlled soot extraction preserves vein hue and minimizes rework, protecting same-batch 95% color consistency for B2B shipments.
1. Pre-clean assessment and mapping of affected veins
Start by mapping soot density and vein geometry to set cleaning priorities and avoid uneven results. Confirm stone type (slate, quartzite, sandstone, marble) because porosity and chemical resistance determine which methods and concentrations you can use without altering pigments or iron oxides.
Run quick porosity checks — a water-drop test and a capillary absorption check — and record absorption time to estimate wetting dwell and poultice cycles. Perform a full patch test on a hidden panel that includes every planned step; document any color shifts, texture loss, or efflorescence before you proceed. For B2B orders, verify batch/vein origin and prioritize same-batch panels to preserve ~95% hue uniformity across repairs and shipments.
- Mark soot-density zones and vein locations on elevation drawings.
- Record stone ID, quarry vein, and batch number for traceability.
- Log water-drop and capillary absorption times to set dwell windows.
- Execute and photograph a multiplatform patch test (mechanical, surfactant, poultice).
2. Safety, containment and site controls
Protect workers and product quality with correct PPE and environmental controls: use NIOSH-rated respirators (N95 or P100 for particulates; add an organic-vapor cartridge when using solvents), chemical-resistant nitrile gloves, and eye protection. Erect dust curtains or tarps and run negative-air extraction during sanding or dry scraping to capture airborne soot and prevent cross-contamination of adjacent panels.
Manage waste as hazardous when carbon-laden residues concentrate oils or heavy metals: collect poultices and rinsate in sealed, labeled containers and follow local hazardous-waste rules. Avoid cleaning during freezing conditions or under direct sun; keep surface temperature between 5–25°C to control evaporation and chemical dwell. For B2B shipments, document pre- and post-clean conditions with photos and video as part of pre-shipment visual verification.
- PPE: N95/P100 respirator; add organic-vapor cartridge if solvents present; nitrile gloves; eye protection.
- Containment: dust curtains, negative-air extraction during dry work.
- Waste: seal and label poultices/rinsate per local hazardous-waste regulations.
- Contrôle environnemental : fonctionner entre 5 et 25 °C ; évitez le soleil direct ou le gel.
- Documentation : photographie/vidéo pour la vérification avant expédition et les enregistrements de garantie.
3. Élimination mécanique : techniques sèches et peu abrasives
Commencez par des méthodes sèches et à faible abrasion pour éliminer la suie de surface et protéger la texture des veines. Utilisez des brosses en nylon souple et un aspirateur industriel à faible aspiration équipé d'une cartouche HEPA (capture jusqu'à 0,3 microns) pour soulever le carbone libre sans enfoncer les particules plus profondément. N'utilisez jamais de brosses métalliques ou de meuleuses à grande vitesse sur les faces des veines ; ces outils abrasent les couches minérales et modifient la finition tactile.
Reserve micro-abrasion for isolated, tested patches only — use inert abrasive at very low pressure and retest appearance. If you must pressure rinse, keep pressure below 600 psi, fit a 25–40° wide-angle fan nozzle, use cold water only, and hold the nozzle 30–50 cm from the face to avoid driving water into panel joins. Shield Z-Shape/S-Shape male-female interlocks and L-corners to prevent water intrusion into panel joins and substrate.
- Dry first: soft nylon brushes + HEPA vacuum (0.3 µm capture).
- No metal tools: avoid wire brushes and high-speed grinders.
- Micro-abrasion: test patch with inert media at low pressure only.
- Power wash: <600 psi, 25–40° nozzle, cold water, 30–50 cm distance.
- Protégez les verrouillages et les coins en L pour empêcher l’eau de pénétrer dans les joints.
4. Sélection et application de tensioactifs à faible pH/neutres
Sélectionnez des tensioactifs non ioniques ou à pH neutre (pH cible 7 à 9) pour la phase humide initiale afin d'éviter de graver des veines ou de mobiliser des oxydes de fer. Commencez avec une dilution de travail conservatrice – environ 1:50 à 1:100 de nettoyant: eau pour la suie légère à moyenne – et augmentez la concentration seulement après un test cutané réussi qui ne montre aucune perte de pigment ni ramollissement de la surface.
Pre-wet the stone, apply the solution with low-pressure spray or a soft brush, and agitate gently to move soot from pore mouths. Keep contact 5–10 minutes, then rinse with low-pressure water and blot excess moisture. Repeat the rinse/blot cycle up to three times before escalating to chemical poultice. Never use acidic cleaners on calcareous stones (marble, some limestones), and avoid strong alkalis on oxidized crusts that bind carbon.
- Cleaner choice: non-ionic or neutral pH (7–9).
- Dilution: start 1:50–1:100; escalate only after testing.
- Apply: pre-wet, low-pressure spray or soft brush, agitate gently, 5–10 minute contact.
- Rinse: low-pressure rinse, blot; repeat up to three cycles before poulticing.
- Compatibility: avoid acids on calcareous stones; avoid strong alkalis on oxidized crusts.
5. Poultice design and stepwise oxidative extraction for deep-set carbon
Use poultices when mechanical and surfactant stages fail to pull soot from micropores. For oxidized carbon, design an oxidative poultice using hydrogen peroxide (3–12%) as the oxidizer mixed with an absorbent medium such as kaolin, diatomaceous earth, or cellulose. For hydrophobic tars, use a solvent-assisted poultice formulated and tested for the stone type.
Mix absorbent powder with cleaning solution to a peanut-butter consistency, roughly 2:1 powder:liquid by volume, and adjust by test. Apply 6–12 mm thick and extend 20–50 mm beyond the stain. Cover with plastic to slow evaporation and control dwell. Allow 24–72 hours per cycle, remove with a plastic scraper, perform a neutral rinse, and repeat until the poultice no longer transfers soot. Neutralize alkaline residues with a 1–2% acetic acid rinse, followed by a full water flush. Test higher peroxide strengths on an inconspicuous vein first — stronger oxidizers can lighten pigments or alter iron oxides.
- Poultice types: oxidative (H2O2 3–12% + kaolin/diatomaceous cellulose) or solvent-assisted for tars.
- Mix: peanut-butter consistency; ~2:1 powder:liquid by volume, adjust by test.
- Apply: 6–12 mm thickness, extend 20–50 mm beyond stain, cover with plastic.
- Dwell: 24–72 hours per cycle; remove with plastic scraper; repeat until no visible transfer.
- Neutralize: 1–2% acetic acid rinse if alkaline residues present; then full water rinse.
- Caution: test higher peroxide on inconspicuous vein to avoid pigment/lightening risk.
6. Verification, drying, repair and preventive finishing
Verify results with repeat water-absorption tests and consistent before/after photography under the same lighting to confirm visual match against the pre-clean baseline. Allow natural drying for 7–14 days depending on slab thickness and ambient humidity before any sealing, inspection, or repair work. Only perform micro-void fills or color-matched mineral epoxy repairs after the stone reaches full dryness.
Choose breathable penetrating sealers (silane/siloxane) to repel water and reduce re-adsorption of carbon while maintaining vapor transit; typical coverage runs 5–10 m²/L and you should test coverage on a sample. Avoid film-forming sealers that trap moisture and can force soot re-emergence. Inspect after the first wetting cycle and at 30 days to confirm no deeper-soot migration. Archive batch/vein IDs, cleaning methods, chemical concentrations, and time-stamped images for warranty, traceability, and pre-shipment verification.
- Verification: repeat water absorption and compare photos under consistent lighting.
- Drying: allow 7–14 days before sealing or repairs.
- Repairs: fill micro-voids with color-matched mineral epoxy only after full drying.
- Sealing: use breathable silane/siloxane; test coverage (≈5–10 m²/L); avoid film-formers.
- Monitoring: inspect after first wetting cycle and at 30 days for re-emergence.
- Record keeping: save batch/vein IDs, methods, concentrations, and before/after media for B2B traceability.
How to Refresh the Stone’s Natural Luster Without Re-installing?
Preserve finish and avoid reinstallation costs by extracting embedded carbon, choosing breathable sealers, and following a documented, scheduled maintenance routine.
Surface Cleaning: Dry and Low‑Impact Wet Methods
Work with the material spec: pierre naturelle empilée (slate or quartzite) in standard panels 150x600mm or 150x550mm and thicknesses from 1.0 to 3.5 cm. Start with low-impact tools to protect natural cleft textures and CNC diamond-cut edges: use a soft-bristle brush or a HEPA vacuum to remove loose carbon and dust, and never use metal scrapers on interlocking male/female joints or precision edges.
For light soiling, apply a pH-neutral stone cleaner per the manufacturer’s directions, agitate with a soft brush, then rinse with low-pressure water (keep spray below ~600 psi) at a 30–45° angle to avoid undercutting thin veneer panels. For interior touch-ups, wipe with a damp microfiber cloth or a low-concentration isopropyl solution to restore sheen without leaving a film.
- Tools: soft-bristle brush, HEPA-filter vacuum (99.97% at 0.3 μm), microfiber cloths, low-pressure pump sprayer.
- Avoid: metal scrapers, metal-bristle brushes, high-pressure washers on indoor installations.
Deep Cleaning and Extraction Techniques for Porous Pores
Recognize why soot embeds: micropores and Van der Waals forces draw carbon and dust into the stone matrix, and freeze-thaw cycles can enlarge pore networks, increasing retention. Simple surface washing rarely extracts particles from those pores, so plan extraction that pulls contaminants out of the matrix rather than just smearing them across the surface.
Use clay-based poultices or absorbent composites (neutral detergent combined with an absorbent matrix) to draw embedded carbon out—apply a poultice, cover until fully dry, lift it off, and repeat as needed. Choose steam or poultice extraction over aggressive acids or high-alkaline etchants, and always trial on a same-batch sample panel (Pierre de source supérieure specifies same-batch quarry consistency to avoid unexpected color shifts). When you clean interlocking Z/S shapes and L-corners, work top-down and use low-pressure suction or soft brushes to avoid forcing water behind panels or into the substrate.
- Extraction methods: clay poultice, absorbent composite, or controlled steam extraction.
- Test protocol: always test on a same-batch sample panel to confirm appearance and no color change.
- Joint care: clean top-down; use low-pressure suction to avoid water migration behind interlocks.
Breathable Penetrating Sealers and a Practical Maintenance Schedule
Select a breathable penetrating sealer—silane/siloxane or siliconate types—that suits 100% pierre naturelle. These chemistries reduce pore adsorption while preserving UV stability and freeze-thaw resistance for Gulf and Northern climates. Apply with a low-pressure pump sprayer or brush and saturate the surface to ensure full penetration on 1–3.5 cm panels; allow the manufacturer’s recommended cure time and verify on a same-quarry sample to confirm no color shift or wetting change.
Set a maintenance cadence: inspect exposed walls every 12–24 months for loss of repellency and reapply or perform spot treatments on high-traffic zones, seams, interlocks, and L‑corners rather than resealing the entire façade prematurely. Keep field records: photograph or video every wall before and after treatment and link records to the installed batch number to monitor long-term performance and protect project consistency.
- Sealer selection: breathable silane/siloxane or siliconate conçu pour la pierre naturelle and UV exposure.
- Application: low-pressure sprayer or brush; saturate for full penetration on 1–3.5 cm panels; trial on same-batch sample.
- Schedule: inspect every 12–24 months; reseal high-wear areas or spot-treat; typical reseal window for pierre empilée ranges 1–3 years depending on exposure.
- Recordkeeping: capture pre/post photos and tie them to the installed batch (same-batch quarry consistency) for warranty and lifecycle analysis.
Preventative Care: Why Vacuuming with a HEPA Filter Is Critical?
HEPA vacuuming prevents submicron soot and dust from lodging in stone pores, reducing long-term staining and lowering restoration costs.
Pore-scale capture mechanisms in natural stacked stone
Pierre naturelle empilée contains micropores, transitional pores and intergranular gaps that create a large internal surface area where particles adhere through Van der Waals forces and hydrogen bonding. Water migration and capillary flow carry suspended carbon and fine dust into those pore networks; repeated freeze–thaw cycles enlarge pores over time and raise long-term retention of contaminants.
Surface oxidation produces black weathering crusts rich in organic carbon and iron oxyhydroxides that chemically bind soot, so once a crust forms you must expect more aggressive restoration. Inspect exposed façades after heavy pollution events and after seasonal freeze–thaw cycles, and remove loose surface particulates before water transport or oxidation locks them into the stone.
How a sealed HEPA vacuum extracts and contains submicron carbon/dust
Specify HEPA H13 (≥99.95% at MPPS) or H14 (≥99.995% at MPPS) filters to capture particles in the 0.1–0.3 µm range that stick to pore surfaces. Use a fully sealed filtration system with a gasketed filter chamber and a HEPA post-filter so captured particulates cannot re-enter the air stream during operation.
Choose units with cyclonic pre-separation to remove coarse dust before it loads the primary HEPA and to preserve airflow and filter life. Mobilize dust with a soft-bristled brush attachment and apply variable suction: start low to dislodge particles, then increase suction to extract lodged dust without abrading the cleft face.
Vacuuming specifications and stepwise protocol for stacked stone panels
Work to the panel specs and use non-abrasive tools. Standard panels measure 150 × 600 mm (150 × 550 mm option), with thicknesses typically 10–25 mm and premium pieces up to 35 mm. Expect flat-panel weight around 30–40 kg/m² and rough faces near 55 kg/m²; protect thin faces and interlocking profiles when you clean.
- Equipment spec: professional-grade sealed HEPA H13/H14 vacuum with cyclonic pre-separator, adjustable suction, soft-brush set and crevice tools.
- Operational tools: soft-bristled brush, crevice tool, variable-suction control, and a sealed waste container or disposable bag for material disposal.
Follow a stepwise protocol to protect the stone and interlocks. Avoid high-pressure washing that drives particles deeper into pores; reserve wet methods only for persistent residues and always test an inconspicuous area first.
- Step 1 — Dry vacuum along bed lines and vertical joints using a soft-brush attachment to remove loose surface dust.
- Step 2 — Use the crevice tool on Z/S interlocks and L-corners to extract lodged dust from male‑female connections.
- Step 3 — Avoid high-pressure washing; escalate to targeted wet cleaning only where dry methods leave residues.
- Step 4 — If residues persist, apply a pH-neutral, stone‑safe cleaner and agitate with a soft brush, then dry thoroughly.
Set service intervals and monitor filter performance to protect both surfaces and staff health. Adjust frequency by exposure and location rather than a fixed calendar.
- Indoor, low-traffic: inspect and vacuum quarterly.
- Outdoor or high-pollution façades: inspect and vacuum every 1–3 months.
- Monitor filter differential pressure; replace the HEPA element per manufacturer guidance or when airflow drops—typical H13 replacement window: 6–12 months under regular use.
The Impact of Sealing: How Protective Layers Repel Carbon Ash?
Proper sealing cuts carbon-ash ingress, reduces cleaning cycles, and preserves Top Source Stone panel performance and margins.
Sealing mechanisms vs pore adsorption: film-forming and penetrating sealer action
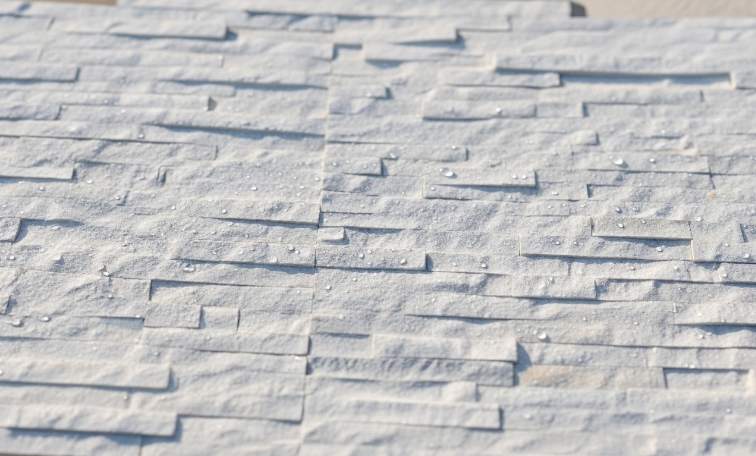
Penetrating sealers (silane, siloxane, siloxane-alkyl) work inside the pore network: they react with pore walls, increase surface hydrophobicity and chemically reduce capillary uptake. You can measure that effect as an increase in static contact angle (target >90° for hydrophobic behavior), a measurable reduction in water absorption per ASTM C97/C170, and a lower capillary-rise rate on lab strips. Typical active penetration ranges between 1 and 10 mm on natural stone; confirm field performance with a cross-section dye test before large-scale application.
Film-formers (acrylics, urethanes) create an external barrier that blocks airborne particles from contacting the mineral surface. Film-formers deliver stronger surface protection against dry carbon ash but change surface appearance and can trap moisture if you apply them to damp or untreated substrates. Choose penetrants when breathability and minimal color change matter; choose film-formers when you need a surface-level shield and accept a potential wet-look or texture change.
- Measurable targets: static contact angle >90°; reduced ASTM C97/C170 absorption; lower capillary-rise rate.
- Penetration: 1–10 mm (verify with cross-section dye test).
- Coverage for penetrants: ~4–12 m²/L on pierre naturelle empilée (porosity-dependent; account for 1–2 coats).
Surface preparation and application protocol for natural stacked stone panels
Prepare panels by removing loose debris and soot with a soft brush, then degrease with a pH-neutral cleaner. If efflorescence exists, perform a controlled acid wash (muriatic diluted 1:10), neutralize, and rinse. Allow the stone to dry 48–72 hours depending on ambient conditions; do not seal until the substrate reads dry to touch. Run a quick water-drop absorption test or a small ASTM C97 patch to establish baseline uptake and estimate coverage and coat count for the job.
Apply within 5–35°C ambient and <85% relative humidity using a low-pressure sprayer, roller or brush to ensure even penetration; back-coat L-corners and interlocking edges on Z/S-shaped panels to protect male/female joints. For penetrants use one coat for moderate exposure and two coats for high exposure sites. For film-formers apply one to two coats with flash times of 2–12 hours and expect full cure in 24–72 hours. Protect sealed panels from rain during the cure window and use Pierre de source supérieure pre-shipment visual verification for B2B orders before crate dispatch.
- Dry time before sealing: 48–72 hours (site-dependent).
- Application window: 5–35°C; RH <85%.
- Tools: low-pressure sprayer, roller, or brush; back-coat interlocks and L-corners.
- Couches : pénétrant 1 à 2 couches ; filmogène 1 à 2 couches avec un flash de 2 à 12 heures et un durcissement de 24 à 72 heures.
Performances, surveillance et compatibilité à long terme avec les panneaux Top Source Stone
Inspecter chaque année les surfaces scellées dans des conditions exposées ; attendez-vous à une nouvelle application tous les 3 à 7 ans en fonction de la composition chimique du scellant, de la gravité de l'exposition et de la salinité ou de l'humidité locale. Utilisez de simples tests de gouttes d'eau sur place pour vérifier la répulsion ; pour R&D ou vérification formelle, mesurez l'angle de contact statique et effectuez des tests périodiques d'absorption d'eau ASTM C97 sur des échantillons de service pour quantifier la perte de performance. Documentez les résultats et associez-les aux fenêtres de maintenance pour protéger les marges du projet et les obligations de garantie.
Nettoyer la pierre scellée avec un lavage basse pression (<1 000 psi) et détergents au pH neutre ; évitez les nettoyants agressifs qui dépouillent les imprégnateurs ou endommagent les bords découpés au diamant CNC et les verrouillages sur les panneaux en forme de Z/S. Pour les projets côtiers ou dans le Golfe, sélectionnez des pénétrants respirants pour préserver la résistance au gel-dégel et la tolérance au sel ; si vous choisissez un filmogène, incluez une maquette qui spécifie un aspect mouillé ou une finition naturelle afin que les parties prenantes approuvent tout changement de couleur. Exigez des EPI (gants en nitrile, protection oculaire, respirateur pour les systèmes à solvants) et joignez des documents SDS/MDS à jour à chaque expédition B2B afin de respecter les réglementations 2026 sur les COV et les matières dangereuses.
- Intervalle d'entretien : inspecter chaque année ; refermer tous les 3 à 7 ans.
- Contrôles sur le terrain : test à la goutte d'eau ; angle de contact pour R&D; Retests ASTM C97 sur des échantillons de service.
- Nettoyage : lavage basse pression <1 000 livres par pouce carré ; Détergents au pH neutre uniquement.
- Sécurité : gants en nitrile, protection oculaire, respirateur pour systèmes à solvants ; fournir des FDS/MSDS avec les commandes B2B.
Conclusion
Suite au la méthode de nettoyage étape par étape préserve la pierre texture et veines naturelles tout en éliminant le carbone et la suie sans graver ni décolorer. Une technique appropriée protège également les occupants et l'équipement, est conforme aux directives de sécurité (y compris l'OSHA le cas échéant) et prolonge la durée de vie de installations de pierres empilées.
Inspectez votre foyer à la recherche de traces de suie tenaces et testez une petite zone peu visible avant un nettoyage complet. Pour obtenir l'assistance du revendeur, les spécifications techniques ou les échantillons correspondant à l'usine, contactez votre représentant commercial Top Source Stone ou votre distributeur agréé.
Foire aux questions
Quelle est la meilleure façon de nettoyer la suie de la pierre texturée ?
Texturé pierre naturelle piège la suie car les particules de carbone adhèrent dans les micropores via les forces de Van der Waals et les liaisons hydrogène et en se logeant dans la structure des pores de la pierre ; les intempéries et la croûte superficielle oxydée (oxyhydroxydes de fer et silice) retiennent davantage la suie. Un nettoyage efficace doit donc atteindre et extraire les particules du réseau de pores et traiter toute croûte oxydée : un simple essuyage de la surface laisse généralement derrière lui le carbone incrusté. Soyez prudent avec les méthodes qui forcent l’eau à pénétrer dans les pores (elles peuvent enfoncer les particules plus profondément) ; consultez un professionnel de l'entretien des pierres pour connaître les cataplasmes ou les approches de nettoyage conçues pour mobiliser le carbone adsorbé par les pores.
Puis-je utiliser du vinaigre pour nettoyer ma cheminée en pierre naturelle ?
La recherche n’évalue pas spécifiquement le vinaigre. Pierre naturelle les surfaces développent des croûtes oxydées chimiquement réactives et lient le carbone organique via la chimie de surface ; les nettoyants acides comme le vinaigre peuvent altérer ces couches superficielles ou la chimie minérale de la surface. Étant donné que RESEARCH_CONTENT met l'accent sur la chimie de surface réactive et l'adsorption des pores, évitez les traitements acides non testés sur pierre naturelle et consultez les conseils spécifiques à la pierre ou un nettoyant professionnel avant d'utiliser du vinaigre.
À quelle fréquence dois-je sceller les pierres empilées de mon foyer ?
RESEARCH_CONTENT relie l'élargissement des pores (gel-dégel et altération) et la migration de l'eau avec une absorption accrue des particules. Le scellement vise à limiter le mouvement de l'eau dans les pores et à ralentir ce processus. La fréquence doit donc être déterminée par l'exposition, les signes de pénétration de l'eau et les intempéries plutôt que par un intervalle fixe. Inspectez le pierre empilée for darkening, increased absorption, or surface crusting; reapply a compatible sealer when the stone no longer repels water—no specific re‑seal interval is given in the research.
How to remove smoke smell from a stone wall?
Smoke odor is caused by organic carbon and soot adsorbed in the stone pore network and by oxidized surface crusts that trap organics. Removing odor therefore requires extraction of the pore-trapped organics and remediation of the oxidized crust, plus drying to stop ongoing water-mediated transport of odorous particles. The research implies that surface-only deodorizing will be insufficient—use cleaning strategies that target pore-embedded organics (professional pore-extracting treatments) and address moisture sources.
Puis-je laver sous pression ma cheminée intérieure en pierre naturelle ?
Le lavage sous pression entraîne de grands volumes d’eau et de pression dans le réseau de pores ; selon la recherche, la migration de l’eau peut transporter les particules plus profondément et le gel-dégel peut élargir les pores. Pour un intérieur naturel cheminée en pierre, le lavage à haute pression risque de pousser la suie et le carbone plus loin dans la pierre et d'altérer la croûte superficielle réactive. Le RESEARCH_CONTENT recommande donc la prudence : évitez le lavage sous pression qui force l'eau à pénétrer dans les pores et privilégiez les méthodes de nettoyage qui extraient le carbone adsorbé par les pores sans introduire de pression d'eau excessive.
