L'adesione alle Specifiche Speciali sui Camini costituisce la principale salvaguardia contro gli incendi strutturali e le responsabilità legali associate a lavori di muratura non conformi. Sebbene i rivestimenti in pietra standard possano sembrare identici alle alternative resistenti al calore, la fisica del trasferimento termico significa che l'utilizzo di materiali sbagliati porta al fallimento dell'adesione o alla combustione dei montanti della parete dietro la pietra. Gli appaltatori che ignorano specifici protocolli di resistenza al calore rischiano il fallimento delle ispezioni e delle rilavorazioni che erodono i margini di profitto.
Questo guida funge da norma tecnica per la posa della pietra su strutture esistenti in mattoni o metallo mantenendo rigorosi codici di autorizzazione ai combustibili. Analizziamo la necessità di adesivi ad alta flessibilità per gestire cicli termici costanti e fornire i requisiti per il montaggio di espositori pesanti su pietre irregolari superfici. Ogni sezione si concentra sulla finitura dei bordi grezzi e sui motivi di sicurezza per cui un focolare rimane una componente obbligatoria dei progetti dal pavimento al soffitto.
Perché i caminetti richiedono una classe diversa di installazione in pietra?
Installazione della pietra su un camino è un compito ingegneristico specializzato in cui la dinamica termica determina le prestazioni del materiale più che l'estetica.
Standard rivestimento delle pareti le tecniche falliscono se applicate ai bordi dei camini perché ignorano le realtà fisiche del ciclo termico. UN il camino è un motore ad alto calore che costringe i materiali da costruzione ad espandersi e contrarsi rapidamente. Se la posa non tiene conto di questi movimenti, il legame meccanico tra la pietra e il supporto finirà per cedere, causando delaminazione o fessurazione dei pannelli.
Gestione dell'espansione e della contrazione termica
I bordi del caminetto subiscono notevoli sbalzi di temperatura che causano l'espansione e la contrazione dei materiali da costruzione a velocità diverse. Pannelli in pietra naturale mantenere l'integrità strutturale sotto questi cicli di calore molto meglio dei compositi fabbricati o “falso” pietre, che spesso contengono resine che si degradano o rilasciano gas quando riscaldate.
- Il ciclo termico sottopone a stress costante il legame tra la pietra e il substrato, richiedendo materiali in grado di assorbire piccoli spostamenti.
- Pietra naturale resiste intrinsecamente alla deformazione associata alle unità di riscaldamento ad alta efficienza standard 2026.
- Raccomandiamo sistemi di supporto specializzati, come pannelli di cemento armato, per evitare che la pietra si sposti o si spezzi nel tempo.
Requisiti adesivi per ambienti ad alto calore
Le malte standard e i set sottili spesso diventano fragili e si guastano sotto il calore intenso di un focolare. Per un legame permanente, gli installatori devono passare ad agenti leganti ad alte prestazioni. Diamo priorità agli adesivi in resina epossidica ad alta resistenza specificatamente formulati per resistere a temperature elevate senza perdere aderenza.
Gli standard di sicurezza nel 2026 richiedono una resistenza minima al taglio di 50 libbre per pollice quadrato. Ciò garantisce il la pietra rimane ancorata anche come il muro sottostante si riscalda. Inoltre, le pratiche di polimerizzazione resistenti al calore sono essenziali; accendere il caminetto troppo presto dopo l'installazione può rendere fragile l'adesivo, provocando un guasto prematuro.
Preparazione del supporto e carico
Mentre è stata progettata la pietra naturale impilata per l’efficienza, il contesto ad alto calore richiede una base più robusta rispetto a un progetto standard di cartongesso. Pannelli in pietra naturale con un peso compreso tra 8 e 13 libbre per piede quadrato richiedono un substrato che non si fletta quando il camino si riscalda.
- Installare pannelli di cemento o listelli metallici sulle superfici esistenti per fornire una base stabile al calore che prevenga cedimenti dei legami legati all'umidità.
- La corretta pulizia della superficie non è negoziabile; fuliggine, polvere o vecchie pitture comprometteranno il legame meccanico della pietra.
- L'uso di un rivestimento antigraffio su superfici in muratura crea il necessario “chiave” affinché l'adesivo possa bloccarsi.
Standard sui materiali non combustibili
Utilizzando il 100% Pietra naturale offre un significativo vantaggio in termini di sicurezza rispettando le severe norme antincendio per i rivestimenti dei caminetti. A differenza dell'artificiale “colto” pietre, la vera pietra impilata di Top Source Stone non sbiadisce né scolorisce a causa dell'esposizione ai raggi UV o del calore. Pietra naturale di cava è intrinsecamente non combustibile e non emette fumi tossici se esposto a calore elevato.
Il nostro sistema di pannelli a forma di Z ad incastro fornisce un ulteriore livello di protezione. Questo design con taglio CNC di precisione elimina le linee di malta visibili che potrebbero altrimenti diventare punti di penetrazione del calore o accumulo di fuliggine. Utilizzando un sistema di connessione maschio-femmina, l'installazione mimetizza efficacemente il supporto, fornendo una finitura architettonica continua, sicura quanto visivamente suggestiva.
Il tuo Surround è sicuro? Rispetto dei codici di autorizzazione ai combustibili
La sicurezza del rivestimento del caminetto dipende dalla comprensione dei profili specifici di dissipazione del calore del focolare sottostante, poiché le unità in muratura costruite in loco e quelle progettate in fabbrica operano secondo mandati normativi completamente diversi.
Distinzione tra muratura e requisiti di fabbrica
I regolamenti edilizi del 2026 classificano i caminetti in due gruppi distinti, ciascuno con mandati di autorizzazione unici. Gli standard nazionali distinguono tra unità in muratura costruite in loco e sistemi di fabbrica preingegnerizzati. I caminetti in muratura richiedono in genere da 2 a 4 pollici di spazio da tutti i componenti dell’intelaiatura per impedire il trasferimento di calore alla struttura della casa. Gli appaltatori devono verificare il tipo di camino prima di installare la pietra accatastata per garantire che il substrato soddisfi i protocolli di sicurezza antincendio locali. Mentre Pietra naturale di per sé non è combustibile, i materiali dietro di esso, come montanti di legno o compensato, rimangono vulnerabili alla pirolisi se gli spazi vuoti vengono ignorati.
| Categoria Camino | Liquidazione standard | Regolamento primario |
|---|---|---|
| Muratura costruita sul posto | 2″ a 4″ da Inquadratura | NFPA 211/Codice locale |
| Costruito in fabbrica (prefabbricato) | 0″ a 1″ (Specifico dell'unità) | Elenco UL 127 |
| Mantelli combustibili | 6″ alle 12″ Divario verticale | Standard IRC/CSA |
Distanze standard per strutture in legno e rivestimenti combustibili
Le norme di sicurezza impediscono il trasferimento di calore all'ossatura strutturale dell'abitazione attraverso specifiche regole di distanziamento. I materiali combustibili devono rimanere ad almeno 6-12 pollici di distanza dall'apertura del focolare, a seconda della profondità di proiezione del materiale di finitura. Il rivestimento può appoggiarsi alle superfici in muratura solo se lo spessore della pietra o del mattone supera i 12 pollici nel punto di contatto. I professionisti dovrebbero utilizzare queste linee guida per evitare incendi strutturali causati dall’esposizione al calore a lungo termine:
- Mantenere una regola di proiezione di 1/8 di pollice per pollice per mensole e finiture.
- Installa la pietra su un pannello di cemento non combustibile anziché su gesso per fornire una barriera termica superiore.
- Utilizzare listelli metallici e un rivestimento antigraffio durante la transizione dalla muratura alle pareti incorniciate per garantire l'integrità del legame.
Conformità agli standard di temperatura superficiale UL 127
I caminetti costruiti in fabbrica sono sottoposti a test rigorosi per determinare quanto vicino possono trovarsi le pareti combustibili all'unità. I sistemi testati secondo gli standard UL 127 devono mantenere la temperatura della superficie esterna inferiore a 175°F sopra l'aria ambiente. Gli installatori dovrebbero verificare la targhetta dati del produttore per informazioni specifiche “gioco zero” valutazioni prima di finire il muro pannelli di pietra impilati. Pietra naturale funziona come un dissipatore di calore, ma non consente la riduzione degli spazi d'aria obbligatori dietro il gruppo della parete. Dimenticare questo aspetto tecnico può portare al calore intrappolato che compromette l’efficienza di ventilazione o la stabilità strutturale del caminetto.
Calcolo dell'altezza del mantello e dei limiti di proiezione
I mantelli agiscono come trappole di calore, richiedendo un posizionamento verticale preciso per evitare rischi di accensione. I codici limitano la distanza che una mensola può sporgere dal muro in base alla sua altezza sopra il focolare. I rivestimenti profondi richiedono punti di montaggio più alti per consentire al calore di dissiparsi naturalmente nella stanza. Durante l'utilizzo rivestimento in pietra naturale attraverso l'intera facciata aiuta a proteggere il muro, la mensola stessa rimane soggetta alle regole di autorizzazione al combustibile. L'utilizzo di una pistola termica a infrarossi durante i primi incendi consente agli installatori di verificare che il calcolo il viso e il mantello rimangano entro temperature operative sicure.
Pannelli in pietra naturale durevoli e di rapida installazione

Come gestire l'installazione della pietra su rivestimenti esistenti in metallo o mattoni?
Incollaggio diretto naturale pietra ai substrati preesistenti richiede neutralizzando i contaminanti esistenti e stabilendo un profilo meccanico per prevenire la delaminazione durante il ciclo termico.
Preparazione della superficie per supporti in muratura e mattoni
Trasformare un obsoleto camino in mattoni richiede la rimozione di tutti i contaminanti per garantire che i nuovi pannelli in pietra raggiungano un legame meccanico permanente. Fuliggine, cera e creosoto agiscono come spezza-legami; puliamo queste superfici utilizzando una spazzola metallica e uno sgrassatore a pH neutro prima di procedere. Se il mattone è verniciato, la malta non si attaccherà alla superficie. Usiamo una smerigliatrice per graffiare o incidere la vernice, esponendo la muratura porosa sottostante.
Una volta che la superficie è pulita e profilata, applicare un agente legante per calcestruzzo o un sottile strato antigraffio di materiale sottile modificato con polimero. Questo passaggio livella le superfici irregolari dei mattoni e fornisce un substrato coerente per i nostri pannelli a Z ad incastro. Lasciare indurire questo strato per 24-48 ore impedisce al mattone di estrarre l'umidità dallo strato adesivo finale troppo rapidamente.
| Tipo di substrato | Metodo di preparazione primaria | Agente legante consigliato |
|---|---|---|
| Mattone poroso/nudo | Pulizia con spazzola metallica & sgrassante | Thin-set modificato con polimero |
| Muratura dipinta | Rettifica meccanica per esporre il 90% del mattone | Agente per calcestruzzo ad alta adesione |
| Cornice in metallo | Levigatura grana 80 & salvietta con solvente | Resina epossidica bicomponente resistente al calore |
Strategie di adesione per bordi metallici lisci
I bordi metallici si espandono e si contraggono a velocità significativamente diverse rispetto a Pietra naturale. Questo movimento termico richiede adesivi specializzati che mantengano la flessibilità sotto calore. Le malte standard spesso falliscono su superfici metalliche non porose, provocando la delaminazione della pietra. Utilizziamo adesivi epossidici ad alta resistenza o malte modificate specializzate progettate specificamente per applicazioni metallo-pietra.
La preparazione prevede la levigatura della superficie metallica con carta vetrata a grana 80 per creare un profilo fisico. Ciò consente all'adesivo di aderire meccanicamente al rivestimento anziché affidarsi esclusivamente all'aspirazione chimica. Prima dell'installazione, verificare che il telaio metallico sia strutturalmente in grado di sostenere il peso naturale di 8-13 libbre per piede quadrato pannelli in pietra senza cedimenti o staccamenti dal muro inquadratura.
Integrazione di pannelli di supporto in cemento per la stabilità strutturale
Per progetti in cui la superficie originale è troppo danneggiata, irregolare o fortemente verniciata, l'installazione di un nuovo substrato fornisce la base più affidabile. Fissare i pannelli di supporto in cemento da 1/2 pollice sulla cornice esistente. Utilizzare tasselli per muratura per mattoni o viti autofilettanti per strutture metalliche, assicurandosi che la tavola sia a piombo e piatta.
- Sigillare tutte le cuciture del pannello di supporto con nastro in rete di fibra di vetro resistente agli alcali e set sottile per creare un piano rigido e unificato.
- Utilizza la nuova superficie piana per allineare perfettamente 6" x 24" pannelli in pietra, garantendo transizioni senza soluzione di continuità attraverso la facciata del camino.
- Utilizzare angoli a L prefabbricati abbinati per avvolgere i ritorni del camino, mantenendo la consistenza della struttura.
Conformità al codice e standard di sicurezza termica
L'installazione deve rispettare le norme di sicurezza aggiornate del 2026 relative ai materiali non combustibili e alle distanze del focolare. Verificare che lo spessore della pietra non ostacoli il funzionamento delle prese d'aria o delle porte in vetro sui caminetti metallici a distanza zero. L'ostruzione di queste prese d'aria può causare il surriscaldamento dell'unità, danneggiando potenzialmente i componenti interni o la struttura della parete circostante.
Maintain required distances between the firebox opening and any surrounding combustible materials as dictated by local building codes. Seal the transition between the stone edge and the firebox with high-temperature silicone or fire-rated caulk. This prevents heat bypass into the wall cavity and ensures the entire installation meets current UL 127 standards for factory-built systems.

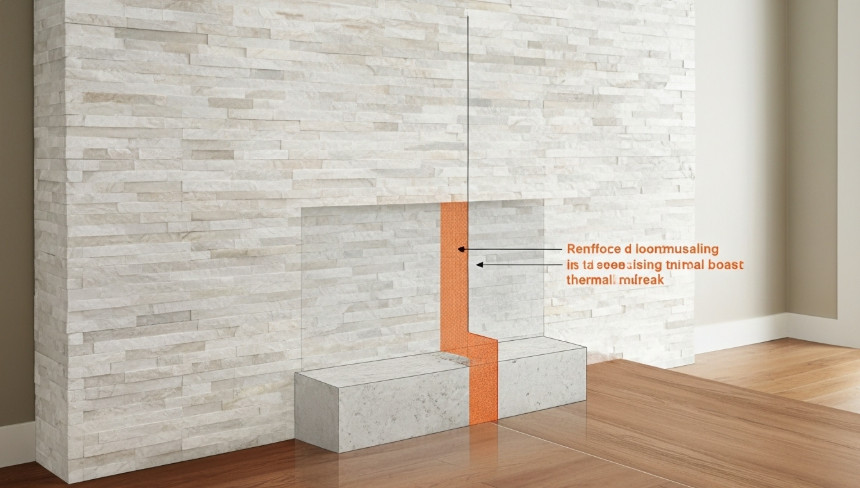
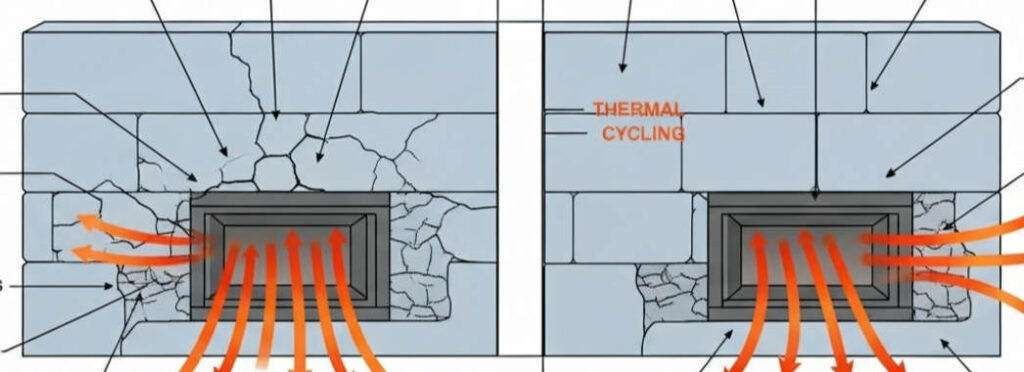
Thermal Cycling: Why Only High-Flex Adhesives Should Be Used?
Thermal cycling creates mechanical shear stress at the bond line; high-flex adhesives serve as a kinetic buffer that prevents pannelli in pietra naturale from delaminating during rapid temperature fluctuations.
Managing Differential Thermal Expansion Rates
Pietra naturale e i substrati di supporto cementizi possiedono diversi coefficienti di dilatazione termica (CTE). Quando un caminetto raggiunge la temperatura di esercizio, il pietra e muro espandersi a tassi e velocità contrastanti. Le malte rigide e tradizionali non hanno l'elasticità necessaria per compensare questo disadattamento, che si traduce in uno stress di taglio interno. Questa pressione alla fine costringe il pietra a “pop” o provoca l'intero pannello deformarsi poiché i materiali faticano a muoversi in modo indipendente.
| Classe adesiva | Flessibilità termica | Rischio di fallimento primario |
|---|---|---|
| Malta di tipo S | Basso (rigido) | Screpolature fragili sotto il calore rapido |
| Thin-set modificato con polimero | Moderare | Affaticamento del legame per oltre 5 anni |
| Resine epossidiche modificate | Alto (elastico) | Minimo/Trascurabile |
Modern high-flex adhesives act as a decouple layer that absorbs the kinetic energy generated by CTE mismatch. By allowing for micro-movements without breaking the bond, these adhesives ensure that 100% natural minerals—whether slate or quartzite—remain structurally integrated with the substrate regardless of the heat intensity. Rigid adhesives fail 2026 thermal shock tests because they cannot deform enough to accommodate this substrate movement.
Preserving Bond Integrity Across Temperature Extremes
Adhesives must maintain a stable glass transition temperature to remain effective. In high-efficiency gas fireplaces or outdoor installations, the bonding agent faces both freezing ambient temperatures and intense localized heat. Modern modified epoxies provide the necessary elasticity without sacrificing the high-strength grip required for heavy, 13-pound-per-square-foot panels. Standard mortars often suffer from embrittlement when subjected to these repeated cycles, losing their adhesive properties over time.
The chemical composition of these advanced adhesives ensures they do not soften or lose adhesion when temperatures rise near the firebox opening. These formulations resist the degradation common in lower-grade materials, ensuring that the stone facade retains its architectural integrity even under direct UV exposure or high salinity in coastal regions.
Preventing Delamination in High-Stress Applications
Delamination represents the primary cause of failure in installazioni di caminetti in pietra. It is rarely a failure of the stone itself but rather a failure of the bond line due to long-term thermal fatigue. Architects and professional installers now favor silicones or modified epoxies that prioritize thermal shock resistance to meet 2026 building standards. These resins ensure a permanent bond between the stone veneer and the panel substrate, even under constant environmental pressure.
Advanced application-driven strategies focus on long-term durability. By selecting adhesives that can withstand the rigors of thermal cycling, we eliminate the risk of stones falling or joints opening. This engineering-first approach protects the investment in premium nature-cut materials, guaranteeing that the aesthetic finish remains flawless for the life of the structure.
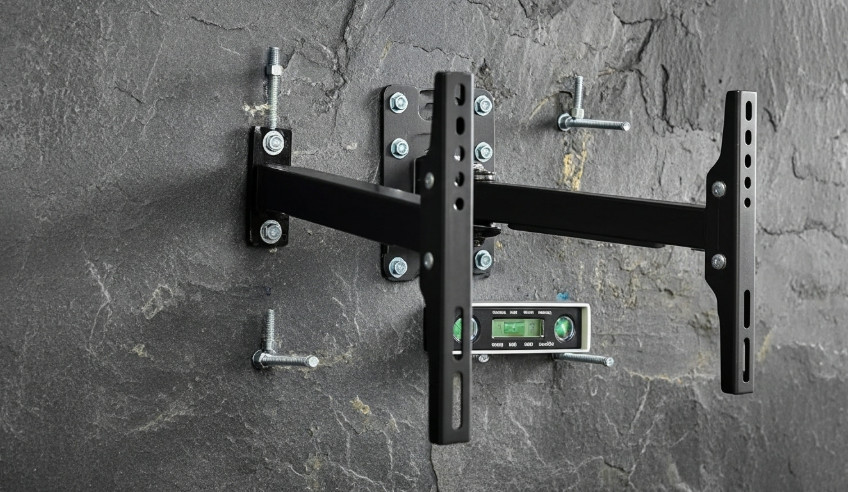
Can You Safely Drill and Mount a Heavy TV Over a Stone Fireplace?
Securing a 2026-standard large-format display over natural stone requires a direct mechanical connection to the home’s structural framing, as the stone veneer is an aesthetic facade and cannot support external shear loads.
Structural Stud Alignment and Weight Distribution
Safe installation dictates that all mounting hardware must bypass the pannelli in pietra and anchor directly into the structural studs. Pietra naturale impilata from Top Source Stone typically weighs between 8 to 13 lbs/sqft, which already puts a constant load on the wall substrate. Adding the weight of a heavy TV and an articulating mount creates a leverage point that can cause stone delamination or wall failure if you only anchor into the stone or cement board.
- We use deep-scan stud finders to locate wood or metal framing behind the pannelli in pietra before we begin any drilling.
- Lag bolts must penetrate at least 2.5 inches into the structural studs to safely support the cantilevered weight of modern displays.
- The wall frame carries the entire load of the electronics; the stone surface serves only as a decorative bypass layer.
Drilling Precision for Natural Stone Panels
Natural materials like quartzite and slate possess high density, so they require specific tools to prevent cracking. Using a standard hammer drill on a high-vibration setting can easily shatter the interlocking panels or break the high-strength epoxy bond holding the ledgestone strips together. Precision is key to maintaining the visual integrity of the CNC diamond-blade edges we provide.
- Use diamond-tipped masonry bits to create clean pilot holes without applying heavy pressure that might crack the stone.
- Maintain a low drill speed to manage heat buildup, which preserves the structural integrity of the stone’s internal composition.
- Drill through the center of a stone piece rather than at the seam between Z-shape panels to minimize the risk of edge chipping.
Heat Mitigation and Pull-Down Mount Integration
Fireplaces generate significant convective heat that rises directly into the TV’s internal components. While the Pietra naturale acts as a heat sink, it can also radiate that heat back toward the display. Integrating the right mounting hardware is just as important as the stone selection for long-term electronics protection.
- Pull-down or articulating mounts allow the TV to sit further away from the stone face, which improves airflow and reduces heat soak.
- A mantel or a protruding stone shelf serves as a vital heat shield to deflect hot air away from the screen.
- Check the fireplace manufacturer’s clearance-to-combustibles even when using non-combustible stone, as the TV itself is a combustible component.
Hardware Selection for Irregular Stone Surfaces
The varied depths of our “Ruvido” O “Premium” stone series create an uneven mounting surface that can bend a TV bracket if it is cinched down tight. Since our panels vary from 0.75” to 1.75” in thickness, you cannot simply flush-mount a flat bracket without preparation.
- Heavy-duty spacers or extra-wide washers compensate for thickness variations to create a perfectly level mounting plane.
- Solid masonry anchors provide a secondary securement point if the mount footprint is wider than the available wall studs.
- Inject a small amount of silicone into the pilot hole before inserting the bolt to seal the stone and prevent dust migration behind the panels.
How to Finish the Rough Stone Edge Around the Firebox Opening?
Precision finishing at the firebox transition prevents substrate exposure and manages thermal expansion, ensuring the Pietra naturale facade maintains structural integrity during high-heat operation.
L-Shaped Corner Pieces for Seamless Interior Returns
Exposing the raw, cut edges of a stone panel at the firebox opening signals a low-quality installation. To achieve a professional return, we utilize pre-fabricated L-shaped corner pieces. These components wrap the natural stone texture from the face of the wall into the interior of the firebox opening, concealing the cement board or metal lath substrate entirely. This approach provides the appearance of a full-bed depth masonry hearth without the associated weight or cost.
- Install matching L-shaped pieces to wrap the stone from the face of the wall into the firebox return.
- Ensure the stone sits flush against the metal firebox flange to create a professional, integrated look.
- Utilize the 90-degree factory edge to maintain a consistent 2026 design standard for clean masonry lines.
Metal Trim Profiles for Contemporary Fireplace Borders
Modern architectural designs often shift away from traditional masonry edges in favor of industrial accents. Metal trim profiles—specifically L-channels or square-edge trims—provide a crisp, linear transition between the irregular surface of the pietra accatastata and the smooth firebox frame. This method is particularly effective for protecting the edges of pannelli contabili from physical impact while framing the firebox as a focal point.
- Select an L-channel or square-edge trim that matches the thickness of the pannello in pietra, typically between 0.75 and 1.5 inches.
- Secure the trim to the cement board before applying the stone to create a protective “frame” for the ledger panels.
- Choose matte black or brushed finishes to complement the natural quartzite or slate textures found in the Rough Series.
Infrared Precision Mitering for Custom Edge Alignment
When dealing with non-standard return depths or custom fireplace geometries, off-the-shelf corners may not fit the project requirements. In these instances, installers use wet saws equipped with infrared guides to create 45-degree mitered edges on-site. This technique allows for a monolithic appearance where two stone panels meet at a corner, creating a continuous vein pattern that wraps around the firebox edge with surgical precision.
- Use wet saws with infrared guides to ensure perfectly straight diagonal cuts across the interlocking stone sections.
- Apply high-strength epoxy resin in a matching color to bond the mitered pieces together permanently.
- Back-fill any minor gaps with color-matched stone dust and adhesive for a monolithic appearance.
Applying High-Heat Sealants to Exposed Transitions
The junction where the stone meets the metal firebox is a high-stress zone subject to constant thermal cycling. Using standard grout or mortar in this gap is a mistake; the different expansion rates of metal and masonry will inevitably cause the mortar to crack and fall out. A dedicated thermal-safe barrier is required to maintain the aesthetic and safety of the fireplace opening over time.
- Apply a bead of black high-temperature silicone between the edge of the stone and the firebox frame to allow for thermal expansion.
- Avoid using standard grout in this transition zone, as thermal cycling causes traditional masonry mortar to crack and drop out.
- Seal the final exposed stone edges with a pH-neutral natural stone sealer to prevent soot buildup and staining.
Why a Hearth is Mandatory for Floor-to-Ceiling Stone Facades?
Full-height stone installations create significant structural and thermal demands that only a dedicated hearth can resolve through load distribution and fire-code compliance.
Meeting 2026 Building Code Compliance
Current safety standards require precise hearth dimensions to mitigate fire risks in both residential and commercial properties. Inspectors look for these non-combustible zones as a prerequisite for approving full-height stone installations. Failure to adhere to these measurements often results in failed inspections and costly retrofits.
- International Residential Code (IRC) standards in 2026 require a hearth extension of at least 16 inches in front of the firebox opening.
- Side extensions must reach at least 8 inches beyond each side of the fireplace opening to catch stray sparks or shifting logs.
- Non-combustible zones must be clearly defined before the stone veneer application begins.
Protecting Combustible Flooring from Thermal Stress
The hearth serves as a critical thermal break between the active heat source and vulnerable floor materials. While natural stone ledger panels possess high heat resistance, the radiant energy they absorb and emit can damage nearby wood, laminate, or carpet over long periods.
- The hearth stops embers or rolling logs from making direct contact with flammable floor coverings.
- Using a stone hearth creates a continuous non-combustible transition from the firebox to the room floor.
- Proper material selection for the hearth ensures the floor substrate remains below critical temperature thresholds during peak firing.
Managing Vertical Load and Structural Weight
Floor-to-ceiling stone facades exert massive downward pressure. Natural stone panels, such as those in the Top Source Stone inventory, weigh between 8 and 13 pounds per square foot. This creates a heavy vertical assembly that needs more than just wall anchors to remain stable over decades.
- A masonry hearth provides a reinforced base that helps distribute the weight of the stone facade across the subfloor.
- Reinforced footings or support columns often sit beneath the hearth to prevent the floor from sagging under the weight of the full-height stone.
- The hearth acts as a starting ledge, ensuring the first row of stone remains perfectly level as the installation climbs toward the ceiling.
Visual Proportions for Tall Stone Features
Beyond structural and safety requirements, the hearth provides the aesthetic anchor necessary for massive stone walls. Without a horizontal base, a floor-to-ceiling stone wall often looks top-heavy or architecturally incomplete.
- The hearth covers the transition where interlocking Z-shape panels meet the floor, effectively hiding expansion gaps.
- Designers use the hearth to define the fireplace as a distinct architectural element within a large room.
- A well-proportioned hearth grounds the vertical lines of the stone, creating a balanced focal point.
Conclusione
Successful fireplace stone installation relies on a balance of safety compliance and high-performance materials. Using the right thermal-rated adhesives and maintaining proper clearances prevents structural failure while protecting overhead electronics from heat damage. These technical standards ensure the finished surround remains a durable, low-maintenance centerpiece for years to come.
For large-scale developments or retail inventory, we provide technical specifications and project-ready solutions for our natural stone collections. Contact our team to request a sample crate or a wholesale quote for our current inventory.
Domande frequenti
Can I install stacked stone over a painted brick fireplace?
Direct installation over paint is not recommended because the bond is only as strong as the paint’s adhesion to the brick. To ensure a professional-grade installation, you must either mechanically strip the paint to expose the porous brick or install a metal lath and a cementitious scratch coat. This provides the reinforced backing and 50 psi shear strength required to support the weight of the stone during thermal cycling.
What is the best heat-rated adhesive for fireplace stone veneer?
The industry standard for stone veneer in high-heat environments is a polymer-modified, thin-set mortar meeting ANSI A118.4 or A118.15 specifications. These specialized adhesives are engineered to handle the thermal expansion and contraction (thermal cycling) of the fireplace without losing bond strength. Always ensure the mortar is rated for a minimum 50 lbs per sq. inch shear to guarantee long-term durability.
Is natural stacked stone safe for high-efficiency gas fireplaces?
Yes, natural stacked stone is inherently non-combustible and is a premium choice for high-efficiency gas fireplaces. Because these units generate significant localized heat, it is critical to use a high-performance mortar and maintain the manufacturer-specified clearances. Properly installed natural stone acts as an excellent thermal mass, safely absorbing and radiating heat back into the room.
How to mount a TV bracket securely on a rugged stone wall?
To secure a TV bracket to uneven stacked stone, you must use a hammer drill with carbide-tipped bits to penetrate the structural substrate behind the veneer. Use heavy-duty masonry sleeve anchors or wedge anchors for maximum weight capacity. To account for the rugged surface, utilize spacers or standoffs between the bracket and the stone to create a perfectly level mounting plane, preventing the bracket from flexing or warping.
How to clean soot stains off stone around the firebox opening?
For effective soot removal, start with a dry soot eraser or a vacuum to remove loose particulates. For deep cleaning, apply a pH-neutral stone cleaner or a paste made of baking soda and clear dish soap. Scrub gently with a soft-bristled brush to lift the carbon stains without etching the stone. Avoid acidic cleaners or harsh chemicals, which can cause permanent discoloration or surface degradation on natural stone materials.
