L'integrazione di un paraschizzi ibrido risolve i crescenti costi di manutenzione e i rischi per la sicurezza antincendio associati al posizionamento improprio della pietra nelle cucine ad alto rendimento. Affidarsi a un unico materiale per l’intera parete spesso impone un compromesso tra struttura estetica e durabilità resistente al calore. Quando gli sviluppatori ignorano le specifiche zone di schizzi di grasso o i punti di intensità di calore dietro le cucine professionali, rischiano macchie permanenti o crepe strutturali che portano a costosi strappi e deprezzamento della proprietà.
Questa guida fornisce una tabella di marcia tecnica per l'esecuzione di una strategia di protezione della zona abbinando lastre di granito lisce a strutturate pannelli in pietra. Descriviamo in dettaglio la transizione specifica metodi per granito e pietra accatastata, che spiega come gestire i diversi spessori dei materiali e la sigillatura dei giunti. Appaltatori e progettisti possono utilizzare queste specifiche come procedura operativa standard per mantenere la continuità visiva rispettando al tempo stesso i rigorosi standard di igiene e sicurezza richiesti per gli ambienti delle cucine di lusso.
Perché i tradizionali alzatine monomateriale stanno diventando obsoleti
Gli attuali standard di progettazione danno priorità alla struttura dimensionale e alla suddivisione in zone dei materiali rispetto all’estetica piatta e monomateriale che ha dominato i decenni precedenti.
Le tendenze architettoniche moderne favoriscono superfici multistrato che creano un ambiente abitativo più coinvolgente rispetto alle griglie di piastrelle piatte e uniformi. I paraschizzi standard spesso non hanno il carattere richiesto per le cucine residenziali o commerciali di fascia alta, portando i progettisti a integrare materiali che offrono una profondità significativa. Passando ad ambienti con più texture, gli sviluppatori possono creare spazi che sembrano dinamici piuttosto che statici.
Spostamento verso la profondità visiva e la trama tridimensionale
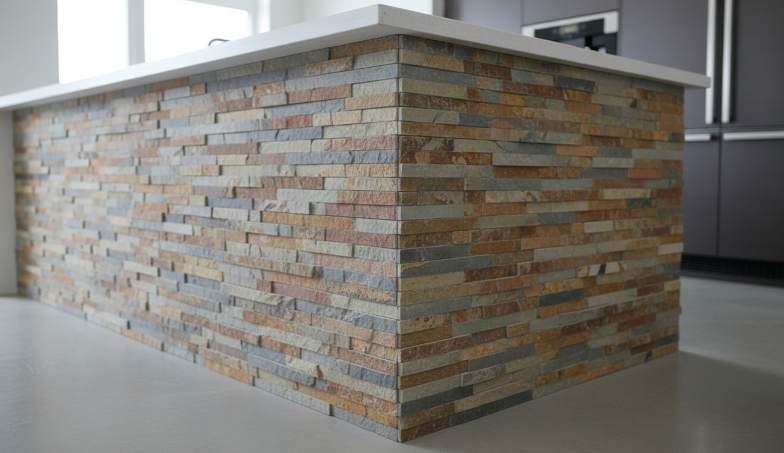
Le alzatine piatte e monomateriale spesso non riescono a fornire il peso architettonico necessario negli ambienti di cucina premium. Nel 2026, la profondità è diventata il motore principale dell’estetica del lusso. Pannelli di pietra impilati risolvi questo problema introducendo ombre e luci naturali che cambiano durante il giorno in base all'illuminazione della cucina, rendendo la parete stessa un elemento di design in evoluzione.
- Pannelli di pietra impilati introdurre ombre e luci organiche che reagiscono ai cambiamenti dell'illuminazione della cucina.
- I proprietari di case scelgono sempre più la pietra strutturata per rompere la monotonia dei mobili e dei controsoffitti lisci.
- Le superfici dimensionali forniscono un punto focale di grande impatto che definisce il carattere della stanza senza bisogno di decorazioni aggiuntive.
Zonizzazione strategica per prestazioni ed estetica
Le installazioni ibride consentono un utilizzo mirato dei materiali, posizionando superfici facili da pulire esattamente dove sono necessarie e utilizzando pietre decorative per un impatto più ampio. Questa suddivisione in zone basata sulle prestazioni garantisce che la cucina rimanga funzionale per cotture pesanti pur mantenendo un fascino visivo di fascia alta. Vediamo designer professionisti riservare lastre lisce per zone ad alto spruzzo dietro la gamma durante l'utilizzo pannelli contabili per pareti d'accento espansive.
- Le lastre lisce forniscono una soluzione igienica per le aree direttamente dietro il fornello o il lavello.
- Le strategie di materiali misti offrono la bellezza aspra di pietra naturale senza compromettere la manutenzione nelle zone di cottura.
- L'utilizzo di materiali diversi aiuta a definire zone funzionali specifiche all'interno dei layout di cucina e sala da pranzo a concetto aperto.
Autenticità della pietra naturale vs. uniformità sintetica
L'abbandono delle piastrelle identiche prodotte in serie riflette una crescente preferenza per le variazioni uniche che si trovano nella vera pietra di cava. Il mercato ha ampiamente rifiutato la proposta “perfetto” uniformità dei materiali sintetici a favore degli autentici cambiamenti di colore e texture che solo i minerali naturali al 100% possono fornire. Questi le variazioni naturali assicurano che ogni installazione è una funzionalità personalizzata unica.
- Ogni offerte di pannelli in pietra naturale texture uniche e variazioni di colore che le opzioni artificiali non possono replicare.
- Vero pannelli contabili in pietra aumentare il valore della proprietà fornendo un aspetto premium e personalizzato.
- I sistemi di pietra ad incastro eliminano le linee di malta visibili, offrendo un aspetto più fluido e sofisticato rispetto ai sistemi in pietra ad incastro piastrella tradizionale griglie.
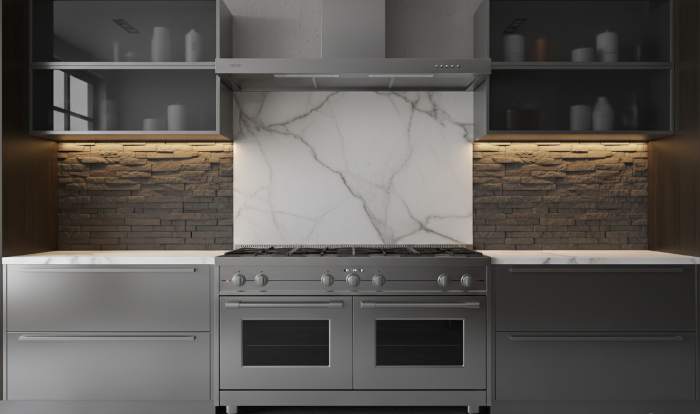
IL “Protezione di zona” Strategia: lastra liscia dietro la gamma contro accenti di pietra
L'architettura moderna della cucina richiede un approccio bimateriale che isoli le zone di cottura ad alto calore con superfici facili da pulire, utilizzando al contempo la struttura organica del pietra naturale per l'ambiente circostante profondità architettonica.
Posizionamento funzionale delle lastre per zone ad alto spruzzo
Il posizionamento di lastre lisce e non porose direttamente dietro il piano cottura soddisfa le esigenze meccaniche delle cucine di livello professionale. Queste superfici resistono al calore intenso e al costante accumulo di grasso che altrimenti penetrerebbe nei materiali porosi. Selezionando una lastra di granito o quarzite abbinata dalle nostre cave, i progettisti mantengono la continuità visiva con i controsoffitti fornendo allo stesso tempo uno scudo che protegge il substrato della parete dalle fluttuazioni termiche.
| Requisito di zona | Selezione dei materiali | Fattore di prestazione fondamentale |
|---|---|---|
| Calore diretto/grasso (gamma) | Lastra liscia lucida | Manutenzione rapida e facile da pulire |
| Muri perimetrali/funzionali | Pietra ad incastro a forma di Z | Profondità visiva & Ombre di struttura |
- Le superfici lisce facilitano la rimozione istantanea di particelle di olio e cibo rispetto ai profili in pietra multisfaccettati.
- Le lastre tagliate con precisione fungono da barriera durevole e resistente al calore per le cucine a gas ad alto BTU da 2026.
- L'integrazione della lastra in pietra preserva l'estetica monocromatica di lusso senza compromettere l'utilità.
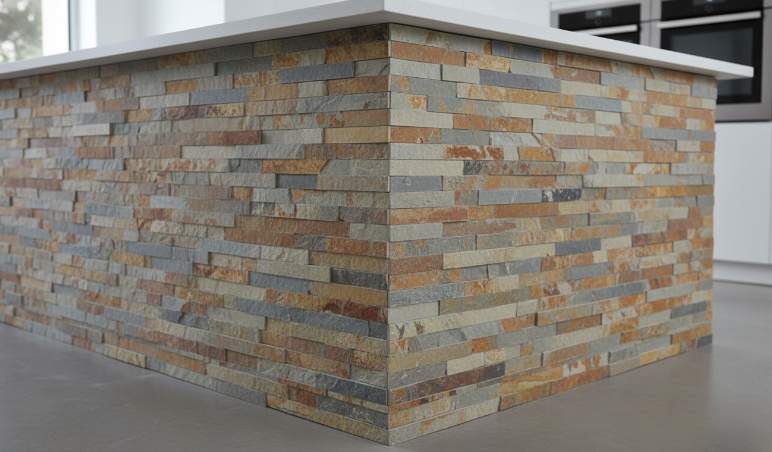
Profondità strutturale attraverso accenti di pietra perimetrale
Pannelli di pietra impilati naturali creano contrasto tattile se applicati su pareti perimetrali lontane dal piano di cottura primario. Utilizziamo la serie Rough per queste aree per generare ombre drammatiche e carattere organico. Questa tecnica di inquadratura aggiunge valore alla proprietà permanente trasformando un backsplash standard in un sofisticato elemento architettonico.
- Il sistema ad incastro a forma di Z elimina i giunti verticali visibili, garantendo un aspetto professionale e privo di fughe.
- La precisione della lama diamantata CNC consente di ottenere pezzi modulari ad alta tenuta che mimetizzano il substrato di installazione.
- Le opzioni di ardesia naturale e quarzite forniscono stabilità UV intrinseca, prevenendo lo sbiadimento comune nelle imitazioni sintetiche.
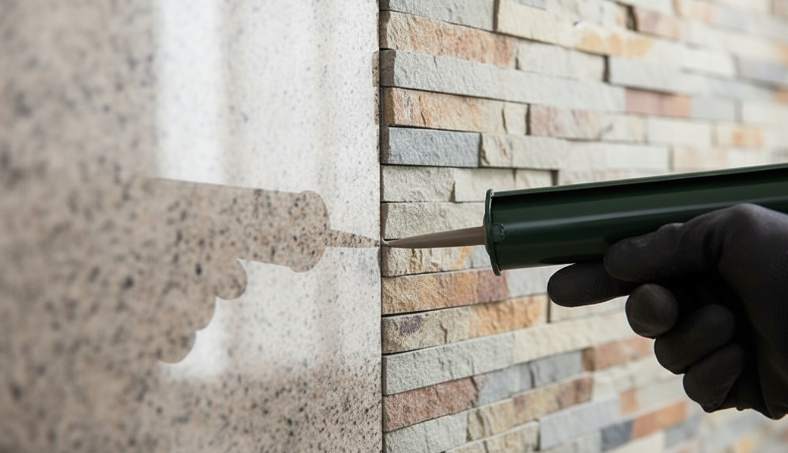
Protocolli di protezione e sigillatura dall'umidità
Ibrido di successo le installazioni dipendono dal corretto barriere contro l'umidità nella giunzione di diversi materiali. Si consiglia di applicare un sigillante di alta qualità a pH neutro sul Pietra naturale accenti per bloccare i vapori e gli oli ambientali della cucina. Sigillatura della giuntura di transizione tra la lastra liscia e quella strutturata i pannelli impediscono l'infiltrazione di liquidi nella parete cavità, mantenendo l'integrità strutturale del pannello di cemento.
- Utilizzare sigillanti a base siliconica nelle transizioni dei materiali per adattarsi ai diversi tassi di espansione della lastra e pietra del registro.
- Barriere a prova di umidità dietro pannelli in pietra sono essenziali nelle zone ad alta umidità per proteggere il substrato sottostante.
- La sigillatura periodica degli accenti in pietra garantisce che rimangano resistenti alle macchie per tutta la loro durata.
Requisiti di durata e pulizia
Concentrare la pietra strutturata in zone perimetrali a basso impatto riduce significativamente il carico complessivo di pulizia. Questa strategia consente al materiale naturale di mantenere la sua estetica originaria per decenni senza la necessità di un lavaggio intensivo. Per gli accenti in pietra, si consiglia di pulire con acqua con una spazzola morbida per mantenere lo standard di design degli interni 2026 senza compromettere il legame epossidico del pannelli in pietra.
- Pietra naturale mantiene l'integrità del colore meglio delle alternative alla pietra fusa a base di pigmenti.
- Il posizionamento strategico in aree a basso impatto previene l'accumulo di grasso nelle fessure profonde dei pannelli a faccia divisa.
- I detergenti standard a pH neutro proteggono la superficie minerale della pietra da incisioni e danni chimici.
Pietra impilata premium per progetti architettonici

Raggiungere la continuità visiva tra diverse superfici di pietra
Ibrido efficace il design della pietra si basa su “lusso tranquillo” principi, dove varie texture sono unificate attraverso la mineralogia condivisa e la falegnameria CNC di precisione per creare una dichiarazione architettonica coerente.
Gli standard di progettazione nel 2026 danno priorità a una storia cromatica unificata rispetto alla perfetta corrispondenza dei materiali. Quando abbiniamo una lastra del controsoffitto liscia con una parete strutturata, il pietra accatastata deve riecheggiare i toni minerali secondari presenti nelle venature della lastra. Questo approccio crea un'atmosfera da galleria, soprattutto quando si utilizzano flussi monocromatici come le lastre di marmo Arctic White abbinate a pannelli di marmo strutturati abbinati. Mantenere questa profondità visiva richiede lungimiranza tecnica nella selezione e protezione dei materiali.
- Selezionare pannelli di pietra impilati che rispecchiano l'accento sottile tonalità della lastra primaria per ancorare il design.
- Utilizza la consistenza della cava dello stesso lotto di Top Source Stone per garantire l'uniformità della tonalità su superfici verticali su larga scala.
- Applicare sigillanti traspiranti a pH neutro per preservare la profondità del colore naturale e prevenire l'invecchiamento irregolare o l'ingiallimento.
Allineamento delle vene e transizioni delle texture
Installazioni di successo gestiscono l'energia visiva tra le lastre levigate e la superficie multidimensionale del ledgestone naturale. Dirigiamo il movimento lineare di vene di pietra verso la parete strutturata ampliare lo spazio percepito. Per i progetti che richiedono un profilo più pulito, la serie Flat fornisce una transizione che rispecchia le linee eleganti del quarzo o del granito lucido senza perdere il carattere organico del Pietra naturale.
- Allineare le venature della lastra in modo che scorrano verso l'alto nell'incastro sistema di pannelli in pietra, simulando una formazione geologica continua.
- Utilizza i principi del bookmatching per le zone ad alta visibilità per eliminare le interruzioni visive fastidiose.
- Sfrutta i bordi di precisione della lama diamantata CNC per garantire uno stretto incastro maschio-femmina che mimetizza le giunture verticali.
Falegnameria di precisione e dettagli della linea d'ombra
L'esecuzione tecnica nel punto d'incontro di due superfici in pietra definisce la qualità di una cucina di fascia alta. Implementiamo smussato trattamenti del bordo o angolo ad L in tinta pezzi per eliminare le cuciture a vista dove convergono diversi piani di pietra. L'incorporazione di linee d'ombra intenzionali in queste giunzioni favorisce l'insediamento naturale degli edifici fornendo allo stesso tempo una rottura architettonica pulita che sembra intenzionale piuttosto che accidentale.
- Installa angoli a L a 90 gradi prefabbricati per garantire la sincronizzazione di texture e colori in tutte le transizioni delle pareti.
- Incolla lastre e pannelli con resine epossidiche ad alta resistenza e in tinta per creare connessioni permanenti e invisibili.
- Mantenere precisi livelli di tolleranza durante preparazione del sottofondo per evitare che differenze di spessore incidano sull'installazione del mobile.
Come passare da una lastra di granito a pannelli di pietra impilati
Transizioni di pietre ibride di successo richiedono valutazioni precise della capacità di carico del substrato e adattamento della profondità per prevenire cedimenti strutturali o antiestetiche giunzioni sfalsate nel punto di incontro.
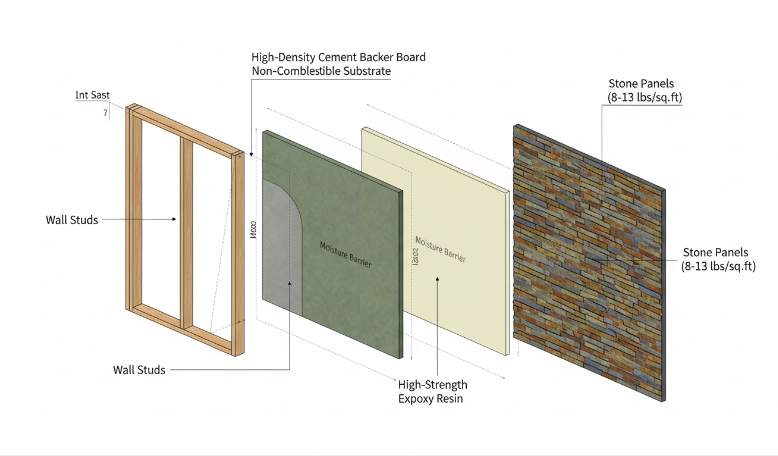
I design ibridi del backsplash stanno sostituendo le pareti monomateriale nelle specifiche B2B di fascia alta. Combinando una solida lastra di granito dietro la gamma con strutturata Pietra naturale gli accenti altrove offrono un equilibrio tra utilità facile da pulire e profondità architettonica. Per ottenere questo aspetto è necessario allontanarsi dal muro a secco standard; gli installatori professionisti devono utilizzare pannelli di supporto in cemento su tutta l'area per fornire una base rigida e non combustibile. Questo substrato deve sopportare un peso combinato in cui il granito spesso supera le 15 libbre/piedi quadrati, mentre il nostro pannelli in pietra naturale impilati range tra 8 e 13 libbre/piede quadrato.
Protocolli di preparazione e allineamento del substrato
Prima che qualsiasi adesivo tocchi la parete, verificare l'integrità strutturale per evitare la deflessione sotto carichi pesanti di pietra. Utilizzare una livella laser per stabilire una linea di transizione orizzontale primaria nel punto in cui la lastra di granito incontra il primo corso pannelli in pietra. Questa linea funge da ancoraggio per l'intera installazione. Qualsiasi deviazione qui si amplificherà man mano che ti sposti lungo il muro, con conseguenti lacune nelle connessioni ad incastro a forma di Z.
- Installare un pannello di supporto in cemento ad alta densità per garantire una superficie uniforme che resista all'umidità e al calore.
- Calcolare il carico morto totale del pietra per confermare che l'intelaiatura del muro incontra l'edificio locale codici per rivestimenti pesanti.
- Mappare il layout a forma di Z per garantire il “maschio-femmina” Il sistema ad incastro libera il bordo della lastra di granito senza richiedere scomodi tagli verticali del nastro.
Gestione dei differenziali di profondità e spessore del materiale
Lastre di granito e Pietra naturale i pannelli raramente condividono lo stesso spessore del profilo. Una lastra di granito standard da 3 cm (circa 1,18 pollici) spesso si trova a filo con la nostra serie di pietre standard, ma potrebbe non essere all'altezza della serie Rough. Per creare una transizione senza soluzione di continuità o intenzionalmente a più livelli, è necessario scegliere profili in pietra che completino la profondità della lastra o costruire il substrato utilizzando strati sottili aggiuntivi.
| Tipo materiale | Spessore standard | Profilo peso (medio) |
|---|---|---|
| Lastra di granito lucido (3 cm) | ~30 mm | 15 – 18 libbre/piedi quadrati |
| Pietra impilata standard (Forma Z) | 10 mm – 25 mm | 8 – 12 libbre/piedi quadrati |
| Serie Premium ruvida | Fino a 35 mm | ~11,5 libbre/piedi quadrati |
Selezione della serie piatta (0,75" – 1,25" di spessore) fornisce il percorso più semplice per una transizione a filo con granito di 3 cm. Se si utilizza la serie Rough, che sporge più lontano dal muro, prendere in considerazione un “gradino” transizione. Ciò evidenzia la naturale struttura a faccia divisa della pietra lasciandola leggermente orgogliosa della superficie in granito lucido, creando una linea d'ombra che aggiunge interesse visivo.
Selezione dell'adesivo e integrazione del giunto
Le diverse densità delle pietre richiedono agenti leganti specifici per gestire l'espansione termica a distanze vicine. Utilizzare malta sottile modificata con polimero per la lastra di granito per garantire flessibilità e resina epossidica ad alta resistenza per la lastra di granito pannelli di pietra impilati per bloccarli in posizione. Sfalsare i pannelli per evitare che le giunture verticali si allineino con i bordi della lastra, il che aiuta la transizione a sembrare più organica.
- Burro posteriore ogni pannello in pietra da realizzare Copertura del 95%, garantendo che non esistano vuoti dove potrebbe depositarsi l'umidità.
- Applicare un sigillante ibrido dello stesso colore o un silicone di alta qualità nel punto di incontro effettivo dei due materiali per consentire un movimento indipendente.
- Evitare l'uso di malta standard nel giunto di transizione; il silicone si adatta meglio ai diversi tassi di espansione del granito, della quarzite o dell'ardesia.
Rifinitura e sigillatura della zona di transizione
Il passo finale protegge la pietra porosa del registro e il granito lucido da grasso e umidità. Applicare un sigillante penetrante a pH neutro su entrambe le superfici solo dopo che l'adesivo si è indurito completamente, in genere entro 24-48 ore. Per le estremità esposte dell'alzatina, utilizzare gli angoli a L corrispondenti della nostra linea di prodotti. Questi pezzi prefabbricati avvolgono i bordi, nascondendo la sezione trasversale della lastra di granito e fornendo una finitura avvolgente pulita e professionale.
La manutenzione nella zona di transizione richiede una spazzola morbida per rimuovere i detriti dalle fessure della pietra strutturata. La sigillatura regolare, idealmente ogni 12-24 mesi a seconda dell'uso in cucina, mantiene la “Coerenza della cava dello stesso lotto” e previene l'assorbimento di olio che potrebbe portare a macchie permanenti.
Caso di studio: cucina da chef di fascia alta con design ibrido in pietra
L’architettura moderna della cucina nel 2026 dà priorità a “protezione della zona” logica, utilizzando lastre lisce ad alte prestazioni nelle zone cottura mentre si implementano strutture strutturate pannelli in pietra naturale per fornire profondità atmosferica negli ambiti sociali.
Integrazione di lastre di marmo con Linear Pencil Stone
In questa ristrutturazione di lusso, il team di progettazione ha utilizzato la nostra serie di matite per creare una sofisticata gerarchia visiva. Gli architetti li hanno specificati lineari pannelli in pietra naturale per le pareti d'accento primarie per introdurre una texture dinamica e fluida che si pone in netto contrasto con i controsoffitti lucidi. Ancorando la tavolozza dei colori della stanza con Pietra naturale, il design ha influenzato la scelta di mobili personalizzati ed elettrodomestici di fascia alta, garantendo che le texture fossero integrate piuttosto che aggiunte.
Il progetto ha esteso questa estetica di lusso coerente nella dispensa del maggiordomo utilizzando la serie Marble. Questo l'applicazione dimostra come la pietra naturale le selezioni fungono da filo conduttore tra le diverse zone funzionali. Mantenendo la coerenza dei materiali dall'area di preparazione principale agli spazi di stoccaggio ausiliari, il progetto ha ottenuto un'atmosfera simile a una galleria che definisce l'attuale “lusso tranquillo” andamento del mercato.
Zonizzazione dello spazio di cottura per protezione e consistenza
Il posizionamento strategico dei materiali ha risolto il tradizionale conflitto tra estetica e manutenzione. I progettisti hanno installato una lastra di pietra liscia e non porosa dietro la gamma professionale per un accesso immediato alla pulizia durante la cottura ad alta temperatura. Questa zona funzionale è poi passata ai nostri pannelli della serie Rough per il backsplash circostante. Questo layout ibrido bilancia le esigenze di efficienza dello chef professionista con il desiderio del proprietario di casa di un ambiente rustico e tattile.
| Metrica di installazione | Massoneria tradizionale | Pietra di alto livello Ibrido |
|---|---|---|
| Peso strutturale | 15+ libbre/piedi quadrati (richiede rinforzo) | 8-13 libbre/piedi quadrati (Standard Wall Ready) |
| Velocità di installazione | Posato a mano (lento/ad alta intensità di manodopera) | Pannelli Z ad incastro (40% più veloci) |
| Esecuzione d'angolo | Mitra sul posto Taglio | Angoli a L abbinati prefabbricati |
Semplificazione dell'installazione nelle ristrutturazioni di lusso del 2026
L'uso di sistemi di pannelli leggeri ha ridotto drasticamente i tempi del progetto. Poiché i profili in pietra pesano tra 8 e 13 libbre/piedi quadrati, l'installazione è avvenuta su strutture murarie esistenti senza la necessità di basamenti aggiuntivi o costosi rinforzi strutturali. Gli appaltatori hanno utilizzato pannelli preassemblati a forma di Z e bordi ad incastro lavorati a CNC per eliminare le linee di malta visibili, creando una finitura architettonica senza soluzione di continuità che la muratura assemblata a mano non può replicare.
- Gli angoli a forma di L tagliati con precisione hanno assicurato la sincronizzazione delle texture e dei colori sull'isola della cucina e sui pilastri strutturali.
- Bordi della lama diamantata CNC forniti stretti “maschio-femmina” connessioni che mimetizzavano completamente il substrato.
- La consegna dei pannelli modulari ha consentito al team di rispettare un programma di consegna serrato per il 2026 riducendo il taglio in loco.
Standard di consistenza dei materiali e durabilità a lungo termine
Selezionando 100% la pietra naturale garantisce l'installazione mantiene il suo valore attraverso decenni di utilizzo. Pietra naturale i pannelli resistono allo sbiadimento indotto dai raggi UV, che è un punto di guasto comune nei pannelli sintetici o “falso” alternative esposte alla luce solare attraverso le grandi finestre della cucina. Per garantire un legame permanente nelle zone ad alto calore in prossimità delle stazioni di cottura, abbiamo utilizzato adesivi in resina epossidica ad alta resistenza che resistono alla dilatazione termica tipica delle cucine di livello professionale.
La manutenzione è stata affrontata attraverso un trattamento sigillante post-installazione a pH neutro. Questo processo semplifica la pulizia quotidiana preservando le trame organiche e non ripetitive del Vera pietra. Utilizzando un'unica vena di cava, il progetto ha ottenuto un'uniformità di tonalità del 95% su tutti i pannelli, evitando l'aspetto irregolare spesso riscontrato quando miscelazione dei materiali da lotti disparati.
Conclusione
I backsplash ibridi di successo bilanciano la trama grezza di Pietra naturale con la necessità pratica di superfici lisce e resistenti al calore nelle zone di cottura ad alto traffico. Questa strategia progettuale protegge il muro dal grasso e dal calore introducendo allo stesso tempo la profondità architettonica che solo un vero libro mastro la pietra fornisce. La selezione di materiali provenienti dalla stessa vena di cava garantisce armonia visiva tra diverse finiture e modalità di installazione.
Rivedi il nostro catalogo tecnico per trovare pietra accatastata profili che si allineano ai vostri requisiti specifici della lastra. Contatta i nostri specialisti di progetto per campioni di materiali o per discutere l'approvvigionamento per i tuoi prossimi progetti di design.
Domande frequenti
Posso utilizzare la pietra accatastata direttamente dietro un fornello a gas professionale?
Sebbene visivamente sbalorditivo, l'installazione di pietre accatastate direttamente dietro una stufa a gas professionale ad alto rendimento è generalmente sconsigliata a meno che non sia protetta da un sigillante resistente al calore e ad alte prestazioni. Le profonde fessure e la natura porosa della pietra registro fungono da a “trappola per grassi,” rendendolo quasi impossibile da pulire rispetto alle superfici lisce. Per un'installazione di livello professionale, è consigliabile installare un paraspruzzi in acciaio inossidabile o quarzo liscio immediatamente dietro i bruciatori e utilizzare la pietra impilata per le aree di accento circostanti.
Come posso abbinare una lastra liscia con una pietra registro strutturata?
I design multi-texture di successo si basano sulla continuità del colore. Selezionare una lastra liscia con venature o toni di base che rispecchiano il colore primario della pietra registro strutturata. Le tendenze del settore favoriscono l’utilizzo della lastra liscia per le zone ad alto tasso di umidità (come il lavello o il fornello) e il passaggio alla pietra a registro come bordo decorativo o parete d’accento a tutta altezza. Per garantire una finitura professionale, installare prima la lastra liscia per creare un bordo orizzontale pulito e livellato su cui appoggiare i pezzi di pietra.
Un backsplash ibrido costa più di una parete monomateriale?
In genere sì. Le installazioni ibride richiedono costi di manodopera più elevati a causa della complessità della gestione di due diversi spessori di materiale e della necessità di giunti di transizione di precisione. Potrebbe anche essere necessario assumere due diversi tipi di specialisti: un produttore di lastre per le sezioni lisce e un piastrellista per i componenti strutturati. Tuttavia, questo approccio può ridurre lo spreco complessivo di materiale consentendo di utilizzare resti di lastre di fascia alta per il punto focale e pietra più economica per le superfici secondarie.
Qual è il modo migliore per sigillare la giunzione tra due diversi tipi di pietra?
Non utilizzare mai la malta standard per colmare il divario tra due materiali diversi, poiché l'espansione e la contrazione ne causeranno inevitabilmente la rottura. Lo standard del settore prevede l'utilizzo di un sigillante siliconico di alta qualità al 100% dello stesso colore della pietra. Ciò fornisce una barriera flessibile e impermeabile che accoglie i minimi movimenti delle diverse densità della pietra mantenendo una transizione visiva senza soluzione di continuità.
La differenza di spessore influirà sull'installazione del mio mobile?
Sì, lo spessore è un fattore critico nella pianificazione. La pietra di registro è significativamente più profonda di una piastrella standard o di una lastra da 2 cm, il che può far sporgere la pietra oltre la parte anteriore dei telai del mobile o interferire con le piastre delle prese elettriche. Per evitare ciò, i mobili dovrebbero essere spostati in avanti, oppure la pietra dovrebbe essere posizionata strategicamente in modo da non ostacolare le oscillazioni delle porte dei mobili o gli spazi liberi degli elettrodomestici. Misurare sempre la profondità totale del letto di pietra e malta prima di finalizzare il posizionamento del mobile.
