
あなたの風景に時代を超越した美しさのタッチを追加したいですか?多くのDIYSと請負業者は、複雑さが認識されているため、不規則なランダムなゆるい石を避けていることを発見しています。間違っていると、不安定な経路、不均一な表面、そして自然なもの以外の外観が生じます。
しかし、恐れないでください!このガイドは、プロセスをフォローの簡単なステップに分解し、プロジェクトが専門的に行われるようにします。適切な石の選択からモルタルの習得まで、見事なパティオ、通路などを作成する方法を学びます。トップソースストーンのような信頼できるソースから高品質の不規則な天然ランダムなゆるい石を選択すると、寸法精度、材料の完全性、美的卓越性が保証されます。
-
 ナチュラルスプリットフェイスグレークォーツランダムランダムなゆるい石の壁クラッディング
 -
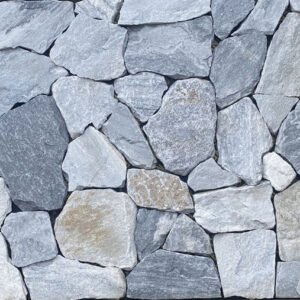
 壁の覆い用の天然クォーツランダムな不規則な石パネルタイル
 -
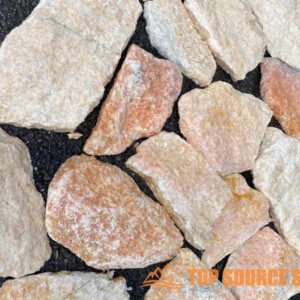
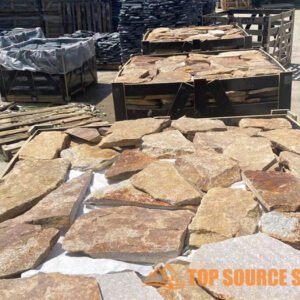
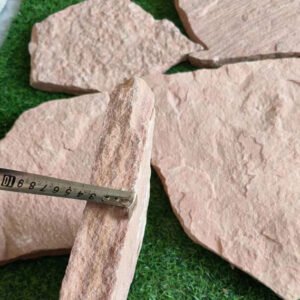 卸売ピンクの砂岩のランダムなゆるい石のクラッディング
 -
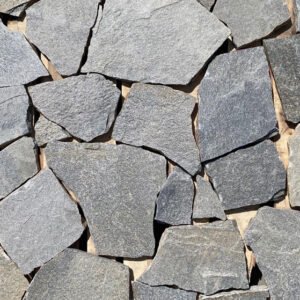
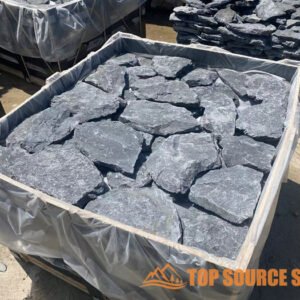
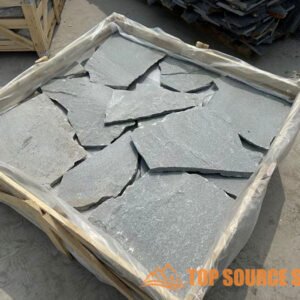
 卸売青色のクォーツランダムランダムなゆるい石タイル壁の覆い
 -
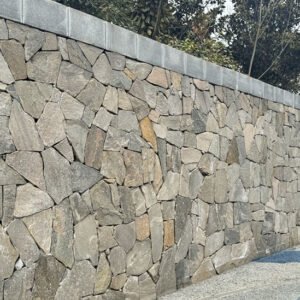
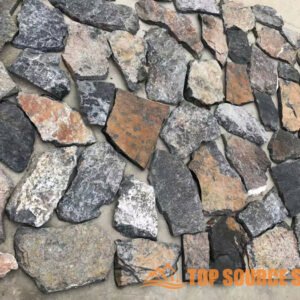
 内部および外壁の覆いのための自然なランダムなゆるい石
 -
 ランダムな外観天然石ゆるい石のベニヤの壁覆い飾り
 -
 自然な不規則なランダムなゆるい石被覆ベニア
 -
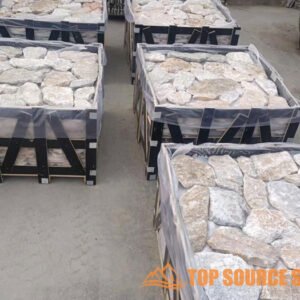
 中国工場供給屋外の自然なランダムなゆるい石の壁クラッディングタイル
 -
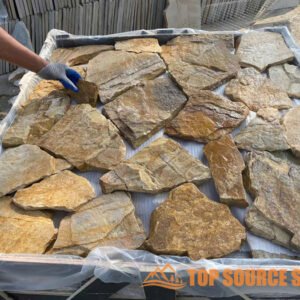
 工場価格自然の外装ランダムなゆるい石の壁の覆い
 -
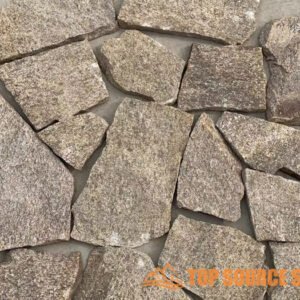
 外側の黄色の粗いランダムなゆるい石の壁の覆い
 -
 屋内と屋外のための自然なランダムなゆるい石の壁のクラッディングパネル
 -
 壁の装飾のための自然なゆるい石の壁
ランダムなゆるい石プロジェクトの計画:選択とデザイン
不規則な自然なランダムなゆるい石のプロジェクトを計画するには、美しく持続的な結果を確実にするためのいくつかの重要なステップが含まれます。景観の評価から材料の推定まで、成功するためには慎重な計画が不可欠です。この章では、石の選択、設計上の考慮事項、およびプロジェクトの範囲の定義に焦点を当てた初期段階を案内します。適切な計画は、費用のかかる間違いを回避し、あなたのビジョンが現実になることを保証します。
“ランドスケープデザインで不規則な自然なランダムなゆるい石を使用すると、全体的な美学を高め、周囲の環境を補完するユニークで自然なタッチを追加できます。”
景観の評価:土壌、排水、スペースの評価
石を選択する前に、風景を評価してください。土壌の種類を確認してください。粘土、砂、ロームですか?水があなたを損傷するのを防ぐためには、良い排水が重要です 石の取り付け。雨の間に水が流れる方法を観察して、潜在的な問題領域を特定します。また、利用可能なスペースを測定して、石で覆うエリアを決定します。これらの詳細を知ることは、適切な石を選択し、地面を効果的に準備するのに役立ちます。このステップはです “非常に重要です”、お見逃しなく!
風景の既存の機能を考えてください。あなたのデザインに影響を与える木、低木、または他の植物はありますか?これは、時間の経過とともに石の色と質感に影響を与える可能性があるため、さまざまな領域での太陽の暴露に注意してください。風景のユニークな特性を理解することで、自然の環境と調和するデザインを作成できます。
適切な石の選択:色、テクスチャ、および材料オプション
適切な石を選択することは、プロジェクトを計画する上で重要なステップです。利用可能な色、テクスチャ、および素材のオプションを検討してください。色は素朴なブラウンやグレーから、鮮やかな赤や黄色まで多岐にわたります。テクスチャは、滑らかで磨かれたものから、粗くてごつごつしたものまでさまざまです。材料のオプションには、花崗岩、石灰岩、砂岩、スレートなどがあります。各タイプは、独自の美しさと耐久性のレベルを提供します。 Top Source Stone は、あらゆるプロジェクトに適した幅広いオプションを提供します。
達成したい全体的なスタイルについて考えてください。素朴なデザインには粗い質感のアースカラーの石が効果的であり、モダンなデザインには滑らかな灰色の石が組み込まれている可能性があります。トップ ソース ストーンにアクセスして、さまざまなサンプルを調べ、あなたのビジョンに完璧にマッチするものを見つけてください。カスタマイズ サービスにより、必要なものを確実に入手できます。
デザインレイアウト:視覚的に魅力的なパターンと配置
石のレイアウトは、プロジェクトの視覚的な魅力に大きな影響を与える可能性があります。さまざまなパターンと配置オプションを検討してください。ランダムなパターンは自然で有機的な外観を作成でき、より構造化されたパターンはフォーマルな雰囲気を加えることができます。さまざまな配置を試して、自分のスペースに最適なものを見つけてください。お気に入りのレイアウトの写真を撮ると、最終結果を視覚的に把握しやすくなります。適切な計画が鍵となります。
石と石の間隔を考えてみましょう。タイトなレイアウトでは堅固な表面を作成できますが、間隔を広くすると石の間にグランドカバーや装飾用の砂利を配置できます。設計している領域の機能を考慮してください。通路にはより安定した平らな表面が必要ですが、装飾的なエリアではより創造的な自由が可能になります。不規則な天然ランダムルースストーンを使用して、プロジェクトにユニークなタッチを与えます。
材料の見積もり: 石材とモルタルの必要量の計算
石の不足や浪費を避けるためには、必要な材料を正確に見積もることが重要です。カバーする予定の面積を測定し、平方フィートを計算します。この測定値を使用して、必要な石の量を決定します。カットや無駄を考慮して 10 ~ 15% のバッファーを追加します。また、石を固定するのに必要なモルタルまたは砂利の量も見積もってください。 Top Source Stone では、材料の見積もりについて専門的なアドバイスを提供できます。
材質を見積もる際には、石の厚さを考慮してください。石が厚いとより多くのモルタルが必要となり、仕上げ面全体の高さに影響を与える可能性があります。正確な寸法と材料の見積もりを得るには、Top Source Stone の専門家に相談してください。彼らの専門知識により、長期的には時間と費用を節約できます。これにより、プロジェクトが途中で不足することがなくなります。

石材の設置に必要な道具と材料
石の設置プロジェクトの準備には、適切なツールと材料を収集する必要があります。すべてを手元に置くことで、スムーズで効率的なプロセスが保証されます。この章では、設置を成功させるために必要な工具、モルタル、基材、および接合剤について概説します。しっかりと準備を整えれば、戦いは半分終わります。
“耐久性があり見た目にも美しい不規則な天然ランダム ルース ストーンの設置には、正しいツールと高品質の素材を使用することが重要です。”
採取道具:ゴム槌、こて、水準器、安全具
ゴムハンマーは、石を傷つけることなく所定の位置に優しく叩き込むのに不可欠です。モルタルを均一に塗るにはコテを使います。水準器を使用すると、石が適切に配置されていることを確認できます。取り付け作業中に身を守るためには、手袋や保護眼鏡などの安全装備が重要です。これらのツールをすぐに利用できるようにすると、作業がはるかに簡単になります。膝の保護も忘れずに!
その他の便利なツールには、石の形を整えるためのノミ、正確な位置に配置するための巻尺、材料を運ぶための手押し車などがあります。大規模なプロジェクトに取り組んでいる場合は、専用ツールのレンタルを検討してください。適切な個人用保護具 (PPE) を着用して、常に安全を優先してください。これらの簡単な手順が大きな違いを生みます。
モルタルの選択: 石の接着に適した混合物の選択
石材を適切に接着するには、適切なモルタルを選択することが重要です。使用している石の種類と環境条件を考慮してください。接着強度と柔軟性に優れているため、ポリマー改質モルタルがよく推奨されます。あらかじめ混合されたモルタルは便利ですが、独自のモルタルを混合すると、粘稠度をより細かく制御できます。 Top Source Stone では、長持ちする高品質のモルタルを推奨しています 結果。
モルタルを選択する際に考慮すべき要素には、圧縮強度、耐水性、硬化時間などがあります。モルタルが使用している特定の種類の石と互換性があることを確認してください。メーカーの説明書をよく読み、その指示に従ってください。間違ったモルタルを使用すると、ひび割れや不安定性が生じる可能性があります。これは冗談ではありません!
母材:砂利、砕石、砂
ベース材料は、石材の設置に安定した基盤を提供します。砂利は通常、排水用の下地として使用されます。砕石は石を置くための水平な表面を提供します。砂は、小さな隙間を埋め、滑らかな表面を作成するために使用されます。 Top Source Stone は、プロジェクトのニーズに合わせてさまざまな骨材を提供しています。耐久性のある設置の鍵となるのは、強固なベースです。
石の沈下や移動を防ぐためには、適切な下地処理が不可欠です。プレートコンパクターまたはハンドタンパーを使用して、母材を徹底的に圧縮します。ベースが水平で、水はけが良いことを確認してください。ベースの準備が不十分だと、将来的に重大な問題が発生する可能性があります。時間をかけて正しく行いましょう。
接合コンパウンド: 隙間を埋めて安定性を高めるためのオプション
ジョイントコンパウンドが石の間の隙間を埋め、安定性を高め、雑草の成長を防ぎます。オプションには、ポリマー砂、モルタル、エポキシベースの接合コンパウンドが含まれます。ポリマーサンドは設置が簡単で柔軟性があります。モルタルは、より伝統的な外観と優れた耐久性を提供します。エポキシベースのコンパウンドは優れた強度と耐水性を提供します。特定のニーズに最適なオプションをお選びください。
目地材を選択するときは、色、質感、貼りやすさを考慮してください。コンパウンドが使用している石の種類と互換性があることを確認してください。メーカーの指示に注意深く従って、正しく取り付けてください。接合コンパウンドは安定性を高めるだけでなく、プロジェクト全体の美しさを向上させます。上手に接合すれば大きな違いが生まれます!
石材の設置に推奨されるツールと材料
| 工具・材料 | 説明 | 目的 | 平均コスト | 同等のトップソースストーン |
|---|---|---|---|---|
| ゴム槌 | ゴム製のヘッドが付いたハンマー。 | 石を所定の位置に叩き込む。 | 15ドル – 30ドル | n/a |
| こて | モルタルを散布するための平らで尖った道具。 | モルタルを均一に塗布していきます。 | 10ドル – 20ドル | n/a |
| レベル | 表面が水平または垂直であることを確認するためのツール。 | 石が揃っていることを確認します。 | 20ドル – 50ドル | n/a |
| ポリマー改質モルタル | 接着を強化するためのポリマーとモルタルの混合物。 | 石と石を貼り合わせます。 | 15ドル – バッグあたり 25 ドル | トップソースストーンプレミアムモルタル |
| 砕石 | 基礎準備用の段階的な骨材。 | 水平で安定したベースを作成します。 | 30ドル – 1立方ヤードあたり50ドル | トップソース石ベース骨材 |
| ポリマーサンド | 目地充填用のポリマーを混合した砂。 | 隙間を埋めて雑草の発生を防ぎます。 | 20ドル – バッグあたり 30 ドル | トップソースストーンジョイントサンド |

設置場所の準備: 強固な基礎の構築
不規則な天然ランダム ルース ストーンを安定して長期にわたって設置するには、適切な現場の準備が不可欠です。強固な基盤は将来の変更を防ぎ、プロジェクトの寿命を保証します。この章では、掘削、基層の設置、レベリング、排水ソリューションなど、サイトの準備に関する詳細なガイドを提供します。これを正しく行うことが絶対に重要です。
“十分に準備された現場は、不規則な天然のランダムなルースストーンの設置を成功させるための基礎であり、将来の問題を防ぎ、美しく耐久性のある結果を保証します。”
掘削: 表土と瓦礫の除去
敷地準備の最初のステップは掘削です。そのエリアからすべての表土、草、根、瓦礫を取り除きます。基層と石の厚さを考慮した深さ(通常は 6 ~ 8 インチ)まで掘削します。これにより、仕上げ面が望ましいレベルになることが保証されます。シャベルや手押し車を使って掘削物を取り除きます。これは手間がかかりますが、必要な手順です。
掘削する前に、地下施設や障害物を必ず取り除いてください。地元の電力会社に問い合わせて、埋設された電線にマークを付けてください。適切な排水を確保するために、周囲の傾斜を考慮してください。有機物をすべて除去すると、石材の設置の安定性が損なわれる可能性がある分解や沈降が防止されます。
基層:砂利または砕石を敷き詰めて固める
掘削後、砂利や砕石などを敷き詰めます。この層は排水と安定した基礎を提供します。土壌の状態とその地域の用途に応じて、少なくとも 4 インチの砂利または砕石を使用してください。材料を均一に広げ、プレートコンパクターまたはハンドタンパーを使用して完全に圧縮します。 Top Source Stone など、信頼できるサプライヤーからの高品質の基材は安定性のために不可欠です。
ベース層を圧縮することは、沈下を防ぐために非常に重要です。均一な圧縮を確実にするために、各パスをコンパクターで少なくとも 6 インチ重ねます。材料の結合を助けるために、圧縮中に水を加えます。適切に圧縮されたベース層は、石の重量を支え、ずれを防ぐ強固な基盤を提供します。
レベリング: 滑らかで均一な表面を実現する
滑らかで均一な表面を実現することは、プロの見栄えの石材設置に不可欠です。砂または細かい砂利の層を使用して、ベース層を平らにします。材料を均等に広げ、水準器を使用して高いところや低いところがあるかどうかを確認します。必要に応じて材料を追加または削除して、完全に水平な表面を作成します。滑らかな表面により、石のセッティングが非常に簡単になります。
長くてまっすぐなボードまたは水準器を使用して表面をスクリードします。これは、一貫した均一な平面を実現するのに役立ちます。精度を確保するために多方向のレベルをチェックします。完全に水平な表面は不均一な沈下を防ぎ、石が安定して整列するようにします。これには忍耐が必要ですが、努力する価値はあります。
排水: 適切な水の流出を確保する
水による石材の設置への損傷を防ぐには、適切な排水が重要です。雨水や流出物を処理できる適切な排水設備が設置場所にあることを確認してください。水をその地域から遠ざけるために、排水パイプまたはフレンチドレインの設置を検討してください。水の流出を促進するために、ベース層をわずかに傾斜させます。排水の良い場所は水による損傷を防ぎ、設置物の寿命を延ばします。
雨が降ったときに水がどのように流れるかを観察して、潜在的な問題領域を特定します。水がたまりやすい場所には排水ソリューションを設置してください。排水システムが適切なコンセントに正しく接続されていることを確認してください。排水を無視すると、将来的に高額な修理が発生する可能性があります。賢明で愚かなことをしないでください。
用地準備の材料費
| 材料 | 説明 | 単価 | 推定数量 | 総コスト |
|---|---|---|---|---|
| 砂利 | 3/4″ 基層用の砕石。 | 35ドル/立方ヤード | 5立方ヤード | $175 |
| 砕石 | 1/2″ レベリング用の砕石。 | $40/立方ヤード | 2立方ヤード | 80ドル |
| 砂 | 表面を平らにするための細かい砂。 | 25ドル/立方ヤード | 1立方ヤード | 25ドル |
| 排水管 | 4″ 穴の開いた排水管。 | $5/フィート | 50フィート | 250ドル |
| フィルターファブリック | 排水用のジオテキスタイル生地。 | 1 ドル/平方フィート | 100平方フィート | 100ドル |

ステップバイステップの設置: 不規則な石を敷いて自然な外観に仕上げる
不規則な天然ランダムルースストーンを取り付けるには、自然でプロフェッショナルな外観を実現するために、細部にまで細心の注意を払う必要があります。この章では、モルタルの塗布、石の配置、接合技術について説明するステップバイステップのガイドを提供します。適切なアプローチを使えば、素晴らしい景観を作り出すことができます。ここがゴムと道路が接する場所です。
“不規則な天然のランダムなルースストーンの自然な美しさを表現し、耐久性と視覚的に魅力的な仕上がりを保証するには、適切な設置技術が鍵となります。”
モルタルの混合: 適切な粘稠度の達成
最初のステップは、モルタルを適切な粘稠度になるまで混合することです。メーカーの指示に注意深く従ってください。乾燥したモルタル混合物に水を徐々に加え、ピーナッツバターに似た滑らかで柔軟な粘稠度が得られるまで継続的にかき混ぜます。モルタルが弱くなる可能性があるため、水を入れすぎないように注意してください。最良の結果を得るには、パドルアタッチメント付きのミキシングドリルを使用してください。ミックスを正しく行うことが重要です。
混合後、モルタルを10〜15分間消失させます。これにより薬液が十分に活性化され、作業性が向上します。モルタルは使用する前に軽く混ぜ合わせてください。硬化または乾燥し始めたモルタルは廃棄してください。モルタルの粘稠度が適切であれば、強力な接着が保証され、ひび割れが防止されます。
モルタルの塗布: 下地との完全な接触を確保する
準備した下地にこてを使ってモルタルをたっぷりと塗ります。モルタル床は、石の不規則な形状に対応できる十分な厚さ (通常は 1 ~ 2 インチ) である必要があります。モルタルと石の裏側が完全に接触していることを確認してください。各石をモルタルにしっかりと押し込み、わずかに揺さぶって良好な結合を確保します。トップ ソース ストーンの優れた製造により寸法精度が保証され、このステップがよりスムーズになります。
石の目に見える表面にモルタルがつかないようにしてください。モルタルが表面についた場合は、湿らせたスポンジですぐに拭き取ってください。石を設置する前にモルタルが乾燥しないように、小さな部分に分けて作業します。耐久性のある設置には、石と下地の間の強力な結合が不可欠です。
石の配置:視覚的に魅力的なパターンに石を配置します
視覚的に魅力的なパターンで石を配置することは芸術です。石を永久に設定する前に、さまざまなレイアウトを試してください。自然でランダムな外観を目指しますが、大きなギャップや繰り返しパターンを作成しないでください。さまざまなサイズと形状の石を使用して、視覚的な関心を生み出します。全体的な外観を評価するために頻繁に戻ります。これは良い目をします!
石をできるだけぴったりと合わせて、接合のための一定の隙間を残します。ゴムハンマーを使用して石を所定の位置に軽く叩きます。各石のレベルを確認し、必要に応じて調整します。モルタルで完全に支えられない石を支えるためにシムを使用します。石を適切に配置することが、美しく自然な外観のインスタレーションの鍵となります。あなたは不規則な天然のランダムなルースストーンを扱っていることを忘れないでください。
接合: 隙間を埋めて安定性を高める
モルタルが 24 ~ 48 時間硬化したら、目地を充填します。指示こてを使用して、石の間の隙間にモルタルを詰めます。接合部が完全に充填され、隙間が残らないようにしてください。モルタルの接合部を湿らせたスポンジで滑らかにし、一貫したプロフェッショナルな仕上がりを実現します。ジョイントすることで安定性が高まり、雑草の発生を防ぎます。
石の自然な外観を損なう可能性があるため、ジョイントを過剰に充填しないでください。石を引き立てるために色付きのモルタルを使用することを検討してください。石の表面に残った余分なモルタルはすぐに取り除いてください。耐久性と見た目の美しい設置には、適切な接合が不可欠です。
段階的なインストール時間の見積もり
| ステップ | 説明 | 推定所要時間 | 必要なツール |
|---|---|---|---|
| 混合モルタル | モルタルを適切な粘稠度に準備します。 | 30分 | ミキシングドリル、パドルアタッチメント、バケツ |
| モルタルを適用します | 基板に迫撃砲を拡散します。 | 1時間 | こて、バケツ |
| 石の配置 | モルタルに石を配置して設定します。 | 2〜4時間 | ラバーマレット、レベル、シム |
| ジョイント | 石の間のモルタルの間の隙間を埋める。 | 1〜2時間 | 湿ったトローウェル、湿ったスポンジ |
仕上げの仕上げとメンテナンス:長期にわたる美しさを確保します
適切な仕上げとメンテナンスは、あなたの美しさと完全性を維持するために不可欠です 不規則な自然 ランダムなゆるい石の設置 今後何年も。この章では、石の表面を最高の状態に保つために、クリーニング、シーリング、継続的なメンテナンスに関する重要なヒントを提供します。少しの注意は長い道のりを歩みます!
定期的なメンテナンスと適切なシーリング技術により、製品の寿命と美しさが大幅に延長されます。 天然石のインスタレーション。”
クリーニング: 余分なモルタルと破片の除去
モルタルが完全に硬化したら、石の表面から余分なモルタルや破片を取り除きます。硬いブラシと中性洗剤を使用して、石を優しくこすります。石を損傷する可能性があるため、強力な化学薬品や研磨剤の使用は避けてください。きれいな水で表面をよく洗い流してください。きれいな表面は美しさを長く保つための第一歩です。
頑固なモルタル汚れには、専用のモルタル除去剤を使用してみてください。メーカーの指示に注意深く従ってください。最初に小さく目立たない領域でリムーバーをテストし、石にダメージを与えないことを確認します。高圧洗浄も効果的ですが、表面の損傷を避けるために低圧設定を使用してください。
シーリング:石を汚れや風雨から守る
石の表面を密閉することで、汚れや風雨によるダメージから保護します。高品質のものを選ぶ 天然石 お持ちの石の種類に適したシーラーを使用してください。メーカーの指示に従ってシーラーを塗布します。通常、これには、ブラシまたはローラーを使用して薄く均一なコートを塗布することが含まれます。トップ ソース ストーンは、適切なシーリング製品の選択に関するアドバイスを提供しています。
表面を水や交通にさらす前に、シーラーを完全に乾燥させてください。暴露レベルに応じて、1 ~ 3 年ごとにシーラーを再塗布します。シーリングは、石材インスタレーションの美しさと寿命を維持するための重要なステップです。これは本当に違いを生みます。
継続的なメンテナンス: 定期的な清掃と検査
継続的なメンテナンスのためには、定期的な清掃と点検が不可欠です。石の表面を定期的に掃除するか掃除機で掃除して、汚れや破片を取り除きます。汚れを防ぐために、こぼれたものはすぐに拭き取ってください。表面に亀裂や損傷がないか定期的に検査してください。小さな問題に迅速に対処することで、より大きな問題に発展するのを防ぐことができます。
石を損傷する可能性があるため、石の表面に解氷塩を使用しないでください。代わりに、トラクションのために砂や砂利を使用してください。汚れや湿気の滞留を防ぐために、石の表面近くに生えている植物をすべて切り取ります。簡単なメンテナンスは大いに役立ちます。
亀裂や損傷の修復: 一般的な問題への対処
風化や交通量の多さにより、時間の経過とともに亀裂や損傷が発生する可能性があります。小さなひび割れは、石の色に合わせた石材補修剤で補修してください。メーカーの指示に注意深く従ってください。大きな亀裂や石の損傷がある場合は、その部分を交換することを検討してください。トップ ソース ストーンの耐久性のある高品質の石は、最小限のメンテナンスで済みます。
修復用コンパウンドを塗布する前に、損傷した領域から剥がれた破片を取り除きます。表面を交通にさらす前に、修復コンパウンドが完全に硬化するまで待ちます。より大規模な修理については専門家に依頼することを検討してください。問題に迅速に対処することで、プロジェクトが維持されます。
異形石メンテナンススケジュール
| タスク | 頻度 | 必要な材料 | 推定所要時間 |
|---|---|---|---|
| 掃き掃除・掃除機をかける | 毎週 | ほうきまたは掃除機 | 15分 |
| クリーニング | 毎月 | 中性洗剤、硬めのブラシ、水 | 30分 |
| シーリング | 1~3年ごと | ストーンシーラー、ブラシまたはローラー | 1〜2時間 |
| 検査 | 四半期ごと | なし | 10分 |
| クラック修理 | 必要に応じて | 石材補修剤、コテ | 変化します |
結論
石の産業で15年後に、不規則な自然なランダムなゆるい石を設置することは、岩を敷くだけではないことを学びました。時代を超越した風景を作成することです。自信を持って自然の芸術を裏庭に持ち込むことです。
Top Source Stone での私の経験から言えば、成功の鍵は細部にあります。適切な計画、高品質の素材、そして少しの忍耐です。私を信じて;基礎を正しくすることは “それがどこにあるのか、” プロジェクトが時の試練に耐えられるようにします。
すべての石には物語があり、適切なアプローチを使えば、本当にユニークなものを作成できることを忘れないでください。持続的な美しさと自然の雰囲気を目指しているのであれば、時間をかけて正しく行うことは常に価値があります。
よくある質問
Q1: 造園に不規則な天然のランダムなルースストーンを使用する利点は何ですか?
A1: 不規則な天然のランダムなルースストーンは、美的魅力と視覚的な興味をもたらす独特の形状のため、造園に最適です。また、耐久性があり、環境に優しく、造園プロジェクトに自然な外観を加えます。
Q2: 不規則な天然のランダムなルースストーンをどのように設置しますか?
A2: 不規則な天然のランダムなゆるい石を設置するには、最初にコンパクトな砂利を使用して安定した水平なベースを準備します。希望のパターンに石を配置し、ぴったりとフィットします。小さな石や砂利で隙間を埋め、表面が均等であることを確認します。
Q3:ゆるい石を敷くために必要なツールは何ですか?
A3: シャベル、レーキ、コンパクターなどの基本的な造園ツールが必要です。さらに、ゴム製のマレットは石の調整に役立ち、レベルはそれらが均等に置かれることを保証します。
Q4:ゆるい石の道やパティオをどのように維持しますか?
A4: 定期的なメンテナンスには、破片の除去、シフトした可能性のある石の調整、そして時々新鮮な砂利を追加してギャップを埋めることが含まれます。頑丈さを維持するには、定期的な圧縮も必要になる場合があります。
Q5: 不規則な天然のランダムなルースストーンは、交通量の多い場所に適していますか?
A5: はい、適切に設置すれば、不規則な天然のランダムなルース石でも交通量の多い場所に対応できます。しっかりと締め固め、安定させるために隙間は砂利で埋めてください。
Q6: 天然石を使用することによる環境上の利点は何ですか?
A6: 天然石 加工が最小限で済み、地元で調達できるため、二酸化炭素排出量が削減され、環境に有益です。また、VOC を排出しないため、建設に環境に優しい選択肢となります。
Q7: 不規則な天然ランダムルース石は屋内でも使用できますか?
A7: はい、これらの石は屋内で、多くの場合、キッチンやバスルームなどのエリアの壁の外装や床として使用でき、素朴で自然な美しさを提供します。
Q8:プロジェクトに適した石をどのように選びますか?
A8: 意図した使用、望ましい美学、局所的な可用性、石の自然な耐久性と気象抵抗などの要因を考慮してください。石のサプライヤーとのコンサルティングは、お客様のニーズに最適なオプションに関する洞察を提供することもできます。
外部リンク
- ランダムなゆるい石:持続可能なデザインのための自然な選択
- 自然な不規則なランダムなゆるい石被覆ベニア
- 天然の旗の舗装に関するすべて – トップソーススレート
- 庭の足がかりの石|風景 & 屋外の足がかりの石
- 秋の茶色の不規則な足がかりの石 – 石の上
- 不規則な石の旗 – ストーンウッド製品
- あなたの屋外スペースのための天然石のクレイジーな舗装アイデア
- オハイオ州で販売されているフラッグストーン - ストーンセンター
