空白の壁を見つめて考えたことがあります、 “これは、いくつかの深刻なすごい要因を使用する可能性があります”?さて、私は15年以上積み重ねられたストーンゲームに参加しています。 積み上げられた石のパネル ロケットサイエンスのように感じる必要はありません。あなたがスキルを曲げようとするDIYの住宅所有者であろうと、感動を求めている請負業者であろうと、私は頭痛の種でプロレベルの結果をもたらすシンプルで5段階のプロセスであなたの背中を持っています。
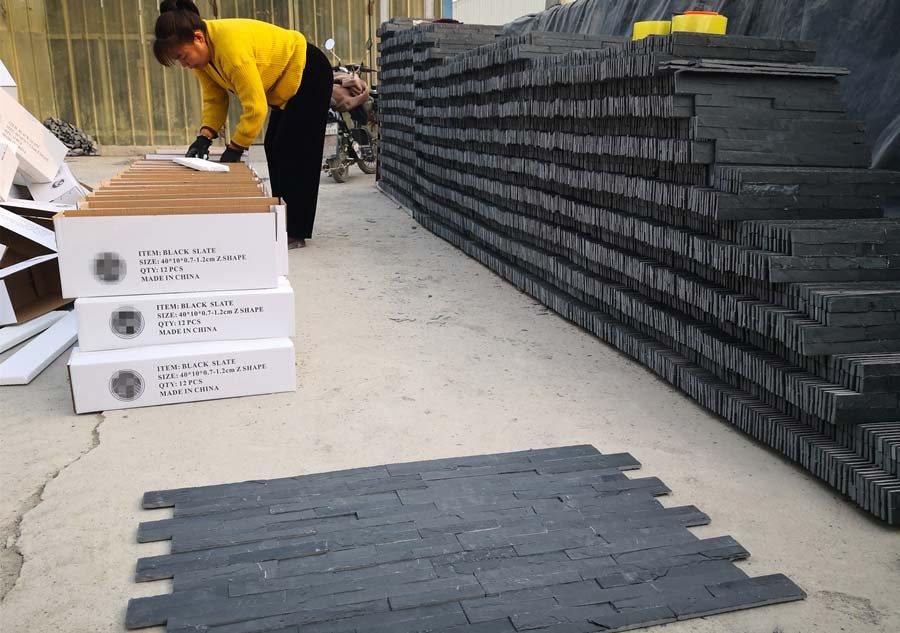
で トップソーススレート、私たちは10年以上を費やしてプレミアムを作成する芸術を完成させました 積み上げられた石のパネル 中国のヘベイの工場から直接。私の使命?時間を節約し、コストを削減し、ロックスターのように見せるための一流の素材とインサイダーのヒントでプロジェクトを釘付けにするのに役立ちます。このガイドはそれをすべて分解します。それを、あなたのチートシートとして、屋内、または屋内で見事な壁に考え、実際の経験から実用的なノウハウが描かれています。
あなたのスペースを高める準備はできましたか?これらの5つのステップに飛び込んで、そのビジョンを現実に変えましょう。ステップごと、ツールごと、ストーンバイストーンです。
次のプロジェクトに積み重ねられた石のパネルを選択する理由
石造りの産業で15年以上の人として、私は直接見たことがあります 積み上げられた石のパネル 普通の空間を素晴らしいショーケースに変えることができます。これらの多用途パネルは、自然の美しさと実用的な設置が完璧に融合しており、DIY 愛好家とプロの請負業者の両方でますます人気が高まっています。暖炉を改修する場合でも、目を引くアクセント壁を作成する場合でも、 積み上げられた石のパネルがアクセス可能な道を提供 特殊な石工技術がなくても劇的な結果を達成できます。
積み石パネルとは何ですか?
積み重ねられた石のパネル 石片が相補的なパターンで配置され、簡単に設置できるように裏材に取り付けられたプレハブのセクションです。個々の石を 1 つずつ配置する必要がある従来の石細工とは異なり、これらのパネルは連動してシームレスで自然な外観の石の表面を作成します。パネルのサイズは通常約 6 です。″ ×24″ さまざまな石の深さを特徴として、誰もが愛する本物の立体的な外観を作り出します。
これらのパネルを革新的なものにしているのは、石材加工を民主化し、長年の石積み経験がなくても誰でもプロのような仕上がりを実現できる点にあります。住宅所有者と請負業者の両方が、従来の石材の設置方法と比較して大幅な時間の節約を高く評価しています。
パネル構造の基礎
モダンな石材突き板パネル 天然石と人工の代替品の 2 つの主な種類があります。天然パネルは実際の石片を裏材に貼り付けて使用しますが、製造オプションではコンクリートや樹脂などの素材を使用して石の外観を再現します。これらのパネルの連結デザインにより、適切に設置すると継ぎ目がほとんど見えなくなり、連続した石の外観が得られます。
天然石と人工積み石: 長所と短所
プロジェクトに適切なパネルを選択するときは、パネル間の違いを理解する必要があります。 自然の積み石 そして、製造されたオプションは、正しい決定を下すために非常に重要です。それぞれのプロジェクトには、特定のプロジェクト要件や予算の制約に応じて、明確な利点があります。
比較表: 天然石パネルと人造石パネル
| 特徴 | 天然石積み石 | 擬似積み石 |
|---|---|---|
| 材料 | 本物の石(スレート、珪岩、石灰岩) | コンクリート、ポリウレタン、樹脂 |
| 重さ | 8 ~ 15 ポンド/平方フィート (軽量オプション) | 4~10ポンド/平方フィート |
| 料金 | 平方フィートあたり 15 ~ 40 ドル | 平方フィートあたり 5 ~ 15 ドル |
| 耐久性 | 非常に耐久性があります (50 年以上) | 優れた耐久性 (15 ~ 30 年) |
| 耐湿性 | 適切に密封されている場合は優れています | とても良い;一部は防水です |
| インストールの難易度 | 適度 | 簡単 |
| 信頼性 | 100%本物の外観と質感 | 説得力のあるものから明らかに人工的なものまでさまざまです |
DIY を容易にする軽量パネル (15 ポンド/平方フィート未満) の利点
従来、石の重量は DIY 設置の大きな制限要因でしたが、軽量パネルの登場により状況は完全に変わりました。 Top Source Slate では、本物の石の外観を損なうことなく、プレミアム軽量パネル (平方フィートあたり 15 ポンド未満) を作成する技術を完成させました。この画期的な進歩により、基本的な DIY スキルを持つほぼ誰でも、プロ並みの石材インスタレーションを作成できるようになりました。
設置に重量が重要な理由
従来の石造物は非常に重いため、多くの場合、構造補強と専門家による設置が必要です。当社の軽量パネルはこれらの懸念を解消し、ほとんどの用途で追加の構造サポートなしで設置できるようにします。特殊な器具を使わずに一人でも簡単に扱うことができ、丸鋸などの標準的な工具で切断できます。
これらの利点により、軽量パネルは、本物の石の外観を損なうことなく自分でプロジェクトに取り組みたいと考えている住宅所有者にとって特に価値があります。重量の軽減により、配送コストが削減され、設置時間が短縮され、通常は個々の石を設置するよりも 50% 早くなります。
用途: 暖炉から屋外ファサードまで
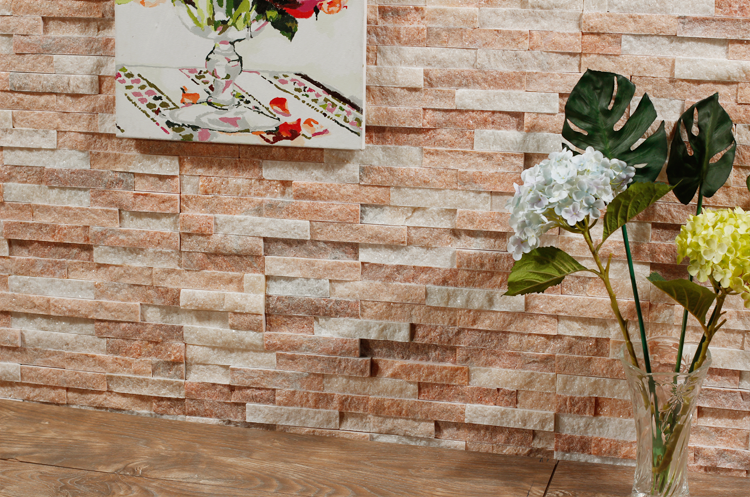
の多用途性 積み重ねられた石のパネルはそれらに適しています 室内空間と屋外空間の両方で無数の用途に使用できます。お客様にアドバイスさせていただきましたが、 暖炉のファサード用の積み石パネル それは彼らのリビングルームを日常から非日常へと完全に変えました。立体的なテクスチャーが目を引く焦点を生み出し、あらゆる空間に即座に個性を加えます。
人気の設置場所
ご自宅の中で、これらのパネルは、ドラマチックな暖炉の周囲、質感を加えるアクセント壁、自然な優雅さを備えたキッチンのバックスプラッシュ、適切に密封されている場合は湿気に耐えるバスルームの壁を作成するのに優れています。高品質のパネルは耐久性があるため、家の外装のアクセント、屋外のキッチンの周囲、庭の壁などの屋外用途にも同様に適しています。
学ぶ 方法 内壁に積み石パネルを設置する 方法は簡単で、ほとんどの住宅所有者は、いくつかの説明ビデオを見た後に基本をマスターします。パネルのモジュール式の性質により、専門的なスキルを必要とする従来の石積みとは異なり、途中で調整できる寛容な設置プロセスが実現します。
ツールと材料: 成功のための準備
何百人ものクライアントの課題解決を支援した後、 積み上げ石パネルプロジェクト, 適切な準備がプロの結果とアマチュアの試みの大きな違いであることを学びました。開始する前に適切なツールと材料を準備しておくと、設置がはるかにスムーズになり、プロジェクト中のハードウェア ストアでの煩わしい作業を回避できます。暖炉の模様替えを計画している場合でも、アクセントウォールを計画している場合でも、素晴らしい結果を達成するために必要なすべてのことを説明します。 積み上げられた石のパネル。
必須ツール: ウェットソー、刻みこて、水準器など
成功 石パネルの設置 まずは適切なツールを手元に用意することから始まります。ここで手を抜きたくなるかもしれませんが、高品質のツールに投資すると、精度、効率、プロフェッショナルな仕上がりが得られます。これらのツールの多くは他の住宅改善プロジェクトにも役立つため、投資する価値があります。
必須ツールのチェックリスト
パネルの切断と成形には、ダイヤモンドブレードを備えた湿式鋸が非常に役立ち、過度の粉塵や破損を生じることなく石材を正確に切断できます。接着剤を塗布するには、ギザギザのコテ(3/8)が必要です。” ノッチはほとんどの用途でうまく機能し、適切な被覆と接着を確保します。その他の必須ツールには、水準器 (長さ 4 フィート以上)、巻尺、チョーク ライン、混合バケツ、混合パドル付きドリル、ゴム槌、安全メガネなどがあります。
作業を容易にする特殊工具も見逃せません。微調整用のパネル ニッパー、安全のための防塵マスク、シーラントを塗布するためのコーキング ガンなどです。頑丈な作業スペースと鋸馬があれば、切断プロセス中の負担を軽減できます。
必須材料: セメントボード、モルタル、シーラント
インストールの基礎は、 元帳パネル 彼ら自身。適切な基材、接着剤、仕上げ材を使用すると、完成したプロジェクトの寿命と構造的完全性が確保されます。理解する 積み石パネルに最適な裏材 はさまざまなアプリケーションにとって重要です。
基材と接着剤の比較
| アプリケーションの種類 | 推奨される裏地 | 粘着タイプ | 特別な考慮事項 |
|---|---|---|---|
| 屋内乾式壁 | セメントボード(HardieBacker) | 改良型シンセットモルタル | 16 ごとにスタッドに固定″ |
| 外壁 | 防水加工を施したセメント板 | ポリマー改質モルタル | 耐候性バリアが必要 |
| 暖炉の周囲 | セメント板(耐熱) | 高温モルタル | 地域の建築基準法を確認する |
| コンクリート/石材 | 直接申請可能 | 標準薄セットモルタル | 表面処理が重要 |
| バスルーム/ウェットエリア | 防水加工を施したセメント板 | 防水モルタル | すべての接合部のシールが必須 |
ほとんどの設置では、下地としてセメントボード、接着用に改良されたシンセットモルタル、完成した作品を保護するための適切なシーラントが必要です。設置時の切断や潜在的な損傷を考慮して、材料を 10% 超過して計算します。
予算に合わせてナチュラルパネルとフェイクパネルからお選びください
多くの場合、予算の考慮事項が材料の選択に影響します。天然石は比類のない真正性を提供しますが、価格と重量が高くなります。製造されたパネルは、低コストで説得力のある美観を提供し、DIY 設置の取り扱いが簡単です。
正しい材料の選択
信頼性が最優先されるプレミアム プロジェクトの場合、 天然石パネル 比類のない質感とキャラクターのバリエーションを提供します。予算を重視した改修の場合、市販のオプションを使用すると、コストを 30 ~ 50% 削減しながら、優れた視覚的魅力を提供できます。 Top Source Slate では、1 平方フィートあたり 15 ポンド未満の軽量天然石パネルを専門とし、本物の外観と設置の利便性の完璧なバランスを提供します。
材質を選択する際は、初期費用だけでなく耐久性も考慮してください。天然石は通常、人工石よりも数十年長持ちし、初期投資が高くても長期的な価値が高まる可能性があります。
安全装備: 設置中に身を守る
理解 内壁に積み石パネルを取り付ける方法 安全に行うことは、技術的な手順を知ることと同じくらい重要です。適切な安全装置は怪我を防ぎ、より快適な作業環境を作り出します。
必須の安全装置
石を切断したり扱ったりするときは、飛来する破片による目の怪我を防ぐために、必ず保護眼鏡を着用してください。防塵マスクまたは呼吸用保護具は、特に切断作業中に石の微粒子から肺を保護します。丈夫な手袋は鋭利な刃先や擦り傷から保護し、膝パッドは床での作業を快適にします。長時間にわたるプロジェクトの場合は、電動工具を使用するときの耳の保護と、落下物から保護するための頑丈な履物を考慮してください。
接着剤やシーラントを使用する場合は、適切な換気が不可欠であることに注意してください。化学製品を使用する前に必ず製造元の安全指示を読み、プロジェクト全体を通じて救急キットを入手できるようにしてください。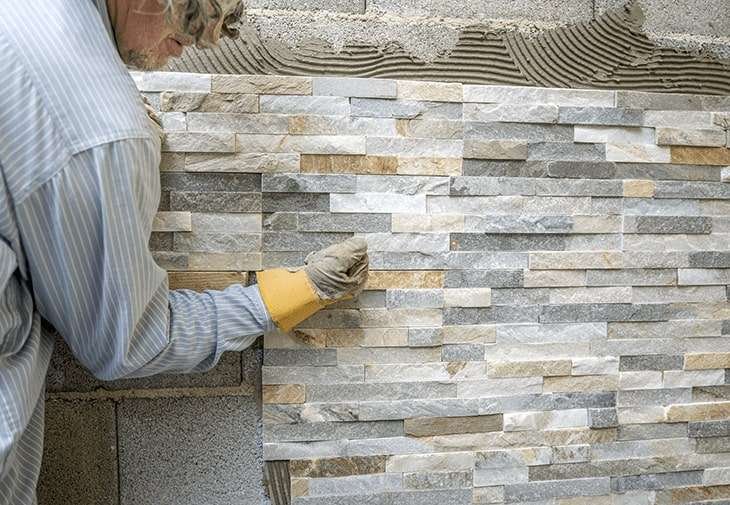
5 ステップのインストール プロセス: 準備から完了まで
持っている 無数に積み上げられた石板が設置されている 私の 15 年のキャリアを通じて、専門的な結果を得るには体系的なアプローチに従うことが重要であると自信を持って言えます。見事なインスタレーションと凡庸なインスタレーションを分けるのは、素材の品質だけではなく、技術の正確さです。この 5 ステップのプロセスを改良して、屋内の造作壁や屋外ファサードのどちらで作業している場合でも、完璧な結果を達成できるようにしました。
ステップ 1: 表面を準備する (セメントボードと乾式壁)
あらゆるものの基礎 成功 石のクラッディング インストール 適切な表面処理にあります。理解する 積み石パネルに最適な裏材 すべての表面が石の重量と湿気の特性をサポートできるわけではありません。
表面処理の比較
| 裏材 | に適しています | インストールに関する注意事項 | 耐荷重 |
|---|---|---|---|
| セメントボード(推奨) | すべてのアプリケーション | 16 でスタッドに固定″ 間隔 | 最大 30 ポンド/平方フィート |
| 防水バッカーボード | バスルーム、外装 | 縫い目に防水膜が必要 | 最大25ポンド/平方フィート |
| 乾式壁 | 軽量パネルのみ (15 ポンド/平方フィート未満) | 濡れた場所には推奨されません | 最大15ポンド/平方フィート |
| 合板 | 推奨されません | 湿気によるダメージを受けやすい | 厚さによって異なります |
まずは壁面が清潔で乾燥しており、構造的に健全であることを確認することから始めます。ほとんどの設置では、セメントボードが理想的な下地となります。特に Top Source Slate の軽量パネル (平方フィートあたり 15 ポンド未満) は、寿命を延ばすために適切な裏打ちが必要です。
ステップ 2: パネルを正確に測定して切断する
何かを適用する前に モルタル、詳細なレイアウト計画を作成します。壁の寸法を測ってパネルの配置を計算し、目に見える継ぎ目や厄介なカットを最小限に抑えます。当社の寸法が一貫したパネルにより、不規則な個々の石を扱うよりもこのプロセスが大幅に簡単になります。
パネルカット技術
いつ 切断 積み上げられた石のパネル、常にカットラインを明確にマークし、きれいなエッジを得るためにダイヤモンドブレードを備えた湿式のこぎりを使用してください。コンセントや器具の場合は、2 回測定して 1 回カットします。最初は少し小さめの開口部から始めて、必要に応じて調整できます。トップ ソース スレート パネルは精密に製造されているため、過度に破損することなくきれいにカットできます。
ステップ 3: 接着剤の塗布とパネルの固定
理解 内壁に積み石パネルを取り付ける方法 適切に接着するには、接着剤の塗布をマスターする必要があります。ミックスしてください モルタル メーカーの仕様によると、通常は屋内用途にはポリマー改質シンセット、屋外設置にはより堅牢な屋外グレードの製品です。
両方を使ってモルタルを塗ります。 “バター” パネル裏面に直接塗布する方法と、 “ノッチ” 接着力を最大限に高めるための方法(壁にうねを作成する)。この二重塗布技術により完全にカバーされ、耐久性を損なう可能性のある空洞部分が排除されます。
ステップ 4: コーナーと継ぎ目を積み重ねて仕上げる
壁の下部から取り付けを開始し、上に向かって列をなしていきます。パネル間の継ぎ目をずらして(レンガ模様のように)、自然な外観を作り出します。コーナーの場合は、長辺と短辺を交互にするか、専用のコーナーピースを使用して洗練された外観を実現します。
各パネルを所定の位置にしっかりと押し込み、レベルを頻繁に確認します。トップ ソース スレートの一貫したパネル寸法によりこのプロセスが簡素化され、適切に取り付けられた場合には継ぎ目がほとんど見えなくなります。自然に見える結果を得るには、水平方向の配置を時々わずかに変更します。
ステップ 5: 寿命と耐候性を高めるためのシーリング
インストールが完了したら、 モルタル 硬化後(通常は 24 ~ 48 時間)、特に屋外用途や濡れた場所には、高品質の浸透シーラーを塗布することが不可欠です。この目に見えない保護により、色が維持され、汚れが防止され、自然な要素に対する石の自然な耐性が強化されます。
ポンプスプレーまたはブラシを使用してシーラーを薄く均一に塗布し、層を追加する前に各アプリケーションが完全に浸透できるようにします。当社のパネルは、多孔質パネルに比べて最小限のシーラーしか必要とせず、少ない塗布量で優れた保護を実現します。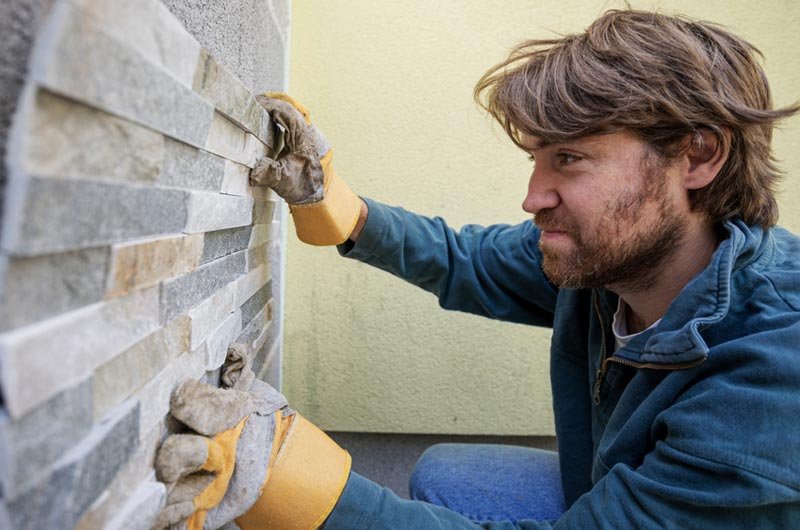
完璧な外観を実現するためのプロのヒントと仕上げ
何百ものインストール後 Top Source Slate での 15 年間のキャリアを通じて積み上げられた石パネル, 私は事実上あらゆる課題に遭遇し、それらすべてに対する解決策を開発してきました。アマチュアのように見えるインスタレーションとプロの傑作の違いは、多くの場合、一握りの専門家の技術と仕上げの違いに帰着します。これらのプロのヒントは、よくある落とし穴を回避し、目標とする雑誌に掲載されるような結果を達成するのに役立ちます。
間違いの回避: レベリング、継ぎ目の位置合わせ、モルタルの失敗
経験豊富な設置者でも、最終的な外観を損なうミスをする可能性があります。 ストーンベニアパネル。私が目にする最も一般的な問題には、不適切なレベリング、目に見える継ぎ目、簡単に防ぐことができたはずのモルタルの問題などが含まれます。
インストールによくある落とし穴
| 問題 | 原因 | プロフェッショナルなソリューション |
|---|---|---|
| 凹凸のある表面 | レベルベースラインなしで開始する | レーザーレベルを使用して、常に完全に水平なスタートラインを確立してください |
| 目に見える縫い目 | パネル配置計画が不十分 | 垂直方向の縫い目をずらして、異なるボックスのパネルを組み合わせる |
| モルタルのにじみ出し | 接着剤の過剰塗布 | 一貫した 3/8 を適用する″ ギザギザのこてパターン、余分な部分はすぐに掃除してください |
| コーナーギャップ | 不適切な切断技術 | シームレスなコーナーには 45° の角度で留め継ぎカットを使用します |
| 色の不一致 | 同じボックスセクションからパネルを取り付ける | 設置前に複数のボックスのパネルを混合する |
軽量パネル (1 平方フィートあたり 15 ポンド未満) を使用する場合は、パネルを完全に覆う必要がありますが、取り付け中に過剰な圧力によって損傷する可能性があるため、接着剤の塗布に特に注意してください。
デザインのカスタマイズ: 石の種類、テクスチャ、仕上げ
の美しさ 自然の積み石 その多様性とユニークな特徴にあります。のために 暖炉のファサード用の積み石パネル、キッチンのバックスプラッシュには、空間を明るくする明るい珪岩の恩恵を受けることがよくありますが、踊る炎を強調する暗いスレートトーンを検討してください。
デザイナーのパターンテクニック
パネルを時々反転したり、対照的な色のアクセントストーンを挿入したりして、視覚的な面白さを生み出します。複数の壁にまたがる連続設置の場合は、コーナーの周りのパターンの流れを維持して、統一感のある外観を実現します。当社の精密に製造されたパネルは、構造の完全性を維持しながら創造的な配置を可能にします。
非常に広い壁の場合は、全体の調和を維持しながら視覚的な単調さを打破するために、途中で微妙なパターンのシフトや寸法の変化を組み込むことを検討してください。このテクニックは、カスタム設置時の取り扱いを簡素化する軽量パネルで特に効果的です。
メンテナンスのヒント: パネルを何年も美しく保つ
適切なメンテナンスにより、 積み上げられた石のパネル 何十年も美しさを保ちます。屋内設置の場合は、柔らかいブラシアタッチメントを使用して定期的にほこりを取り除き、定期的に徹底的なメンテナンスを行うために、石材に特化した pH バランスの取れたクリーナーで掃除してください。
季節メンテナンススケジュール
屋外の設置には季節的な注意が必要です。春になったら、冬による損傷がないか検査し、必要に応じて再度密閉します。夏のメンテナンスには、柔らかい毛のブラシと適切な石クリーナーを使った丁寧な掃除が含まれます。秋の準備には、冬の前の石の緩みのチェックと対処が含まれます。一方、冬のメンテナンスでは、適切な排水メンテナンスによる氷の損傷の防止に重点が置かれます。
最初に必ず目立たない部分で洗浄剤をテストしてください。酢やレモンベースの製品などの酸性洗浄剤は、表面を永久にエッチングしてしまう可能性があるため、天然石には決して使用しないでください。
プロジェクト用の高品質パネルを入手できる場所
適切なサプライヤーを見つけることは、適切な設置技術と同じくらい重要です。高品質のパネルは、一貫した厚さ、寸法精度、本物の石の外観が特徴です。 Top Source Slate では、大量の契約を必要とせずにプレミアム パネルに特化しており、小規模なプロジェクトでもプロ グレードの材料を利用できるようにしています。
設置に最適な接着剤の選択
積み石パネルに最適な接着剤の選択 特定のアプリケーションによって異なります。セメントボード上のほとんどの内装工事では、ポリマー改質シンセットモルタルが優れた接着力を発揮します。屋外用途には、屋外での使用のために特別に配合された耐候性接着剤が必要です。当社の技術チームは、プロジェクトのパラメータに基づいて特定の製品を推奨できます。
簡単な参照のために、天然パネルと人工パネルの両方が、特定の重量クラスに評価された接着剤を使用すると最高のパフォーマンスを発揮します。当社の 15 ポンド/平方フィート未満の軽量パネルは、接着強度を維持しながら微妙な構造の動きに対応する最新の柔軟な接着剤との相性が抜群です。
結論
15年を経て、 積み重ねられた石の産業, 積み上げられた石のパネルが、最小限の労力であらゆる空間を傑作に変える方法を見てきました。私の 5 ステップのプロセスは取り付けを簡素化し、自然の美しさと実用的なデザインを融合させ、DIY ユーザーにもプロにも最適です。軽量パネルの選択からツールやシーリング技術の習得まで、このガイドでは、長持ちする美しい壁を作成するための準備を整えます。鍵は?高品質の素材と系統的なアプローチ。
ココです トップソーススレート当社は中国の河北省で10年以上にわたり、高級積み石パネルを製造してきました。私たちの使命は、価値と専門知識を提供し、お客様のプロジェクトを確実に輝かせることです。あなたの空間を変える準備はできていますか?これらの手順から始めて、プロのように壁を高めましょう。
