
Steen paden die zinken, verschuiven of overwoekerd worden na slechts één seizoen frustreren zelfs de meest geduldige huiseigenaren. Wat een blijvende landschapsfunctie zou moeten zijn, wordt vaak een terugkerende onderhoudshoofdpijn wanneer de juiste constructietechnieken niet vanaf het begin worden gevolgd.
Een losse steen Pad dat de tand des tijds bestaat, vereist meer dan alleen het verspreiden van rotsen over uw tuin. De sleutel ligt in het selecteren van kwaliteitsmaterialen, het voorbereiden van een goede basis en het implementeren van slimme ontwerpstrategieën die veel voorkomende problemen zoals zinkende stenen, onkruidgroei en erosie voorkomen. Deze uitgebreide gids loopt u door de essentiële stappen om een duurzaam losse stenen pad te bouwen dat uw buitenruimte verbetert met minimale onderhoudseisen.
Planning van uw losse stenen pad: ontwerp- en materiële overwegingen
Een losse steen Pathway kan uw buitenruimte transformeren, zowel functionaliteit als visuele aantrekkingskracht aan uw landschap toevoegen. Voordat je je schop vastpakt, zorgt er een goede planning voor dat je pad de tand des tijds doorstaat, terwijl je de esthetiek van je huis aanvult. Laten we de essentiële overwegingen onderzoeken voor het ontwerpen van uw perfecte stenen pad.
Een goed ontworpen losse stenen route brengt esthetische aantrekkingskracht in evenwicht met praktische duurzaamheid, die een doordachte planning van lay-out, materialen en installatietechnieken vereist om de tevredenheid op de lange termijn te garanderen.
Uw stijl definiëren: het pad matchen met uw huis en tuin
Je losse stenen pad zou moeten aanvoelen als een natuurlijke uitbreiding van de architecturale stijl van je huis. Overweeg voor hedendaagse huizen slanke lei of uniform grind. Traditionele huizen koppelen prachtig met onregelmatige flagstone of afgeronde rivierrots. Leg inspiratie van uw bestaande landschapselementen - uw pad zou niet als een bijzaak moeten voelen, maar een “Perfecte pasvorm” met uw algehele buitenontwerp.
Overweeg hoe het pad zal worden gebruikt. Is het een primaire loopbrug die belangrijke gebieden verbindt? Of een meanderend tuinpad? Hoogwaardige gebieden vereisen meer duurzame steenkeuze en de juiste basisbereiding, terwijl decoratieve paden meer flexibiliteit bieden in materialen.
Het kleurenpalet is belangrijk belangrijk. Selecteer stenen die aanvullen of doordacht contrasteren met de buitenkant van uw huis en bestaande landschapsfuncties. Natuurlijke aardtonen bieden doorgaans tijdloze aantrekkingskracht, terwijl brutale kleuren opvallende focuspunten kunnen creëren.
Meten en in kaart brengen: het beoordelen van het padgebied en de vereisten
Begin met het in kaart brengen van de route van uw pad, met behulp van tuinslangen of touw om de stroom te visualiseren. Voor natuurlijk aantrekkelijke rondingen, vermijd perfecte geometrische vormen - subtiele, stromende lijnen creëren meer aangename esthetiek. Standaard pathway-breedtes variëren van 18-36 inch voor tuinpaden tot 48-60 inch voor grote loopbruggen.
Bereken uw vierkante meters zorgvuldig om materiaalhoeveelheden te bepalen. Meet de lengte en breedte en vermenigvuldig deze cijfers vervolgens. Voeg 10-15% extra toe om rekening te houden met bezuinigingen, breuk en toekomstige reparaties. Voor losse stenen paden moet je ook basismaterialen zoals gemalen steen of zand berekenen.
Steen selectie: soorten stenen, kleuren en texturen
De steen die u selecteert, heeft invloed op zowel functionaliteit als uiterlijk. Gemeenschappelijke opties voor losse stenen paden zijn afgebroken graniet, erwtengrind, gemalen kalksteen, rivierrotsen en flagstone stukken. Elk brengt unieke kenmerken aan uw ontwerp:
| Stenen type | Typische kosten (per vierkante ft) | Duurzaamheidsbeoordeling | Onderhoudsniveau | Beste toepassingen | Regionale beschikbaarheid |
|---|---|---|---|---|---|
| Gedaalde graniet | $ 0,50- $ 1,50 | Medium | Matig (vereist af en toe aanvulling) | Casual tuinpaden, droogtetolerante landschappen | Op grote schaal beschikbaar in westerse regio's |
| Erwtengrind | $ 1,00-$ 3,00 | Middelhoog | Laag (jaarlijkse hark/nivellering) | Gezinsvriendelijke paden, mediterrane ontwerpen | Universeel beschikbaar |
| Gemalen kalksteen | $ 0,75- $ 2,25 | Hoog | Laag (compacts in de loop van de tijd) | Met veel verkeer, formele tuinen | Gebruikelijk in Midwestern/Eastern Regions |
| Rivierrotsen | $ 2,50- $ 5,00 | Erg hoog | Zeer laag (incidentele reiniging) | Drainagegebieden, Aziatisch geïnspireerde tuinen | Premium prijzen in woestijnregio's |
| Willekeurige losse steen | $ 3,00- $ 7,50 | Erg hoog | Laag (incidentele herpositionering) | Formele ingangen, showcase paden | Specialty leveranciers zoals topbron leisteen |
Materiaalkosten schatten: budgettering voor uw project
Voorbij de steen zelf, budget voor noodzakelijke basismaterialen. Een goed geconstrueerde losse stenen route vereist 2-4 inch verdichte gemalen steenbasis, gevolgd door 1-2 inch zand of fijn grind, vervolgens gegarneerd met je gekozen stenen materiaal.
Over het hoofd geen randbeperkingen over het hoofd zien - of het nu metaal, plastic, steen of baksteen is - die het verspreiden en de frisse lijnen van uw pad voorkomen. Deze kosten meestal $ 1- $ 3 per lineaire voet, maar verlengen de levensduur van uw pad aanzienlijk. Professionele landschapsstof onder uw pad ($ 0,10- $ 0,30 per vierkante voet) voorkomt de groei van onkruid terwijl de juiste drainage mogelijk is.
Voor aangepaste stenen selecties die perfect overeenkomen met uw ontwerpvisie, overweeg speciale leveranciers zoals topbron leisteen. Hun willekeurige losse stenen aanbiedingen bieden uitzonderlijke duurzaamheid met aangepaste dimensies en afwerkingen om te voldoen aan specifieke projectvereisten en esthetische doelen.
Met een zorgvuldige planning van het ontwerp en de materialen van uw losse stenen pad, creëert u een buitenfunctie die uw landschap verbetert en tegelijkertijd jaren van praktisch gebruik biedt met minimaal onderhoud.
Stapsgewijze handleiding voor het bouwen van een duurzaam los stenen pad
Het creëren van een prachtig stenen pad hoeft geen professionele tuinaanleg te zijn. Met de juiste materialen en technieken kan elke huiseigenaar een duurzaam los stenen pad bouwen dat zijn buitenruimte verbetert en tegelijkertijd minimaal onderhoud vergt. Deze gids verdeelt het proces in beheersbare stappen die langdurige resultaten garanderen.
Een goed aangelegd pad van losse stenen vereist een grondige voorbereiding van de locatie, hoogwaardige materialen en strategische installatietechnieken om een stabiel, onkruidbestendig looppad te creëren dat vele jaren meegaat met minimaal onderhoud.
Voorbereiding van de locatie: opruimen, egaliseren en nivelleren
Succesvolle bouwsteenpaden beginnen met een goede voorbereiding van de locatie. Begin met het markeren van de grenzen van uw pad met behulp van palen en touw of een tuinslang om de uiteindelijke vorm te visualiseren. De standaardbreedte voor tuinpaden is 1,20 meter, waardoor een comfortabele doorgang voor mensen en tuingereedschap mogelijk is.
Maak het gemarkeerde gebied volledig leeg en verwijder alle vegetatie, stenen en puin. Graaf uit tot een diepte van 6-8 inch om uw funderingsmaterialen op te bergen. Deze diepte is cruciaal voor het creëren van een stabiele basis die toekomstige bezinking en verplaatsing van uw stenen voorkomt.
Helling van het uitgegraven gebied met een lichte helling (ongeveer 1-2%), weg van eventuele constructies, om een goede afwatering te garanderen. Gebruik een niveau- en touwlijn om te controleren op een consistente helling. Verdicht de grond met behulp van een handstamper of een trilplaat om een stevige ondergrond te creëren die dat wel doet “opsluiten” uw funderingsmaterialen.
De basis leggen: onkruidbarrière en basismaterialen installeren
Een stabiele fundering is het geheim van het bouwen van stenen paden die de tand des tijds doorstaan. Begin met het leggen van professioneel landschapsweefsel over het gehele uitgegraven gebied, tot 7-10 cm voorbij de geplande randen. Deze kritische barrière voorkomt onkruid en zorgt tegelijkertijd voor waterafvoer, waardoor veel voorkomende onderhoudsproblemen worden aangepakt.
Voeg vervolgens een laag van 7-10 cm grof steenslag of grind (meestal ¾ inch) toe als uw primaire basismateriaal. Gelijkmatig verdelen en grondig verdichten met een trilplaat, waarbij u meerdere keren doorloopt om de maximale dichtheid te bereiken. Deze basislaag zorgt voor cruciale drainage en voorkomt vorst in koudere klimaten.
Bedek de basis met een laagje grof zand of fijn steenslag van 1-2 inch. Hierdoor ontstaat een gladde, gelijkmatige bodem voor uw stenen, terwijl deze doorlaatbaar blijft voor drainage. Licht verdichten en nogmaals controleren op de juiste sortering om er zeker van te zijn dat het water van de constructies wegstroomt.
Steenplaatsing: technieken voor stabiliteit en esthetiek
| Stenen type | Gewicht per vierkante voet | Typische dikte | Tussenruimte | Randbehandeling | Beoordeling oppervlaktetextuur |
|---|---|---|---|---|---|
| Fagstone | 12-15 lbs | 1-2 inch | 00,5-2 inch | Gesneden of natuurlijk | Medium-ruw |
| Leisteen | 10-13 pond | 00,5-1 inch | 00,25-1 inch | Schoon gesneden | Glad-medium |
| Kalksteen | 11-14 pond | 1,5-2,5 inch | 00,5-1,5 inch | Ruw gesneden | Medium |
| Graniet | 15-18 pond | 1-3 inch | 00,5-1 inch | Gezaagd of thermisch | Ruw |
| Kwartsiet | 13-16 pond | 1-2 inch | 00,5-1 inch | Naturel of gesneden | Medium-ruw |
Wanneer u stenen plaatst, begin dan aan het ene uiteinde van het pad en werk systematisch naar het andere uiteinde. Voor natuurlijk ogende arrangementen kunt u de steenafmetingen variëren, terwijl u consistente openingen tussen de stukken behoudt. Plaats elke steen stevig in de zandbodem en zorg ervoor dat hij plat ligt en niet wiebelt.
Gebruik een rubberen hamer om de stenen voorzichtig op hun plaats te tikken. Controleer regelmatig met een waterpas om een gelijkmatig oppervlak te behouden. Zorg er voor optimale stabiliteit voor dat elke steen minimaal drie contactpunten heeft met omliggende stenen of randen. Streef naar openingen van ½ tot 1 inch tussen de stenen – breed genoeg om natuurlijke bezinking mogelijk te maken, maar smal genoeg om struikelgevaar te voorkomen.
Het pad beveiligen: randen en stabilisatie
Installeren Een goede rand is cruciaal voor de levensduur van doe-het-zelf losse stenen paden. Opties zijn onder meer metalen randstrips, kunststof landschapsranden, bakstenen randen of grotere stenen. Bevestig het door u gekozen randmateriaal stevig in de omringende grond en strek het minimaal 10 cm diep uit om verschuiving en migratie van uw padmaterialen te voorkomen.
Zodra de randen op hun plaats zitten, vult u de openingen tussen de stenen met het door u gekozen materiaal: afgebroken graniet, fijn grind of steenstof zijn uitstekende opties. Veeg het materiaal in alle spleten en besproei het vervolgens lichtjes met water om het te laten bezinken. Dit bindmateriaal voorkomt steenbeweging terwijl de doorlaatbaarheid behouden blijft.
Voor resultaten van professionele kwaliteit die toekomstig onderhoud tot een minimum beperken, koopt u uw stenen bij fabrikanten zoals Top Source Slate, bekend om hun consistente kwaliteit en nauwkeurige maatspecificaties. Hun strenge kwaliteitscontrole in twee fasen zorgt voor uniforme stenen die op natuurlijke wijze in elkaar grijpen, waardoor het bezinken en verschuiven in de loop van de tijd wordt verminderd. Met een standaard levertijd van 20-30 dagen kunnen zelfs grote padprojecten worden geleverd met bijpassende stenen die een samenhangend, stabiel oppervlak creëren.
Als u deze stappen volgt voor het bouwen van stenen paden, resulteert dit in een prachtige, duurzame toevoeging aan uw landschap die de komende jaren minimaal onderhoud vereist.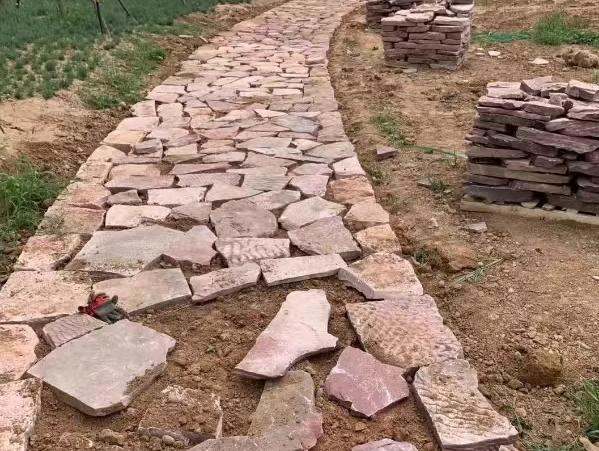
Onderhoud van uw losse stenen pad: langdurige zorg en probleemoplossing
Een goed aangelegd pad van losse stenen kan bij goed onderhoud uw landschap jarenlang verfraaien. Hoewel deze natuurlijke looppaden rustieke charme en duurzaamheid bieden, vereisen ze wel regelmatig aandacht om hun schoonheid en functionaliteit te behouden. Deze gids behandelt essentiële onderhoudsstrategieën voor stenen paden om ervoor te zorgen dat uw pad er goed uitziet, ondanks veranderende seizoenen en uitdagende omstandigheden.
Regelmatig onderhoud van losse stenen paden verlengt hun levensduur aanzienlijk, waarbij preventieve maatregelen zoals goede randen, seizoensschoonmaak en snelle reparaties effectiever zijn dan reactieve oplossingen voor grote problemen.
Onkruidbestrijding: effectieve strategieën voor preventie en verwijdering
Onkruid is de meest voorkomende klacht onder eigenaren van stenen paden. De beste verdediging begint tijdens de installatie met kwaliteitslandschapsdoek onder uw pad. Overweeg voor bestaande trajecten deze preventieve maatregelen en behandelingsopties:
Breng tweemaal per jaar (vroege lente en herfst) een herbicide vóór opkomst aan op het pad om zaadkieming te voorkomen zonder de omliggende planten te beschadigen. Als milieuvriendelijk alternatief doodt een azijnoplossing (1 gallon witte azijn, 1 kopje zout, 1 eetlepel afwasmiddel) effectief bestaand onkruid zonder chemicaliën in uw tuin te introduceren.
Voor hardnekkig onkruid dat tussen stenen groeit, gebruikt u een onkruidhulpmiddel met een lange steel om het hele wortelstelsel te verwijderen in plaats van alleen het zichtbare gedeelte af te breken. Regelmatig vegen van de paden voorkomt de ophoping van vuil op plaatsen waar onkruidzaden wortel kunnen schieten. Onthoud dat consistent “behandeling ter plaatse” van opkomend onkruid vergt minder inspanning dan het aanpakken van een volledige plaag.
Zinkende stenen aanpakken: technieken voor het optillen en nivelleren
Na verloop van tijd kunnen natuurlijke bezinking en erosie ervoor zorgen dat stenen zinken of verschuiven. Dit zorgt voor oneffen oppervlakken en mogelijk struikelgevaar. Wanneer u een verzonken steen opmerkt, behandel deze dan onmiddellijk om verdere bederf te voorkomen:
| Ernst van het probleem | Reparatiemethode | Gereedschap vereist | Materiële behoeften | Geschatte tijd | Professioneel kostenbereik |
|---|---|---|---|---|---|
| Kleine zinking (0,25-0,5″)) | Eenvoudige lift & Vullen | Koevoet, handmanipulatie | Hoekig zand (0,5 cu.ft.) | 15-30 minuten per steen | $ 10-25 per steen |
| Matig zinken (0,5-1,5″)) | Volledige steenreset | Koevoet, sabotage, waterpas | Grof zand/steenslag (1 cu.ft.) | 30-45 minuten per steen | $ 25-40 per steen |
| Ernstig zinken (>1.5″)) | Basisreconstructie | Schop, sabotage, waterpas | Grindbasis + zand (2+ cu.ft.) | 1-2 uur per sectie | $ 40-75 per sectie |
| Meerdere steenfalen | Vervanging van secties | Volledige gereedschapsset + compactor | Complete basismaterialen + nieuwe stenen | 3-4 uur per 10 vierkante meter. | $ 150-300 per 10 vierkante meter. |
| Drainagegerelateerd falen | Installatie van ondergrondse afvoer | Graafapparatuur | Afvoerbuis, grind, landschapsweefsel | 4-8 uur | $ 300-600 |
Voor kleine aanpassingen tilt u de verzonken steen voorzichtig op met een koevoet of een troffel, voegt u verdichtbaar materiaal eronder toe (hoekig zand werkt het beste) en stampt u het materiaal vervolgens stevig aan voordat u de steen terugplaatst. Controleer het niveau van de steen ten opzichte van de omliggende stenen en pas deze indien nodig aan totdat het oppervlak vlak is.
Erosiepreventie: beheer van waterafvoer en bodemstabiliteit
Water is zowel essentieel voor uw tuin als potentieel destructief voor uw stenen pad. Effectief onderhoud van stenen paden omvat het beheren van de waterstroom om erosie te voorkomen. Installeer afvoerkanalen of Franse afvoeren langs paden in gebieden met hevige regenval of slechte afvoer.
Houd de gebieden in de gaten waar uw pad het gazon of de tuinbedden ontmoet; deze overgangszones zijn bijzonder kwetsbaar voor erosie. Overweeg om kleine bermen of wadi's aan te leggen om het water van uw pad af te leiden. Voor paden op hellingen maak je klein “snelheidsdrempels” steen om de paar meter om de waterstroom te vertragen en erosieschade te verminderen.
Seizoensonderhoud: voorbereiding op winter en zomer
Verschillende seizoenen bieden unieke uitdagingen voor natuursteen paden. Verwijder in de herfst regelmatig gevallen bladeren om ontbinding en verkleuring te voorkomen. Zorg er vóór de winter voor dat alle stenen waterpas en stabiel zijn, omdat vries-dooicycli bestaande problemen kunnen overdrijven.
Gebruik voor het verwijderen van sneeuw plastic schoppen in plaats van metaal om krassen of afbrokkelende stenen te voorkomen. Vermijd het gebruik van typische strooizouten, die natuursteen kunnen beschadigen. Gebruik in plaats daarvan zand of calciummagnesiumacetaat (CMA), dat zachter is voor zowel stenen oppervlakken als omliggende planten.
Voer in het voorjaar een grondige inspectie uit na de laatste nachtvorst en behandel eventuele winterschade onmiddellijk. Zomeronderhoud moet zich richten op onkruidbestrijding en af en toe spoelen om stof en pollen te verwijderen die steenoppervlakken dof kunnen maken.
Voor paden die zijn gebouwd met hoogwaardige materialen van leveranciers als Top Source Slate, zijn de onderhoudsvereisten vaak beperkt dankzij de consistente kwaliteit en nauwkeurige maatspecificaties van de stenen. Hun toewijding aan responsieve communicatie en deskundig advies reikt verder dan de aankoop en biedt advies over de juiste verzorgingstechnieken die specifiek zijn voor hun producten, zodat uw traject jarenlang zijn schoonheid behoudt.

Conclusie
Uit mijn jaren in de steenhandel heb ik geleerd dat dit een blijvende ervaring is losse steen Het pad gaat niet alleen over de stenen zelf, het gaat over de fundering, de planning en het onderhoud. Het overslaan van stappen kan in eerste instantie tijd besparen, maar u betaalt er later voor met kopzorgen en extra werk.
Bij Top Source Slate zien we deze trajecten als meer dan alleen functionele elementen; ze zijn een investering in de schoonheid en waarde van uw huis. Om het goed te doen, betekent het selecteren van kwaliteitsmaterialen en begrijpen hoe ze in de loop van de tijd zullen presteren. Het gaat erom iets te creëren dat lang meegaat en waarde toevoegt aan uw ruimte.
Uiteindelijk gaat het bij het bouwen van een geweldig stenen pad erom dat je het de eerste keer goed doet. Het is een beetje een investering vooraf, maar betrouwbare stenen vinden en de moeite nemen om deze op de juiste manier te installeren? Dat is een slam-dunk.
