Ooit naar een lege muur gestaard en dacht, “Dit kan een serieuze wow -factor gebruiken”? Nou, ik ben al meer dan 15 jaar in het gestapelde Stone -spel en ik ben hier om je te vertellen dat je ruimte zou transformeren met gestapelde stenen panelen hoeft niet als raketwetenschap te voelen. Of je nu een doe-het-zelf-huiseigenaar jeukt om je vaardigheden te buigen of een aannemer die indruk wil maken, ik heb je rug met een eenvoudig proces in vijf stappen dat resultaten op pro-niveau oplevert-zonder de hoofdpijn.
Bij Topbron leisteen, we hebben meer dan een decennium besteed aan het perfectioneren van de kunst van het maken van premium gestapelde stenen panelen rechtstreeks uit onze fabriek in Hebei, China. Mijn missie? Om u te helpen uw project te nagelen met eersteklas materialen en insider-tips die tijd besparen, kosten besparen en u eruit laten zien als een rockster. Deze gids breekt het allemaal af-denk aan je spiekbriefje tot verbluffende muren, binnen of buiten, met praktische knowhow afkomstig van de echte ervaring.
Klaar om uw ruimte te verheffen? Laten we in deze vijf stappen duiken en van die visie omzetten in de realiteit-step-voor-stap, gereedschap-per-tool en steen per steen.
Waarom kiezen voor gestapelde stenen panelen voor uw volgende project
Als iemand met meer dan 15 jaar in de stenen industrie, heb ik uit de eerste hand gezien hoe gestapelde stenen panelen Kan gewone ruimtes transformeren in verbluffende vitrines. Deze veelzijdige panelen bieden de perfecte mix van natuurlijke schoonheid en praktische installatie, waardoor ze steeds populairder worden voor zowel doe -het -zelfliefhebbers als professionele aannemers. Of u nu een open haard renoveert of een opvallende accentmuur creëert, Gestapelde stenen panelen bieden een toegankelijke manier om dramatische resultaten te bereiken zonder gespecialiseerde metselwerkvaardigheden.
Wat zijn gestapelde stenen panelen?
Gestapelde stenen panelen zijn vooraf gefabriceerde delen van stenen stukken gerangschikt in een complementair patroon en gemonteerd op een rugmateriaal voor eenvoudige installatie. In tegenstelling tot traditioneel steenwerk dat een voor een moet plaatsen om individuele stenen te plaatsen, richten deze panelen zich in elkaar om een naadloos, natuurlijk ogend stenen oppervlak te creëren. De panelen meten meestal ongeveer 6″ x 24″ en zijn voorzien van verschillende steendieptes om die authentieke, dimensionale look te creëren waar we allemaal van houden.
Wat deze panelen revolutionair maakt, is de manier waarop ze metselwerk democratiseren, waardoor iedereen professioneel ogende resultaten kan bereiken zonder jarenlange metselervaring. Zowel huiseigenaren als aannemers waarderen de aanzienlijke tijdsbesparing in vergelijking met traditionele steeninstallatiemethoden.
Basisprincipes van paneelconstructie
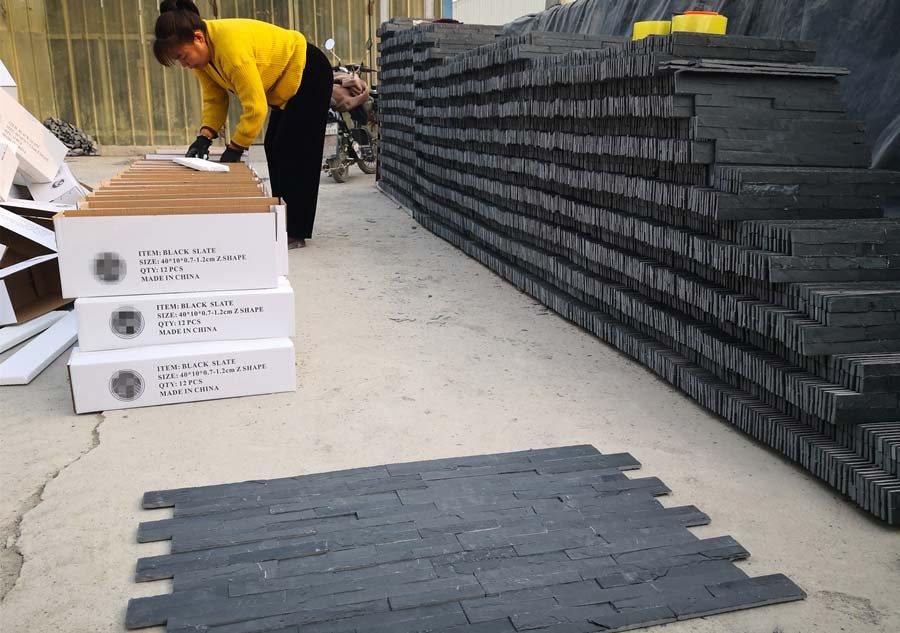
Moderne stenen fineerpanelen zijn er in twee hoofdvariëteiten: natuursteen en gefabriceerde alternatieven. Natuurlijke panelen maken gebruik van echte stenen stukken die aan een rugmateriaal zijn gehecht, terwijl gefabriceerde opties het uiterlijk van steen nabootsen met behulp van beton, hars of andere materialen. Het in elkaar grijpende ontwerp van deze panelen zorgt bij correcte installatie voor vrijwel onzichtbare naden, wat resulteert in een doorlopend steeneffect.
Natuurlijke versus namaakgestapelde steen: voor- en nadelen
Wanneer u de juiste panelen voor uw project selecteert, moet u de verschillen ertussen begrijpen natuurlijke gestapelde steen en gefabriceerde opties zijn cruciaal voor het nemen van de juiste beslissing. Elk heeft duidelijke voordelen, afhankelijk van uw specifieke projectvereisten en budgetbeperkingen.
Vergelijkingstabel: natuurlijke versus kunststenen panelen
| Functie | Natuurlijke gestapelde steen | Faux gestapelde steen |
|---|---|---|
| Materiaal | Echte steen (leisteen, kwartsiet, kalksteen) | Beton, polyurethaan of hars |
| Gewicht | 8-15 lbs/sq ft (lichtgewicht opties) | 4-10 kg/m2 |
| Kosten | $ 15-40 per vierkante voet | $ 5-15 per vierkante voet |
| Duurzaamheid | Extreem duurzaam (50+ jaar) | Goede duurzaamheid (15-30 jaar) |
| Vochtbestendigheid | Uitstekend als het goed is afgesloten | Erg goed; sommige zijn waterdicht |
| Installatieproblemen | Gematigd | Eenvoudig |
| Authenticiteit | 100% authentieke look en textuur | Varieert van overtuigend tot overduidelijk kunstmatig |
Voordelen van lichtgewicht panelen (minder dan 15 lbs/sq ft) voor doe-het-zelfgemak
Het gewicht van steen is van oudsher een belangrijke beperkende factor bij doe-het-zelf-installaties, maar lichtgewichtpanelen hebben het spel volledig veranderd. Bij Top Source Slate hebben we de kunst van het creëren van premium lichtgewicht panelen (minder dan 15 pond per vierkante voet) geperfectioneerd die geen concessies doen aan het authentieke steenuiterlijk. Deze doorbraak heeft professioneel ogende steeninstallaties toegankelijk gemaakt voor vrijwel iedereen met basisvaardigheden voor doe-het-zelf.
Waarom gewicht belangrijk is bij installatie
Traditioneel metselwerk vereist vaak structurele versterking en professionele installatie vanwege het extreme gewicht. Onze lichtgewicht panelen nemen deze zorgen weg, waardoor installatie zonder extra structurele ondersteuning in de meeste toepassingen mogelijk is. Ze kunnen gemakkelijk door één persoon worden gehanteerd zonder speciale apparatuur en kunnen worden gesneden met standaardgereedschap zoals cirkelzagen.
Deze voordelen maken lichtgewichtpanelen bijzonder waardevol voor huiseigenaren die hun projecten zelf willen aanpakken zonder concessies te doen aan het authentieke uiterlijk van steen. Het lagere gewicht betekent ook lagere verzendkosten en snellere installatietijden – doorgaans 50% sneller dan het plaatsen van individuele stenen.
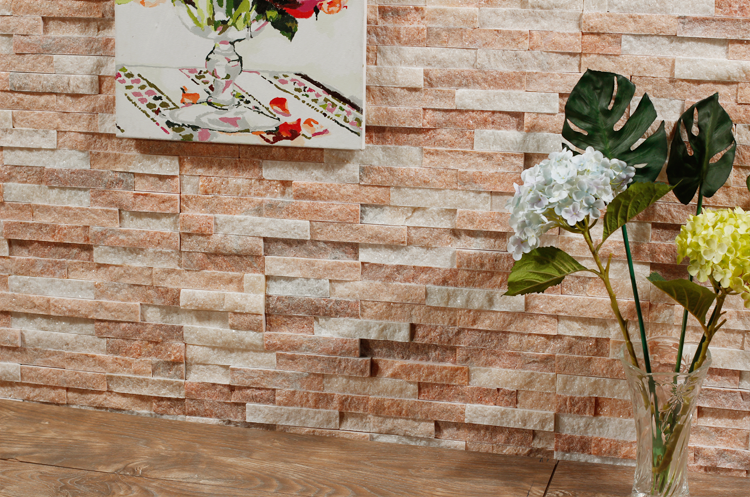
Toepassingen: Van open haarden tot buitengevels
De veelzijdigheid van gestapelde stenen panelen maken ze geschikt voor talloze toepassingen in zowel binnen- als buitenruimtes. Ik heb klanten geadviseerd gestapelde stenen panelen voor gevels van open haarden die hun huiskamers volledig transformeerden van gewoon naar buitengewoon. De dimensionale textuur creëert een brandpunt dat de aandacht trekt en direct karakter toevoegt aan elke ruimte.
Populaire installatielocaties
In uw huis blinken deze panelen uit in het creëren van dramatische omlijstingen van open haarden, accentmuren die textuur toevoegen, keukenachterwanden met natuurlijke elegantie en badkamerwanden die bestand zijn tegen vocht als ze op de juiste manier zijn afgedicht. De duurzaamheid van kwaliteitspanelen maakt ze net zo geschikt voor buitentoepassingen, zoals accenten aan de buitenkant van huizen, buitenkeukens en tuinmuren.
Leer hoe installeer gestapelde stenen panelen op binnenmuren is eenvoudig, waarbij de meeste huiseigenaren de basis onder de knie hebben na het bekijken van een paar instructievideo’s. Het modulaire karakter van de panelen zorgt voor een vergevingsgezind installatieproces dat aanpassingen onderweg mogelijk maakt, in tegenstelling tot traditioneel metselwerk dat gespecialiseerde vaardigheden vereist.
Hulpmiddelen en materialen: klaar voor succes
Na honderden klanten te hebben geholpen met hun gestapelde stenen panelenprojectenIk heb geleerd dat een goede voorbereiding het belangrijkste verschil is tussen professionele resultaten en amateurpogingen. Als u over de juiste gereedschappen en materialen beschikt voordat u begint, verloopt de installatie veel soepeler en worden frustrerende werkzaamheden in de bouwmarkt tijdens het project voorkomen. Of u nu een make-over voor uw open haard of een accentmuur plant, ik begeleid u door alles wat u nodig heeft om verbluffende resultaten te bereiken met uw gestapelde stenen panelen.
Essentiële gereedschappen: natzaag, getande troffel, waterpas en meer
Succesvol installatie van stenen panelen begint met het bij de hand hebben van het juiste gereedschap. Hoewel u misschien in de verleiding komt om op dit punt te bezuinigen, zal het investeren in kwaliteitsgereedschappen zijn vruchten afwerpen in de vorm van precisie, efficiëntie en professioneel ogende resultaten. Veel van deze hulpmiddelen zijn ook nuttig voor andere projecten voor woningverbetering, waardoor ze waardevolle investeringen zijn.
Een onmisbare toolchecklist
Voor het zagen en vormgeven van panelen is een natte zaag met een diamantzaagblad van onschatbare waarde voor nauwkeurige zaagsneden door steen zonder overmatig stof of breuk. Voor het aanbrengen van lijm heb je een getande lijmkam nodig (⅜” inkepingen werken goed voor de meeste toepassingen) om een goede dekking en hechting te garanderen. Bijkomende essentiële gereedschappen zijn onder meer een waterpas (minstens 1,20 meter lang), meetlint, krijtlijn, mengemmer, boormachine met mengpeddel, rubberen hamer en veiligheidsbril.
Vergeet het speciale gereedschap dat het werk eenvoudiger maakt niet: een paneeltang voor kleine aanpassingen, een stofmasker voor de veiligheid en een kitpistool voor het aanbrengen van kit. Het hebben van een stevige werkruimte en zaagpaarden zal je rug sparen tijdens het zaagproces.
Onmisbare materialen: cementplaat, mortel en kit
De fundering van uw installatie is net zo belangrijk als de grootboekpanelen zich. De juiste substraten, lijmen en afwerkingsmaterialen garanderen een lange levensduur en structurele integriteit van uw voltooide project. Het begrijpen van de beste dragermateriaal voor gestapelde steenpanelen is cruciaal voor verschillende toepassingen.
Vergelijking van substraten en lijmen
| Toepassingstype | Aanbevolen steun | Kleefsoort | Speciale overwegingen |
|---|---|---|---|
| Droge muur binnenshuis | Cementplaat (HardieBacker) | Gemodificeerde thinset-mortel | Bevestig elke 16 noppen aan de noppen″ |
| Buitenmuur | Cementplaat met waterdichting | Polymeer-gemodificeerde mortel | Weerbarrière vereist |
| Open haard surround | Cementplaat (hittebestendig) | Mortel voor hoge temperaturen | Controleer de lokale bouwvoorschriften |
| Beton/metselwerk | Directe toepassing mogelijk | Standaard dunsetmortel | Oppervlaktevoorbereiding cruciaal |
| Badkamer/natte ruimtes | Cementplaat met waterdichting | Waterdichte mortel | Afdichten van alle verbindingen verplicht |
Voor de meeste installaties heb je cementplaat nodig als ondergrond, gemodificeerde thinset-mortel voor hechting en geschikte afdichtingsmiddelen om het voltooide werk te beschermen. Bereken materialen met een overschot van 10% om rekening te houden met sneden en mogelijke schade tijdens de installatie.
Kiezen tussen natuurlijke en namaakpanelen voor uw budget
Budgetoverwegingen zijn vaak van invloed op materiële keuzes. Natuursteen biedt ongeëvenaarde authenticiteit, maar heeft een hogere prijs en gewicht. Gefabriceerde panelen bieden overtuigende esthetiek tegen lagere kosten en zijn gemakkelijker te hanteren bij doe-het-zelf-installaties.
De juiste materiaalkeuze maken
Voor premiumprojecten waarbij authenticiteit voorop staat, bieden onze natuurstenen panelen leveren ongeëvenaarde textuur en karaktervariatie. Voor budgetbewuste renovaties kunnen gefabriceerde opties een uitstekende visuele aantrekkingskracht bieden en tegelijkertijd de kosten met 30-50% verlagen. Bij Top Source Slate zijn we gespecialiseerd in lichtgewicht natuursteenpanelen van minder dan 15 kg per vierkante meter, waardoor we de perfecte balans bieden tussen authentieke uitstraling en installatiegemak.
Houd bij het selecteren van materialen rekening met de levensduur en de initiële kosten. Natuursteen gaat doorgaans tientallen jaren langer mee dan gefabriceerde alternatieven en biedt mogelijk een betere waarde op de lange termijn, ondanks hogere investeringen vooraf.
Veiligheidsuitrusting: uzelf beschermen tijdens de installatie
Begrip Hoe gestapelde stenen panelen op binnenmuren te installeren veilig zijn is net zo belangrijk als het kennen van de technische stappen. Een goede veiligheidsuitrusting voorkomt letsel en creëert een comfortabelere werkomgeving.
Essentiële veiligheidsuitrusting
Draag altijd oogbescherming bij het zagen of hanteren van stenen om oogletsel door rondvliegend puin te voorkomen. Stofmaskers of ademhalingstoestellen beschermen uw longen tegen fijne steendeeltjes, vooral tijdens snijwerkzaamheden. Robuuste handschoenen beschermen tegen scherpe randen en schaafwonden, terwijl kniebeschermers comfort bieden tijdens werk op vloerniveau. Overweeg bij langdurige projecten gehoorbescherming bij het gebruik van elektrisch gereedschap en stevig schoeisel om te beschermen tegen vallende materialen.
Houd er rekening mee dat een goede ventilatie essentieel is bij het werken met lijmen en kitten. Lees altijd de veiligheidsinstructies van de fabrikant voordat u chemische producten gebruikt, en houd tijdens uw hele project een EHBO-doos bij de hand.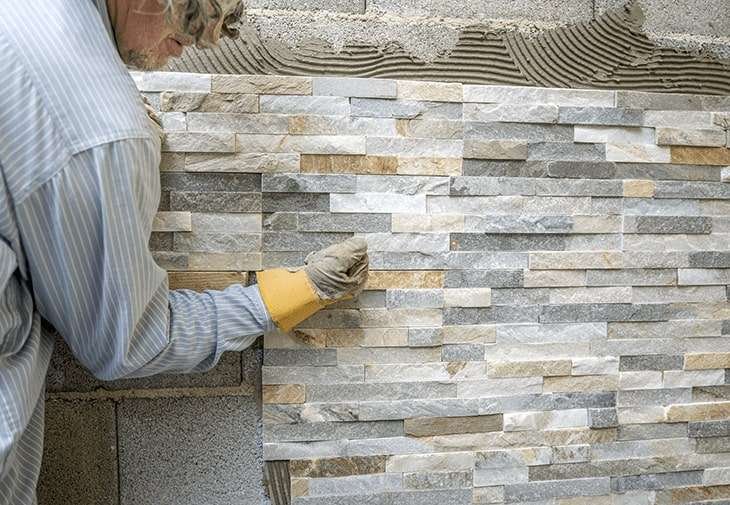
Het installatieproces in 5 stappen: van voorbereiding tot perfectie
Hebben installeerde talloze gestapelde stenen panelen Gedurende mijn 15-jarige carrière kan ik vol vertrouwen zeggen dat het volgen van een systematische aanpak cruciaal is voor professionele resultaten. Wat een verbluffende installatie onderscheidt van een middelmatige installatie, is niet alleen de kwaliteit van de materialen, maar ook de precisie van je techniek. Ik heb dit 5-stappenproces verfijnd om u te helpen onberispelijke resultaten te bereiken, of u nu aan een binnenmuur of een buitengevel werkt.
Stap 1: Uw oppervlak voorbereiden (cementplaat versus gipsplaat)
De basis van elk succesvol Stenen bekleding installatie ligt in een goede voorbereiding van het oppervlak. Het begrijpen van de beste dragermateriaal voor gestapelde steenpanelen is van cruciaal belang: niet alle oppervlakken kunnen de gewichts- en vochteigenschappen van steen dragen.
Vergelijking van oppervlaktevoorbereiding
| Steunmateriaal | Geschikt voor | Installatie-opmerkingen | Gewicht capaciteit |
|---|---|---|---|
| Cementplaat (aanbevolen) | Alle toepassingen | Bevestig aan noppen op 16″ intervallen | Tot 30 kg/m2 |
| Waterdichte steunplaat | Badkamers, buitenkant | Vereist waterdichtingsmembraan bij de naden | Tot 25 kg/m2 |
| Gipsplaten | Alleen lichtgewicht panelen (minder dan 15 lbs/sq ft) | Niet aanbevolen voor natte ruimtes | Maximaal 15 kg/m2 |
| Multiplex | Niet aanbevolen | Gevoelig voor vochtschade | Varieert op basis van dikte |
Begin door ervoor te zorgen dat uw muuroppervlak schoon, droog en structureel gezond is. Voor de meeste installaties biedt cementplaat het ideale substraat, met name de lichtgewicht panelen van Top Source Slate (minder dan 15 kg per vierkante meter), die nog steeds een goede achterkant nodig hebben voor een lange levensduur.
Stap 2: Panelen met precisie meten en snijden
Voordat u iets toepast mortier, maak een gedetailleerd inrichtingsplan. Meet uw muur en bereken de plaatsing van de panelen om zichtbare naden en lastige sneden te minimaliseren. Onze maatvaste panelen maken dit proces aanzienlijk eenvoudiger dan het werken met onregelmatige individuele stenen.
Technieken voor het snijden van panelen
Wanneer snijden gestapelde stenen panelenMarkeer uw zaaglijn altijd duidelijk en gebruik een natte zaag met een diamantzaagblad voor zuivere randen. Voor stopcontacten of armaturen meet u twee keer en knipt u één keer – te beginnen met een iets kleinere opening die indien nodig kan worden verfijnd. De precisieproductie van Top Source Slate-panelen zorgt voor zuivere sneden zonder overmatige breuk.
Stap 3: Lijm aanbrengen en panelen vastzetten
Begrip Hoe gestapelde stenen panelen op binnenmuren te installeren vereist het beheersen van de lijmtoepassing. Meng je mortier volgens de specificaties van de fabrikant - doorgaans een met polymeer gemodificeerde thinset voor binnentoepassingen en een robuuster product voor buitentoepassingen voor buiteninstallaties.
Breng mortel aan met behulp van beide “boter” methode (rechtstreeks aanbrengen op de achterkant van het paneel) en de “inkeping” methode (ribbels op de muur creëren) voor maximale hechting. Deze dubbele applicatietechniek zorgt voor een volledige dekking en elimineert holle plekken die de duurzaamheid in gevaar kunnen brengen.
Stap 4: Hoeken en naden stapelen en perfectioneren
Begin met de installatie onderaan de muur en werk in rijen naar boven. Verspreid de naden tussen panelen (zoals baksteenpatronen) om een natuurlijke uitstraling te creëren. Voor hoeken wissel je lange en korte zijden af of gebruik je speciale hoekstukken voor een gepolijste look.
Druk elk paneel stevig op zijn plaats en controleer het niveau regelmatig. De consistente paneelafmetingen van Top Source Slate vereenvoudigen dit proces en creëren bijna onzichtbare naden wanneer ze op de juiste manier worden geïnstalleerd. Voor natuurlijk ogende resultaten kunt u de horizontale uitlijning af en toe enigszins variëren.
Stap 5: Afdichten voor een lange levensduur en weersbestendigheid
Zodra de installatie is voltooid en mortier is uitgehard (doorgaans 24-48 uur), is het aanbrengen van een hoogwaardige penetrerende sealer essentieel, vooral voor buitentoepassingen of natte ruimtes. Deze onzichtbare bescherming behoudt de kleur, voorkomt vlekken en verbetert de natuurlijke weerstand van de steen tegen elementen.
Breng de sealer in dunne, gelijkmatige lagen aan met behulp van een pompspuit of borstel, zodat elke applicatie volledig kan doordringen voordat er extra lagen worden aangebracht. Onze panelen vereisen minimale sealer vergeleken met poreuze alternatieven, waardoor ze uitstekende bescherming bieden met minder toepassingen.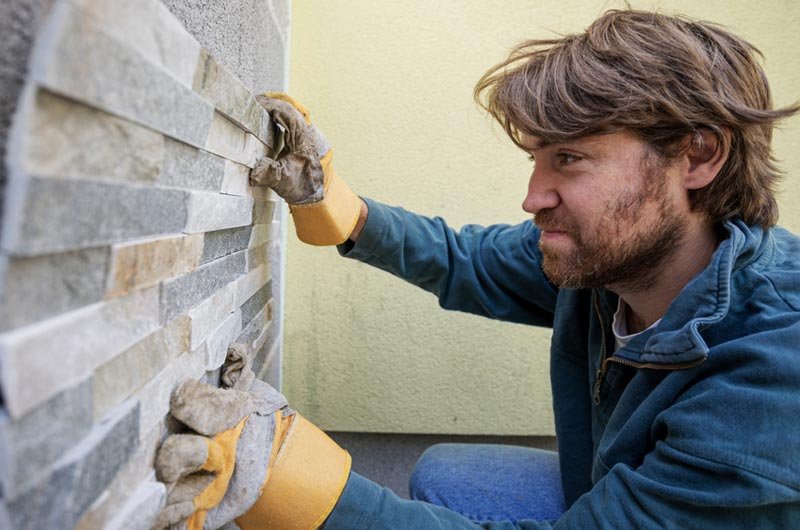
Professionele tips en finishing touch voor een vlekkeloze look
Na het installeren van honderden gestapelde stenen panelen gedurende mijn 15-jarige carrière bij Top Source Slate, Ik ben vrijwel elke uitdaging tegengekomen en heb er oplossingen voor ontwikkeld. Het verschil tussen een amateuristisch ogende installatie en een professioneel meesterwerk komt vaak neer op een handvol deskundige technieken en afwerkingen. Met deze professionele tips kunt u veelvoorkomende valkuilen vermijden en het tijdschriftwaardige resultaat bereiken waar u naar streeft.
Fouten vermijden: nivellering, uitlijning van naden en ongelukken met mortel
Zelfs ervaren installateurs kunnen fouten maken die het uiteindelijke uiterlijk van uw installatie in gevaar brengen stenen fineer panelen. De meest voorkomende problemen die ik zie, zijn onjuiste nivellering, zichtbare naadlijnen en mortelproblemen die gemakkelijk voorkomen hadden kunnen worden.
Veelvoorkomende installatievalkuilen
| Probleem | Oorzaak | Professionele oplossing |
|---|---|---|
| Ongelijk oppervlak | Beginnen zonder niveaubasislijn | Breng altijd een perfect vlakke startlijn tot stand met behulp van een laserwaterpas |
| Zichtbare naden | Slechte planning van de paneelopstelling | Verspreid verticale naden en mix panelen uit verschillende dozen |
| Mortel lekt | Overmatige lijmtoepassing | Consistent toepassen 3/8″ getand spaanpatroon, overtollige lijm onmiddellijk verwijderen |
| Hoekschepen | Onjuiste snijtechniek | Gebruik versteksneden in hoeken van 45° voor naadloze hoeken |
| Kleurinconsistentie | Installeren van panelen uit hetzelfde kokerprofiel | Meng panelen uit meerdere dozen vóór installatie |
Wanneer u werkt met lichtgewicht panelen (minder dan 15 kg per vierkante meter), moet u extra voorzichtig zijn met de verdeling van de lijm, aangezien deze panelen volledige dekking vereisen, maar tijdens de installatie kunnen worden beschadigd door overmatige druk.
Uw ontwerp aanpassen: steensoorten, texturen en afwerkingen
Het mooie van natuurlijke gestapelde steen ligt in zijn veelzijdigheid en unieke karakter. Voor gestapelde stenen panelen voor gevels van open haardenOverweeg donkerdere leisteentinten die de dansende vlammen benadrukken, terwijl keukenachterwanden vaak profiteren van lichter kwartsiet dat de ruimte opfleurt.
Ontwerperpatroontechnieken
Creëer visuele interesse door af en toe een paneel om te draaien of accentstenen met contrasterende kleuren in te voegen. Bij doorlopende installaties die meerdere wanden overspannen, moet u de patroonstroom rond de hoeken behouden voor een samenhangend uiterlijk. Onze nauwkeurig vervaardigde panelen maken creatieve arrangementen mogelijk met behoud van de structurele integriteit.
Voor uitzonderlijk brede muren kunt u overwegen om halverwege een subtiele patroonverschuiving of dimensionale variantie op te nemen om de visuele monotonie te doorbreken en tegelijkertijd de algehele harmonie te behouden. Deze techniek is bijzonder effectief bij onze lichtgewicht panelen die het hanteren tijdens aangepaste installaties vereenvoudigen.
Onderhoudstips: houd uw panelen jarenlang prachtig
Goed onderhoud garandeert uw gestapelde stenen panelen blijven tientallen jaren mooi. Voor binneninstallaties: regelmatig afstoffen met een zacht borstelopzetstuk en reinigen met steenspecifieke pH-gebalanceerde reinigingsmiddelen voor incidenteel dieper onderhoud.
Seizoensgebonden onderhoudsschema
Buiteninstallaties vereisen seizoensgebonden aandacht. Inspecteer in het voorjaar op winterschade en sluit indien nodig opnieuw af. Het zomeronderhoud omvat een zachte reiniging met zachte borstels en geschikte steenreinigers. De herfstvoorbereiding omvat het controleren op losse stenen en het aanpakken ervan vóór de winter, terwijl het winteronderhoud zich richt op het voorkomen van ijsschade door goed drainageonderhoud.
Test schoonmaakproducten altijd eerst op een onopvallende plek en gebruik nooit zure schoonmaakmiddelen zoals azijn of producten op citroenbasis op natuursteen, omdat deze het oppervlak permanent kunnen etsen.
Waar u kwaliteitspanels voor uw project kunt vinden
Het vinden van de juiste leverancier is net zo belangrijk als de juiste installatietechniek. Kwaliteitspanelen hebben een consistente dikte, maatnauwkeurigheid en een authentiek steenuiterlijk. Bij Top Source Slate zijn we gespecialiseerd in premiumpanelen zonder dat er bulkverplichtingen nodig zijn, waardoor professionele materialen toegankelijk worden voor kleinere projecten.
De beste lijm voor uw installatie kiezen
Het selecteren van de beste lijm voor gestapelde steenpanelen hangt af van uw specifieke toepassing. Voor de meeste binneninstallaties op cementplaten biedt polymeergemodificeerde thinset-mortel een uitstekende hechting. Buitentoepassingen vereisen weerbestendige lijmen die speciaal zijn ontwikkeld voor gebruik buitenshuis. Ons technisch team kan specifieke producten aanbevelen op basis van uw projectparameters.
Voor een snelle referentie: zowel natuurlijke als samengestelde panelen presteren het beste met lijmen die geschikt zijn voor hun specifieke gewichtsklasse. Onze lichtgewicht panelen van minder dan 15 kg per vierkante meter werken uitstekend met moderne flexibele lijmen die subtiele structurele bewegingen mogelijk maken terwijl de hechtsterkte behouden blijft.
Conclusie
Na 15 jaar in de gestapelde steenindustrie, heb ik gezien hoe gestapelde stenen panelen elke ruimte met minimale inspanning in een meesterwerk kunnen veranderen. Mijn vijfstappenproces vereenvoudigt de installatie, waarbij natuurlijke schoonheid wordt gecombineerd met praktisch ontwerp, perfect voor zowel doe-het-zelvers als professionals. Van het kiezen van lichtgewicht panelen tot het beheersen van gereedschappen en afdichtingstechnieken: deze gids helpt u bij het maken van prachtige muren die lang meegaan. De sleutel? Kwaliteitsmaterialen en een methodische aanpak.
Ik ben Coco van Topbron leisteen, waar we al meer dan tien jaar hoogwaardige gestapelde stenen panelen maken in Hebei, China. Onze missie is om waarde en expertise te leveren, zodat uw project glanst. Klaar om uw ruimte te transformeren? Begin met deze stappen en verhoog uw muren als een professional.
