Precyzja montażu narożnego często decyduje o powodzeniu projektu murarskiego lub wymaga kosztownych przeróbek na miejscu. Źle wykonane przejścia na krawędziach elewacji budynku tworzą luki strukturalne i niszczą ciągłość wizualną, jakiej oczekują klienci komercyjni. Wykonawcy, którzy ignorują niuanse techniczne tych połączeń, ryzykują niezaliczeniem kontroli i utratą marży zysku z powodu marnowania materiałów i nadmiernej liczby godzin pracy.
W tym przewodniku porównano wydajność fabrycznie produkowanych narożników L z ręcznymi cięciami ukośnymi, aby pomóc zespołom w dotrzymaniu ścisłych terminów realizacji projektów. Szczegółowo opisujemy kroki umożliwiające osiągnięcie płynnego wyrównania w poziomie i rozwiązywanie problemów z przerwami w narożnikach wewnętrznych, aby zapewnić standard operacyjny dla każdego Ułożona aplikacja kamienna.
Dlaczego narożniki definiują jakość Twojego projektu z kamienia
Precyzja wykonania narożników służy jako główny wyznacznik autentyczności projektu, oddzielając wysokiej klasy mury architektoniczne od niskobudżetowych zastosowań forniru.
Integralność architektoniczna opiera się na przejściu pomiędzy płaszczyznami pionowymi. W montaż forniru kamiennegonarożnik jest najbardziej wrażliwym punktem zarówno pod względem estetycznym, jak i konstrukcyjnym. Doświadczeni instalatorzy traktują priorytetowo precyzję narożników, ponieważ od niej zależy, w jaki sposób światło pada na powierzchnię i jak budynek radzi sobie z wilgocią przez cały cykl życia.
Tworzenie iluzji kamienia naturalnego o pełnej głębokości
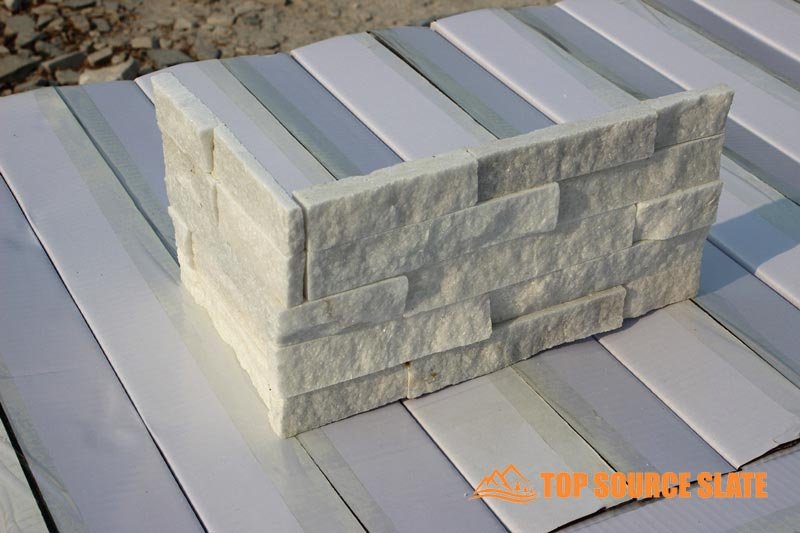
Autentyczne powroty w kształcie litery L skutecznie maskują grubość od 0,75” do 1,75”. kamienne panele, tworząc ciężar konstrukcyjny oczekiwany w tradycyjnym murze. Bez tych zwrotów oko szybko rozpoznaje instalację jako cienką okleinę, szczególnie na elewacjach zewnętrznych i słupach konstrukcyjnych, gdzie profil boczny jest dobrze widoczny.
- Spójna tekstura w przejściach narożnych zapobiega odbijaniu się światła przez szwy i ujawnianiu panelowego charakteru produktu.
- Odpowiednio dociążone narożniki zapewniają ciężar architektoniczny wymagany w przypadku wysokiej klasy fasad mieszkalnych i komercyjnych.
- Zawijanie kamień naturalnie wokół Kąty 90 stopni sprawiają, że element wygląda jak solidna kamienna konstrukcja, a nie aplikacja powierzchniowa.
Ochrona powłoki budynku i podłoża
Narożniki pełnią funkcję stref narażonych na duże obciążenia, w których wilgoć i zanieczyszczenia środowiska często próbują ominąć warstwę kamienia. Szczelne połączenia narożne minimalizują narażenie klejów epoksydowych i podłoży z płyt cementowych na promieniowanie UV i deszcz, które z czasem mogą pogorszyć przyczepność.
- Profesjonalne wyrównanie gwarantuje, że woda będzie odprowadzana z konstrukcji, a nie gromadziła się w szczelinach pomiędzy panelami.
- Minimalizacja szczelin w przejściach narożnych zapobiega przedostawaniu się deszczu powodowanego wiatrem przez barierę powietrzną, co jest krytycznym wymogiem nowoczesny wygląd zewnętrzny projektowanie.
- Zmniejszenie ekspozycji spoin chroni podłoże przed cyklami zamrażania i rozmrażania, które mogą powodować rozwarstwianie.
Eliminacja odsłoniętych krawędzi cięcia i przetartych rdzeni
Źle wykonane przejścia narożne często odsłaniają wewnętrzny przetarty rdzeń kamienia, któremu brakuje naturalnego starzenia i tekstury podzielonej powierzchni. Wysokiej jakości techniki skupiają się na ukrywaniu gładkich śladów mechanicznych pozostawionych przez urządzenia do cięcia na podczerwień, aby zachować solidny, naturalny wygląd.
- Stosowanie fabrycznie dopasowanych narożników lub precyzyjnych cięć ukośnych zapewnia naturalny wygląd “rozdwojona twarz” tekstura pozostaje jedyną widoczną powierzchnią.
- Prawidłowe wykonanie pozwala uniknąć “szachownica” awaria wizualna spowodowana odsłoniętymi końcami paneli i niedopasowanymi kolorami kamienia.
- Dbałość o szczegóły zapobiega ujawnieniu gładkich, wyprodukowanych krawędzi, które są sprzeczne z organiczną estetyką naturalny kamień ułożony.
Zwiększenie długoterminowej trwałości i wiązania strukturalnego
Elementy narożne zazwyczaj są najbardziej narażone na wpływ ruchu pieszego i maszyn w środowiskach komercyjnych. Strategicznie rozmieszczone złącza narożne rozprowadzają naprężenia związane z rozszerzalnością cieplną bardziej równomiernie na powierzchni ściany, zapobiegając miejscowym pęknięciom kamienia lub fugi.
- Prawidłowy montaż zapewnia wzajemne wsparcie sąsiadujących płaskich paneli, zmniejszając ryzyko długoterminowego rozłączenia.
- Stabilny instalacje narożne eliminują “ruchomy” kamienie które są podatne na uszkodzenia w strefach handlu detalicznego lub hotelarstwa o dużym natężeniu ruchu.
- Rozproszone zarządzanie naprężeniami termicznymi zapewnia, że instalacja przetrwa ekstremalne zmiany temperatury w klimacie północnym.
Wybór Pro: zalety fabrycznie prefabrykowanych narożników L
Prefabrykowane narożniki w kształcie litery L umożliwiają przejście projektu od ręcznego murowania do szybkiego montażu modułowego, zapewniając 100% spójność tekstury przy każdym przejściu pod kątem 90 stopni.
Ręczne cięcie na miejscu powoduje błąd. Nawet jednostopniowe odchylenie powoduje powstawanie widocznych szczelin, które rujnują ciągłość elewacji. Fabrycznie wykonane narożniki w kształcie litery L eliminują ryzyko błędu ludzkiego, zapewniając precyzyjnie wycięte, jednoczęściowe elementy. Ten zapobiega kamieniom odpryski i utrzymuje naturalną powierzchnię szczeliny w nienaruszonym stanie, bez charakterystycznych śladów piłowania pozostawionych przez szlifierki polowe.
- Wykonawcy oszczędzają godziny, pomijając precyzyjne cięcia pod kątem 45 stopni wymagane w przypadku tradycyjnego montażu ukośnego.
- Prefabrykowane jednostki znacznie zmniejszają straty materiału związane z pękaniem kamienia podczas ręcznych cięć w terenie.
- Instalatorzy zapewniają czysty powrót pod kątem 90 stopni, który chroni kamień naturalny teksturę bez odsłaniania podłoża.
| Metryka wydajności | Ręczna miarka polowa | Najlepsze źródła narożników L |
|---|---|---|
| Prędkość instalacji | 15-20 minut na stopę liniową | 3-5 minut na stopę liniową |
| Więź strukturalna | Zmienna (klej polowy) | Przemysłowe wzmocnione żywicą epoksydową |
| Odpady materiałowe | Wysoka (odpryski/błędne cięcie) | Zero (precyzyjny rozmiar) |
Kompresja kosztów pracy i harmonogramów projektów
Standaryzowane komponenty umożliwiają zespołom pokonywanie skomplikowanych zakrętów z taką samą prędkością, jak płaskie ściany. Niedobory siły roboczej sprawiają, że wydajność jest miernikiem przetrwania nowoczesnych firm budowlanych. Korzystanie z prefabrykatów narożniki umożliwiają załodze wykończenie muru kamiennego projektu do 50% szybciej niż metodami tradycyjnymi, chroniąc zyski projektu i zwiększając roczną wydajność.
- Gotowe do montażu narożniki zmniejszają wymagania dotyczące umiejętności technicznych, umożliwiając mniej doświadczonym załogom uzyskanie profesjonalnych rezultatów.
- Uproszczone przepływy pracy umożliwiają szybszą rotację witryny, zwiększając roczny obrót wolumen projektów dla B2B dystrybutorów i wykonawców.
- Krótsza liczba dni spędzonych na miejscu przekłada się bezpośrednio na niższe koszty ogólne i lepszą rentowność.
Doskonałe wiązanie strukturalne i trwałość
Kleje stosowane w terenie często zawodzą w pionowych narożnikach z powodu stresu środowiskowego i niewłaściwego mieszania. Nasze narożniki L produkujemy w kontrolowanych warunkach fabrycznych przy użyciu żywic epoksydowych o wysokiej wytrzymałości stosowanych pod określonym ciśnieniem i temperaturą. Tworzy to trwałe wiązanie strukturalne, które jest odporne na cykle zamrażania i rozmrażania powszechne w klimacie północnoamerykańskim i europejskim.
- Klejenie fabryczne eliminuje ryzyko opadu kamienia, częsty punkt awarii w przypadku narożników ciętych pod kątem przy użyciu standardowej cienkiej warstwy.
- Wykorzystanie 100% kamień naturalny zapewnia, że narożniki zachowują stabilność UV i nie blaknie ani nie rozwarstwia się po dziesięcioleciach ekspozycji.
- Każda jednostka spełnia rygorystyczne standardy trwałości, wytrzymując środowiska o dużym zasoleniu i wysokiej wilgotności bez degradacji strukturalnej.
Bezproblemowa ciągłość wizualna
Wada estetyczna pojawia się, gdy wzór kamienia gwałtownie pęka w narożniku. Nasza blokująca konstrukcja narożnika w kształcie litery L doskonale integruje się z Panele w kształcie litery Z do maskowania pionowych szwów i linii fug. Do każdego zamówienia pozyskujemy kamień z tego samego kamieniołomu, zapewniając, że kolor i faktura płyną za rogiem bez niejednolitych przesunięć.
- Krawędzie diamentowe CNC zapewniają precyzyjne zazębienie, które skutecznie ukrywa podłoże montażowe.
- Spójna głębia i linie cienia w przejściach zapobiegają efektowi “zszyte” wygląd typowy dla ręcznego tkania kamienia.
- Stosowanie fabrycznie dobranych partii zapobiega rozbieżnościom kolorystycznym, zapewniając jednolite wykończenie architektoniczne wysokiej klasy fasad.
Wysokiej jakości panele kamienne układane bezpośrednio w fabryce

Jak wykonać idealne cięcia ukośne na miejscu (jeśli to konieczne)
Uzyskanie włoskowatego połączenia ukośnego Kamień naturalny wymaga przejścia od standardowego rąbania muru do precyzyjnych technik lapidarnych, aby zapewnić, że narożnik pozostanie najsilniejszym punktem wizualnym instalacji.
Niezbędne narzędzia do precyzyjnych cięć w terenie
Standardowe ostrza do cięcia na sucho często powodują nadmierne odpryski na powierzchni czołowej panele kwarcytowe lub łupkowe. Polecamy wysokiej jakości piłę do pracy na mokro wyposażoną w tarczę diamentową o obrzeżu ciągłym. Taka konfiguracja utrzymuje stały przepływ wody, który chłodzi ostrze i tłumi kurz, co ma kluczowe znaczenie podczas pracy z materiałami o dużej gęstości, takimi jak nasz łupek sadzy węglowej lub kwarcyt biały lodowcowy. Precyzja tarczy diamentowej CNC ustawiana fabrycznie w fabryce wyznacza poprzeczkę, więc Twoje narzędzia terenowe muszą odpowiadać tym standardom, aby zachować spójność.
- Aby zapewnić gładkie krawędzie bez odprysków, należy używać tarczy diamentowej z obrzeżem ciągłym.
- Zabezpiecz stabilną, poziomą powierzchnię roboczą, aby zapobiec wibracjom panelu, które mogą powodować “wydmuchy” na końcu cięcia.
- Utrzymuj stały przepływ wody, aby chronić integralność strukturalną kamienia i minimalizować pył krzemionkowy.
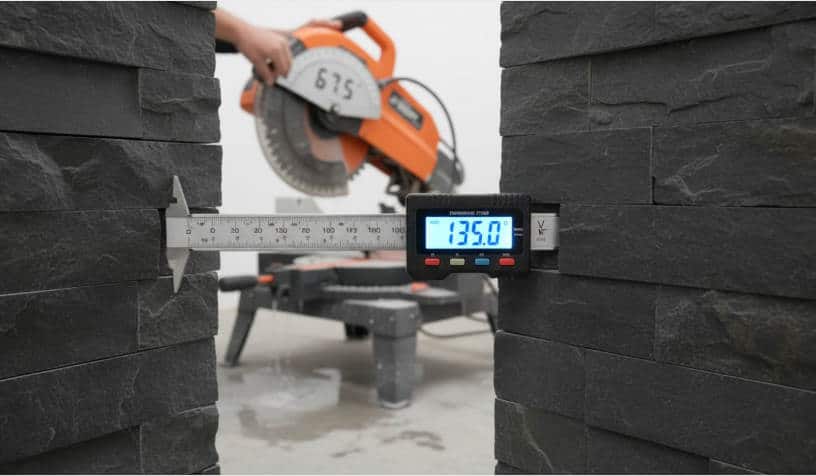
Pomiar i oznaczanie niestandardowych kątów ścian
Warunki terenowe rzadko zapewniają idealny kąt 90 stopni. Opieranie się na założeniach prowadzi do widocznych szczelin na czubku narożnika lub pięcie. Użyj cyfrowego kątomierza, aby uchwycić rzeczywisty kąt podłoża ściany. Podziel ten pomiar przez dwa, aby określić dokładny skos piły. W przypadku narożnika o kącie 90 stopni jest to 45 stopni, ale 92 stopnie ściana wymaga cięć pod kątem 46 stopni na obu łączących się płytach aby prawidłowo zamknąć szew.
| Wspólna metoda | Wykonanie techniczne | Najlepszy przypadek użycia |
|---|---|---|
| Standardowy ukos | Bezpośrednie skosowanie pod kątem 45 stopni na obu krawędziach kamienia. | Standardowe narożniki zewnętrzne o kącie 90 stopni. |
| Ukos tylny (podcięcie) | Skos do wewnątrz (46°), aby zapewnić, że przednie powierzchnie stykają się jako pierwsze. | Nieregularne lub lekko rozwarte kąty ścian. |
| Połączenie tyłowe | Kwadratowa krawędź jednego panelu zachodzi na drugi. | Narożniki wewnętrzne lub przejścia o słabej widoczności. |
- Zamiast zakładać prostopadłość, mierz rzeczywiste kąty narożników za pomocą cyfrowego kątomierza.
- Zaznacz linię cięcia z tyłu panel księgi głównej chroniący teksturowany kamień twarz od zaznaczenia.
- Przed wykonaniem końcowego cięcia sprawdź wyrównanie wzoru blokującego w kształcie litery Z.
Technika kątowania wstecznego dla ciasnych połączeń
Skuteczne połączenie ukośne opiera się na tym, że przednie wykończone krawędzie stykają się jako pierwsze. Polecamy “ukosowanie tylne,” w którym tniesz kamień pod niewielkim skosem do wewnątrz (około 46 stopni dla narożnika 90 stopni). Tworzy to niewielką szczelinę z tyłu, aby pomieścić klej i zapobiega “obcas” kamieni przed dotknięciem i rozwarciem przedniego szwu. Powoli przesuwaj panel przez ostrze, aby uniknąć wydmuchów w miejscach najcieńszych kamieni.
- Cięcie z lekkim skosem do wewnątrz, tak aby przednie krawędzie stykały się z tylną stroną paneli.
- Każdą parę ukośnych paneli należy dopasować na sucho, aby sprawdzić płynność przejścia przed nałożeniem zaprawy.
- Wygładź mikrowióry wzdłuż krawędzi cięcia za pomocą diamentowej podkładki szlifierskiej, aby uzyskać profesjonalne wykończenie.
Klejenie i uszczelnianie ściętego narożnika
Właściwe nałożenie kleju gwarantuje, że połączenie pozostanie strukturalne i wizualnie spójne w miarę upływu czasu. Nałożyć żywicę epoksydową o wysokiej wytrzymałości lub cienką warstwę zaprawa specjalnie opracowana do kamienia naturalnego. Posmaruj obie ścięte krawędzie masłem, aby zapewnić 100% pokrycia. Jeśli pozostaną jakiekolwiek luki, wymieszaj mieszankę w kolorze kamienny pył z twoich skaleczeń z mieszanką żywicy, aby stworzyć niestandardowy wypełniacz. To maskuje szew i utrzymuje “Bezpośrednie źródło kamieniołomu” estetyka ciągłego bloku kamiennego.
- Posmaruj masłem tył obu ściętych krawędzi, aby uzyskać trwałe, strukturalne połączenie.
- Wypełnij włoskowate szczeliny mieszaniną pyłu kamiennego i żywicy, aby ukryć szew.
- Zastosuj premię uszczelniacz do kamienia naturalnego w celu ochrony nowo odsłonięte krawędzie cięć przed wilgocią.
Połączenia nakładające się: The “Połączenie tyłowe” Technika dla początkujących
Podczas gdy fabrycznie wykonane narożniki w kształcie litery L zapewniają najwyższą wydajność, schodkowe połączenie doczołowe służy jako niezawodna technika terenowa do tworzenia przejść pod kątem 90 stopni przy użyciu standardowych płaskich paneli.
Naprzemienny wzór nakładania się
Osiągnięcie profesjonalnego wyglądu bez prefabrykowanych narożników wymaga metody naprzemiennego nakładania się, która imituje tradycyjny kamień naturalny kamieniarstwo. Technika ta polega na zmianie tego, który panel wystaje poza narożnik w każdej warstwie. Zamieniając krawędź wiodącą w każdym rzędzie, tworzymy “tkane” efekt skutecznie przełamujący pionowy szew. Ta wizualna przerwa uniemożliwia dostrzeżenie pojedynczej ciągłej linii, która często zdradza: Instalacja DIY lub niskiej jakości.
- Zamień przednią krawędź w każdej warstwie, aby uzyskać efekt tkanego narożnika, który zakryje pionowy szew.
- Zapewnij końcowe ziarno płyta kamienna pozostaje ukryty za licem prostopadłego panelu.
- Unikaj wyrównywania połączeń pionowych w wielu rzędach, aby zachować integralność strukturalną i zapobiec: “ułożone w stos” wygląd.
Przygotowanie czystych i kwadratowych krawędzi
Sukces połączenia doczołowego zależy całkowicie od precyzji cięcia i stanu powierzchni kamienia. Nawet niewielkie odchylenie od kąta 90 stopni spowoduje widoczne szczeliny, które wychwytują światło i cienie. Zalecamy użycie piły na mokro lub urządzenia do cięcia na podczerwień, aby mieć pewność, że każda krawędź panelu będzie idealnie równa. Ponieważ Kamień naturalny może przenosić kurz i gruz z kamieniołomów, czyszczenie krawędzi łączących jest obowiązkowym krokiem w celu zapewnienia dobrego dopasowania.
- Użyj mokrej piły z tarczą diamentową, aby upewnić się, że każda krawędź panelu jest idealnie równa pod kątem 90 stopni.
- Usuń pył kamienny i luźne zanieczyszczenia z krawędzi łączących, aby zapewnić lepsze dopasowanie pomiędzy panelami.
- Przed nałożeniem kleju przymocuj panele na sucho, aby sprawdzić, czy nie ma szczelin spowodowanych przez nierówności kamienia naturalnego.
Zabezpieczenie połączenia za pomocą kleju o wysokiej wytrzymałości
Połączenia na styk opierają się na powierzchni styku końca jednego panelu z tyłem drugiego. Aby spełnić standardy bezpieczeństwa na rok 2026 i zapewnić długoterminową trwałość, instalatorzy muszą stosować środki wiążące o wysokiej wytrzymałości opracowane specjalnie dla Kamień naturalny. Nakładanie kleju zarówno na podłoże, jak i na tylną część panelu księgi głównej – często nazywane “podwójne masło”— eliminuje kieszenie powietrzne i tworzy trwałe wiązanie odporne na zmiany środowiskowe.
- Nałóż żywicę epoksydową o wysokiej wytrzymałości lub cienką warstwę do kamienia, aby zapewnić trwałe połączenie między panelami.
- Rozprowadź klej równomiernie na podłożu i tylnej części panelu, aby wyeliminować kieszenie powietrzne.
- Utrzymuj stały docisk podczas początkowej fazy wiązania, aby zapobiec przesunięciu się paneli z wyrównania.
Rozwiązanie problemu szczeliny w narożnikach wewnętrznych
Precyzja w narożnikach wewnętrznych zależy od kompensacji odchyleń ściany poprzez strategiczny montaż na sucho i zastosowanie profesjonalnych uszczelniaczy do kamienia o neutralnym pH.
Pomiar strategiczny i precyzyjne cięcie
Szczeliny w narożnikach wewnętrznych zwykle wynikają z założenia, że ściana ma idealny kąt 90 stopni. Konstrukcja w świecie rzeczywistym obejmuje łuki i pochylenia, które tworzą strukturalne puste przestrzenie, jeśli kamień zostanie przecięty na ślepo. Łagodzimy to, stosując urządzenia do cięcia na podczerwień lub piły na mokro wyposażone w tarcze diamentowe, które utrzymują integralność krawędzi kamienia i zapobiegają mikroodpryskom często spotykanym w przypadku standardowych tarcz.
- Zmierz kąt narożnika u podstawy, w środku i na górze ściany, aby zidentyfikować problemy ze zwężaniem się przed pierwszym cięciem.
- Użyj mokrej piły, aby zapewnić pionowe krawędzie panele księgi głównej pozostają ostre, aby zapewnić ciaśniejsze dopasowanie.
- Dopasuj na sucho każdy panel w sekwencji narożnej, aby sprawdzić wyrównanie w pionie przed nałożeniem kleju epoksydowego o wysokiej wytrzymałości.
Wykonanie połączenia doczołowego zakładkowego
Narożniki wewnętrzne najlepiej sprawdzają się przy łączeniu na styk, jeśli takowe występuje panel kończy się bezpośrednio przy ścianie a sąsiedni panel zakrywa tę surową krawędź. Ta metoda jest bardziej wyrozumiała niż cięcie ukośne w przypadku kątów wewnętrznych i zapewnia czystsze przejścia wizualne. Nakładając panele, ukrywamy pionowy szew przed główną linią wzroku i tworzymy iluzję ciągłego bloku kamienia.
- Zamontuj pierwszy panel równo z wnętrzem narożnik, aby stworzyć solidną podstawę do przejścia.
- Rozciągnij drugi panel tak, aby zachodził na krawędź pierwszego, skutecznie zakrywając wyciętą powierzchnię.
- Rozłóż poziome złącza w narożniku, aby zapobiec tworzeniu się szwów, które zachowują integralność strukturalną i są z nią dopasowane nowoczesny design standardy.
Wypełnianie pozostałych luk związkami specyficznymi dla kamienia
Kamień naturalny tekstura, taka jak wykończenie z dzieloną powierzchnią w naszej serii Alaska Grey lub Carbon Black, w naturalny sposób tworzy drobne puste przestrzenie w miejscu styku. Standardowe masy lateksowe są nieodpowiednie, ponieważ kurczą się i odbarwiają naturalne minerały, takie jak marmur czy łupek. Zamiast tego używamy profesjonalnych związków, które odpowiadają pH i profilowi kolorystycznemu kamienia, aby zapewnić trwałe i stabilne uszczelnienie.
- Nałóż dopasowane kolorystycznie, o neutralnym pH, uszczelniacze do kamienia na pęknięcia włoskowate, aby zablokować kurz i wilgoć.
- Use structural setting compounds for larger gaps to stabilize the corner against building settlement.
- Avoid silicone-based products that can “bleed” oils into the stone, causing permanent staining around the joint.
Compensating for Substrate Irregularities
A successful corner starts with the surface behind the stone. Most drywall is too flexible and rarely square, so we recommend installing cement backer board to provide a rigid, flat substrate. If the wall protrudes, the installer must adjust the stone rather than forcing it, which might require localized grinding of the panel’s rear surface to achieve a flush fit against the corner.
- Install cement backer board over the drywall to minimize wall-flexing that leads to joint separation.
- Shave the back of the ledger stone panel with an angle grinder if a wall high-spot prevents the corner from sitting tight.
- Level each row independently to ensure the corner gap does not widen as the installation moves up the wall.
How to Ensure Horizontal Alignment Across Corner Transitions
Horizontal alignment across corners determines the structural integrity and visual continuity of a okleina kamienna project; a deviation of even 1/8 inch at the corner can propagate into visible ‘stair-stepping’ across the entire wall face.
Establishing a Level Baseline with Starter Strips
Horizontal alignment begins at the lowest point of the installation where the first row of panels meets the floor or ledge. Setting a precise foundation eliminates the risk of “row creep,” gdzie kolejne kursy stają się coraz bardziej pochyłe. Profesjonalni instalatorzy wykorzystują tymczasowe drewniane lub metalowe listwy startowe, aby utrzymać ciężar własny warstwy początkowej, zapewniając, że kamień pozostanie nieruchomy podczas utwardzania kleju.
- Zainstaluj tymczasową drewnianą lub metalową listwę startową wypoziomowaną za pomocą poziomicy cyfrowej zgodnej ze standardem 2026, aby utrzymać ciężar pierwszego dania.
- Narysuj kredą linię na całym obszarze roboczym, łącznie z rogami, aby upewnić się, że punkt początkowy jest jednolity na wszystkich płaszczyznach.
- Przed przystąpieniem do układania sąsiadujących płaskich paneli sprawdź, czy pierwszy element narożny idealnie przylega do listwy startowej.
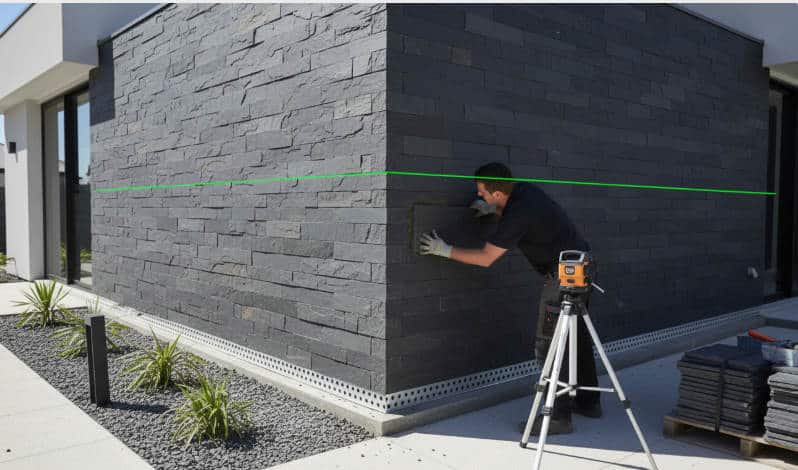
Ciągłe monitorowanie poprzez ustawienie lasera
Zastosowanie technologii zapobiega kumulowaniu się błędów, gdy małe różnice wysokości w jednym rzędzie prowadzą do znacznych luk w wyższych warstwach. Poziomica laserowa o promieniu 360 stopni wyświetla stałą poziomą linię odniesienia na wszystkich ścianach i narożnikach, służąc jako niepodlegający negocjacjom przewodnik po każdej warstwie kamienia. Jest to szczególnie istotne w przypadku obiektów na dużą skalę Projekty B2B gdzie jednolitość wizualna w wielu narożnikach zewnętrznych jest kluczowym miernikiem jakości.
| Parametr wyrównania | Ręczne ukosowanie na miejscu | Fabrycznie prefabrykowane narożniki |
|---|---|---|
| Tolerancja precyzji | +/- 5 mm (błąd ludzki) | +/- 1 mm (precyzja CNC) |
| Wspólna synchronizacja | Wymaga ręcznego podkładkowania | Blokujące “Mężczyzna-Kobieta” System |
| Prędkość instalacji | Wysoka praca (powolna) | Szybki montaż (50% szybszy) |
- Ustaw poziom lasera o promieniu 360 stopni na środku pokoju, aby wyświetlić stałą poziomą linię odniesienia na wszystkich ścianach i narożnikach.
- Sprawdź górną krawędź co trzeciego rzędu względem linii lasera, aby natychmiast wykryć i skorygować drobne odchylenia pionowe.
- Zmierz odległość od linii lasera do krawędzi panelu zarówno w narożniku, jak i na końcu biegu, aby zachować równoległe rzędy.
Synchronizacja prefabrykowanych narożników z płaskimi panelami
Wysokość narożników w kształcie litery L musi idealnie pasować do płaskich paneli, aby zapobiec powstawaniu „stopni schodowych”.’ efekt. W Top Source Stone projektujemy dopasowane narożniki w kształcie litery L, stosując tę samą precyzję diamentowego ostrza CNC, co nasze 6″ x 24″ płaskie panele. Ta synchronizacja zapewnia, że gdy narożnik L otacza kąt, jego blokujący profil w kształcie Z styka się z płaskim panelem bez przesunięcia pionowego, zachowując architektoniczny zamysł płynnego wykończenia.
- Przed nałożeniem kleju przymocuj na sucho narożnik L i przylegający do niego płaski panel, aby sprawdzić, czy łączące się kształty Z są wyrównane bez przesunięć pionowych.
- Naprzemiennie długie i krótkie ramiona narożników L w każdym rzędzie, aby przesunąć połączenia pionowe, co w naturalny sposób pomaga ustabilizować poziomy poziome.
- Użyj plastikowych podkładek za lub pod panelami, jeśli określony element narożny jest nieco krótszy z powodu Kamień naturalny zmienność.
Kompensacja różnic w grubości kamienia naturalnego
Kamień naturalny posiada nieodłączne tolerancje grubości i wysokości. Chociaż nasza fabryka standaryzuje grubość w zakresie od 1 cm do 2,5 cm, drobne poprawki na miejscu zapewniają wizualnie proste rzędy. Instalatorzy radzą sobie z tymi różnicami, manipulując głębokością złoża kleju, co jest techniką znaną jako back-buttering. Nakładając spójną warstwę kleju epoksydowego o wysokiej wytrzymałości, tworzysz jednolitą poduszkę, którą można lekko ścisnąć lub rozszerzyć, aby wyrównać powierzchnie sąsiadujących kamieni w przejściu narożnym.
- Posmaruj panele stałą ilością kleju epoksydowego o wysokiej wytrzymałości, aby uzyskać jednakową głębokość warstwy w przejściu narożnym.
- Przytnij dół lub górę panelu używając mokrej piły, jeśli rząd zaczyna wznosić się lub opadać więcej niż 1/8 cala od linii poziomu.
- Zastosuj równomiernie nacisk na złącze narożne, aby upewnić się, że kamienna powierzchnia pozostaje w tej samej płaszczyźnie poziomej, gdy owija się wokół kąta.
Wniosek
Profesjonalny Instalacje kamienne polegaj na precyzyjnym wykonaniu narożników, aby zachować wizualną ciągłość i integralność strukturalną w każdym przejściu. Stosowanie prefabrykowanych narożników L lub dokładnych cięć ukośnych eliminuje nieestetyczne szczeliny i chroni podłoże ściany przed narażeniem. Metody te zapewniają jednolite wykończenie architektoniczne, które odzwierciedla jakość produktu kamień naturalny w całym projekcie.
Przejrzyj wymagania projektu, aby określić, czy są zgodne z fabryką narożniki lub wykonane na miejscu cięcia pod kątem najlepiej pasują do danej instalacji harmonogram i budżet pracy. Kontakt Najlepszy kamień źródłowy w celu uzyskania specyfikacji technicznych lub zamówienia próbki naszej serii narożników dopasowanych kolorystycznie do swojego magazynu.
Często zadawane pytania
Czy można uzyskać idealne narożniki bez cięcia pod kątem?
Tak. Narożniki profesjonalnej jakości można uzyskać, stosując prefabrykowane narożniki w kształcie litery L lub stosując tzw “tkactwo” technika (złącza stykowego). W tkanym narożniku kamienie nakładają się na siebie naprzemiennie, upewniając się, że fabrycznie wykończona krawędź jednego kamienia pokrywa się z obciętą krawędzią drugiego. Tworzy to naturalną, wytrzymałą estetykę, która naśladuje tradycyjny mur z pełnym łożem, jednocześnie unikając kruchości strukturalnej często związanej z cienkimi krawędziami skośnymi.
Jak zainstalować kamień wokół narożnika o 90 stopniach?
Montaż należy zawsze rozpoczynać od narożnika i kierować się do wewnątrz, w stronę płaskiej powierzchni ściany. Na tylną część narożnika nałóż zaprawę o dużej przyczepności (masowanie od tyłu) i mocno dociśnij ją do podłoża, upewniając się, że jest idealnie pionowa. Zaczynając od rogu, upewniasz się, że najbardziej krytyczny punkt wizualny projektu jest wyrównany; wszelkie niezbędne drobne nacięcia lub poprawki można następnie ukryć na środku ściany lub w wewnętrznych narożnikach, gdzie są mniej widoczne.
Czy potrzebujesz specjalnych narożników do płyt kamiennych?
Chociaż nie jest to absolutnie obowiązkowe, zdecydowanie zalecane są specjalne elementy narożne systemy płyt kamiennych. Te “W kształcie litery L” Jednostki zostały zaprojektowane tak, aby wyeliminować widoczny pionowy szew, który pojawia się, gdy spotykają się dwa płaskie panele. Bez elementów narożnych odsłonięty zostałby cienki profil podłoża fornirowego, co zagroziłoby autentyczności wyglądu kamienia. Jeśli elementy narożne są niedostępne, należy wykonać precyzyjne cięcia ukośne, aby zachować wizualną ciągłość.
Jak ukryć przyciętą krawędź w zewnętrznym narożniku?
Aby ukryć obciętą krawędź, użyj szlifierki kątowej z tarczą diamentową “sukienka” lub teksturuj krawędź tak, aby pasowała do naturalne oblicze kamienia. Dodatkowo zastosowanie dopasowanego kolorystycznie odcienia muru lub użycie pasującej zaprawy do wypełnienia szwu może zamaskować przejście. Aby uzyskać najlepsze rezultaty, zawsze umieszczaj obciętą krawędź skierowaną w stronę przeciwną do głównej linii wzroku lub użyj: “tkactwo” wzór, gdzie naturalna fabryczna krawędź sąsiedniego kamienia zakrywa obciętą stronę.
Najlepszy sposób na cięcie pod kątem 45 stopni na kamieniu księgi głównej?
Złotym standardem jest profesjonalna piła do pracy na mokro wyposażona w stół przesuwny i tarczę diamentową o obrzeżu ciągłym. Aby zapewnić bezproblemowe dopasowanie, “wycięcie z tyłu” kamień pod nieco większym kątem (około 46 lub 47 stopni). Dzięki temu zewnętrzne punkty kamienia ściśle przylegają do siebie, pozostawiając niewielką wewnętrzną szczelinę dla kleju. Ta technika zapobiega kamieniom “osiąganie dna” względem siebie z tyłu, co często powoduje widoczną szczelinę z przodu połączenia ukośnego.
