
White Trend Aesthetics and the pressure to deliver pristine stone finishes collide with real operational problems—iron-induced yellowing, soot staining and UV degradation—that translate directly into warranty claims, failed fire-code inspections and costly project delays. Design teams and contractors face rising rework and remediation costs when material choice, installation detailing and sealant specification fall short.
This guide acts as a field-ready technical SOP for designers, specifiers and installers: it explains why white natural stone dominates contemporary interiors, gives a core mineralogical and performance comparison of natural white quartzite versus marble, and lays out practical controls for preventing yellowing (iron content, UV exposure, sealing). You’ll get step-by-step soot-protection and cleaning protocols, mortar and pairing recommendations for wood versus metal to maximize visual ROI, and lighting techniques that make mineral texture pop after dark—each section with spec-level recommendations, test thresholds and inspection checkpoints you can apply on site.
Why White Natural Stone Dominates Contemporary Interior Design?
White natural stone delivers consistent aesthetics and engineered durability that reduce lifecycle costs and protect contractor and dealer margins.
Material performance and durability parameters for white interior stone
Specify 100% natural stone—quartzite, slate, marble, or granite—based on the veining and hardness your project demands: use quartzite where abrasion and heat resistance matter, choose marble where softer, classic veining defines the aesthetic. Source from the same quarry vein to achieve hue uniformity of about 95% within a batch; do this for large feature walls to avoid visible color shifts during installation.
Design to regional exposure: require UV-stable stone with high salinity and humidity resistance for Gulf projects and ASTM-grade freeze-thaw resistance for Northern climates. Assign thickness by function: 10–12 mm for backsplashes, 20–35 mm for freestanding feature walls and premium rough panels. Verify substrate capacity: flat panels weigh ~30–40 kg/m² and rough faces can reach ~55 kg/m²—use mechanical anchors when load exceeds 40 kg/m².
- Core materials: 100% natural Quartzite, Slate, Marble, Granite—choose by veining and Mohs hardness (quartzite ~7, marble 3–5).
- Hue uniformity target: 95% within a single batch; enforce same-batch quarry consistency.
- Environmental specs: UV-stable, high salinity & humidity resistance, ASTM freeze-thaw resistant for cold climates.
- Thickness: 10–25 mm standard; up to 35 mm for rough/premium—assign 10–12 mm for backsplashes, 20–35 mm for feature walls.
- Surface weight: ~30–40 kg/m² (flat), ~55 kg/m² (rough)—spec mechanical fixings when >40 kg/m².
Design strategies to achieve quiet luxury and seamless spatial continuity
Choose soft whites with warm undertones—align with Pantone Cloud Dancer 2026 when you need an architectural yet livable white—and favor stones that show organic veining to prevent a sterile look. Run full-height stone across open-plan areas to create visual continuity; plan vein matching and panel orientation during templating so veining reads as a continuous composition rather than segmented panels.
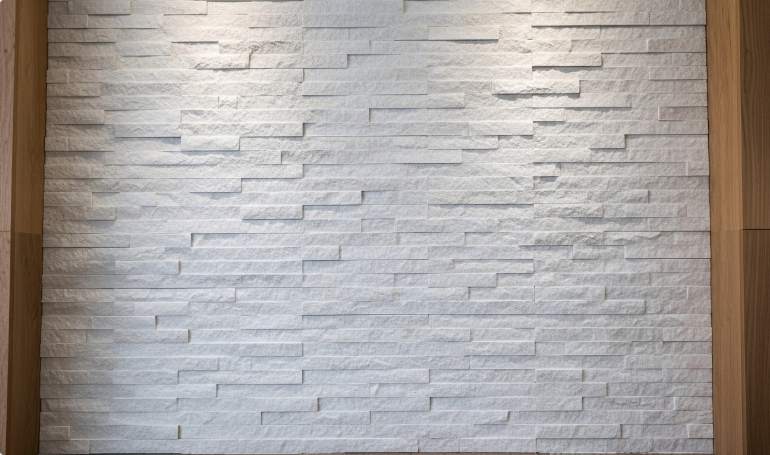
Balance white stone with brushed metals and medium-tone woods to add warmth and controlled contrast. Specify edge finishes (natural cleft, split-face, seamless) to control texture and light reflection. Use interlocking Z-shape or S-shape panels with matching L-corners to hide vertical joints and minimize on-site cutting; require CNC diamond-blade precision for tight male-female fits that deliver a near-seamless architectural surface.
- Color strategy: soft whites with warm undertones (Pantone Cloud Dancer 2026) plus organic veining for warmth.
- Spatial continuity: full-height runs across open-plan spaces; perform vein-matching during templating.
- Material pairing: white stone + brushed metals + medium-tone woods for balanced contrast.
- Edge finishes: natural cleft, split-face, seamless—select to control texture and reflected light.
- Joint control: use Z-shape/S-shape interlocking panels and matching L-corners; require CNC diamond-blade precision for tight male-female fit.
Specification, procurement and installation controls for project-ready white stone
Specify panel sizes and packing up front: standard panels at 150×600 mm or 150×550 mm packed 7 pcs/box (0.63 m²) or 8 pcs/box (0.72 m²). Order with a 10% waste allowance and meet the manufacturer MOQ of 300 m² for trial or private-label orders. Build lead time into the project: in-stock items ship to Xingang port in 10–15 days; production runs require 20–25 days for a 20GP container.
Enforce quality control: require pre-shipment high-definition photos and videos of finished crates for color, edge, and packaging verification before you release the balance payment. For installation, specify substrate anchoring, the adhesive family, and mechanical anchors based on local code and measured stone weight; plan crate handling and pallet unloading around crate gross weights (900–1,000 kg) and container loading limits to avoid on-site delays or handling damage.
- Panel & packing: 150×600 mm or 150×550 mm; cartons 7 pcs/box (0.63 m²) or 8 pcs/box (0.72 m²); include 10% waste allowance.
- Procurement: MOQ 300 m² (trial/private-label); lead times: in-stock 10–15 days, production 20–25 days to Xingang port.
- Quality control: request pre-shipment HD photos/videos of finished crates before final payment (pre-shipment visual verification).
- Installation controls: specify substrate anchoring method, adhesive type, and mechanical anchors per local code and stone weight; require matching L-corners for wrap-around finishes.
- Logistics planning: pallet crate gross weight ~900–1000 kg; 20GP container loads 25–30 pallets; max coverage per 20GP: standard panels ~750–860 m², rough panels ~480–540 m².
- Commercial terms: standard payment T/T 30% deposit, 70% balance before shipment; enforce pre-shipment visual verification to protect cash flow and margins.
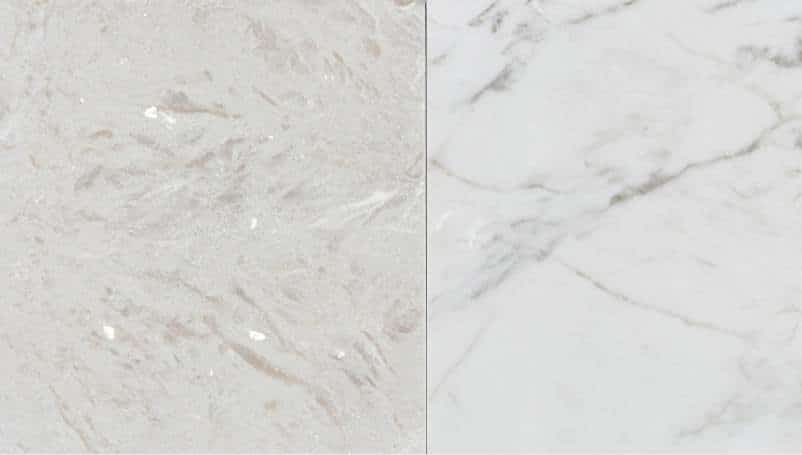
Natural White Quartzite vs. Marble: Analyzing the Mineral Choice
Choose quartzite for durability and low maintenance; choose marble only when aesthetics and controlled use outweigh long-term service costs.
Material properties and laboratory specs: hardness, porosity, and durability
Quartzite rates roughly Mohs 7, giving it high abrasion and scratch resistance that suits high-traffic floors and countertops. Marble sits around Mohs 3–4 and scratches and etches far more easily, so designers and specifying engineers reserve it for decorative or low-traffic surfaces where appearance, not wear resistance, defines value.
Test porosity and absorption before final specification: run ASTM C97/C97M (or an equivalent water-absorption test) to quantify risk for staining and freeze-thaw damage. For exterior projects in cold climates, require ASTM-equivalent freeze-thaw testing; Top Source Stone quartzites carry a “Freeze-Thaw Resistant” designation that simplifies spec compliance. Use published panel weight data—flat panels ~30–40 kg/m², rough panels ~55 kg/m²—when you calculate structural loads for anchorage and backing systems.
- Hardness: Quartzite ≈ Mohs 7; Marble ≈ Mohs 3–4
- Porosity check: run ASTM C97/C97M water-absorption before approval
- Freeze-thaw: specify ASTM-equivalent cycles for exteriors; use “Freeze-Thaw Resistant” quartzite for cold climates
- Environmental stability: quartzite and Top Source slate show strong UV and high-salinity resistance for Gulf-region use
- Design loads: flat panels ~30–40 kg/m²; rough panels ~55 kg/m²
Panel sizes, thickness options and structural implications
Specify panel format precisely in the purchase order. Top Source Stone standard rectangles are 150 × 600 mm (6″ × 24″) and 150 × 550 mm (6″ × 22″); note format on the PO to avoid field trimming and wasted labor. Standard thickness ranges run 10–25 mm; use up to 35 mm for rough or premium panels where stiffness or load-bearing capacity matters.
Match thickness to application: 10–20 mm for veneer cladding and vertical facades, and ≥20–35 mm for countertops and load-bearing treads. Include crate gross weights (900–1000 kg/crate) in lift plans and site crane calculations, and factor pallet counts and container loading into logistics: typical 20GP capacity supports 25–30 pallets.
- Standard panel formats: 150 × 600 mm and 150 × 550 mm — specify exact format on PO
- Thickness: 10–25 mm standard; up to 35 mm for rough/premium
- Weight per m²: flat panels 30–40 kg/m²; rough panels ≈55 kg/m²
- Application guidance: veneer facades 10–20 mm; countertops and treads ≥20–35 mm
- Corners and transitions: order matching L-corners and interlocking Z/S panels to reduce on-site coping
- Logistics: crate gross weight 900–1000 kg; plan forklift/crane specs and container loading (20GP: 25–30 pallets)
Cutting, edge finishing and fabrication protocols
Use CNC diamond-blade cutting for interlocking Z/S profiles to hold male-female tolerances and minimize visible vertical joints. Specify edge finishes—Natural Cleft, Split-Face, or Seamless Finish—based on slip resistance and the desired visual texture; pick the finish that matches the project maintenance and scrub requirements.
Hold fabrication tolerances tight: maintain panel-edge tolerance to ±1–2 mm to ensure tight interlock and seam concealment. Request factory-made matching L-corners to preserve texture and color continuity at 90° transitions. Use diamond-segment blades and wet cutting to reduce microcracking in both marble and quartzite, and require pre-shipment visual verification with HD photos/videos before balance payment.
- Cutting: CNC diamond-blade for Z/S interlocks
- Edge finishes: Natural Cleft, Split-Face, Seamless Finish — specify per slip/scrub needs
- Fabrication tolerance: ±1–2 mm on panel edges
- Corner/coping: factory L-corners for texture and color continuity
- Cutting tools: diamond-segment blades and wet cutting to limit microcracks
- QC: require pre-shipment HD photos/videos of finished crates prior to final payment
Installation procedures and on-site best practices
Verify “Same-Batch Quarry Consistency” on delivery and confirm hue uniformity of 95% across crates before you begin layout. Prepare substrates so they are plumb, level, and structurally rated for the panel weight; design backing and anchors to support 30–55 kg/m² depending on panel type.
Use polymer-modified thinset for most veneer installations, and select mechanical anchors when panels exceed recommended adhesive thickness or for heavy rough panels. Install Z/S interlocking panels in the specified female-male sequence to camouflage vertical joints; set factory L-corners first and align adjacent panels to minimize field cutting. Handle crates (900–1000 kg) with forklifts or cranes and move individual panels >25 mm with mechanical lifters to avoid breakage.
- Pre-install check: confirm same-batch quarry consistency and 95% hue uniformity
- Substrate: plumb, level, and structurally rated for 30–55 kg/m² panels
- Adhesive/fixings: polymer-modified thinset for veneers; mechanical anchors for thick/heavy panels
- Interlock assembly: follow female-male Z/S sequence to hide vertical seams
- Corner work: set factory L-corners first to retain pattern flow
- Handling: plan forklifts/cranes for crate weights; use mechanical handling for panels >25 mm
Performance verification, maintenance and troubleshooting
Run acceptance tests at delivery: inspect batch color consistency, surface defects, and panel dimensions and reject mismatched crates before installation. On site, measure flatness and seam engagement; record and report deviations greater than 2 mm so you can correct substrate or fabrication issues before grout or sealers mask defects.
Seal marble regularly for stain protection; quartzite requires less frequent sealing but test a sealed sample area first. Avoid acids and citrus on marble surfaces and use pH-neutral cleaners. Keep a 5–10% material overage from the same batch for future repairs and replace damaged panels with those spares. After installation, perform spot water-absorption checks and monitor exterior walls for delamination or efflorescence over the first freeze-thaw cycle.
- Delivery acceptance: check color, defects, dimensions; reject mismatches before install
- On-site verification: measure flatness and seam gaps; report deviations >2 mm
- Sealing: marble — regular sealing; quartzite — periodic sealing after sample testing (typical schedule 1–3 years depending on use)
- Cleaning: use neutral cleaners; avoid acids and citrus on marble
- Spare material: retain 5–10% same-batch spare panels for repairs
- Post-install tests: spot water-absorption checks; inspect for delamination and efflorescence in exteriors
Premium Stacked Stone — Faster Installs

How to Prevent Yellowing: The Impact of Iron Content and UV Exposure
Control iron and UV exposure to protect white stone appearance, avoid costly remediation, and preserve project value and warranty obligations.
Measure and Specify Iron Content: lab tests and acceptance thresholds
Require laboratory verification of both total and acid‑soluble iron on representative quarry samples before you accept material. Test by ICP‑OES or AAS to quantify bulk iron and reactive (acid‑soluble) iron; reactive iron drives surface yellowing when it oxidizes. Set an acceptance threshold for acid‑soluble Fe at ≤ 0.10% wt and flag any batch above 0.10% for immediate review or exclusion to reduce risk of visible oxidation on finished walls.
- Require ICP‑OES or AAS reports on representative samples taken from the same quarry vein for each order.
- Specify acid‑soluble (reactive) Fe ≤ 0.10% wt for low yellowing risk; reject or quarantine batches above that limit.
- Request a quarry certificate showing same‑batch vein sourcing to limit local iron‑rich streaks and ensure the product meets the Top Source Stone 95% hue uniformity target.
- Include a pre‑shipment visual and lab sample check as part of your “pre‑shipment visual verification” package to confirm lab values match documentation and visible hue consistency.
Control UV-driven surface yellowing: material selection and coating specs
Choose stone grades with documented UV stability for exterior use—quartzite and certain natural slates typically offer superior UV performance compared with coated or altered surfaces. Ask suppliers to provide a written UV‑stability statement and lab data for the specific quarry vein you order. For topical protection, prefer breathable water‑repellent impregnators (silane/siloxane chemistry) instead of film‑forming acrylic or alkyd topcoats, which oxidize and yellow over time.
- Request accelerated UV‑weathering per ASTM G154 (fluorescent UV) or equivalent for any coating or sealer applied to exterior stone.
- Require color change measurement using CIEDE2000 (ΔE00) and accept only ΔE00 ≤ 2 after the specified test cycles.
- Specify breathable, silane/siloxane‑based treatments for outdoor projects; prohibit acrylic/alkyd topical finishes on natural white stone facades.
- Document recoat windows in the project spec using the manufacturer’s test data and include recoat intervals in the maintenance section of the O&M manual.
Design and installation measures to stop iron transfer and moisture entrapment
Design details determine whether iron or moisture reaches the visible face. Isolate stone from ferrous materials by specifying corrosion‑resistant fixings: use 316 stainless steel anchors for coastal and Gulf projects and 304 for typical inland projects; forbid plain carbon steel fasteners that rust and bleed. Provide a ventilated rainscreen with a continuous air gap of 10–25 mm and positive drainage/weep paths to avoid trapped moisture and cyclic oxidation beneath panels.
- Specify 316 stainless anchors for coastal/Gulf regimes and 304 for inland installations; detail fastener type and finish on shop drawings.
- Design a ventilated rainscreen with a continuous 10–25 mm air gap and clear drainage channels to prevent moisture entrapment and mineral migration.
- Use low‑iron mortars and grout: require soluble iron < 0.05% or iron‑free pigments in mortar specifications and pre‑seal cut and edge surfaces to limit substrate‑driven staining.
- Include a maintenance protocol: perform annual inspections, replace corroded fixings promptly, and verify approved stain‑removal methods (test a small area first). For iron stains, follow supplier guidance and use an oxalic‑acid based poultice tested on a sample panel before full‑scale application.
Managing Soot Stains: Protection Strategies for Light Stone Surfaces
Targeted sealing, documented testing, and scheduled cleaning reduce restoration costs and preserve white stone appearance across the project lifecycle.
Assess surface vulnerability and map exposure zones
Start by identifying the stone mineral and surface finish—slate, quartzite, sandstone, granite, or marble—and record whether the face is natural cleft, split-face, or seamless. Textured finishes trap soot and require higher protection and more aggressive maintenance. Run a suction/absorption test on a 100 cm² patch and time it: <30s means low porosity, 30–120s means moderate, and >120s means high porosity; use that result to set sealer type and frequency.
Log panel specifications for every elevation: standard panels measure 150 × 600 mm or 150 × 550 mm, thickness ranges 10–25 mm, flat panels weigh roughly 30–40 kg/m² while rough faces run ≈55 kg/m². Heavier, rough panels absorb more sealer and need longer cleaning cycles. Classify exposure zones as high (fireplaces, grills, chimneys, HVAC returns), medium (kitchen backsplashes, near fixtures), or low (hallways, bedrooms) and assign protection priority accordingly. Always run a photographed test patch on an L-corner or same-batch reference panel for each sealer and cleaner to confirm color, sheen, and adhesion before full application.
- Perform 100 cm² suction test and record seconds to set porosity class.
- Record panel size, thickness, and weight per m² for each wall.
- Map zones (High / Medium / Low) and assign protection priority.
- Photograph and log a full test patch on matching same-batch material before approvals.
Select and apply protective sealers for soot resistance
Match sealer chemistry to porosity and location. Use penetrating silane–siloxane impregnators where you need a breathable, invisible barrier that repels water and soot without changing appearance. Use fluoropolymer or acrylic topical sealers only when surface-level stain resistance and an altered sheen remain acceptable. For fireplace surrounds choose impregnators rated for heat exposure and vapor permeability to avoid trapped moisture and long-term yellowing.
Follow coverage and application metrics: penetrating sealers cover 6–10 m²/L on rough split-face and 10–15 m²/L on smooth faces; apply 1–2 wet coats as needed. Topical sealers run about 8–12 m²/L per coat and normally require a single uniform coat. Apply with a low-pressure sprayer, back-roll or brush to force penetration, allow 5–15 minutes dwell, then wipe excess within 10–15 minutes to prevent hazing on light stones. Allow solvent- or modified sealers 24–72 hours to cure before exposure to soot and avoid application if rain or high humidity can interrupt the cure window. Mask vertical joints and male–female interlocks to prevent bridging that hides joint profiles or creates slippery seam buildup. Use nitrile gloves, eye protection, and a NIOSH-approved respirator for solvent-based products and comply with local VOC and disposal rules.
- Penetrating sealer coverage: 6–10 m²/L (rough), 10–15 m²/L (smooth).
- Topical sealer coverage: 8–12 m²/L per coat; usually one coat.
- Dwell and wipe: 5–15 minutes dwell, remove excess within 10–15 minutes.
- Safety: nitrile gloves, eye protection, NIOSH respirator; follow VOC/disposal regulations.
Routine maintenance and emergency soot-removal protocols
Maintain light stone with a daily or weekly regimen: vacuum with a HEPA-capable unit and agitate with a soft-bristle brush to remove loose soot before any wet cleaning. Use pH-neutral stone cleaners (pH 7–9) for routine washes. For embedded soot, test a mildly alkaline cleaner (pH 9–11) first; keep marble and other calcitic stones on pH-neutral products to avoid etching.
Limit mechanical force—prefer manual agitation. If pressure washing becomes necessary, keep pressure ≤500 psi, use a wide-angle nozzle, and maintain a 300–500 mm working distance to protect split-face texture and mortar joints. For stubborn deposits use a poultice: blend an absorbent base (kaolin or diatomaceous earth) into a paste with an appropriate solvent—use 3% hydrogen peroxide for organic soot—apply under plastic for 6–24 hours, then remove and neutralize. Always test the poultice on the same-batch reference panel first. After cleaning document with before/after photos, allow 48–72 hours for full drying before final assessment, and compare results to reference panels to detect any permanent discoloration. Specify Top Source Stone same-batch quarry consistency and matching L-corners in project specs and keep maintenance schedules plus product MSDS on file to protect warranties and longevity.
- Daily/weekly: HEPA vacuum, soft-bristle brush; avoid abrasive pads.
- Cleaner selection: pH 7–9 for routine; pH 9–11 for tested spot treatments (not on marble).
- Pressure-wash limits: ≤500 psi, wide-angle nozzle, 300–500 mm distance.
- Poultice steps: mix kaolin/DE with solvent, apply under plastic 6–24 hours, remove, neutralize, test first.
- Verification: photograph before/after, allow 48–72 hours drying, compare to same-batch reference panels.
- Design note: require Top Source Stone same-batch sourcing and matching L-corners in specs; store maintenance schedule and MSDS for warranty claims.

Pairing White Stone with Wood vs. Metal: The Contrast ROI
Contrast choices drive visual value, installation cost and rework risk—spec material, panel geometry and a 0.5–1.0 m² mock-up to protect margins.
Aesthetic ROI: Quantifying Contrast Effects and Spec Choices
Choose Glacier White Stacked Stone (Quartzite) or Glacier White from The Big 10 to achieve the soft architectural white that reads like Pantone 2026 Cloud Dancer; quartzite preserves warm undertones and mineral movement while keeping the surface durable. Use standard panels 150 x 600 mm (6″ x 24″) or 150 x 550 mm and prefer long, linear runs when pairing with wood to amplify perceived room width, or specify vertical feature bands to frame narrow metal trims and focal hardware.
Require same-batch quarry consistency with at least 95% hue uniformity for large visual fields to avoid patchiness across paired materials. Specify Z-Shape or S-Shape interlocking panels where you need invisible vertical joins and crisp contrast lines against metal; test a 0.5–1.0 m² mock-up with the exact wood stain or metal finish to validate undertones and scale before signing a bulk order.
- Recommended stock: Glacier White Stacked Stone (Quartzite) — aligns with Cloud Dancer aesthetics.
- Panel sizes: 150×600 mm or 150×550 mm; use linear runs for wood, vertical bands for metal accents.
- Color control: same-batch quarry sourcing, 95% hue uniformity.
- Edge/finish: Z-Shape or S-Shape interlocking to hide vertical joints.
- Validation: produce a 0.5–1.0 m² mock-up with the final wood stain or metal finish.
Performance ROI: Durability, Compatibility and On-Site Best Practices
Specify natural quartzite when the program demands UV stability, high salinity and humidity resistance, and ASTM-grade freeze-thaw durability for both exterior and interior applications. Use panel thickness based on load: standard 1.0–2.5 cm for walls and facades, premium/rough panels up to 3.5 cm where you expect heavy fixtures or direct mechanical loads; plan substrate and fixings for flat panels at ~30–40 kg/m² and rough panels near 55 kg/m².
Design compatibility details into the package: when pairing with wood, include a moisture barrier and a thermal/expansion gap to prevent movement transfer; when pairing with metal, specify corrosion-resistant fasteners and anodized or powder-coated finishes to prevent staining. Require matching L-corners to maintain continuous texture at transitions and mandate CNC diamond-blade precision for interlocking edges to reduce visible stepping and shorten finishing time. For kitchens and wet zones, choose quartzite for countertops and backsplashes and specify 3.5 cm thickness or thicker backing where heavy metal fixtures attach.
- Durability: UV stable, high salinity and humidity resistance, freeze-thaw rated.
- Thickness: 1.0–2.5 cm standard; up to 3.5 cm for premium/heavy-use.
- Weights: flat ~30–40 kg/m²; rough ~55 kg/m² — specify substrate capacity accordingly.
- Compatibility: moisture barrier and expansion gaps for wood; corrosion-resistant fixings and coated metals to avoid staining.
- Installation: use matching L-corners and CNC diamond-blade precision for interlocks to speed finishing.
Cost-to-Install ROI: Panel Selection, Labor Savings and Logistics Metrics
Calculate yields from box metrics before you price labor: standard boxes contain 7 pcs (0.63 m²) or 8 pcs (0.72 m²); rough stacked boxes contain 5 pcs (0.45 m²). Build work orders and waste allowances around those units and order in pallet multiples to reduce on-site handling—Option A (48 boxes) covers ~30.24 m²; Option B (60 boxes) covers ~37.80 m². For container planning, plan on a 20GP loading capacity of roughly 750–860 m² for standard panels and 480–540 m² for rough panels.
Respect MOQ and lead time constraints to protect schedules and margins: trial or private-label MOQ sits at 300 m²; in-stock dispatch runs 10–15 days, production lead time 20–25 days, so add buffers to project milestones. Account for crate gross weight (900–1000 kg) and USA port weight limits (standard 17.5 tons) to avoid surcharges. Save on labor by specifying Z-/S-shape interlocks plus matching L-corners to reduce grout and finishing time and require pre-shipment visual verification to cut rework risk.
- Box coverage: 7 pcs = 0.63 m²; 8 pcs = 0.72 m²; rough box = 5 pcs = 0.45 m².
- Pallet options: 48 boxes ≈ 30.24 m²; 60 boxes ≈ 37.80 m² — order to pallet multiples.
- Container: 20GP max coverage ≈ 750–860 m² (standard panels).
- MOQ & lead times: 300 m² MOQ; in-stock 10–15 days; production 20–25 days.
- Weight/port: crate gross 900–1000 kg; confirm destination port limits (US standard 17.5 tons).
- Labor savings: specify interlocking profiles and L-corners; demand pre-shipment photos/videos (pre-shipment visual verification).
Lighting Secrets: Making White Mineral Textures Pop at Night
Deliberate beam control, color fidelity, and thermal-safe mounting keep white stacked stone textured, true-colored, and low-maintenance under night lighting.
Fixture selection and beam control for grazing white stacked stone
Choose optics and fixture types that emphasize micro-relief without creating glare or washed highlights. For tight, high-contrast grazing, use narrow-beam optics in the 10°–30° range; switch to 40°–60° when you need a softer wall-wash that reduces shadow contrast. Prefer linear LED modules (10–18 W/m) for continuous runs and adjustable spot fixtures (3–10 W) where pinpoint accents or angled adjustments are required. Place fixtures close to the stone—typically 50–200 mm from the face—and aim them at shallow grazing angles between 5°–20° to maximize shadowing on ridges and crevices while avoiding blown-out high points.
- Use clear lenses for tight beams and frosted lenses when you need blended appearance; select asymmetric optics for long linear runs to prevent banding.
- Specify shielded optics or baffles to control glare for occupants and minimize stray light on nearby windows.
- Select IP65-rated fixtures for exterior installations and low-voltage 12 V or 24 V systems for concealed linear channels behind panels.
Color temperature, CRI and intensity targets for white quartzite and slate
Set color temperature to match the stone’s undertone and the design intent: use 2700–3000 K to warm mineral veins and 3000–3500 K to preserve a neutral, architectural Cloud Dancer look. Specify high color fidelity: require CRI ≥ 90 (Ra) with R9 ≥ 50 and target TM-30 fidelity > 90 for premium projects so warm veins render naturally under night lighting. For scene balance, aim ambient illuminance at 100–200 lux and apply accent illuminance of 300–600 lux on textured faces to hold a 3:1–5:1 contrast ratio between accent and ambient layers.
- Use tunable-white drivers during mock-ups to dial CCT on-site and confirm how warm undertones respond under actual night conditions.
- Specify lumen output so linear LED power (10–18 W/m) meets the 300–600 lux accent target at your mounting distance; verify with an on-site light meter.
- Confirm fixture spectral data (IES files) and measure R9 and TM-30 during sample approvals to avoid surprises on large façades.

Mounting, wiring and thermal practices around interlocking Z/S-shape and corner panels
Plan service channels behind Z/S and S-Shape panels and leave a 10–20 mm service gap between the LED channel and the stone back for wiring and heat dissipation. Account for panel mass when selecting anchors: use stainless steel anchors or expansion bolts sized for substrate and load—standard flat panels weigh about 30–40 kg/m² and rough panels about 55 kg/m². Anchor aluminum LED channels directly to the structural substrate and use CNC-cut recesses at interlocks and L-corners so fixtures remain concealed and continuous across corners.
- Use constant-current drivers (350 mA or 700 mA) in ventilated enclosures and place drivers inside service-accessible zones; avoid burying drivers in sealed cavities.
- Follow wiring-gauge rules to limit voltage drop: 18 AWG for runs ≤5 m, 16 AWG for 5–15 m, 14 AWG for 15–30 m and keep voltage drop under 3% to preserve uniform output.
- Waterproof penetrations with neutral-cure silicone, use gasketed junction boxes and specify IP66 junctions and exterior-rated conduit for outdoor runs.
- Manage thermal load: keep LED case temperature below 70°C, apply 20–30% lumen/driver derating for high-ambient or enclosed installations, and verify temperatures with a thermistor during commissioning.
Conclusion
Correct installation and wiring of fireplace and lighting systems keeps occupants safe and ensures compliance with OSHA and local codes. Proper installation also preserves stone finishes and mechanical components, lowering maintenance needs and extending service life.
Review your fleet’s current setup and project specifications, or contact Top Source Stone for a certified lighting catalog and a sample panel to verify fit and finish. We provide technical data and pre-shipment photos to help protect your margins and schedule.
Frequently Asked Questions
Does white stacked stone turn yellow over time?
The provided research does not document chemical yellowing of white stacked stone. It highlights that 2026 white natural stones commonly feature warm undertones and organic veining (for example, Pantone’s Cloud Dancer) that are selected to feel livable rather than sterile. To minimise the appearance of discoloration over time, choose stones with soft white/warm undertones and follow manufacturer/fabricator maintenance guidance; the research does not specify particular cleaning or treatment methods.
What is the best sealer to prevent soot on white stone?
The research does not name specific sealers or products for preventing soot. It emphasizes durability and long‑term livability as selection criteria for white stone. For soot-prone applications (like fireplaces), the appropriate approach is to use the manufacturer’s or fabricator’s recommended sealer and a routine maintenance plan; consult technical specifications or a stone professional for product selection because the research contains no product-level recommendations.
Which white stone is most heat resistant: marble or quartzite?
The research lists both marble and quartzite as popular, versatile white natural stones in 2026 but does not compare their heat resistance. Both materials are commonly used in high‑end applications; for a definitive answer on heat resistance (for example, around fireplaces or direct heat), consult manufacturer technical data or a stone professional, since the research does not provide a direct comparison.
How to clean soot off white stacked stone fireplace?
The research does not provide step‑by‑step soot‑cleaning instructions. It does stress that white stone is used as a visible design feature with warm undertones, so maintenance matters. Follow fabricator or manufacturer cleaning recommendations, test any cleaner in an inconspicuous area first, and consider professional cleaning for heavy soot—the research contains no detailed cleaning protocol.
What color mortar should I use with white natural stone?
The research highlights that 2026 whites often have warm undertones (Cloud Dancer) and are used to create integrated, livable spaces. Therefore choose a mortar color that matches or harmonizes with the stone’s undertone—soft white or a warm neutral mortar will best preserve the seamless, quiet‑luxury look the research describes.
