Floor-to-Ceiling Walls demand more than aesthetic vision; they require rigorous structural validation to prevent foundation settlement or long-term structural failure. Overlooking the sheer dead weight of a full-height stone installation can result in sagging floor joists and costly remediation work that erodes project margins. When a fireplace transition moves from a standard height to a vertical monolith, the engineering requirements shift from simple masonry to a complex high-load interior build where load-bearing capacity becomes the primary constraint.
This guide details the technical standards for vertical stone integration, covering weight distribution limits, scaffolding safety for interior climbs, and seam management across large surface areas. We provide a framework for aligning heavy stone panels against vaulted ceilings and sloped architecture while maintaining visual continuity. This analysis functions as a technical procedure for mitigating the structural risks and logistical hurdles of full-scale interior masonry.
Why the Full-Height Stone Wall is the Ultimate Value-Adder?
Full-height natural stone installations transform vertical surfaces into permanent structural assets that provide superior UV stability and appreciation in property valuation compared to synthetic alternatives.
Authentic Texture and Natural Uniqueness
Natural stone panels offer a distinct aesthetic that manufactured alternatives fail to replicate. Each panel contains unique color variations and organic textures formed over millions of years. This authenticity eliminates the repetitive patterns found in concrete-based stones, which often look artificial when viewed across a large surface area. By sourcing materials from specific quarry veins, we ensure that the natural slate and quartzite maintain a consistent hue while preserving the raw, tactile quality that bridges the gap between outdoor landscapes and luxury interior design.
- Natural minerals provide organic textures and color depth impossible to mimic with pigments.
- Real stone avoids the “tile look” by utilizing natural cleft and split-face finishes.
- Each installation remains a one-of-a-kind architectural feature for the property owner.
Permanent Asset Value in Real Estate
Real estate appraisers and high-end buyers recognize floor-to-ceiling stone walls as capital improvements rather than simple cosmetic updates. These installations signal a level of structural integrity and premium craftsmanship that increases a property’s overall market valuation. The psychological impact of a massive stone wall during a showing creates an immediate sense of permanence and luxury that paint or wallpaper cannot achieve. For B2B stakeholders, offering natural stone panels means providing clients with a finish that actively contributes to their equity.
- Stone walls serve as a tangible asset that justifies higher per-square-foot property pricing.
- Floor-to-ceiling applications maximize the vertical focal point of high-traffic living areas.
- Premium masonry applications demonstrate long-term investment in building quality.
Longevity Through Weather and UV Resistance
Natural stone maintains its integrity for decades without the fading associated with dyed or man-made materials. The minerals in quartzite and slate are inherently UV-stable, ensuring that sun-drenched rooms do not suffer from color loss over time. Beyond aesthetic durability, natural stone is non-combustible, which adds a layer of fire safety to fireplace surrounds and accent walls. These panels withstand high-traffic impacts in commercial settings, making them ideal for lobbies and public spaces where wood or drywall would require frequent repair.
- Inherent UV stability prevents the bleaching common in manufactured “faux” products.
- The material resists high-impact wear in both residential and commercial corridors.
- Non-combustible properties provide an extra safety margin for interior vertical surfaces.
Low Maintenance Requirements for Property Owners
A full-height stone wall provides a durable finish that virtually eliminates the need for cosmetic refreshes. Owners no longer face the cycle of repainting, patching drywall, or replacing peeling wall coverings. Maintenance typically requires only periodic dusting or cleaning with water and pH-neutral solutions. When installed with high-quality epoxy resins and CNC-cut precision edges, the panels remain permanently bonded, providing a maintenance-free architectural feature that lasts the lifetime of the building.
- The stone surface requires only basic cleaning without specialized chemicals.
- Eliminates recurring labor costs for painting and decorative repairs.
- Robust bonding technologies ensure long-term structural adhesion to the substrate.
Structural Engineering: Can Your Floor Handle a 12-Foot Stone Wall?
Full-height vertical stone features exert cumulative dead loads that require specific subfloor rigidity and structural diaphragm assessment to prevent long-term deflection and joint failure.
Calculating Dead Load and Weight Distribution
Engineers in 2026 prioritize precise dead load calculations to determine how natural stone panels impact the building diaphragm. Natural stone ledger panels typically weigh between 8 and 13 pounds per square foot, which seems manageable in small sections but compounds rapidly in 12-foot vertical applications. A standard 12-foot wall creates significant vertical pressure that requires a structural assessment of the underlying floor system to ensure the joists or slab can support the concentrated linear load at the wall base.
Load analysis must account for the cumulative weight of the stone, the thin-set adhesive, and the substrate materials like cement backer units. For high-rise residential or commercial interiors, ignoring these variables leads to floor sagging or wall shearing. Technical teams must verify that the total assembly weight stays within the structural limits defined by local building codes, especially when retrofitting stone onto existing partition walls.
| Material Specification | Avg. Weight (per sq. ft.) | Foundation Requirement |
|---|---|---|
| Full-Bed Building Stone | 40 – 60 lbs | Structural Footing / Brick Ledge |
| Top Source Ledger Panels (Standard) | 8 – 12 lbs | Standard Load-Bearing Wall |
| Top Source Rough Panels (Premium) | Up to 14 lbs | Reinforced Framing (16″ O.C.) |
Assessing Subfloor Rigidity and Deflection
Structural stability depends on the floor’s ability to resist bending or shifting under the weight of a full-height stone installation. Stone surfaces require a rigid substrate to prevent grout cracking or stone displacement over time. Concrete floors and masonry walls provide the most stable foundations for high-rise stone applications because they offer minimal deflection.
Interior wood-frame floors often require cement board reinforcement or additional blocking between joists to manage the weight without excessive deflection. If the subfloor flexes more than the L/360 industry standard, the bond between the stone and the wall will eventually fail, leading to hazardous delamination.
Vertical Load Management and Foundation Needs
Modern engineering standards focus on how vertical loads distribute through bearing walls to the building foundation. Standard full-thickness stone often requires a structural footing or brick ledge to support its mass, but lightweight ledger panels allow for 12-foot installations without the need for additional structural footings.
- High-strength epoxy resins and interlocking Z-shaped panels ensure the vertical load remains evenly distributed across the wall surface.
- Direct-to-stud installation using specialized metal lath provides secondary mechanical anchoring for heights exceeding 10 feet.
- Engineered Z-shape connections from Top Source Stone eliminate “stepped” gaps that concentrate stress at the seams.
Seismic Reinforcement and Connection Security
Ensuring the stone wall stays anchored during vibration or settlement is critical for long-term safety for commercial and residential builds. Structural reinforcement is essential in seismic zones to maintain the bond between the stone and the wall framing. Wall-to-foundation connections must be verified to handle the added tension of a tall vertical stone feature.
Three-stage quality inspections during manufacturing ensure that the bond between the stone and the panel backing meets 2026 safety standards. In regions prone to seismic activity, installers use flexible mortars and mechanical ties to allow for slight building movement without compromising the integrity of the stone facade.
Authentic Natural Stone at Factory-Direct Prices

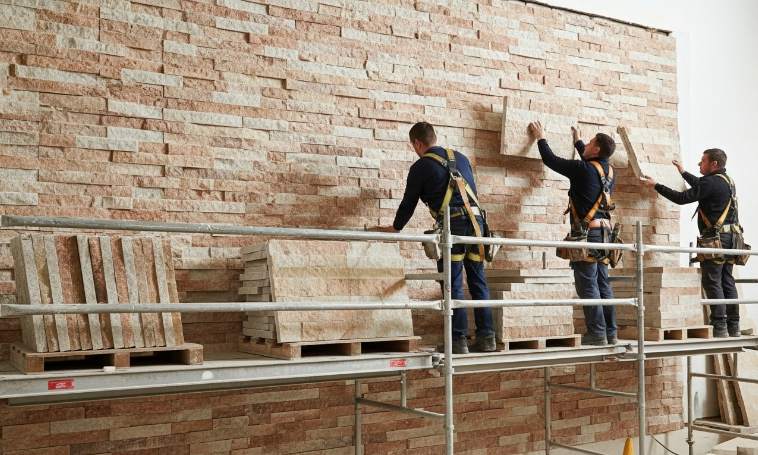
Managing Scaffolding and Safety for Vertical High-Rise Installs
2026 high-rise stone installations demand an engineering-first approach to vertical access to manage the 13lb/sq.ft dead load of natural materials while maintaining strict federal safety compliance.
High-rise stone masonry requires specialized vertical access that goes beyond standard residential scaffolding. We prioritize OSHA Subpart L standards for every interior and exterior project exceeding ten feet in height. Safety protocols must evolve alongside the weight requirements of natural stone to prevent structural failure or worker injury during the application phase.
OSHA Standards and Regulatory Compliance for Stone Masonry
Current safety protocols for 2026 emphasize absolute adherence to federal mandates for all masonry work. We implement fall arrest systems and perimeter guardrails for all work surfaces exceeding 10 feet. This ensures a secure environment for crews as they maneuver heavy stone crates at elevation.
- Engineers provide stamped designs for any scaffolding structure exceeding 125 feet to guarantee structural integrity during stone application.
- Competent persons supervise the assembly and conduct daily inspections of all platforms to identify potential hazards before installation begins.
- We maintain rigorous documentation of site-specific safety plans to meet evolving high-rise construction regulations.
Structural Stabilization and Guying for Tall Stone Walls
Vertical stone work creates unique swaying risks due to the weight distribution of the ledger panels. We utilize systematic guying and bracing for structures that exceed a 4:1 height-to-base ratio. This prevents the platform from tipping or swaying while masons apply pressure to the wall substrate.
Installers place vertical restraints every 20 to 26 feet to secure the scaffold against the building facade. The system also incorporates overhead protection to shield workers from falling debris or tools during high-elevation panel placement. These measures create a stable environment for precision stone alignment.
Platform Load Capacity and Weight Management for Natural Stone
Scaffolding must support the heavy dead load of natural stone ledger panels, which typically range from 8 to 13 pounds per square foot. We design our platforms to support four times the maximum intended load. This capacity accounts for stone pallets, mortar, high-strength adhesives, and the installation personnel.
- Crews distribute stone crates evenly across the scaffold deck to prevent localized structural failures or platform tilting.
- We manage high-strength epoxy adhesives at elevation to ensure bonding remains consistent across the entire vertical span.
- Engineers calculate the combined weight of all materials and equipment to ensure the deck never exceeds its rated capacity.
Fall Protection Protocols and Integrated Guardrail Systems
Safety systems must integrate with the workflow of installing interlocking stone panels at height. Installers use personal fall arrest systems (PFAS) when working near edges where guardrails are temporarily removed for specific panel placement. This double-layered protection minimizes exposure to fall risks during the most technical phases of the install.
Using L-shaped corner pieces reduces the time crews spend at the edge of the scaffold, which naturally minimizes fall risk exposure. We maintain clear communication protocols between ground crews and high-rise installers to coordinate the vertical transport of material crates. This coordination ensures that the scaffold remains balanced and free of clutter throughout the project duration.

Avoiding the “Seam Line” in Large Scale Stone Transitions
Invisible transitions in high-rise stone installations depend on geometric interlocking and batch-level color synchronization rather than site-level masking or fillers.
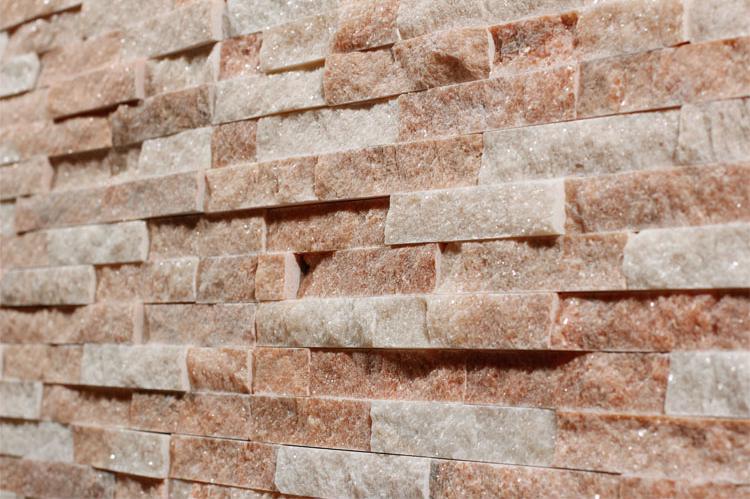
Interlocking Z-Shape Panel Geometry
Standard rectangular panels often create vertical “stacked” lines that break the visual flow of a large-scale wall. We utilize a Z-shape and S-shape interlocking design that hides vertical seams by creating a staggered joint following the natural stone texture. Our CNC diamond-blade equipment ensures each panel fits its neighbor with high precision, eliminating the shadow lines that typically expose panel borders.
| Transition Feature | Standard Rectangular Panels | Top Source Z-Shape Interlock |
|---|---|---|
| Vertical Seam Visibility | Highly visible “stacked” lines | Camouflaged male-female joints |
| Precision Engineering | Standard manual saw cut | CNC Diamond-Blade Precision |
| Substrate Coverage | Potential for “stepped” gaps | Full coverage seamless finish |
This interlocking geometry removes the straight vertical joints found in traditional tiles. It makes transitions invisible even on expansive commercial facades by ensuring the “male” end of one panel seats perfectly into the “female” end of the next. This system effectively conceals the installation substrate and provides a professional finish without the need for complex on-site adjustments.
Unified Batch Sourcing and Sorting
Visible seams often occur because of color shifts between different production runs rather than physical gaps. We pull raw materials from the same quarry section and specific vein for large-scale projects to maintain 95% hue uniformity across the entire surface area. This same-batch consistency prevents the “patchy” or “color-blocked” look that typically highlights where one panel ends and another begins.
- Our three-stage inspection process ensures that panels with high color contrast are redistributed, preventing visual jarring at the borders.
- We control the supply chain from the mountain to the crate to ensure that every pallet in a container maintains consistent mineral characteristics.
- Using stone from the same layer of the quarry guarantees inherent UV stability and mineral harmony across thousands of square feet.
L-Shaped Corner Integration
Transitions at corners are the most frequent fail points for visible seams. Simple on-site mitering often results in uneven edges and prominent lines at the most visible points of the architecture. Our pre-fabricated L-shaped corner pieces provide a seamless wrap-around look that maintains the staggered pattern of the flat panels.
These matching L-corners synchronize texture and color at wall transitions, eliminating the need for complex field cuts. By providing a project-ready full solution, we reduce on-site labor costs and ensure the natural stone aesthetic remains uninterrupted as it moves from one plane to another. This approach guarantees a professional finish that standard straight-cut panels cannot replicate.
How to Align Stone Panels Across Ceiling Slopes and Vaults
Aligning natural stone across complex overhead geometries requires a combination of 360-degree laser leveling and precision CNC diamond-blade cutting to eliminate the “stair-step” effect at architectural transition points.
Geometric Planning and Reference Baselines
Installation success on a vaulted surface depends entirely on the initial baseline. We utilize 360-degree laser levels to project a continuous horizontal reference line across the vertical wall and the slope transition. This ensures that the interlocking Z-shape pattern remains level even as the wall height changes. Establish the first course of panels at the lowest point of the slope to maintain pattern integrity. We recommend marking vertical plumb lines at 24-inch intervals to monitor lateral shifting, a common issue as installation moves toward a vault peak.
| Installation Parameter | Standard Vertical Wall | Vaulted/Sloped Ceiling |
|---|---|---|
| Adhesion Strategy | Standard Thin-set Mortar | High-Strength Stone Epoxy Resin |
| Structural Reinforcement | Friction & Gravity Fit | Mechanical L-Clips & Cleats |
| Cutting Requirement | Standard 90-Degree Miter | CNC Precision Compound Angles |
Compound Angle Precision for Vault Peaks
Vaulted peaks demand significantly tighter tolerances than standard 90-degree corners. Use a digital angle finder to determine the specific pitch of the vault, which dictates the precise miter for the top-row panels. While our CNC diamond-blade edges provide a clean fit, installers must use infrared-guided wet saws to execute compound cuts that allow opposing slopes to meet flush at the ridge. We suggest back-buttering the edges of peak panels with color-matched epoxy to camouflage the structural seam at the highest point of the installation.
Mechanical Fastening and High-Strength Adhesion
Gravity exerts significant shear force on stone panels installed on overhead slopes. For panels weighing 8-13 lbs/sq.ft, apply high-strength, stone-grade epoxy resin to ensure a permanent bond to cement board substrates. During the initial cure time, install temporary wood cleats or bracing systems below the current row of panels to prevent sliding. On slopes exceeding 45 degrees, we require mechanical fasteners or secondary L-clips to provide necessary structural redundancy and long-term safety.
Managing Seam Continuity at Wall-to-Slope Transitions
The junction where a vertical wall meets a sloped ceiling often suffers from pattern breaks. Careful panel management preserves the visual flow:
- Scribe the top edge of the vertical wall panels to match the exact pitch of the ceiling for a gap-free transition.
- Stagger panel joints across the transition line to prevent the eye from catching a long, continuous horizontal seam.
- Use the natural cleft and depth of our Rough Series or Pencil Series stone to mask minor angular deviations where the ceiling plane begins.
- Maintain same-batch quarry consistency to ensure that lighting across different angles does not reveal color shifts between the wall and the slope.
Conclusion
Successfully executing a floor-to-ceiling stone wall requires a precise combination of structural planning, scaffolding safety, and meticulous panel alignment. Selecting materials from a direct quarry source ensures batch consistency and tight tolerances, which are critical for maintaining a seamless aesthetic across large vertical surfaces. These professional standards protect both the architectural vision and the long-term safety of the installation.
Review our technical specifications and the Big 10 inventory to identify the best natural stone for your upcoming project requirements. Reach out to our team to discuss container-load pricing or to request a sample of our interlocking ledgestone series.
Frequently Asked Questions
Is a full-wall stone fireplace too heavy for my foundation?
It depends on the material choice and existing construction. A full-height natural stone wall (full-bed) can weigh upwards of 2,000 to 5,000 lbs, which typically requires a reinforced concrete footing or a thickened slab. If using Thin Stone Veneer (TSV), the weight is significantly lower (approx. 7–15 lbs per sq. ft.), but for a floor-to-ceiling installation, a structural engineer should still verify that your floor joists or slab can handle the concentrated dead load to prevent settling or cracking.
How to stagger stone panels on a tall wall to hide seams?
To achieve a seamless look on a tall vertical surface, use a “running bond” pattern where vertical joints are offset by at least one-third of the panel length. For the most professional finish, utilize “Z-shaped” interlocking stone panels rather than straight-edged rectangles; the staggered “teeth” of the Z-shape break up the eye’s path and hide the seams. Always “dry lay” your panels on the floor first to ensure color blending and to prevent identical textures from sitting adjacent to one another.
How much more does a full-height fireplace cost vs. partial?
On average, a full-height fireplace costs 150% to 200% more than a partial-height (mantel-level) installation. While material costs scale linearly with square footage, labor costs increase exponentially due to the need for scaffolding, specialized safety equipment, and the increased difficulty of maintaining level lines and structural integrity at height. You should also factor in the potential cost of structural reinforcements for the foundation, which are rarely needed for partial-height designs.
Do I need a permit for a massive interior stone wall?
Yes, most local building codes require a permit for large-scale interior stone installations. This is categorized as a structural modification due to the significant “dead load” added to the building’s frame. Additionally, if the stone wall surrounds a fireplace or chimney, it must meet specific fire-clearing and non-combustible material codes. Failure to obtain a permit can result in insurance claim denials and complications during the resale of the property.
Best way to install stone on a vaulted fireplace ceiling?
Installation on a vaulted or sloped ceiling requires a mechanical-plus-chemical bond. Use a high-performance, polymer-modified “Large and Heavy Tile” (LHT) mortar (ANSI A118.15) for maximum immediate grab. Crucially, you must also use mechanical fasteners, such as metal ties or screws anchored through a wire lath into the ceiling joists, to provide a secondary fail-safe against gravity. Work from the bottom up and use a ledger board to support the first row while the mortar cures.
