06. الصيانة & يعتبر Soot Science بمثابة خط المواجهة ضد تسرب السخام الناتج عن المسام إلى الحجر الطبيعي؛ إذا تركت هذه المشكلة دون حل، فإنها تؤدي إلى تكاليف تنظيف غير متوقعة، وتزيد من وقت توقف الصيانة، وتعرض المنشآت لشكاوى تتعلق بجودة الهواء والمخاطر التنظيمية.
يعد هذا الدليل بمثابة إجراء تشغيلي قياسي تقني لأصحاب المنازل ومديري المرافق: فهو يشرح لماذا تعمل المسام الحجرية كمغناطيس للكربون والغبار، والأعلام الحمضية وغيرها من المنظفات التي يجب تجنبها، ويقدم إجراء خطوة بخطوة لإزالة تراكم الدخان الكثيف دون إتلاف الأوردة - القسم الأساسي. ستحصل أيضًا على طرق آمنة لاستعادة اللمعان الطبيعي، وإجراءات فراغ HEPA لقطع الجسيمات المحمولة بالهواء، واستراتيجيات الختم التي تطرد رماد الكربون في المستقبل، بالإضافة إلى قوائم الأدوات، ونسب التخفيف، ونقاط تفتيش معدات الوقاية الشخصية، ومعايير الفحص التي تجعل العمل قابلاً للتكرار والتدقيق.
لماذا تعتبر مسام الحجر الطبيعي مغناطيسًا للكربون والغبار؟
مسامية يمتص الحجر السخام والغبار الناعم عبر القوى السطحية والنقل المائي، لذا اختر المواد والمواصفات التي تحد من الامتصاص وميزانية الصيانة.
امتزاز المسام الصغيرة: فان دير فالس، القوى الكهروستاتيكية والشعرية
تخلق المسام الدقيقة والفجوات الضيقة بين الحبوب والحبوب مساحة سطحية داخلية عالية جدًا حيث تقوم عوامل الجذب Van der Waals والتفاعلات الكهروستاتيكية والروابط الهيدروجينية بسحب السخام والغبار دون الميكرون إلى الأسطح المعدنية. تعمل طبقات الماء داخل تلك المسام الدقيقة كحاملات، حيث تحرك الكربون المعلق إلى عمق المصفوفة وتحبسه عندما تتبخر السوائل أو تتأكسد الرواسب. توقع تعتيمًا أوليًا سريعًا للمواد ذات المسامية المفتوحة العالية والأداء المتغير بين دفعات المحاجر ما لم تتحكم في المصادر.
حدد مقاييس المواد القابلة للقياس مقدمًا: اطلب اختبار المسامية المفتوحة وامتصاص الماء وفقًا لمعيار ASTM C97 على عينات تمثيلية من المحاجر قبل الموافقة على الطلبات، ويفضل متغيرات الكوارتزيت الأكثر كثافة للواجهات عالية السخام. قم بتضمين بدل الصيانة وجدول الفحص في وثائق العقد لمعالجة التلوث المبكر بشكل أسرع عندما يكون حجم المسام الدقيقة مرتفعًا.
- اطلب بيانات المسامية المفتوحة وامتصاص الماء ASTM C97 على عينات تمثيلية من المحاجر قبل الموافقة على الطلب.
- تحديد المواد ذات المسامية المنخفضة (الكوارتزيت الكثيف) للبيئات عالية السخام.
- المصدر من نفس وريد المحجر لكل طلب للحفاظ على اتساق سلوك اللون والامتزاز.
- ميزانية بدلات التنظيف والتفتيش في صيانة المشروع المواصفات للتعتيم الأولي.
بنية المسام والتجوية: التجميد والذوبان والتوسيع وانحباس الجسيمات
تعمل دورات التجميد والذوبان وبلورة الملح على توسيع المسام الانتقالية والأكبر بمرور الوقت، مما يزيد من قدرة الحجر على احتجاز الكربون الجسيمي والمذاب. قم بتأكيد النتائج المختبرية أو الميدانية الموثقة التي تظهر "مقاومة التجميد والذوبان".’ تقييم من المورد الخاص بك للمشاريع في المناخات الدورية، والتخطيط لكيفية تغيير توسيع المسام لتكرار التنظيف ونطاق الترميم على مدار دورة حياة المبنى.
تصميم لتقليل نقل الجسيمات الناتج عن الرطوبة: الاستخدام لوحات متشابكة على شكل Z أو على شكل S ومطابقة الزوايا على شكل حرف L لتقليل المفاصل الرأسية المكشوفة وقطع المسارات المباشرة للمياه والجزيئات. قم بجدولة مسوحات الحالة حتى تتمكن من اكتشاف توسيع المسام مبكرًا والتخطيط لإعادة الغلق الانتقائي أو استبدال اللوحة حيث تزيد المسامية ماديًا.
- تحقق من "مقاومة التجميد والذوبان".’ بيانات الأداء من المورد (تقارير المختبر أو دراسات الحالة الميدانية) للمناخات الباردة.
- تحديد الألواح ذات الشكل Z/S المتشابكة والزوايا L المطابقة للحد من الوصلات الرأسية المكشوفة؛ يوفر Top Source Stone تشابكات دقيقة بشفرة ماسية CNC من أجل ملاءمة محكمة.
- التخطيط لإجراء مسوحات للحالة كل 2-5 سنوات على الأقل في المناخات الدورية؛ زيادة التكرار حيث يؤدي التعرض للملح أو التلوث الشديد إلى تسريع عملية التجوية.
- حساب سمك اللوحة والتعامل معها: اللوحات القياسية 150 × 600 مم (6″ × 24″) والسمك من 1 إلى 3.5 سم يؤثر على لوجستيات الاستبدال والوزن لكل متر مربع.
كيمياء السطح والقشور الجوية والحماية: استراتيجيات التنظيف والختم
تشكل القشور التجوية طبقة سطحية نشطة كيميائيًا غنية بالمواد العضوية وأوكسي هيدروكسيدات الحديد والسخام. تعمل الأكسدة على تقوية احتجاز الجسيمات وتجعل إزالة الرواسب أكثر صعوبة. الحد من انتقال الجسيمات المنقولة بالمياه عن طريق تحديد مواد مانعة للتسرب من مادة السيلان/السيلوكسان قابلة للتنفس والتي تحافظ على نفاذية البخار؛ قم دائمًا باختبار المواد المانعة للتسرب على النماذج الأولية ألواح من نفس دفعة المحجر قبل التطبيق الكامل.
اعتماد بروتوكول تنظيف محافظ: قم بإزالة الحطام السائب باستخدام المكنسة الكهربائية المجهزة بـ HEPA (مصائد HEPA ~ 99.97٪ من الجسيمات ≥0.3 ميكرومتر)، ثم استخدم الشطف منخفض الضغط ودرجة الحموضة المحايدة منظفات الحجر للصيانة الروتينية. احتفظ بالطحن الميكانيكي أو المعالجة الكيميائية القوية للتدخلات الموثقة والخاضعة للرقابة وتجنب المنظفات الحمضية - قم بتدريب الطاقم على متطلبات SDS ومعدات الحماية الشخصية والتهوية. أضف بنود العقد التي تتطلب التحقق البصري من الصناديق قبل الشحن وجدول الصيانة في الموقع المصمم خصيصًا لظروف التلوث والملوحة المحلية.
- اختبار مواد مانعة للتسرب من السيلان/السيلوكسان قابلة للتنفس على عينات من مجموعة المحجر المعتمدة؛ التحقق من التوافق ونفاذية البخار.
- قم بتفريغ السخام السائب باستخدام معدات مرشحة بواسطة HEPA قبل أي تنظيف رطب لتقليل إعادة تدوير الهواء.
- استخدم منظفات الأس الهيدروجيني المحايدة والشطف منخفض الضغط للصيانة الروتينية؛ لا يمكن التصعيد إلى المعالجة الميكانيكية أو الكيميائية إلا بعد التوثيق والاختبار.
- حظر المنظفات الحمضية في الموقع دون مراجعة SDS وبروتوكولات معدات الوقاية الشخصية؛ المنتجات الحمضية تخاطر بإصابة العمال وتلف السطح.
- تضمين التحقق البصري قبل الشحن من الصناديق الجاهزة وجدول الصيانة الخاص بالموقع في عقد الشراء؛ خطط لدورات إعادة الختم عادةً كل 1-3 سنوات حسب التعرض.
خطر المنظفات الحمضية: ما يجب تجنبه بأي ثمن
تعمل المنظفات الحمضية على تغيير كيمياء السطح بسرعة الحجر الطبيعي مكدسةوالحفر والتلطيخ واستبدال اللوحة المكلفة إذا تركت دون تحديد.
آليات الحمض والحجر: كيف تهاجم الأحماض المسام والمعادن الحجرية المكدسة
تظهر أحجار الكالسيت - الرخام والحجر الجيري - نقشًا مرئيًا بمجرد تعرضها لمحاليل أقل من الرقم الهيدروجيني 4، ويمكن للأحماض القوية في نطاق الرقم الهيدروجيني 0-2 إزالة المواد السطحية في غضون دقائق. يقاوم الكوارتزيت والعديد من الألواح الحفر المباشر بشكل أفضل بسبب ارتفاع محتوى السيليكا، ولكن التعرض لانخفاض الرقم الهيدروجيني لا يزال يتسرب من المعادن القابلة للذوبان، ويحرك الحديد، وينتج عنه بهتان السطح وتغير اللون عند الاتصال المتكرر.
Liquid moves into stone through micropores and transitional pores; acid rides capillary water and carries dissolved ions and pollutants deep into the matrix where oxidation can convert trapped iron to oxyhydroxides and bind organic carbon, accelerating dark crusts and staining. Natural cleft or split-face finishes increase exposed surface area and contact points, raising the risk of localized etching and deeper penetration compared with honed surfaces. Standard panel thicknesses (1.0–3.5 cm) do not stop these chemical changes—damage starts at the exposed face and often requires restoration or panel replacement.
Common acidic cleaners and ingredients to avoid (pH, typical effect)
Many household and commercial products contain acids with predictable pH ranges and damage profiles; operators must treat these products as high-risk around الحجر الطبيعي مكدسة. Below are the typical culprits and the effects you will see on calcite-bearing and iron-bearing materials.
- Hydrochloric (muriatic) acid — pH ~0–1: causes rapid dissolution of carbonates, severe surface etching, and harms metal fixings and grout.
- Sulfamic and strong descaler acids — pH ~1–2: remove scale but will dull and etch many الحجارة الطبيعية and can leach iron, producing staining.
- Acetic acid (household vinegar) and citric acid cleaners — pH ~2–3: cause slow but visible etching and surface haze on calcite-rich stones and can discolor some slates.
- Commercial lime/scale and toilet cleaners — often highly acidic; treat SDS as mandatory and avoid on any الحجر الطبيعي سطح.
Before using any product, read the Safety Data Sheet for active ingredient and pH, perform a 24–48 hour spot test on a hidden sample, and never apply unknown acidic products directly to stacked panels or pre-fabricated L-corners—those details protect warranty, appearance, and project timelines.
Safe cleaning and emergency mitigation protocol for stacked stone panels
Specify neutral pH (6–8) stone cleaners or diluted non-ionic detergent for routine maintenance وحظر المواد الكاشطة والقلويات القوية والمركزات الحمضية من مواصفات الصيانة. اتبع معدلات التخفيف الخاصة بالشركة المصنعة، واشطفها جيدًا بالماء الصالح للشرب، واستخدم الغسيل منخفض الضغط فقط عند الحاجة - احتفظ بالضغط أقل من 1000 رطل لكل بوصة مربعة واستخدم فوهة واسعة الزاوية لتجنب الأضرار الميكانيكية للأوجه والمفاصل المشقوقة.
- الاستجابة الفورية للانسكابات: أوقف التلامس واغسل المنطقة بالماء لمدة 10-15 دقيقة، ثم استخدم محلول بيكربونات الصوديوم (حوالي 50-100 جرام من NaHCO3 لكل لتر) لتحييد الحمض المتبقي؛ افركي بلطف باستخدام فرشاة ناعمة واشطفيه جيدًا.
- Drying and inspection: allow 48–72 hours for complete drying (longer in high humidity). Document affected panels and inspect interlocking Z/S joints and L-corners for color change, loss of texture, or edge weakening.
- Remediation: treat light surface haze with a neutral stone cleaner; for deep etching or mineral loss, engage a stone restoration specialist for honing or panel replacement; address iron staining only with approved chelating agents under professional guidance.
- Project prevention: write neutral-cleaner requirements into maintenance specs, require post-install protective measures for interlocking joints during construction, and enforce pre-shipment visual verification of finishes to avoid on-site corrective work.
Premium Stacked Stone for Profitability

Step-by-Step: Removing Heavy Smoke Buildup Without Damaging Veins
Controlled soot extraction preserves vein hue and minimizes rework, protecting same-batch 95% color consistency for B2B shipments.
1. Pre-clean assessment and mapping of affected veins
Start by mapping soot density and vein geometry to set cleaning priorities and avoid uneven results. Confirm stone type (slate, quartzite, sandstone, marble) because porosity and chemical resistance determine which methods and concentrations you can use without altering pigments or iron oxides.
Run quick porosity checks — a water-drop test and a capillary absorption check — and record absorption time to estimate wetting dwell and poultice cycles. Perform a full patch test on a hidden panel that includes every planned step; document any color shifts, texture loss, or efflorescence before you proceed. For B2B orders, verify batch/vein origin and prioritize same-batch panels to preserve ~95% hue uniformity across repairs and shipments.
- Mark soot-density zones and vein locations on elevation drawings.
- Record stone ID, quarry vein, and batch number for traceability.
- Log water-drop and capillary absorption times to set dwell windows.
- Execute and photograph a multiplatform patch test (mechanical, surfactant, poultice).
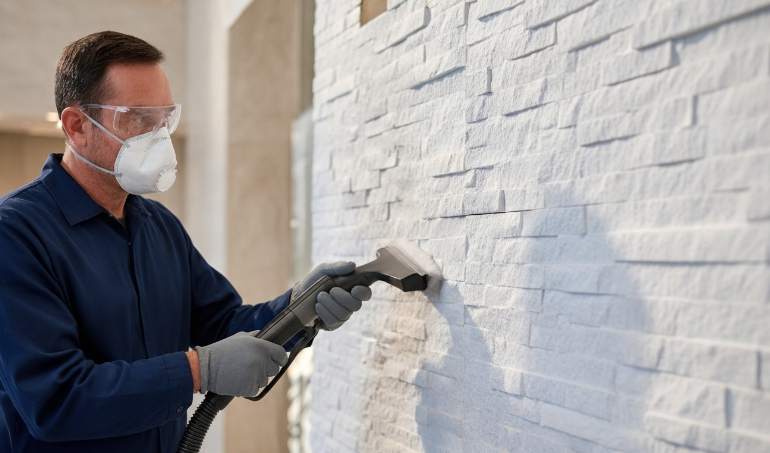
2. Safety, containment and site controls
Protect workers and product quality with correct PPE and environmental controls: use NIOSH-rated respirators (N95 or P100 for particulates; add an organic-vapor cartridge when using solvents), chemical-resistant nitrile gloves, and eye protection. Erect dust curtains or tarps and run negative-air extraction during sanding or dry scraping to capture airborne soot and prevent cross-contamination of adjacent panels.
Manage waste as hazardous when carbon-laden residues concentrate oils or heavy metals: collect poultices and rinsate in sealed, labeled containers and follow local hazardous-waste rules. Avoid cleaning during freezing conditions or under direct sun; keep surface temperature between 5–25°C to control evaporation and chemical dwell. For B2B shipments, document pre- and post-clean conditions with photos and video as part of pre-shipment visual verification.
- PPE: N95/P100 respirator; add organic-vapor cartridge if solvents present; nitrile gloves; eye protection.
- Containment: dust curtains, negative-air extraction during dry work.
- Waste: seal and label poultices/rinsate per local hazardous-waste regulations.
- Environmental control: operate between 5–25°C; avoid direct sun or freezing.
- Documentation: photograph/video for pre-shipment verification and warranty records.
3. Mechanical removal: dry and low-abrasion techniques
Begin with dry, low-abrasion methods to remove surface soot and protect vein texture. Use soft nylon brushes and a low-suction industrial vacuum fitted with a HEPA cartridge (captures down to 0.3 microns) to lift loose carbon without driving particles deeper. Never use wire brushes or high-speed grinders on vein faces; those tools abrade mineral layers and change tactile finish.
Reserve micro-abrasion for isolated, tested patches only — use inert abrasive at very low pressure and retest appearance. If you must pressure rinse, keep pressure below 600 psi, fit a 25–40° wide-angle fan nozzle, use cold water only, and hold the nozzle 30–50 cm from the face to avoid driving water into panel joins. Shield Z-Shape/S-Shape male-female interlocks and L-corners to prevent water intrusion into panel joins and substrate.
- Dry first: soft nylon brushes + HEPA vacuum (0.3 µm capture).
- No metal tools: avoid wire brushes and high-speed grinders.
- Micro-abrasion: test patch with inert media at low pressure only.
- Power wash: <600 psi, 25–40° nozzle, cold water, 30–50 cm distance.
- Protect interlocks and L-corners to prevent water ingress into joins.
4. Selection and application of low-pH/neutral surfactants
Select non-ionic or neutral-pH surfactants (target pH 7–9) for the initial wet stage to avoid etching veins or mobilizing iron oxides. Start with a conservative working dilution — roughly 1:50 to 1:100 cleaner:water for light to medium soot — and increase concentration only after a successful patch test that shows no pigment loss or surface softening.
Pre-wet the stone, apply the solution with low-pressure spray or a soft brush, and agitate gently to move soot from pore mouths. Keep contact 5–10 minutes, then rinse with low-pressure water and blot excess moisture. Repeat the rinse/blot cycle up to three times before escalating to chemical poultice. Never use acidic cleaners on calcareous stones (marble, some limestones), and avoid strong alkalis on oxidized crusts that bind carbon.
- Cleaner choice: non-ionic or neutral pH (7–9).
- Dilution: start 1:50–1:100; escalate only after testing.
- Apply: pre-wet, low-pressure spray or soft brush, agitate gently, 5–10 minute contact.
- Rinse: low-pressure rinse, blot; repeat up to three cycles before poulticing.
- Compatibility: avoid acids on calcareous stones; avoid strong alkalis on oxidized crusts.
5. Poultice design and stepwise oxidative extraction for deep-set carbon
Use poultices when mechanical and surfactant stages fail to pull soot from micropores. For oxidized carbon, design an oxidative poultice using hydrogen peroxide (3–12%) as the oxidizer mixed with an absorbent medium such as kaolin, diatomaceous earth, or cellulose. For hydrophobic tars, use a solvent-assisted poultice formulated and tested for the stone type.
Mix absorbent powder with cleaning solution to a peanut-butter consistency, roughly 2:1 powder:liquid by volume, and adjust by test. Apply 6–12 mm thick and extend 20–50 mm beyond the stain. Cover with plastic to slow evaporation and control dwell. Allow 24–72 hours per cycle, remove with a plastic scraper, perform a neutral rinse, and repeat until the poultice no longer transfers soot. Neutralize alkaline residues with a 1–2% acetic acid rinse, followed by a full water flush. Test higher peroxide strengths on an inconspicuous vein first — stronger oxidizers can lighten pigments or alter iron oxides.
- Poultice types: oxidative (H2O2 3–12% + kaolin/diatomaceous cellulose) or solvent-assisted for tars.
- Mix: peanut-butter consistency; ~2:1 powder:liquid by volume, adjust by test.
- Apply: 6–12 mm thickness, extend 20–50 mm beyond stain, cover with plastic.
- Dwell: 24–72 hours per cycle; remove with plastic scraper; repeat until no visible transfer.
- Neutralize: 1–2% acetic acid rinse if alkaline residues present; then full water rinse.
- Caution: test higher peroxide on inconspicuous vein to avoid pigment/lightening risk.
6. Verification, drying, repair and preventive finishing
Verify results with repeat water-absorption tests and consistent before/after photography under the same lighting to confirm visual match against the pre-clean baseline. Allow natural drying for 7–14 days depending on slab thickness and ambient humidity before any sealing, inspection, or repair work. Only perform micro-void fills or color-matched mineral epoxy repairs after the stone reaches full dryness.
Choose breathable penetrating sealers (silane/siloxane) to repel water and reduce re-adsorption of carbon while maintaining vapor transit; typical coverage runs 5–10 m²/L and you should test coverage on a sample. Avoid film-forming sealers that trap moisture and can force soot re-emergence. Inspect after the first wetting cycle and at 30 days to confirm no deeper-soot migration. Archive batch/vein IDs, cleaning methods, chemical concentrations, and time-stamped images for warranty, traceability, and pre-shipment verification.
- Verification: repeat water absorption and compare photos under consistent lighting.
- Drying: allow 7–14 days before sealing or repairs.
- Repairs: fill micro-voids with color-matched mineral epoxy only after full drying.
- Sealing: use breathable silane/siloxane; test coverage (≈5–10 m²/L); avoid film-formers.
- Monitoring: inspect after first wetting cycle and at 30 days for re-emergence.
- Record keeping: save batch/vein IDs, methods, concentrations, and before/after media for B2B traceability.
How to Refresh the Stone’s Natural Luster Without Re-installing?
Preserve finish and avoid reinstallation costs by extracting embedded carbon, choosing breathable sealers, and following a documented, scheduled maintenance routine.
Surface Cleaning: Dry and Low‑Impact Wet Methods
Work with the material spec: الحجر الطبيعي مكدسة (slate or quartzite) in standard panels 150x600mm or 150x550mm and thicknesses from 1.0 to 3.5 cm. Start with low-impact tools to protect natural cleft textures and CNC diamond-cut edges: use a soft-bristle brush or a HEPA vacuum to remove loose carbon and dust, and never use metal scrapers on interlocking male/female joints or precision edges.
For light soiling, apply a pH-neutral stone cleaner per the manufacturer’s directions, agitate with a soft brush, then rinse with low-pressure water (keep spray below ~600 psi) at a 30–45° angle to avoid undercutting thin veneer panels. For interior touch-ups, wipe with a damp microfiber cloth or a low-concentration isopropyl solution to restore sheen without leaving a film.
- Tools: soft-bristle brush, HEPA-filter vacuum (99.97% at 0.3 μm), microfiber cloths, low-pressure pump sprayer.
- Avoid: metal scrapers, metal-bristle brushes, high-pressure washers on indoor installations.
Deep Cleaning and Extraction Techniques for Porous Pores
Recognize why soot embeds: micropores and Van der Waals forces draw carbon and dust into the stone matrix, and freeze-thaw cycles can enlarge pore networks, increasing retention. Simple surface washing rarely extracts particles from those pores, so plan extraction that pulls contaminants out of the matrix rather than just smearing them across the surface.
Use clay-based poultices or absorbent composites (neutral detergent combined with an absorbent matrix) to draw embedded carbon out—apply a poultice, cover until fully dry, lift it off, and repeat as needed. Choose steam or poultice extraction over aggressive acids or high-alkaline etchants, and always trial on a same-batch sample panel (أعلى المصدر حجر specifies same-batch quarry consistency to avoid unexpected color shifts). When you clean interlocking Z/S shapes and L-corners, work top-down and use low-pressure suction or soft brushes to avoid forcing water behind panels or into the substrate.
- Extraction methods: clay poultice, absorbent composite, or controlled steam extraction.
- Test protocol: always test on a same-batch sample panel to confirm appearance and no color change.
- Joint care: clean top-down; use low-pressure suction to avoid water migration behind interlocks.
Breathable Penetrating Sealers and a Practical Maintenance Schedule
Select a breathable penetrating sealer—silane/siloxane or siliconate types—that suits 100% الحجر الطبيعي. These chemistries reduce pore adsorption while preserving UV stability and freeze-thaw resistance for Gulf and Northern climates. Apply with a low-pressure pump sprayer or brush and saturate the surface to ensure full penetration on 1–3.5 cm panels; allow the manufacturer’s recommended cure time and verify on a same-quarry sample to confirm no color shift or wetting change.
Set a maintenance cadence: inspect exposed walls every 12–24 months for loss of repellency and reapply or perform spot treatments on high-traffic zones, seams, interlocks, and L‑corners rather than resealing the entire façade prematurely. Keep field records: photograph or video every wall before and after treatment and link records to the installed batch number to monitor long-term performance and protect project consistency.
- Sealer selection: breathable silane/siloxane or siliconate مصممة للحجر الطبيعي and UV exposure.
- Application: low-pressure sprayer or brush; saturate for full penetration on 1–3.5 cm panels; trial on same-batch sample.
- Schedule: inspect every 12–24 months; reseal high-wear areas or spot-treat; typical reseal window for حجر مكدس ranges 1–3 years depending on exposure.
- Recordkeeping: capture pre/post photos and tie them to the installed batch (same-batch quarry consistency) for warranty and lifecycle analysis.
Preventative Care: Why Vacuuming with a HEPA Filter Is Critical?
HEPA vacuuming prevents submicron soot and dust from lodging in stone pores, reducing long-term staining and lowering restoration costs.
Pore-scale capture mechanisms in natural stacked stone
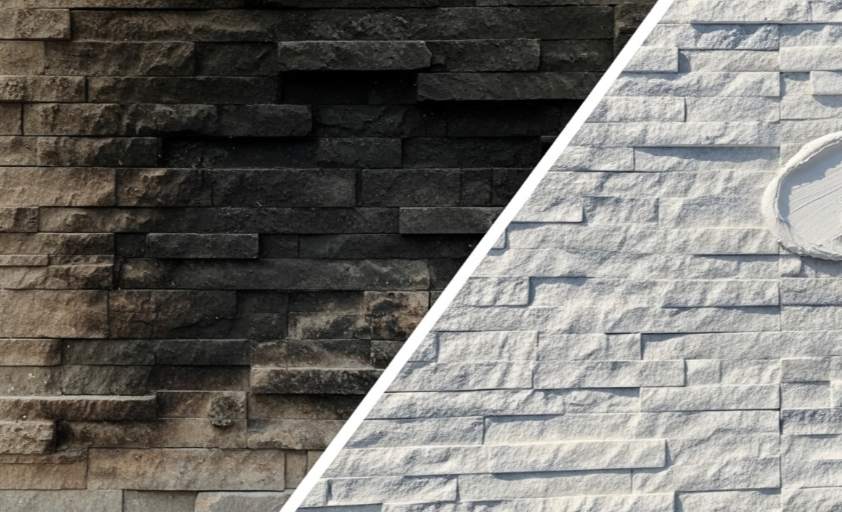
حجر طبيعي مكدس contains micropores, transitional pores and intergranular gaps that create a large internal surface area where particles adhere through Van der Waals forces and hydrogen bonding. Water migration and capillary flow carry suspended carbon and fine dust into those pore networks; repeated freeze–thaw cycles enlarge pores over time and raise long-term retention of contaminants.
Surface oxidation produces black weathering crusts rich in organic carbon and iron oxyhydroxides that chemically bind soot, so once a crust forms you must expect more aggressive restoration. Inspect exposed façades after heavy pollution events and after seasonal freeze–thaw cycles, and remove loose surface particulates before water transport or oxidation locks them into the stone.
How a sealed HEPA vacuum extracts and contains submicron carbon/dust
Specify HEPA H13 (≥99.95% at MPPS) or H14 (≥99.995% at MPPS) filters to capture particles in the 0.1–0.3 µm range that stick to pore surfaces. Use a fully sealed filtration system with a gasketed filter chamber and a HEPA post-filter so captured particulates cannot re-enter the air stream during operation.
Choose units with cyclonic pre-separation to remove coarse dust before it loads the primary HEPA and to preserve airflow and filter life. Mobilize dust with a soft-bristled brush attachment and apply variable suction: start low to dislodge particles, then increase suction to extract lodged dust without abrading the cleft face.
Vacuuming specifications and stepwise protocol for stacked stone panels
Work to the panel specs and use non-abrasive tools. Standard panels measure 150 × 600 mm (150 × 550 mm option), with thicknesses typically 10–25 mm and premium pieces up to 35 mm. Expect flat-panel weight around 30–40 kg/m² and rough faces near 55 kg/m²; protect thin faces and interlocking profiles when you clean.
- Equipment spec: professional-grade sealed HEPA H13/H14 vacuum with cyclonic pre-separator, adjustable suction, soft-brush set and crevice tools.
- Operational tools: soft-bristled brush, crevice tool, variable-suction control, and a sealed waste container or disposable bag for material disposal.
Follow a stepwise protocol to protect the stone and interlocks. Avoid high-pressure washing that drives particles deeper into pores; reserve wet methods only for persistent residues and always test an inconspicuous area first.
- Step 1 — Dry vacuum along bed lines and vertical joints using a soft-brush attachment to remove loose surface dust.
- Step 2 — Use the crevice tool on Z/S interlocks and L-corners to extract lodged dust from male‑female connections.
- Step 3 — Avoid high-pressure washing; escalate to targeted wet cleaning only where dry methods leave residues.
- Step 4 — If residues persist, apply a pH-neutral, stone‑safe cleaner and agitate with a soft brush, then dry thoroughly.
Set service intervals and monitor filter performance to protect both surfaces and staff health. Adjust frequency by exposure and location rather than a fixed calendar.
- Indoor, low-traffic: inspect and vacuum quarterly.
- Outdoor or high-pollution façades: inspect and vacuum every 1–3 months.
- Monitor filter differential pressure; replace the HEPA element per manufacturer guidance or when airflow drops—typical H13 replacement window: 6–12 months under regular use.
The Impact of Sealing: How Protective Layers Repel Carbon Ash?
Proper sealing cuts carbon-ash ingress, reduces cleaning cycles, and preserves Top Source Stone panel performance and margins.
Sealing mechanisms vs pore adsorption: film-forming and penetrating sealer action
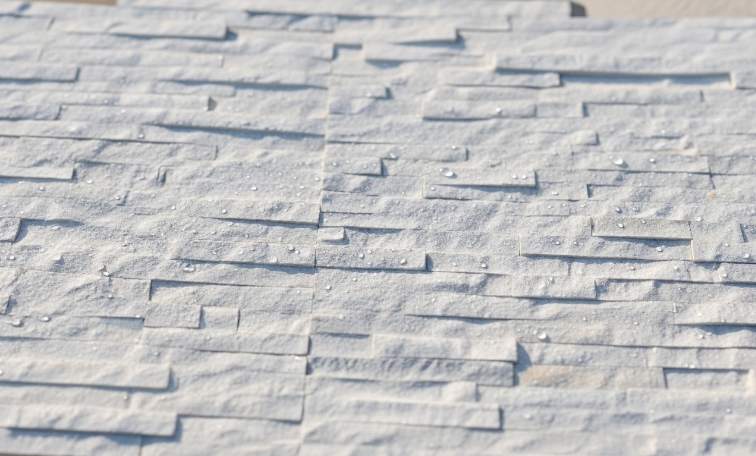
Penetrating sealers (silane, siloxane, siloxane-alkyl) work inside the pore network: they react with pore walls, increase surface hydrophobicity and chemically reduce capillary uptake. You can measure that effect as an increase in static contact angle (target >90° for hydrophobic behavior), a measurable reduction in water absorption per ASTM C97/C170, and a lower capillary-rise rate on lab strips. Typical active penetration ranges between 1 and 10 mm on natural stone; confirm field performance with a cross-section dye test before large-scale application.
Film-formers (acrylics, urethanes) create an external barrier that blocks airborne particles from contacting the mineral surface. Film-formers deliver stronger surface protection against dry carbon ash but change surface appearance and can trap moisture if you apply them to damp or untreated substrates. Choose penetrants when breathability and minimal color change matter; choose film-formers when you need a surface-level shield and accept a potential wet-look or texture change.
- Measurable targets: static contact angle >90°; reduced ASTM C97/C170 absorption; lower capillary-rise rate.
- Penetration: 1–10 mm (verify with cross-section dye test).
- Coverage for penetrants: ~4–12 m²/L on الحجر الطبيعي مكدسة (porosity-dependent; account for 1–2 coats).
Surface preparation and application protocol for natural stacked stone panels
Prepare panels by removing loose debris and soot with a soft brush, then degrease with a pH-neutral cleaner. If efflorescence exists, perform a controlled acid wash (muriatic diluted 1:10), neutralize, and rinse. Allow the stone to dry 48–72 hours depending on ambient conditions; do not seal until the substrate reads dry to touch. Run a quick water-drop absorption test or a small ASTM C97 patch to establish baseline uptake and estimate coverage and coat count for the job.
Apply within 5–35°C ambient and <85% relative humidity using a low-pressure sprayer, roller or brush to ensure even penetration; back-coat L-corners and interlocking edges on Z/S-shaped panels to protect male/female joints. For penetrants use one coat for moderate exposure and two coats for high exposure sites. For film-formers apply one to two coats with flash times of 2–12 hours and expect full cure in 24–72 hours. Protect sealed panels from rain during the cure window and use أعلى المصدر حجر pre-shipment visual verification for B2B orders before crate dispatch.
- Dry time before sealing: 48–72 hours (site-dependent).
- Application window: 5–35°C; RH <85%.
- Tools: low-pressure sprayer, roller, or brush; back-coat interlocks and L-corners.
- Coats: penetrant 1–2 coats; film-former 1–2 coats with 2–12 hour flash and 24–72 hour cure.
Long-term performance, monitoring and compatibility with Top Source Stone panels
Inspect sealed surfaces annually in exposed conditions; expect re-application every 3–7 years depending on sealer chemistry, exposure severity and local salinity or humidity. Use simple water-drop tests on-site to check repellency; for R&D or formal verification, measure static contact angle and run periodic ASTM C97 water-absorption retests on service samples to quantify performance loss. Document results and link them to maintenance windows to protect project margins and warranty obligations.
Clean sealed stone with low-pressure wash (<1000 psi) and pH-neutral detergents; avoid aggressive cleaners that strip impregnators or damage CNC diamond-cut edges and interlocks on Z/S-shaped panels. For coastal or Gulf projects, select breathable penetrants to preserve freeze-thaw resistance and salt tolerance; if you choose a film-former, include a mock-up that specifies wet-look or natural finish so stakeholders approve any color change. Require PPE—nitrile gloves, eye protection, respirator for solvent systems—and attach up-to-date SDS/MDS documents to every B2B shipment to meet 2026 VOC and hazardous-material regulations.
- Maintenance interval: inspect annually; reseal every 3–7 years.
- Field checks: water-drop test; contact-angle for R&D; ASTM C97 retests on service samples.
- Cleaning: low-pressure wash <1000 psi; pH-neutral detergents only.
- Safety: nitrile gloves, eye protection, respirator for solvent systems; supply SDS/MSDS with B2B orders.
خاتمة
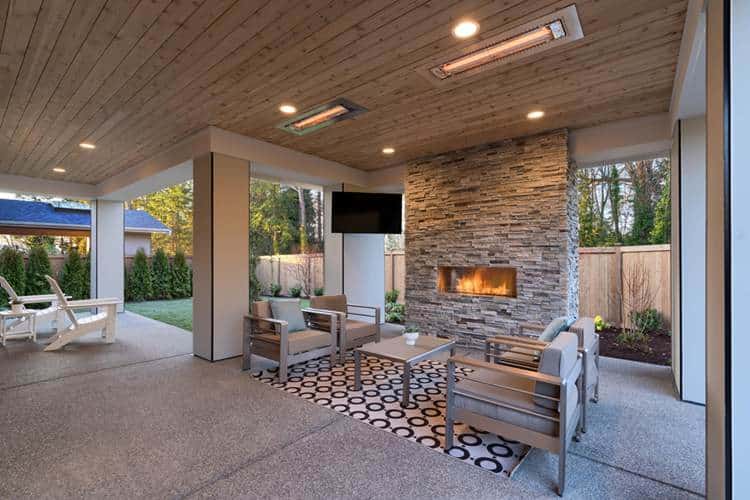
Following the step-by-step cleaning method preserves the stone’s texture and natural veins while removing carbon and soot without etching or discoloring. Proper technique also protects occupants and equipment, aligns with safety guidance (including OSHA where applicable), and extends the service life of المنشآت الحجرية المكدسة.
Inspect your fireplace for stubborn soot patches and test a small, inconspicuous area before full cleaning. For dealer support, technical specifications, or factory-matched samples, contact your Top Source Stone sales representative or authorized distributor.
الأسئلة المتداولة
What is the best way to clean soot off textured stone?
Textured الحجر الطبيعي traps soot because carbon particles adhere in micropores via Van der Waals forces and hydrogen bonds and by lodging in the stone’s pore structure; weathering and oxidized surface crust (iron oxyhydroxides and silica) further bind soot. Effective cleaning therefore must reach and extract particles from the pore network and address any oxidized crust—simple surface wiping usually leaves embedded carbon behind. Be cautious with methods that force water into pores (they can drive particles deeper); consult a stone-care professional for poultices or cleaning approaches designed to mobilize pore-adsorbed carbon.
Can I use vinegar to clean my natural stone fireplace?
The research does not evaluate vinegar specifically. الحجر الطبيعي surfaces develop chemically reactive, oxidized crusts and bind organic carbon via surface chemistry; acidic cleaners like vinegar can alter these surface layers or the mineral surface chemistry. Because the RESEARCH_CONTENT emphasizes reactive surface chemistry and pore adsorption, avoid untested acidic treatments on الحجر الطبيعي and consult stone-specific guidance or a professional cleaner before using vinegar.
How often should I seal my fireplace stacked stone?
RESEARCH_CONTENT links pore enlargement (freeze–thaw and weathering) and water migration with increased particle uptake. Sealing is intended to limit water movement into pores and slow that process, so frequency should be driven by exposure, signs of water penetration, and weathering rather than a fixed interval. Inspect the حجر مكدس for darkening, increased absorption, or surface crusting; reapply a compatible sealer when the stone no longer repels water—no specific re‑seal interval is given in the research.
How to remove smoke smell from a stone wall?
Smoke odor is caused by organic carbon and soot adsorbed in the stone pore network and by oxidized surface crusts that trap organics. Removing odor therefore requires extraction of the pore-trapped organics and remediation of the oxidized crust, plus drying to stop ongoing water-mediated transport of odorous particles. The research implies that surface-only deodorizing will be insufficient—use cleaning strategies that target pore-embedded organics (professional pore-extracting treatments) and address moisture sources.
Can I power wash my indoor natural stone fireplace?
Power washing drives large volumes of water and pressure into the pore network; according to the research, water migration can transport particles deeper and freeze–thaw can enlarge pores. For an indoor natural مدفأة حجرية, high-pressure washing risks pushing soot and carbon farther into the stone and altering the reactive surface crust. The RESEARCH_CONTENT therefore advises caution—avoid pressure washing that forces water into pores and favor cleaning methods that extract pore-adsorbed carbon without introducing excessive water pressure.
