Los diseños de esquina representan un desafío espacial importante en los desarrollos a gran escala, donde la mala ubicación de las chimeneas puede desperdiciar metros cuadrados y reducir el valor de mercado de una unidad. Los arquitectos y contratistas enfrentan riesgos técnicos cuando los acabados de piedra no se calculan para ángulos no estándar, lo que genera costuras visibles que sugieren una falta de control de calidad.
Esta documentación proporciona el protocolo técnico para manejar los desafíos de las esquinas de 135 grados e implementar una estrategia de alineación del centro hacia afuera para paneles de piedra natural. Abordamos la mecánica específica de ocultar las uniones verticales, gestionar la difracción de la luz para evitar trampas de sombras y los requisitos estructurales para montar herrajes en superficies de piedra irregulares.
Why Corner Fireplaces are the Ultimate “Space Savers” in B2B Projects?
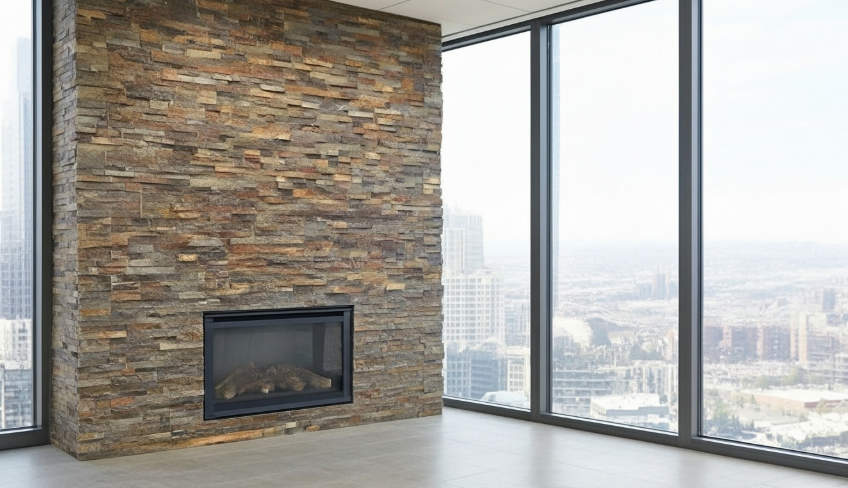
Corner placements transform architectural dead zones into high-value focal points, allowing developers to reclaim primary wall space for functional glazing or storage in high-density urban projects.
Optimizing Floor Plans in High-Density Developments
Modern urban residential and commercial layouts in 2026 demand maximum utility from every square foot. By shifting the fireplace to a corner, architects free up primary wall surfaces for floor-to-ceiling windows or integrated storage systems that high-end tenants expect. This strategic placement creates a natural focal point that does not obstruct the central living or work area.
- Architects use corner placements to prioritize large-scale glazing and natural light on main walls.
- Corner units improve traffic flow in compact B2B environments like boutique hotel rooms or executive suites.
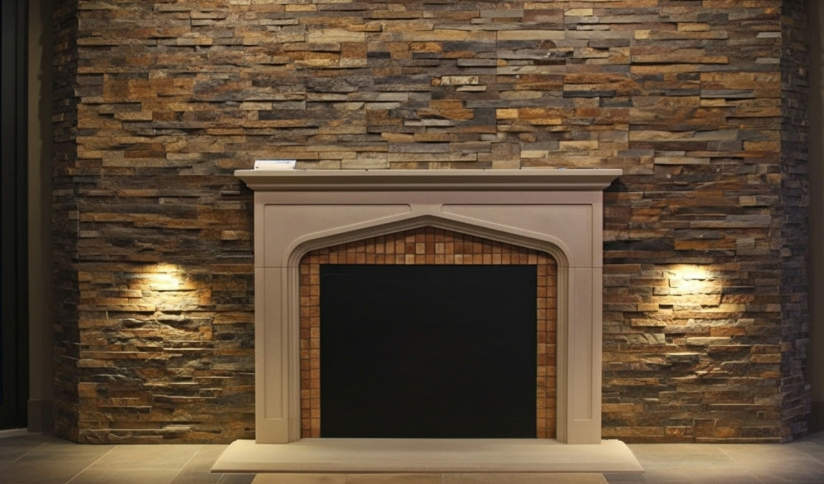
- Piedra natural surrounds provide an upscale aesthetic without encroaching on usable floor space.
Structural Advantages of Lightweight Stone Veneers
Traditional masonry often requires expensive footings or structural reinforcement, particularly when positioned in corners where load-bearing requirements are complex. Top Source Stone’s natural paneles de piedra apilados offer a 100% natural slate or quartzite finish with a profile weighing only 8 to 12 lbs per square foot. This lightweight engineering allows for installation on standard paredes interiores without the need for brick ledges.
- Panel weights between 8 and 13 lbs per square foot make corner installations viable on standard interior enmarcado.
- Reduced weight eliminates the need for structural reinforcement, significantly cutting material and labor costs.
- Piedra natural remains non-combustible, ensuring compliance with commercial fire safety standards for fireplace surrounds.
Efficiency in Large-Scale Installation Timelines
In multi-family and commercial builds, speed determines profitability. Our interlocking Panel en forma de Z system uses CNC diamond-blade precision to create a “hombre-mujer” connection that camouflages vertical joints. This modular approach eliminates the need for complex on-site miter cutting, which is typically the most time-consuming part of corner fireplace stonework.
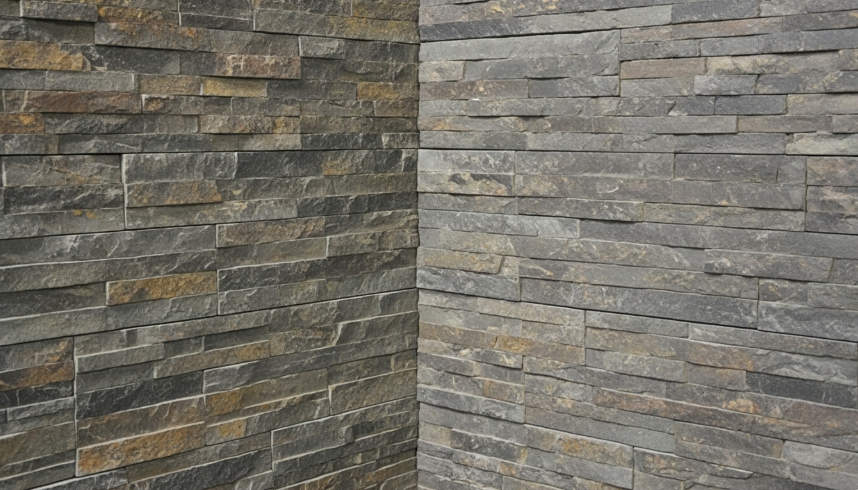
- Interlocking designs provide a seamless appearance across corner transitions without visible “pisó” lagunas.
- Pre-fabricated L-shaped corner pieces remove the requirement for specialized on-site stone cutting.
- Precision-cut panels ensure a consistent fit across hundreds of units, maintaining quality control in large-scale projects.
Long-Term Value Retention for Property Owners
Natural stone is an investment in durability. Unlike manufactured “falso” piedra that uses concrete and pigments, 100% natural minerals like quartzite and slate possess inherent UV stability and high salinity resistance. For property managers, this means lower maintenance cycles and a surface that retains its premium texture despite high-traffic exposure.
- Piedra natural resists UV fading, preventing the “irregular de” look often seen in aged manufactured stone.
- High durability results in fewer repair requirements for property managers in commercial B2B settings.
- piedra real surfaces provide a measurable increase in perceived asset value for real estate investors.
Manejando el desafío de los 135 grados: más allá de las esquinas estándar de 90 grados
Lograr continuidad arquitectónica en esquinas de chimeneas de 135 grados requiere pasar por alto las unidades en L prefabricadas en favor de cortes a inglete de precisión y uniones epoxi especializadas para evitar la separación de las juntas.
Corte a inglete de precisión para ángulos no estándar
Las esquinas prefabricadas estándar de 90 grados dominan el mercado, pero fallan por completo cuando se encuentran con la geometría de 135 grados de las chimeneas estilo bahía o los pilares octogonales. Los instaladores deben ejecutar cortes a inglete precisos de 67,5 grados en cada piedra. panel utilizando discos de diamante CNC guiados por infrarrojos para crear una unión limpia y profesional. Esta técnica garantiza que la hendidura natural de nuestro Alaska Grey o Midnight Slate fluya alrededor de la esquina sin los espacios estructurales típicos de las unidades forzadas de 90 grados.
- Coloque en seco cada panel antes de aplicar el adhesivo para verificar que las texturas se alineen a lo largo de la unión en ángulo.
- Evite las sierras húmedas estándar para estos ángulos; Utilice sierras de puente especializadas para obtener un borde más recto y sin astillas.
- Alterne paneles largos y cortos a cada lado del vértice de 135 grados para dividir las líneas verticales e imitar mampostería natural.
Estrategias adhesivas para la estabilidad de las esquinas obtusas
Angles exceeding 90 degrees face unique mechanical stresses. Building vibration and thermal expansion from the fireplace often cause standard thin-set mortar to crack at the mitered point. Using high-strength epoxy resin specifically at the mitered edge creates a unified structural bond that moves with the wall rather than against it. We recommend reinforcing the substrate with cement board to handle the specific weight distribution of these custom angled layouts.
| Corner Specification | Standard 90° Turn | Obtuse 135° Turn |
|---|---|---|
| Fabrication Method | Pre-fabricated L-Corner Units | Custom Miter (67.5° x 2) |
| Velocidad de instalación | Rapid (Click-and-Set) | Skilled Labor Required |
| Unión conjunta | Standard Polymer Mortar | High-Strength Epoxy Resin |
Blending Textures Across 135-Degree Transitions
Maintaining visual flow across an obtuse angle requires meticulous panel selección. Recomendamos utilizar nuestra Serie Flat para esquinas de 135 grados para minimizar las sombras profundas que pueden hacer que una junta a inglete personalizada parezca un defecto estructural. Para ocultar las micro brechas causadas por la piedra natural Variación, mezcle el polvo de piedra de los cortes de instalación con un sellador transparente. Esto crea una pasta del mismo color que llena la costura y desaparece en condiciones de iluminación estándar.
- Verifique que todas las piezas de piedra para la esquina provengan de la misma veta de cantera para garantizar una uniformidad de tono del 95 %.
- Aplique una capa final de sellador a la junta en inglete para proteger los minerales naturales expuestos de la humedad y la acumulación de polvo.
- Controle la humedad del entorno de instalación; el exceso de humedad puede interferir con el proceso de curado de los adhesivos de alto rendimiento.
Paneles de larguero de piedra apilados directos de fábrica de primera calidad

How to Symmetrically Align Stone Panels from the Center Outward?
Symmetrical alignment eliminates the risk of lopsided visual weight by anchoring the installation to a measured central axis, ensuring that mirrored edge cuts maintain architectural balance across the fireplace face.
Establishing a Central Vertical Reference Line
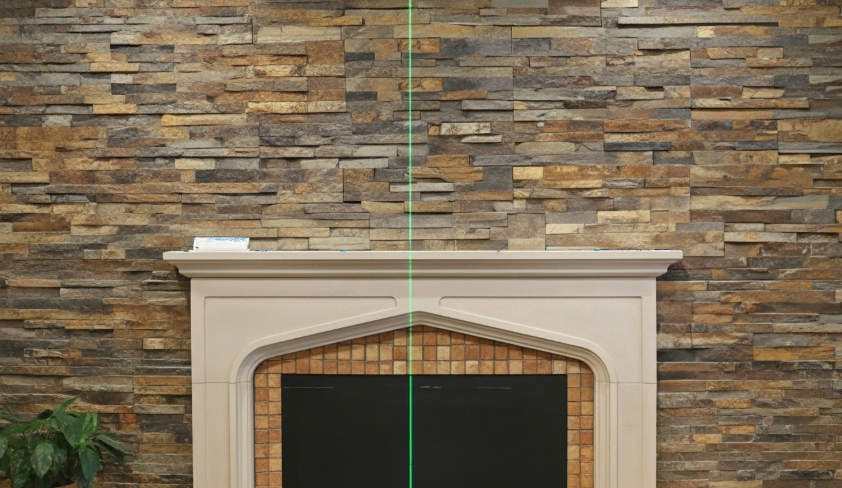
La simetría precisa comienza con mediciones precisas de la superficie de instalación para definir el punto de partida. Medimos el ancho total de la pared y marcamos el punto medio exacto con una plomada vertical. Depender de una estimación visual a menudo conduce a errores acumulativos que se vuelven evidentes una vez que la piedra llega al techo o a las esquinas adyacentes. Al utilizar un nivel láser proyectamos una referencia constante que guía la colocación de los primeros paneles de piedra, asegurando que la verticalidad de todo el conjunto se mantenga durante todo el proyecto.
Antes de aplicar el adhesivo, colocamos en seco una hilera de paneles en el suelo. Este paso nos permite visualizar cómo los bordes se unirán con las esquinas. Si una colocación en seco revela cortes finos como una astilla en los límites, desplazamos ligeramente la línea central para garantizar que las piezas de los extremos permanezcan sustanciales y estructuralmente sólidas. Este ajuste proactivo evita que “fragmentado” aspecto que se ve a menudo en instalaciones de aficionados donde se descuidó la planificación.
Ejecución de la secuencia de instalación de centro a borde
Placing panels from the middle outward ensures that cut pieces at the ends remain uniform in size. We align the first panel directly on the center mark to anchor the visual weight of the wall. This central stone acts as the foundation for the entire course. From this anchor, we work outward toward both the left and right boundaries simultaneously. This dual-direction workflow maintains balance and allows for real-time adjustments if the substrate shows minor irregularities.
| Alignment Strategy | Visual Symmetry | Cutting Logic |
|---|---|---|
| Center-Outward (B2B Standard) | High: Mirrored edges create a balanced focal point. | Uniform: Both left and right end-cuts share identical dimensions. |
| Corner-to-Corner | Low: Visual weight shifts toward the starting side. | Random: The final cut is often an awkward sliver. |
| Random Offset | Moderate: Texture masks some misalignment. | Variable: Requires constant measurement for every row. |
We apply high-strength epoxy adhesive or professional-grade thinset to the substrate to secure the panels immediately upon alignment. For Proyectos B2B involving our Z-shape interlocking series, the “hombre-mujer” connection system ensures each panel locks into the next, further stabilizing the central anchor point.
Verifying Horizontal Alignment with 2026 Site Standards
Current 2026 construction practices prioritize constant leveling to prevent the “subir escaleras” effect common in interlocking systems. We check the level of every second row to ensure the Z-shaped interlocking joints remain perfectly horizontal. Even a 2mm deviation at the base can translate into a massive gap by the time the stone reaches eye level.
- Adjust for minor substrate variations using shims to keep the courses straight across the entire span.
- Monitor the seams between the natural slate or marble pieces to confirm the stones fit tightly without visible gaps.
- Utilize CNC diamond-blade edges for panels to ensure a consistent fit that eliminates the need for manual grinding on-site.
Managing Symmetrical Edge Cuts and Corner Transitions
Finalizing the installation requires mirrored cuts at the wall ends to preserve the professional appearance. We measure the remaining space at both edges and cut the stone panels a dimensiones coincidentes. Esta atención al detalle garantiza que la chimenea parezca intencionada en lugar de ensamblada a partir de restos. Si la pared se extiende alrededor de un giro de 90 grados, integramos piezas de esquina en forma de L a juego de nuestro inventario para proporcionar una transición limpia y envolvente que mantenga la sincronización de textura y color.
Utilizamos herramientas de corte por infrarrojos o sierras húmedas de alto rendimiento para obtener bordes precisos que imitan el acabado de fábrica de los paneles centrales. Este nivel de precisión es fundamental cuando se trabaja con minerales 100% naturales como cuarcita o pizarra, donde los bordes ásperos pueden restar valor a la estética premium. Al reflejar estos cortes finales, la instalación logra un acabado simétrico y arquitectónicamente sólido que cumple con los más altos estándares comerciales.
Does a Corner Stone Wall Make a Small Room Feel Larger or Smaller?
Strategic corner stone placement expands perceived square footage by drawing the eye to the room’s furthest architectural boundaries while utilizing thin-veneer profiles that preserve actual floor area.
Impact of Stone Texture on Perceived Square Footage
En modern interior design, stone texture depth dictates how the human eye perceives wall boundaries in confined areas. Deep textures, such as those found in our Rough Series, create significant shadow play. This visual weight can make a corner feel as though it is advancing toward the center of the room, which creates a cozy, “wrapped” sensation in larger halls but may feel encroaching in very tight spaces.
Smooth surfaces from our Flat Series or honed marble options provide a clean, architectural backdrop that maintains an open atmosphere. These panels offer the luxury of piedra natural without the aggressive protrusions that consume visual volume.
- Rough Series textures emphasize architectural character but require larger room volumes to avoid a “closing in” efecto.
- Consistent 6×24 inch panel sizing helps the eye travel smoothly across the wall surface, which reduces the feeling of clutter compared to small, irregular mosaic tiles.
- Minimalist split-face finishes provide just enough depth to hide substrate imperfections while keeping the wall profile slim.
Color Choice and Light Reflectivity
La paleta de colores de la piedra dicta cuánta luz queda en la habitación, lo que afecta directamente a la sensación de espacio. Las piedras de tonos claros, como el gris Alaska o el blanco glaciar de nuestro inventario de las 10 grandes, reflejan la luz ambiental. Esta reflectividad hace que las habitaciones pequeñas se sientan más aireadas y amplias al hacer rebotar la luz en la sala de estar en lugar de absorberla.
La pizarra más oscura o la cuarcita de carbón, aunque sofisticada, agrega una profundidad significativa. Los diseñadores deben combinar estos tonos más oscuros con una iluminación estratégica para evitar que la esquina parezca un vacío oscuro. porque nuestro paneles de piedra natural Son 100 % de base mineral y proporcionan un acabado permanente y resistente a la decoloración que mantiene el espacio con un aspecto vibrante durante décadas.
Beneficios de ahorro de espacio del revestimiento de piedra fina
Moderno paneles de piedra natural apilada offer the look of full-thickness masonry while occupying minimal physical space. Traditional 4-inch stone blocks can significantly reduce the usable floor area in a small office or apartment. In contrast, our standard panel thicknesses range from 0.75 to 1.5 inches, preserving nearly all usable square footage.
- Slim-profile panels allow installers to add high-value natural materials to small apartments and commercial offices without structural renovations.
- Lightweight construction (8-12 lbs/sqft) eliminates the need for bulky structural footings that would otherwise consume floor space.
- Our CNC diamond-blade precision ensures every panel fits tightly, minimizing the “thickness creep” often seen with hand-cut stones.
Visual Anchoring Through Corner Placement
Strategically placing stone in a corner creates a focal point that can actually expand the room’s perceived dimensions. By drawing the eye upward and into the corners, the installation highlights the full height and width of the architectural layout. This “anchoring” effect gives a small room a sense of permanence and structural strength.
To ensure a professional result, we provide matching L-shaped corner pieces for every model. These pre-fabricated units create a solid, wrap-around look that camouflages the vertical joint. Focusing texture on a single corner prevents the stone from overwhelming the room—a common risk when attempting full four-wall stone installations in compact environments.
Lighting a Corner Fireplace: Avoiding Awkward Shadow Traps
Effective corner fireplace lighting requires balancing directional grazing to accentuate stone texture while neutralizing the “dead zones” and harsh shadows inherent in architectural junctions.
Lighting a corner installation presents unique geometric challenges. Unlike flat wall applications, the intersection of two stone planes can create dark voids or distracting glare if the fixtures are not positioned with precision. Success depends on understanding how light interacts with the specific relief of natural paneles de piedra.
Surface Grazing for Texture Enhancement
Recomendamos colocar los accesorios empotrados en el techo a una distancia de entre 12 y 18 pulgadas de la cara de piedra para lograr un efecto rasante óptimo. Esta distancia específica permite que la luz atrape las crestas irregulares de nuestros paneles Rough Series, que presentan variaciones de espesor de hasta 1,75 pulgadas. Al utilizar haces direccionales en lugar de reflectores anchos, los instaladores pueden proyectar sombras intencionales que enfaticen las características 3D de la pizarra y la cuarcita naturales.
- Coloque los accesorios empotrados en el techo a una distancia de 12 a 18 pulgadas de la cara de piedra para crear un efecto rasante.
- Utilice haces direccionales para proyectar luz hacia abajo a través de las superficies irregulares de pizarra natural y cuarcita.
- Resalte las características 3D de la piedra sin eliminar las variaciones de color orgánico.
Balanced Ambient Lighting for Shadow Reduction
Relying on a single overhead light source often creates a triangular “shadow trap” at the corner apex, which can make the fireplace look hollow or disconnected from the rest of the room. To solve this, we suggest integrating lateral light sources. High-intensity downlights placed directly over the corner apex should be avoided as they exaggerate vertical seams and create harsh contrasts.
- Install wall sconces on adjacent walls to provide lateral light that fills in deep shadow pockets.
- Avoid placing high-intensity downlights directly over the apex of the corner fireplace.
- Combine task lighting with dimmable ambient layers to maintain the cozy aesthetic expected in 2026 interior designs.
Fixture Placement Relative to Stone Projections
The physical dimensions of L-shaped corner pieces require specific light angles to ensure the transition between walls remains visually seamless. Aligning fixtures with the center of the paneles de piedra promotes symmetry across the corner joint, preventing one side from appearing brighter than the other. For our natural Marble and Slate series, we specify warm-spectrum LEDs in the 2700K to 3000K range to enhance earthy pigments.
- Align fixtures with the center of the stone panels to promote symmetry across the corner joint.
- Select warm-spectrum LEDs (2700K-3000K) to complement the earthy tones of the Marble and Slate series.
- Verify that light angles do not cause glare on the smoother surfaces of the Flat Series or Pencil Series products.
Conclusión
Successful corner fireplace projects rely on balancing architectural symmetry with technical precision at every transition. Utilizing factory-matched L-corners and interlocking panel systems allows installers to maintain a seamless natural texture while navigating non-standard angles or complex layouts. This integrated approach streamlines the construction timeline and provides developers with a consistent, high-end finish across large-scale multi-family projects.
Review our current inventory of natural slate and quartzite ledgestone to select a material that fits your specific project requirements. Contact us to request product samples or a wholesale quote for your next commercial development.
Preguntas frecuentes
How do you install stone on a 45-degree corner fireplace?
A install stone on a 45-degree corner, you must miter-cut the back of each stone at a 22.5-degree angle where they meet at the point. This creates a clean, professional “birdsmouth” joint. Ensure your substrate is cement backer board reinforced with thinset and fiberglass mesh tape at the corner seam. Apply a high-quality polymer-modified thinset to both the wall and the back of the stone (back-buttering) to ensure a permanent bond that accounts for the unique geometry of the angle.
Do you need special corner pieces for non-90 degree fireplaces?
Mayoría piedra manufacturada manufacturers only produce 90-degree corner returns. For non-standard angles like a 45-degree fireplace, you typically do not use pre-made corner pieces. Instead, you use “departamento” stones and custom-cut them on-site using a wet saw with a diamond blade. This allows for a much tighter fit and a more natural aesthetic than attempting to force a 90-degree piece into a shallow angle.
Where do you start stoning a corner fireplace: center or edges?
You should always start at the corner (the edge) and work your way outward toward the walls or the fireplace opening. The corner is the most visually prominent part of the installation; by starting there, you ensure the mitered joints are perfectly aligned. Once the corner stones are set and leveled, you can run the remaining stones toward the ends where cuts are less noticeable or can be hidden by trim or cabinetry.
Best way to hide the vertical seam in a fireplace corner?
The most effective method is “tejeduría” the stones or using a precise miter cut. To weave, you alternate which side of the stone overlaps the other on every course, preventing a continuous vertical line. For a seamless look on 45-degree angles, use a color-matched masonry caulking or mix polvo de piedra de tus cortes with a small amount of clear epoxy to fill any micro-gaps at the miter joint, blending the two stones into a single cohesive unit.
How to mount a TV on a corner stone fireplace?
Mounting a TV requires securing the bracket directly into the wall studs behind the stone. Use a hammer drill with a masonry bit to drill through the chapa de piedra, then use extra-long lag bolts (usually 4 to 6 inches) to reach the wooden framing. For corner fireplaces, a full-motion articulated arm mount is recommended, as it allows you to pull the TV out and angle it toward the seating area, compensating for the diagonal orientation of the fireplace.
