Apprendre à installer correctement les pierres empilées fait la différence entre un élément architectural à forte marge et une réclamation en responsabilité coûteuse causée par une défaillance des panneaux. Une mauvaise installation entraîne souvent l’arrachement des pierres du substrat, ce qui crée des risques pour la sécurité des clients et ruine la réputation de l’entrepreneur. Pour éviter ces rappels, il faut d’abord comprendre la physique de la répartition verticale du poids et la chimie de la liaison entre la pierre et le mur.
Ce le guide établit une norme technique pour la pierre professionnelle maçonnerie, couvrant tout, depuis la préparation critique du substrat et la sélection du mortier jusqu'aux spécificités du beurrage arrière pour une adhérence maximale. Nous examinons la mécanique des panneaux emboîtables en forme de Z et comment gérer transitions de bord sans recourir à des coupes d'onglet complexes sur site. Le respect de ces protocoles sur site garantit une durabilité à long terme et élimine les problèmes courants après l'installation tels que l'efflorescence ou les pièges à humidité.
Votre mur est-il prêt ? Normes critiques de préparation des substrats
L'intégrité du substrat et la gestion de l'humidité déterminent si un pierre naturelle la façade conserve son adhérence structurelle pendant des décennies ou se brise au cours du premier cycle de gel-dégel significatif.
Évaluation de l'intégrité structurelle et des exigences de charge
Naturel standard panneaux de pierre empilés de Top Source Stone pèsent entre 8 et 12 lb par pied carré, tandis que les sélections brutes de qualité supérieure peuvent atteindre 13,5 lb par pied carré. Les installateurs doivent confirmer le mur peut supporter ces charges mortes sans bouger. Toute déviation du substrat sera transmise à travers la pierre, provoquant la séparation des joints de verrouillage en forme de Z découpés avec précision. Avant l'installation, nous exigeons que toutes les surfaces soient d'aplomb et exemptes de contaminants comme la peinture, la cire ou les agents de démoulage qui agissent comme brise-adhérence.
| Type de substrat | Capacité de charge | Exigence de préparation |
|---|---|---|
| Béton / Maçonnerie | Haut (>25 lb/pi²) | Scarifier ou écrémer |
| Ossature Bois + Latte | Modéré (15 lb/pi²) | Latte galvanisée + couche anti-rayures |
| Panneau d'appui en ciment | Élevé (15-20 lb/pi²) | Application fine sur du ruban maillé |
Compatibilité des substrats pour les murs intérieurs et extérieurs
Les environnements intérieurs et extérieurs exigent des stratégies de liaison différentes pour garantir que les panneaux en forme de Z se verrouillent correctement. Pour les cloisons sèches intérieures, les installateurs ne devraient jamais appliquer de pierre directement à l'épaisseur du papier. Au lieu de cela, fixez un panneau d'appui en ciment aux poteaux. Pour les applications extérieures, l’accent est mis sur la rigidité et la force d’adhérence.
- L'application directe n'est autorisée que sur des briques, du béton ou des blocs de CMU propres et non peints.
- Panneaux emboîtables nécessitent une surface parfaitement plane pour maintenir le “homme-femme” connexion qui cache les joints verticaux.
- Les murs à ossature de bois doivent être suffisamment rigides pour empêcher la flexion conduisant au délaminage.
Barrières de gestion de l’humidité et d’étanchéité aux intempéries
Pierre naturelle est intrinsèquement durable, mais ce n’est pas une barrière étanche. Dans zones extérieures ou à forte humidité comme les cheminées et les jeux d'eau, la protection principale se trouve derrière la pierre. Les codes 2026 actuels mettent l’accent sur des plans de drainage spécialisés pour empêcher l’efflorescence et le piégeage de l’eau.
- Installez une barrière résistante à l'humidité (WRB) conforme au code et un solin autour de toutes les ouvertures.
- Utilisez des scellants de haute qualité après le durcissement du mortier pour bloquer la migration du sel et simplifier l'entretien.
- Les projets extérieurs dans des climats de gel-dégel nécessitent des mortiers modifiés aux polymères qui dépassent les normes ANSI A118.15 en matière de résistance à l'eau.
Normes de l’industrie pour les revêtements anti-rayures et les lattes
Lors de l'installation sur des surfaces non maçonnées, une latte métallique et une couche de grattage prévoir la clé mécanique nécessaire à la pierre. Les professionnels utilisent un treillis diamanté galvanisé fixé à 6 pouces au centre des montants du mur. Une couche grattée d'environ 1/2 pouce à 3/4 pouce d'épaisseur doit être appliquée et rainurée horizontalement. Cette couche doit durcir complètement pour empêcher les fissures de retrait de se transférer au placage en pierre. L'utilisation d'ensembles minces modifiés aux polymères ANSI A118.4 ou supérieur garantit que la force de liaison répond aux exigences de cisaillement de plus de 300 PSI typiques des constructions modernes hautes performances.

Quels outils professionnels sont réellement nécessaires pour une finition propre ?
Qualité professionnelle les résultats des pierres empilées dépendent d'une gestion thermique à couple élevé pendant la coupe et des lignes de référence horizontales continues pour empêcher la dérive cumulative de l'alignement sur les grandes façades architecturales.
Scies à eau à lame diamantée pour une coupe précise de la pierre
Des coupes nettes et précises distinguent les produits haut de gamme installations commerciales des tentatives d'amateurs. Lors de la manipulation de minéraux à haute densité comme le quartzite et l'ardoise, les lames de maçonnerie standard provoquent souvent des écailles ou une surchauffe. Nous utilisons des scies à eau robustes équipées de lames imprégnées de diamant pour maintenir la netteté des bords et l'intégrité structurelle lors du dimensionnement personnalisé.
- Refroidi par eau les systèmes de coupe éliminent les contraintes thermiques sur la pierre, empêchant les micro-fractures dans les panneaux de 6" x 24" lors de coupes complexes pour les prises ou les luminaires.
- Les disques diamantés de précision permettent des joints plus serrés dans la série Flat, garantissant une esthétique minimaliste sans la distraction des bords irréguliers.
- Une lubrification constante pendant la coupe garantit que la couleur d'origine reste cohérente au niveau du bord coupé, évitant ainsi “voile blanc” de la chaleur de friction.
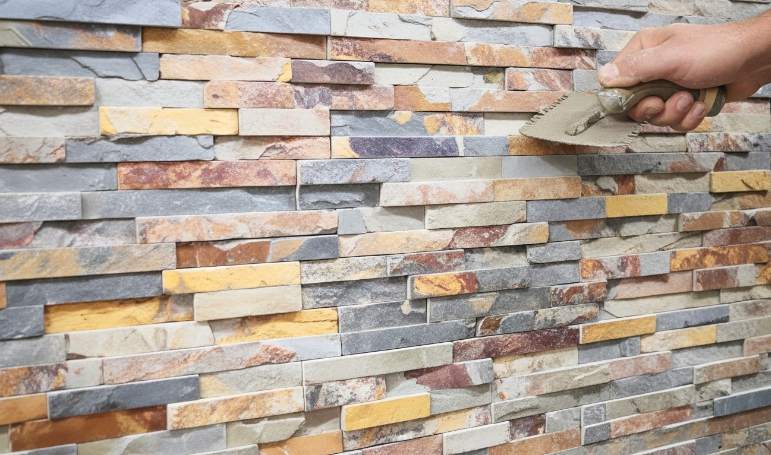
Truelles à encoches carrées pour application contrôlée du mortier
La profondeur du lit de mortier affecte directement la force d’adhérence et la longévité d’un mur. Des truelles standardisées garantissent que la couche adhésive supporte la substance poids de la pierre naturelle sans affaissement. Nous recommandons des géométries d'encoches spécifiques pour s'adapter à la charge de 8 à 13 lb/pied carré typique de l'inventaire Top Source Stone.
- Une truelle à encoches carrées de 1/2 pouce x 1/2 pouce crée la profondeur nécessaire pour que le mortier puisse “clé” à l'arrière de la pierre.
- Un dimensionnement approprié des encoches facilite la technique de contre-beurrage, permettant d'obtenir la couverture à 100 % requise pour une liaison permanente dans des climats variables.
- L'utilisation correcte de la truelle empêche l'excès de mortier de s'infiltrer dans les joints en Z imbriqués, gardant ainsi la finition propre et éliminant le besoin d'un nettoyage fastidieux du coulis.
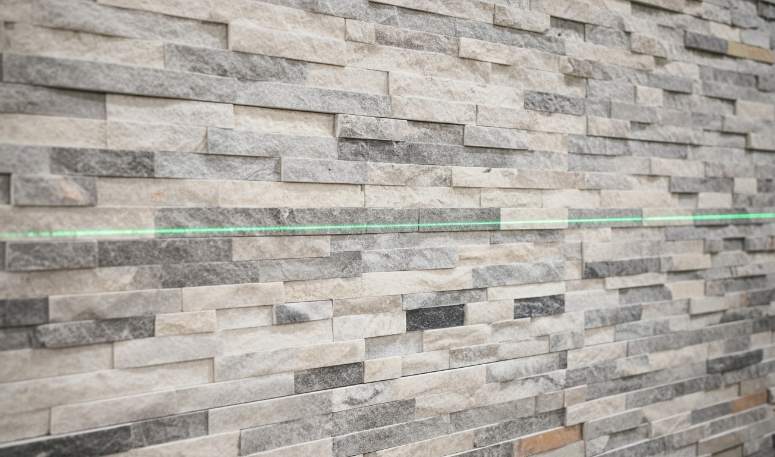
Systèmes de nivellement laser pour l'alignement horizontal
Les outils de nivellement de haute précision évitent les erreurs d’alignement qui s’aggravent lorsque vous montez un mur. Même un écart de 1/16 de pouce dans le premier rang peut entraîner des écarts importants ou des lignes inclinées au dixième rang. Les systèmes laser fournissent un guide visuel stable que les niveaux à bulles traditionnels ne peuvent égaler sur de longues distances.
- Les niveaux laser projettent une ligne de référence horizontale continue, garantissant que la couche de fondation est parfaitement plate sur l'ensemble du substrat.
- Les niveaux numériques aident les installateurs à vérifier l'aplomb des murs, en particulier pour la série Rough où les textures et les ombres profondes mettent en évidence toute déviation dans le plan vertical.
- L'équipement de nivellement automatisé accélère le processus d'installation pour les projets commerciaux à grande échelle en réduisant le temps consacré au calage manuel.
Applicateurs spécialisés pour le scellement de surfaces
L'esthétique finale de la pierre naturelle dépend de son degré de protection les mastics sont appliqués à la surface. Une mauvaise application entraîne souvent “mise en commun” dans des crevasses profondes ou des endroits manqués dans la texture. Choisir le bon outil garantit que le marbre ou l’ardoise conserve sa teinte naturelle et éclatante tout en restant protégé des taches environnementales.
- Les brosses à poils souples permettent aux produits d'étanchéité de pénétrer dans les profils irréguliers des pierres des séries Rough et Pencil sans laisser de flaques de liquide dans les creux.
- Les pulvérisateurs à pompe basse pression offrent un revêtement uniforme pour les grands façades extérieures, créant une barrière efficace contre l'exposition aux UV et à une salinité élevée.
- Les éponges de nettoyage au pH neutre éliminent le film de mortier résiduel avant le scellement, évitant ainsi le flou “fantôme” d'être emprisonné de façon permanente sous la couche de mastic.
Faites évoluer votre entreprise avec des panneaux de grand livre haut de gamme

Comment sélectionner le meilleur mortier pour le placage en pierre naturelle ?
Moderne placage en pierre l'échec est généralement dû à une mauvaise sélection d'adhésif ; donner la priorité aux systèmes modifiés aux polymères qui répondent aux normes ANSI A118.15 pour gérer les 8 à 12 lb/pi². mort chargement de panneaux naturels.
Thinset modifié aux polymères pour des performances d'adhérence élevées
Les mortiers techniques modifiés aux polymères représentent la référence de l'industrie en matière de sécurisation placage en pierre naturelle. Ces produits dépassent les normes ANSI A118.15, offrant la résistance critique au cisaillement nécessaire pour supporter le poids de 8 à 13 lb/pied carré de produits de qualité professionnelle. panneaux de pierre empilés. Contrairement aux mélanges traditionnels, ces mortiers contiennent de fortes concentrations de polymères qui augmentent la flexibilité. Cela permet à la liaison de résister à des changements structurels mineurs et à la dilatation thermique courante dans les façades architecturales à grande échelle sans fissuration ni délaminage.
Les tests montrent que ces mortiers modifiés offrent une force d'adhérence supérieure à 300 PSI. C'est nettement plus élevé que les mélanges traditionnels non modifiés, qui échouent souvent sous le poids des matériaux lourds de quartzite ou d'ardoise. Quand installation de Top Source Stone 6″ x24″ Les panneaux, utilisant un Thinset à haute teneur en polymère, garantissent que les textures naturelles fendues et à faces fendues restent solidement ancrées au substrat pendant toute la durée de vie du bâtiment.
Mortier de maçonnerie de type S pour la résistance portante
Le mortier de type S reste une option fiable et à haute résistance à la compression pour les installations de maçonnerie et de pierres lourdes. Il s'agit spécifiquement conçu pour l'extérieur murs où une résistance latérale et une résistance aux chocs élevées sont requises. Pour applications en pierre naturelle, le type S offre une résistance à la compression minimale de 1 800 PSI, supportant la charge verticale de pierre épaisse sur de longues durées.
| Catégorie de mortier | Mesure de performances | Cas d'utilisation principal |
|---|---|---|
| Maçonnerie de type S | 1 800+ PSI de compression | Extérieur structurel murs et lourdes cheminées en pierre. |
| Modifié aux polymères (A118.15) | Liaison de cisaillement de 300+ PSI | Panneaux emboîtables en forme de Z ; zones à fortes vibrations ou thermiques. |
| Adhésif anti-affaissement LHT | Stabilité de la prise verticale | Panneaux premium bruts (jusqu'à 3,5 cm d'épaisseur). |
Les entrepreneurs doivent mélanger le type S avec un agent de liaison liquide si le substrat en pierre a une faible aspiration. Cela améliore la première “saisir” pendant la phase de prise, indispensable pour les panneaux lourds. Bien que les couches minces soient meilleures en termes de résistance au cisaillement, le type S excelle dans les applications en vrac où le nivellement du substrat fait partie de la tâche. processus d'installation.
Adhésifs anti-affaissement pour panneaux verticaux lourds
Verticale les installations nécessitent des formulations spécialisées anti-affaissement pour empêcher les panneaux de pierre de se déplacer avant que le mortier ne durcisse. Les mortiers pour carreaux de grande taille et lourds (LHT) sont spécifiquement étiquetés pour leurs performances verticales. Ces adhésifs éliminent le besoin de cales mécaniques en fournissant une aspiration et un support immédiats pour les lourds panneaux en forme de Z emboîtables de 6" x 24".
- Appliquer le mortier à l'aide d'une truelle dentelée de 1/2 pouce pour assurer une couverture à 100 % et un verrouillage mécanique.
- Utiliser les mortiers LHT pour “Rugueux” panneaux de série où l'épaisseur atteint jusqu'à 3,5 cm.
- Assurez-vous que l'adhésif supporte le poids immédiatement après le contact pour maintenir l'alignement de verrouillage sans faille.
Mortiers résistants aux intempéries pour les environnements gel-dégel
Pour les projets extérieurs en Amérique du Nord, en Europe ou au Moyen-Orient, la sélection du mortier doit donner la priorité à la résistance à l’humidité et à la stabilité de la température. Les mortiers haute performance avec de faibles taux d'absorption d'eau sont essentiels pour prévenir l'efflorescence, les dépôts de sel blanc qui peuvent abîmer un mur d'ardoise foncée ou de quartzite de minuit. Dans les climats plus froids, ces mortiers préviennent les dommages internes causés par la glace en empêchant l'eau de pénétrer dans la ligne de liaison.
Vérifier que l'adhésif choisi est chimiquement compatible avec les résines à haute résistance utilisées dans les fabrication de panneaux de pierre empilés. Pour les installations à proximité de plans d'eau ou de halls commerciaux très humides, spécifiez des mortiers conçus spécifiquement pour les environnements humides. Cela garantit que l'uniformité de teinte à 95 % d'un lot de Top Source Stone est protégée contre la lixiviation minérale ou les taches causées par l'humidité au fil du temps.
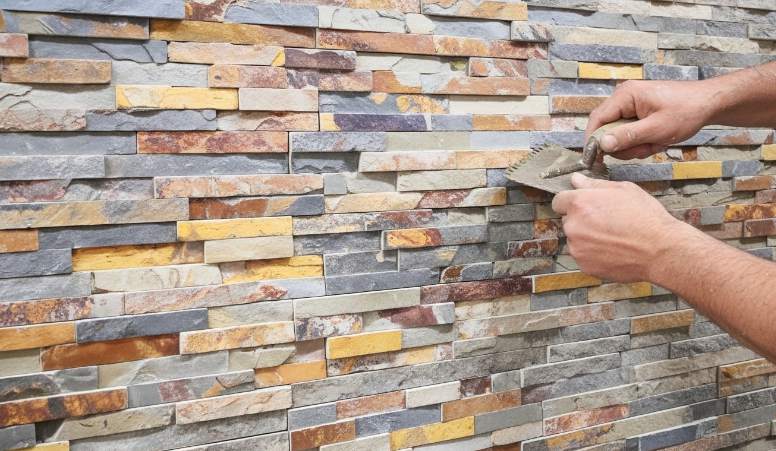
Pourquoi le “Beurrage du dos” La technique, le secret de la longévité ?
Le rétro-beurrage assure un transfert d'adhésif à 100 % entre le substrat et la pierre, éliminant ainsi efficacement les vides creux qui conduisent à une défaillance due à l'humidité et au délaminage de la pierre.
Obtenir une couverture adhésive complète
La truelle crantée standard sur un mur laisse des espaces d'air entre les arêtes de mortier. Si ces arêtes sont suffisantes pour les carreaux de céramique légers, elles présentent un risque important pour panneaux de pierre naturels empilés qui pèsent entre 8 et 12 lb/pied carré. Le rétro-beurrage consiste à appliquer une fine couche de mortier plate sur toute la surface arrière du pierre avant de la presser dans le mur. Cette action effondre les crêtes et comble toutes les irrégularités naturelles de la surface de l'ardoise ou du quartzite, garantissant que chaque centimètre carré du matériau entre en contact avec l'adhésif.
- Réduit les crêtes de mortier pour fournir une couche de liaison solide et continue sur tout le panneau.
- Fournit un lit adhésif cohérent pour les panneaux avec des textures naturelles à face fendue ou irrégulières.
- Augmente initiale “saisir” ou aspiration, qui empêche les panneaux lourds de s'affaisser lors d'une installation verticale.
Éliminer les vides et les poches d'humidité
Des creux derrière une façade en pierre servent de réservoirs d’eau. Dans les environnements extérieurs, cette humidité subit des cycles de gel-dégel, se dilatant et appliquant une pression vers l'extérieur qui finit par faire éclater le pierre du mur. En utilisant la technique du back-beuttering, nous éliminons les poches d’air où l’eau s’accumule généralement. Cette pratique est essentielle pour répondre aux normes modernes de durabilité dans les climats très humides ou froids, car elle empêche également la migration des sels qui provoquent des efflorescences disgracieuses sur la face de la pierre.
- Empêche l'eau de s'accumuler dans les cavités derrière le placage en pierre, l’une des principales causes de défaillance des obligations.
- Réduit le risque d’efflorescence en supprimant les poches d’air où s’accumulent l’humidité et les minéraux.
- Protège les adhésifs modifiés aux polymères à haute résistance du stress environnemental en les scellant dans une couche solide.
Améliorer la force des liaisons structurelles
Une liaison mécanique permanente repose sur la pénétration du mortier dans les pores microscopiques du pierre naturelle. Une connexion mouillé sur mouillé – où le mortier frais sur la pierre rencontre le mortier frais sur le mur – permet d'obtenir un verrouillage beaucoup plus solide qu'une simple pression sur un bouton. pierre sèche dans un mur semi-peau couche. Cette technique garantit que la pierre et le substrat se comportent comme une seule unité structurelle lors de la dilatation thermique. Pour les projets commerciaux où la responsabilité à long terme est une préoccupation, le beurrage est la norme pour empêcher la chute des pierres et assurer la sécurité publique.
- Force le mortier profondément dans le pierre naturelle pores pour une clé mécanique inflexible.
- Permet au panneau en pierre et le substrat pour se déplacer comme une seule unité lors de changements de température extrêmes.
- Minimise le risque de chute de pierre, répondant ainsi à la principale préoccupation relative à l'intégrité structurelle à long terme.
Comment installer correctement des panneaux de pierre emboîtables en forme de Z ?
Atteindre un niveau professionnel finir avec des panneaux en forme de Z nécessite une stratégie rigoureuse d'emboîtement mâle-femelle et un taux de transfert de mortier de 100 % pour supporter les 8 à 13 lb par pied carré typiques de la pierre naturelle.
Stratégie d'aménagement et préparation des murs
Une installation efficace commence par une base de référence de niveau. Utilisez une ligne de craie horizontale pour établir un point de départ, car toute déviation à la base s'amplifie en espaces visibles à mesure que le mur s'élève. Les installateurs doivent vérifier que le substrat est structurellement solide ; pour les projets intérieurs, utilisez des panneaux de support en ciment sur du gypse standard pour supporter le poids de l'ardoise naturelle ou du quartzite.
Le montage à sec des panneaux sur le sol avant l'application vous permet de mélanger les variations de différentes caisses. Ce processus garantit la “Cohérence des carrières dans le même lot” reste intact sur toute la surface. Nous vous recommandons de calculer des panneaux complets pour éviter les petits éclats instables en haut ou sur les bords du projet.
Application d'adhésif pour une liaison à haute résistance
Les projets haute performance nécessitent des mortiers modifiés aux polymères comme le mortier de maçonnerie Mapei Ultralite ou Type S. Utilisez une truelle crantée de 1/4 de pouce pour appliquer une couche uniforme sur le substrat. Pour éviter le détachement, beurrez chaque panneau en appliquant une fine couche d'adhésif au dos de la pierre. Cela garantit une couverture à 100 % et élimine les vides qui pourraient emprisonner l’humidité dans les environnements extérieurs de gel-dégel.
| Fonctionnalité | Écrans plats standards | Panneaux en forme de Z de source supérieure |
|---|---|---|
| Système de connexion | Joint bout à bout (bord droit) | Interverrouillage mâle-femelle |
| Visibilité conjointe | Élevé (lignes verticales visibles) | Sans couture (joints camouflés) |
| Précision des bords | Manuel / Découpé à la main | Finition CNC à lame diamantée |
Techniques d’alignement structurel et de verrouillage
Commencez l'installation par le coin inférieur et travaillez horizontalement. Enfoncez le premier panneau dans le mortier et tapotez-le doucement avec un maillet en caoutchouc. Cette action effondre les crêtes du mortier et forme une liaison mécanique solide. Glissez les panneaux suivants ensemble étroitement, en utilisant la forme en Z pour cacher le substrat et éliminer les joints verticaux visibles.
- Utilisez un niveau de 4 pieds pour vérifier l'alignement horizontal toutes les deux rangées.
- Placez fermement les bords mâle-femelle pour maintenir le flux visuel du pierre naturelle texture.
- Enlevez immédiatement tout excès de mortier de la face de la pierre avec une éponge humide.
Transitions de coin et gestion des articulations transparente
Terminez le projet avec des pièces d'angle assorties en forme de L. Ces unités préfabriquées éliminent le besoin de travaux difficiles coupes d'onglet sur place et assurez-vous que la texture reste synchronisée aux transitions murales. Décalez les joints verticaux entre les cours pour améliorer l’intégrité structurelle et créer une esthétique plus naturelle.
Pour les installations extérieures, maintenez un espace de 1/16 de pouce entre les panneaux pour permettre la dilatation thermique. Ceci est particulièrement important dans les climats soumis à des variations de température extrêmes, car cela empêche la pierre de se fissurer ou de se déformer. Nettoyez soigneusement la surface de la pierre une fois que le mortier a atteint sa prise initiale, en vous assurant qu'il ne reste aucun résidu sur la texture à face fendue.
Pouvez-vous obtenir des coins parfaits sans coupe d’onglet sur place ?
Les unités de coin préfabriquées modernes en forme de L éliminent les risques structurels et l'intensité du travail liés à la coupe d'onglet manuelle tout en assurant une transition esthétique harmonieuse pour murs en pierre naturelle.
La maçonnerie traditionnelle oblige souvent les installateurs à passer des heures devant une scie à eau, essayant d'aligner deux pièces de pierre distinctes à un angle parfait de 45 degrés. Ce processus est lent et entraîne souvent des bords irréguliers ou des espaces visibles qui compromettent l’aspect haut de gamme du projet. Pierre de source supérieure résout ce problème en fournissant des unités de coin en forme de L fabriquées en usine qui fournissent deux faces perpendiculaires dans une seule unité solide.
Utilisation d'unités de coin préfabriquées en forme de L
Ces unités utilisent la même pierre naturelle que nos panneaux plats pour garantir la cohérence des couleurs et des textures sur l'ensemble du projet 2026. En nous approvisionnant en matériaux provenant de la même veine de carrière, nous maintenons une uniformité de teinte de 95 %, évitant ainsi l'apparence inégale courante lors du mélange de différents lots. Les unités arrivent prêtes à installer, offrant une transition structurelle qui maintient un 100 % vraie pierre esthétique.
- Les pièces fabriquées avec précision offrent une finition structurelle enveloppante sans la fragilité des joints manuels.
- La conception emboîtable permet au coin de se fondre dans le mur, cachant les joints verticaux qui apparaissent généralement avec les joints bout à bout.
- Les bords contrôlés en usine garantissent que la texture de la pièce d'angle correspond parfaitement aux panneaux plats adjacents.
Réduire les coûts de main-d'œuvre et les délais d'installation
Les calendriers de construction modernes exigent des délais d’exécution plus rapides. Les solutions de coins prédécoupés facilitent cela en supprimant les tâches de maçonnerie spécialisées. Les entrepreneurs gagnent beaucoup de temps car ils n’ont plus besoin de mesurer, marquer et scier à l’eau chaque pierre sur le chantier. Cette efficacité est un facteur majeur pour les acheteurs B2B qui cherchent à maximiser leurs marges bénéficiaires sur les développements à grande échelle.
- Des processus simplifiés permettent aux installateurs généraux d’obtenir des résultats professionnels auparavant réservés aux maîtres tailleurs de pierre.
- Le gaspillage de matériaux sur site est minimisé en éliminant la casse et la poussière associées à la coupe d'onglet manuelle.
- Les tailles de coin standardisées permettent une logistique prévisible et une rotation des stocks plus rapide pour les détaillants.
Maintenir l’intégrité visuelle grâce aux coutures imbriquées
La conception en forme de Z ou jointée de ces coins garantit que la transition du coin au mur est presque invisible. Nous utilisons un équipement CNC à lame diamantée pendant la fabrication pour garantir que chaque pièce s'emboîte étroitement avec notre série plate. Ce “homme-femme” Le système de connexion camoufle le support d'installation et empêche le “fait un pas” lacunes constatées dans les produits de moindre qualité placage en pierre.
- Les joints décalés empêchent l’empilement’ lignes, qui sont un point de défaillance courant dans la pierre manuelle candidatures.
- Une fabrication précise maintient un ajustement uniforme tout en préservant les variations naturelles uniques de chaque pièce de pierre.
- La finition sans joint rehausse la valeur architecturale du bâtiment en créant une apparence solide et monolithique.
Gestion des angles non standard et des exigences personnalisées
Bien que les coins à 90 degrés soient la norme pour la plupart des projets résidentiels et commerciaux, certaines conceptions architecturales nécessitent des ajustements manuels pour des géométries uniques. Pour les angles qui ne sont pas exactement de 90 degrés, les installateurs utilisent toujours des scies à eau avec des lames diamantées pour créer des joints à onglet personnalisés. La durabilité naturelle de nos ardoises et quartzites permet des coupes nettes sans écaillage excessif lors de ces ajustements.
- La résine époxy haute résistance garantit que les joints manuels restent permanents et stables dans les applications personnalisées.
- Les outils à lame diamantée sont essentiels pour maintenir des lignes épurées lorsque vous travaillez avec des matériaux à haute densité comme le Sierra Blue ou le Glacier White.
- Une planification et un montage à sec appropriés restent essentiels lors de la transition des coins préfabriqués aux sections découpées sur mesure.

Comment résoudre les problèmes d’installation courants comme l’efflorescence ?
L'efflorescence se produit lorsque les sels solubles migrent vers la surface de la pierre via l'humidité ; la prévention nécessite d'éliminer les sources de sel dans le mortier et de bloquer les passages d'eau grâce à des barrières performantes.
Sélectionnez des matériaux à faible teneur en sel et des sources d’eau propre
Le contrôle de l’efflorescence commence par la composition chimique de vos matériaux d’installation. Dans les applications professionnelles B2B, nous donnons la priorité au mortier de type N plutôt qu’au type S ou M pour les travaux de placage. Le type N contient des niveaux de ciment plus faibles, ce qui réduit considérablement le réservoir interne de sels solubles tout en offrant la flexibilité nécessaire à l'expansion de la pierre naturelle. Nous utilisons exclusivement du sable lavé et bien calibré pour éviter l'introduction de minéraux non raffinés qui déclenchent souvent des taches en surface.
- Mélanger tous les mortiers avec de l'eau filtrée ou potable pour éviter la teneur élevée en minéraux trouvée dans l'eau de puits.
- Optez pour des pierres naturelles denses comme l’ardoise ou le granit, qui ont des taux d’absorption inférieurs à ceux des alternatives poreuses.
- Vérifiez que tous les composants de maçonnerie répondent Normes ASTM pour une faible teneur en sel soluble.
- Maintenez la cohérence d’un même lot de carrière pour garantir des propriétés chimiques uniformes sur l’ensemble du projet.
Mettre en œuvre des barrières contre l'humidité et un drainage robustes
L’eau étant le principal vecteur de migration du sel, la gestion de l’humidité constitue le facteur préventif le plus crucial. Installer une membrane d'étanchéité de haute qualité sur le support pour isoler le placage de pierre du mur structure. Cette barrière empêche la remontée capillaire et empêche l'humidité d'extraire les sels du béton ou de la brique derrière la pierre. Chaque projet doit inclure des solins intégrés autour des fenêtres, des portes et des lignes de toit pour empêcher l'eau de s'infiltrer derrière les panneaux.
Le drainage à l'échelle du site joue également un rôle dans la protection de la pierre. Nous veillons à ce que les systèmes de nivellement paysager et de gouttières dirigent l’eau loin des fondations. Pour les supports en béton, nous imposons une période de durcissement complète avant pose de pierre. Le béton jeune libère des composés volatils et des niveaux d'humidité élevés ; les piéger derrière panneaux de pierre est une recette garantie pour une efflorescence immédiate.
Appliquer des protocoles de scellement pour bloquer les voies de migration
La réduction de la porosité de l’installation globale limite les voies empruntées par l’eau pour atteindre la surface. Une fois la pierre et le mortier complètement secs, nous appliquons un scellant hydrophobe et respirant. Ces imprégnateurs à base de silane permettent à la vapeur d'eau de s'échapper, empêchant l'accumulation de pression, tout en empêchant l'eau liquide de pénétrer dans la pierre depuis l'extérieur.
- Utiliser des techniques d’application de mortier dense et des vibrations mécaniques pour éliminer les vides où l’humidité s’accumule.
- Utilisez des panneaux de verrouillage en forme de Z avec une précision de lame diamantée CNC pour créer des joints serrés qui protègent le substrat.
- Établir un calendrier d'entretien pour revérifier l'intégrité de la couche hydrophobe tous les 3 à 5 ans.
Techniques d'élimination sûres des dépôts de surface
Lorsque des résidus blancs apparaissent, l’élimination mécanique constitue la première ligne de défense. Nous utilisons une brosse sèche à poils durs pour balayer les sels de surface avant qu'ils puissent être dissous à nouveau. Évitez à tout prix le lavage à haute pression ; la force extrême pousse souvent les sels dissous plus profondément dans les pores de la pierre, ce qui fait que le problème se reproduit avec une plus grande intensité une fois que le mur sèche.
Pour les dépôts tenaces, nous recommandons des nettoyants pour pierres naturelles au pH neutre spécialement formulés pour la maçonnerie. Les solutions acides peuvent réagir avec certains minéraux de la pierre naturelle, en particulier le quartzite ou le calcaire, entraînant une décoloration ou une gravure permanente. Testez toujours tout agent de nettoyage sur une zone peu visible pour vous assurer qu’il préserve la texture et la teinte naturelles de la pierre avant de l’appliquer sur toute la façade.
Quels sont les protocoles de scellement post-installation ?
Un scellement efficace sert de défense structurelle finale, nécessitant une fenêtre de durcissement spécifique et une compatibilité chimique pour garantir la respirabilité et l’intégrité de la couleur de la pierre naturelle.
Attendre que le lit de colle ou de mortier ait atteint sa pleine maturité structurelle avant d'introduire des agents de scellement. L’application de produits chimiques trop tôt emprisonne l’humidité dans la pierre, ce qui perturbe le processus d’hydratation du lien cimentaire et peut entraîner une défaillance à long terme. Pour les projets impliquant du coulis, le traitement de la pierre avec un scellant agit d'abord comme agent de démoulage. Cela empêche la surface naturelle poreuse d'absorber les pigments du coulis, ce qui provoque souvent des taches permanentes sur des matériaux plus légers comme le quartzite Alaska Grey ou Glacier White.
Avant de commencer l'application, éliminer tout film de ciment, poussière de construction et résidus de chantier à l'aide d'un nettoyant au pH neutre. La surface de la pierre doit être parfaitement sèche. Même des traces d'humidité emprisonnée peuvent entraîner “rougir”—un film blanc trouble qui se forme sous le scellant et est difficile à enlever sans décapants de qualité professionnelle.
Sélection et application de scellants pénétrants
Évitez les scellants filmogènes qui créent un revêtement semblable à du plastique sur la surface. Utilisez plutôt des scellants pénétrants respirants à base de silane qui permettent à la vapeur d’humidité de s’échapper tout en bloquant la pénétration de l’eau liquide. Cette respirabilité est essentielle pour prévenir l’effritement et le délaminage pendant les cycles de gel-dégel dans les climats nordiques. L’application de plusieurs couches légères est bien plus efficace qu’une seule application lourde et saturée.
- Appliquez le scellant à l'aide d'un pulvérisateur à basse pression ou d'un chiffon non pelucheux pour assurer une saturation uniforme sur la surface naturelle de la fente.
- Travaillez par petites sections faciles à gérer pour empêcher le scellant de sécher sur la surface avant de pouvoir être poli.
- Polissez tout excès de scellant avec un chiffon propre dans les 10 minutes suivant l'application pour éviter un résidu collant ou une finition brumeuse.
Exigences d'étanchéité pour les zones extérieures et humides
Les environnements très humides, tels que les abords des piscines, les jeux d’eau et les façades extérieures dans les régions très humides, exigent les protocoles d’étanchéité les plus rigoureux. Les matériaux poreux comme le calcaire, l’ardoise et le travertin nécessitent une protection pénétrante en profondeur pour empêcher l’oxydation interne du fer, qui se manifeste souvent par des taches de rouille disgracieuses. Les scellants installés dans ces zones atténuent la dégradation de l'environnement et empêchent la pierre de devenir un hôte de croissance organique.
Notez qu’un scellant n’est pas un agent imperméabilisant principal. Pour les applications extérieures, le système de panneaux de pierre doit fonctionner en conjonction avec une barrière secondaire contre l’humidité et un solin approprié. Le rôle du scellant est de protéger la surface esthétique et structurelle de la pierre, tandis que le plan de drainage sous-jacent gère la pénétration massive de l’eau. Assurez-vous que tous les joints et bords soient soigneusement recouverts pour empêcher l’eau de migrer derrière les panneaux.
Calendriers de durcissement et tests d’entretien
Protéger la surface scellée de tout contact pendant au moins 2 heures après l'application. La zone doit rester complètement sèche pendant au moins 12 heures, bien que la liaison chimique nécessite généralement une période de durcissement complète de 24 heures pour atteindre une résistance maximale aux taches et à l'eau. Restreindre l'accès pendant cette fenêtre empêche les contaminants de s'incruster dans le nouveau joint.
Pour entretenir l’installation, effectuez périodiquement un test de gouttelettes d’eau. Si l'eau ne coule pas sur la surface et pénètre dans la pierre dans les deux heures, le scellant est probablement usé et doit être réappliqué. Pour le nettoyage de routine, évitez les produits chimiques acides ou les nettoyeurs haute pression. Ces méthodes enlèvent le scellant et peuvent éroder les textures délicates de la pierre naturelle, compromettant à la fois l'apparence et la longévité du mur.
Conclusion
Des techniques d'installation appropriées telles que le beurrage et la préparation correcte du substrat protègent l'intégrité structurelle de murs en pierre naturelle. L’utilisation de panneaux en forme de Z découpés avec précision et de coins préfabriqués réduit le temps de travail tout en garantissant une finition architecturale haut de gamme et sans couture. Ces normes évitent les problèmes courants comme le délaminage ou l’efflorescence des pierres, garantissant ainsi un résultat durable aux clients commerciaux et résidentiels.
Passez en revue les exigences actuelles de votre projet et vérifiez si votre inventaire comprend les coins en L correspondants nécessaires pour une finition enveloppante professionnelle. Contactez Top Source Stone pour demander un catalogue technique ou discuter des options d'approvisionnement en gros pour votre prochaine installation.
Foire aux questions
Pouvez-vous poser des pierres empilées sur des briques existantes sans latte ?
Oui, tu peux installer des pierres empilées directement sur des briques existantes sans latte métallique, à condition que la brique soit non peinte, propre et structurellement solide. La surface doit être suffisamment poreuse pour absorber l’eau ; si la brique est émaillée ou peinte, vous devez soit sabler la surface, soit installer une latte métallique pour assurer une liaison mécanique. Utilisez un mortier modifié aux polymères de haute qualité répondant aux normes ANSI A118.4 pour assurer une adhérence maximale au substrat de maçonnerie.
Avez-vous besoin d'une latte métallique pour un placage en pierre naturelle sur une cloison sèche ?
Les cloisons sèches standard ne constituent pas un substrat structurel recommandé pour placage en pierre naturelle en raison de son poids et de sa sensibilité à l'humidité. Pour une installation professionnelle, vous devez installer une latte métallique sur une barrière contre l'humidité ou, de préférence, remplacer la cloison sèche par un panneau d'appui en ciment. La latte métallique fournit la clé mécanique nécessaire pour que la couche de grattage accroche la lourde pierre en toute sécurité et empêche le papier de cloison sèche de se délaminer sous la charge.
Quel est le meilleur adhésif pour les pierres lourdes empilées sur une cheminée ?
Le meilleur adhésif pour les travaux lourds pierre empilée sur une cheminée est un mortier-colle de qualité professionnelle modifié aux polymères qui respecte ou dépasse les spécifications ANSI A118.15. Ces “Tuile grande et lourde” (LHT) sont spécialement conçus pour fournir une force d'adhérence élevée et une résistance supérieure à l'affaissement, ce qui est essentiel pour les applications en pierre. De plus, ces mortiers sont conçus pour résister aux cycles de dilatation et de contraction thermiques courants dans les environnements de cheminée.
Comment couper des panneaux de pierre naturelle sans s’écailler ni se fissurer ?
Pour éviter l'écaillage ou la fissuration, utilisez une scie à eau de haute qualité équipée d'une lame diamantée à jante continue. conçu spécifiquement pour la pierre naturelle. Maintenez une vitesse d'avance lente et constante et assurez un débit d'eau constant vers la surface de coupe pour réduire la chaleur et les vibrations. Pour les coupes complexes ou les bords qui seront exposés, la finition de la coupe avec une meuleuse d'angle à vitesse variable et un tampon de polissage diamanté peut lisser davantage les micro-éclats mineurs.
Comment réparer des panneaux de pierre qui se détachent ou tombent après des années d'utilisation ?
Pour réparer les panneaux desserrés, retirez d'abord tout élément défectueux. pierres et gratter le vieux mortier Retirez à la fois l'arrière de la pierre et le substrat du mur jusqu'à ce que vous atteigniez une surface propre et solide. Appliquer un agent adhésif sur le support, puis “beurre de dos” le panneau en pierre avec un mortier modifié aux polymères haute performance. Appuyez fermement sur la pierre pour la mettre en place, en assurant une couverture à 100 %, et renforcez-la si nécessaire jusqu'à ce que le mortier prenne. Si l'humidité est à l'origine de la défaillance, assurez-vous que la zone est correctement scellée une fois la réparation durcie.
Devez-vous sceller les pierres empilées avant ou après le durcissement du mortier ?
Les pierres empilées doivent toujours être scellées après le mortier. a complètement durci, ce qui prend généralement entre 72 heures et 28 jours selon les conditions environnementales. Le scellement avant que le mortier ne durcisse peut emprisonner l'humidité et les gaz à l'intérieur du système mural, entraînant une efflorescence (dépôts de sel blanc disgracieux) ou une rupture d'adhérence. Pour de meilleurs résultats, assurez-vous que la pierre est complètement sèche et propre avant d'appliquer un scellant pénétrant respirant de haute qualité.
