 Ga naar de inhoud
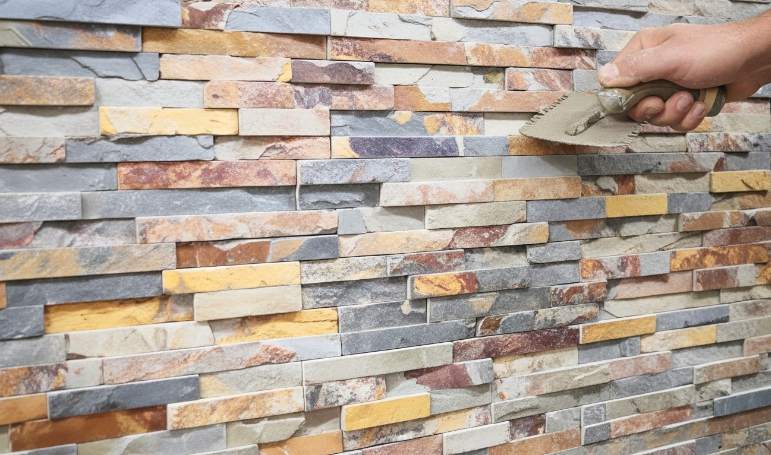
Leren hoe u gestapelde steen op de juiste manier installeert, is het verschil tussen een architectonisch kenmerk met hoge marges en een kostbare aansprakelijkheidsclaim als gevolg van paneeldefecten. Onjuiste installatie leidt er vaak toe dat stenen van de ondergrond afschuiven, wat veiligheidsrisico's voor klanten met zich meebrengt en de reputatie van een aannemer ruïneert. Het vermijden van deze terugroepacties begint met het begrijpen van de fysica van de verticale gewichtsverdeling en de chemie van de verbinding tussen de steen en de muur.
Dit gids stelt een technische standaard vast voor professionele steen metselwerk, dat alles omvat, van de kritische voorbereiding van de ondergrond en de keuze van de mortel tot de bijzonderheden van back buttering voor maximale hechting. We kijken naar de werking van in elkaar grijpende Z-vormige panelen en hoe dit te beheren randovergangen zonder te vertrouwen op complexe versteksneden ter plaatse. Het volgen van deze lokale protocollen zorgt voor duurzaamheid op de lange termijn en elimineert veelvoorkomende problemen na de installatie, zoals uitbloeiingen of vochtvangers.
Is jouw muur klaar? Kritische normen voor substraatvoorbereiding
De integriteit van het substraat en het vochtmanagement bepalen of: natuursteen gevel behoudt zijn structurele verbinding tientallen jaren of bezwijkt tijdens de eerste belangrijke vries-dooicyclus.
Evaluatie van structurele integriteit en belastingvereisten
Standaard naturel gestapelde stenen panelen van Top Source Stone weegt tussen de 8 en 12 lbs per vierkante voet, terwijl premium ruw gesneden selecties 13,5 lbs per vierkante voet kunnen bereiken. Installateurs moeten de muur bevestigen kan deze dode lasten dragen zonder te verschuiven. Elke doorbuiging van het substraat zal door de steen heen telegraferen, waardoor de nauwkeurig gesneden Z-vormige in elkaar grijpende verbindingen loskomen. Vóór de installatie vereisen we dat alle oppervlakken vlak zijn en vrij zijn van verontreinigingen zoals verf, was of vormlossers die als hechtingsbrekers werken.
| Substraattype | Laadvermogen | Voorbereidingsvereiste |
|---|---|---|
| Beton / Metselwerk | Hoog (>25 lbs/sq.ft) | Scarify- of skimcoat |
| Houten frame + lat | Matig (15 lbs/sq.ft) | Gegalvaniseerde lat + kraslaag |
| Cementsteunplaat | Hoog (15-20 lbs/sq.ft) | Dun geplaatst over Mesh Tape |
Substraatcompatibiliteit voor binnen- en buitenmuren
Binnen- en buitenomgevingen vereisen verschillende verbindingsstrategieën om ervoor te zorgen dat de Z-vormige panelen correct vergrendelen. Voor gipsplaten binnenshuis, installateurs mogen nooit steen aanbrengen direct op papierdikte. Bevestig in plaats daarvan een cementsteunplaat aan de noppen. Voor buitentoepassingen verschuift de focus naar stijfheid en hechtsterkte.
- Directe toepassing is alleen toegestaan op schone, ongeverfde baksteen, beton of CMU-blokken.
- In elkaar grijpende panelen vereisen een perfect vlak oppervlak om het te behouden “man-vrouw” verbinding die verticale voegen verbergt.
- Wanden met een houten frame moeten stijf genoeg zijn om de buiging die tot delaminatie leidt te voorkomen.
Vochtbeheer en weerbestendige barrières
Natuursteen is inherent duurzaam, maar het is geen waterdichte barrière. In buitenruimtes of zones met veel vocht, zoals open haarden en waterpartijen ligt de primaire bescherming achter de steen. De huidige codes voor 2026 leggen de nadruk op gespecialiseerde drainagevlakken om uitbloeiingen en waterophoping te voorkomen.
- Installeer een vochtbestendige barrière (WRB) die voldoet aan de regelgeving en rondom alle openingen.
- Gebruik hoogwaardige afdichtingsmiddelen nadat de mortel is uitgehard om de zoutmigratie te blokkeren en het onderhoud te vereenvoudigen.
- Buitenprojecten in vries-dooi-klimaten vereisen met polymeer gemodificeerde mortels die de ANSI A118.15-normen voor waterbestendigheid overschrijden.
Industrienormen voor kraslagen en latten
Bij installatie op niet-metselwerkoppervlakken een metalen lat en een kraslaag aanbrengen zorg voor de benodigde mechanische sleutel voor de steen. Professionals gebruiken gegalvaniseerd diamantgaas dat 15 cm in het midden in de muurstijlen is bevestigd. Er moet een kraslaag van ongeveer 1/2 inch tot 3/4 inch dikte worden aangebracht en horizontaal gegroefd. Deze laag moet volledig uitharden om te voorkomen dat krimpscheuren naar de ondergrond overgaan stenen fineer. Het gebruik van ANSI A118.4 of hogere polymeer-gemodificeerde thin-sets zorgt ervoor dat de hechtsterkte voldoet aan de 300+ PSI-afschuifvereisten die typisch zijn voor hoogwaardige moderne constructies.

Welk professioneel gereedschap is eigenlijk nodig voor een nette afwerking?
Professionele kwaliteit De resultaten van gestapelde stenen zijn afhankelijk van het thermisch beheer met een hoog koppel tijdens het zagen en doorlopende horizontale referentielijnen om te voorkomen dat cumulatieve uitlijning over grote architecturale gevels afwijkt.
Natzagen met diamantbladen voor nauwkeurig zagen van steen
Zuivere, nauwkeurige sneden onderscheiden het topsegment commerciële installaties van amateurpogingen. Bij het hanteren van mineralen met een hoge dichtheid, zoals kwartsiet en leisteen, veroorzaken standaard metselwerkbladen vaak afbrokkeling van de randen of oververhitting. We gebruiken heavy-duty natzagen uitgerust met met diamant geïmpregneerde bladen om de randscherpte en structurele integriteit te behouden tijdens aangepaste afmetingen.
- Watergekoeld snijsystemen elimineren thermische spanning op de steen, waardoor microbreuken in 6” x 24” panelen worden voorkomen tijdens ingewikkelde sneden voor stopcontacten of armaturen.
- Precisiediamantzaagbladen zorgen voor strakkere verbindingen in de Flat-serie, waardoor een minimalistische esthetiek wordt gegarandeerd zonder de afleiding van gekartelde randen.
- Constante smering tijdens het snijden zorgt ervoor dat de fabrieksmatige kleur consistent blijft aan de snijrand, waardoor beschadiging wordt voorkomen “wit-uit” door wrijvingswarmte.
Vierkant gekerfde troffels voor het gecontroleerd aanbrengen van mortel
De diepte van het mortelbed heeft rechtstreeks invloed op de hechtsterkte en de levensduur van een muur. Gestandaardiseerde troffels zorgen ervoor dat de lijmlaag het substantiële ondersteunt gewicht natuursteen zonder doorzakken. We raden specifieke kerfgeometrieën aan om tegemoet te komen aan de belasting van 8-13 lbs/sqft die typisch is voor de Top Source Stone-inventaris.
- Een troffel met vierkante tanden van 1/2 inch x 1/2 inch creëert de nodige diepte zodat de mortel kan worden aangebracht. “sleutel” in de achterkant van de steen.
- Een juiste maatvoering vergemakkelijkt de back-butteringtechniek, waardoor de 100% dekking wordt bereikt die nodig is voor een permanente hechting in wisselende klimaten.
- Correct gebruik van de troffel voorkomt dat overtollige mortel in in elkaar grijpende Z-verbindingen terechtkomt, waardoor de afwerking schoon blijft en het vervelende opruimen van de voegen overbodig wordt.
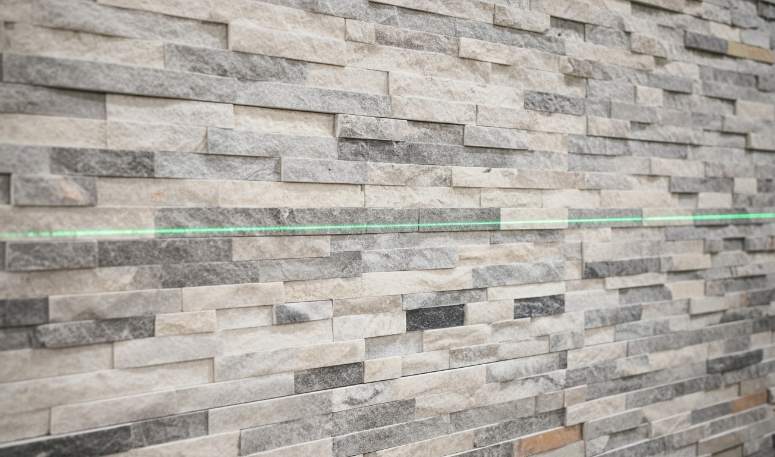
Lasernivelleringssystemen voor horizontale uitlijning
Uiterst nauwkeurige waterpasinstrumenten voorkomen uitlijningsfouten die groter worden naarmate u tegen een muur op beweegt. Zelfs een afwijking van 1/16 inch in de eerste gang kan op de tiende rij tot grote gaten of schuine lijnen leiden. Lasersystemen bieden een stabiele visuele gids die traditionele waterpassen over lange afstanden niet kunnen evenaren.
- Laserwaterpassen projecteren een ononderbroken horizontale referentielijn, waardoor de funderingslaag perfect vlak is over de gehele ondergrond.
- Digitale waterpassen helpen installateurs bij het verifiëren van het loodrecht op de muur, vooral bij de Rough Series, waar diepe texturen en schaduwen elke afwijking in het verticale vlak benadrukken.
- Geautomatiseerde nivelleringsapparatuur versnelt de installatieproces voor grootschalige commerciële projecten door de tijd die aan handmatig opvullen wordt besteed, te verminderen.
Gespecialiseerde applicators voor oppervlakteafdichting
De uiteindelijke esthetiek van natuursteen hangt af van hoe beschermend afdichtingsmiddelen worden op het oppervlak aangebracht. Onjuiste toepassing leidt vaak tot “poolen” in diepe spleten of gemiste plekken in de textuur. Door het juiste gereedschap te kiezen, zorgt u ervoor dat het marmer of leisteen zijn levendige, natuurlijke tint behoudt en tegelijkertijd beschermd blijft tegen vlekken van buitenaf.
- Zachte borstels zorgen ervoor dat afdichtingsmiddelen de gekartelde profielen van steen uit de Rough- en Pencil-serie kunnen binnendringen zonder dat er vloeistofplassen in de uitsparingen achterblijven.
- Lagedrukpompsproeiers bieden een uniforme coating voor grote oppervlakken buitengevels, waardoor een effectieve barrière ontstaat tegen UV-blootstelling en een hoog zoutgehalte.
- PH-neutrale reinigingssponzen verwijderen de resterende mortelfilm vóór het verzegelen, waardoor waasvorming wordt voorkomen “spookbeelden” voorkomen dat ze permanent onder de kitlaag terechtkomen.
Schaal uw bedrijf op met premium grootboekpanelen

Hoe selecteert u de beste mortel voor natuursteenfineer?
Modern stenen fineer falen is meestal terug te voeren op een slechte lijmkeuze; geef prioriteit aan met polymeer gemodificeerde systemen die voldoen aan de ANSI A118.15-normen om de 8-12 lbs/sq.ft. dood belasting van natuurlijke panelen.
Polymeer-gemodificeerde thinset voor hoge hechtingsprestaties
Speciaal samengestelde, met polymeer gemodificeerde mortels vertegenwoordigen de industriële maatstaf voor beveiliging Natuurlijke stenen fineer. Deze producten overtreffen de ANSI A118.15-normen en bieden de kritische schuifsterkte die nodig is om het gewicht van 8-13 lbs/sqft van professionele gestapelde stenen panelen. In tegenstelling tot traditionele mengsels bevatten deze mortels hoge concentraties polymeren die de flexibiliteit vergroten. Hierdoor is de verbinding bestand tegen kleine structurele verschuivingen en de thermische uitzetting die gebruikelijk is bij grootschalige architectonische gevels, zonder scheuren of delaminatie.
Uit tests blijkt dat deze gemodificeerde mortels een hechtsterkte van meer dan 300 PSI leveren. Dit is aanzienlijk hoger dan traditionele, niet-gemodificeerde mengsels, die vaak bezwijken onder het gewicht van zware kwartsiet- of leisteenmaterialen. Wanneer Top Source Stone's installeren 6″ x 24″ panelen, waarbij gebruik wordt gemaakt van een thinset met een hoog polymeergehalte, zorgt ervoor dat de natuurlijke gespleten en gespleten oppervlakken veilig verankerd blijven aan de ondergrond gedurende de levensduur van het gebouw.
Type S Metselmortel voor draagkracht
Type S-mortel blijft een betrouwbare optie met hoge druksterkte voor traditionele mortels metselwerk en zware steeninstallaties. Het is specifiek ontworpen voor buiten wanden waar een hoge laterale sterkte en slagvastheid vereist zijn. Voor toepassingen van natuursteenType S biedt een minimale druksterkte van 1.800 PSI, waardoor de verticale belasting van dik gesneden steen gedurende lange tijd wordt ondersteund.
| Categorie mortel | Prestatiestatistiek | Primaire gebruikscasus |
|---|---|---|
| Type S Metselwerk | 1.800+ PSI compressie | Structurele buitenkant muren en zware stenen open haarden. |
| Polymeer-gemodificeerd (A118.15) | 300+ PSI afschuifbinding | In elkaar grijpende Z-vormige panelen; zones met hoge trillingen of thermische zones. |
| LHT-lijm die niet uitzakt | Verticale grijpstabiliteit | Ruw gesneden premiumpanelen (tot 3,5 cm dikte). |
Aannemers moeten Type S mengen met een vloeibaar bindmiddel als dat nodig is stenen substraat heeft een lage zuigkracht. Dit verbetert de initiële “grijpen” tijdens de uithardingsfase, wat essentieel is voor zware panelen. Hoewel thinsets beter zijn voor de schuifsterkte, blinkt Type S uit in bulktoepassingen waarbij het nivelleren van het substraat deel uitmaakt van de installatieproces.
Niet-uitzakkende lijmen voor zware verticale panelen
Verticaal installaties vereisen gespecialiseerde niet-uitzakkende formuleringen om stenen panelen te voorkomen niet verschuiven voordat de mortel is uitgehard. Mortels voor grote en zware tegels (LHT) zijn specifiek gelabeld voor verticale prestaties. Deze lijmen elimineren de noodzaak van mechanische vulplaten door onmiddellijke zuiging en ondersteuning te bieden voor zware in elkaar grijpende Z-vormige panelen van 6” x 24”.
- Breng mortel aan met een getande troffel van 1/2 inch om 100% dekking en een mechanische vergrendeling te garanderen.
- Gebruik LHT-mortels voor “Ruw” serie panelen met een dikte tot 3,5 cm.
- Zorg ervoor dat de lijm het gewicht onmiddellijk bij contact ondersteunt om de naadloze uitlijning te behouden.
Weerbestendige mortels voor vries-dooi-omgevingen
Voor buitenprojecten in Noord-Amerika, Europa of het Midden-Oosten moet bij de selectie van mortel prioriteit worden gegeven aan vochtbestendigheid en temperatuurstabiliteit. Hoogwaardige mortels met een lage waterabsorptiesnelheid zijn essentieel voor het voorkomen van uitbloeiingen – de witte zoutafzettingen die een muur van donker leisteen of middernachtkwartsiet kunnen beschadigen. In koudere klimaten voorkomen deze mortels interne ijsschade door te voorkomen dat water de verbindingslijn binnendringt.
Controleer of de gekozen lijm chemisch compatibel is met de zeer sterke harsen die in de moderne tijd worden gebruikt productie van gestapelde stenen panelen. Voor installaties in de buurt van waterpartijen of commerciële lobby's met een hoge luchtvochtigheid specificeert u mortels die speciaal zijn ontworpen voor natte omgevingen. Dit zorgt ervoor dat de kleuruniformiteit van 95% van een Top Source Stone-batch na verloop van tijd wordt beschermd tegen door vocht veroorzaakte uitloging of vlekken van mineralen.
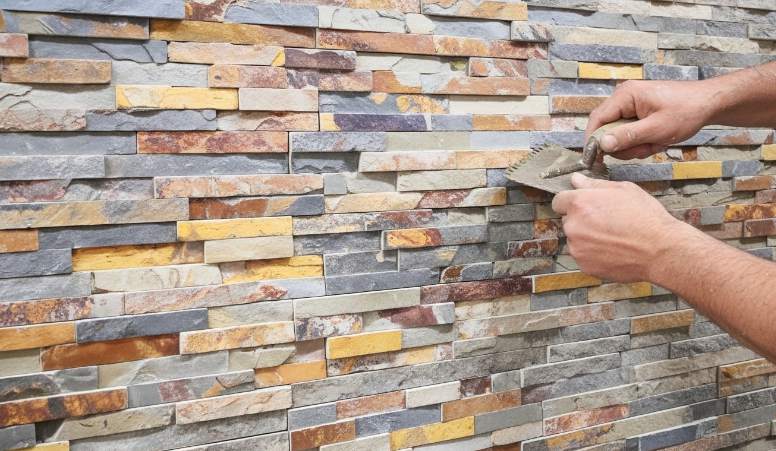
Waarom is de “Back-boteren” Techniek het geheim van een lang leven?
Back-buttering zorgt voor 100% lijmoverdracht tussen de ondergrond en de steen, waardoor de holle ruimtes die leiden tot door vocht veroorzaakt falen en delaminatie van de steen effectief worden geëlimineerd.
Het bereiken van volledige lijmdekking
Standaard getande troffels op een muur laten luchtspleten tussen de mortelruggen achter. Hoewel deze ribbels voldoende zijn voor lichte keramische tegels, vormen ze een aanzienlijk risico natuurlijke gestapelde stenen panelen die tussen de 8 en 12 lbs/sqft wegen. Back-boteren houdt in dat een dunne, vlakke laag mortel wordt aangebracht op het gehele achteroppervlak van de steen voordat u deze in de muur drukt. Hierdoor worden de ruggen samengedrukt en worden eventuele natuurlijke oneffenheden in het oppervlak van de leisteen of het kwartsiet opgevuld, zodat elke vierkante centimeter van het materiaal in contact komt met de lijm.
- Laat mortelruggen instorten om een stevige, doorlopende hechtlaag over het gehele paneel te creëren.
- Zorgt voor een consistent lijmbed voor panelen met natuurlijke gespleten of onregelmatige texturen.
- Verhoogt de initiële waarde “grijpen” of zuigkracht, waardoor zware panelen niet doorzakken tijdens verticale installatie.
Het elimineren van holtes en vochtzakken
Holle plekken achter een stenen gevel fungeren als waterreservoirs. In buitenomgevingen ondergaat dit vocht cycli van bevriezen en ontdooien, waarbij het uitzet en een naar buiten gerichte druk uitoefent die uiteindelijk het vocht doet ontploffen steen van de muur. Door gebruik te maken van de back-buttering-techniek verwijderen we de luchtzakken waar water zich doorgaans verzamelt. Deze praktijk is essentieel om te voldoen aan de moderne duurzaamheidsnormen in hoge luchtvochtigheid of koude klimaten, omdat het ook de migratie van zouten voorkomt die lelijke uitbloeiingen op het stenen oppervlak veroorzaken.
- Voorkomt dat water zich ophoopt in de holtes achter de stenen fineer, een primaire oorzaak van het mislukken van obligaties.
- Vermindert het risico op uitbloeiingen door de luchtzakken te verwijderen waar vocht en mineralen zich verzamelen.
- Beschermt zeer sterke polymeer-gemodificeerde lijmen tegen omgevingsinvloeden door ze af te dichten in een stevige laag.
Verbetering van de structurele hechtsterkte
Een permanente mechanische verbinding is afhankelijk van het feit dat de mortel de microscopisch kleine poriën van het oppervlak binnendringt natuursteen. Een nat-in-nat verbinding – waarbij verse mortel op de steen en verse mortel op de muur samenkomen – resulteert in een veel sterkere verbinding dan simpelweg op een drukknop drukken. droge steen in een halfhuidige muur laag. Deze techniek zorgt ervoor dat de steen en de ondergrond zich tijdens thermische uitzetting als één structureel geheel gedragen. Voor commerciële projecten waarbij aansprakelijkheid op de lange termijn een probleem is, is back buttering de standaard om het vallen van stenen te voorkomen en de openbare veiligheid te garanderen.
- Forceert mortel diep in de natuursteen poriën voor een onverzettelijke mechanische sleutel.
- Staat de stenen paneel en substraat om als één geheel te bewegen tijdens extreme temperatuurverschuivingen.
- Minimaliseert het risico op steenafval en pakt daarmee de belangrijkste zorg voor structurele integriteit op de lange termijn aan.
Hoe in elkaar grijpende Z-vormige stenen panelen correct te installeren?
Het bereiken van een professionele kwaliteit afwerking met Z-vormige panelen vereist een rigoureuze man-vrouw-in elkaar grijpende strategie en een morteloverdrachtssnelheid van 100% om de 8-13 lbs per vierkante voet te ondersteunen die typisch is voor natuursteen.
Indelingsstrategie en wandvoorbereiding
Effectieve installatie begint met een vlakke basislijn. Gebruik een horizontale krijtlijn om een startpunt vast te stellen, aangezien elke afwijking aan de basis zich uitbreidt tot zichtbare gaten naarmate de muur hoger wordt. Installateurs moeten verifiëren dat de ondergrond structureel gezond is; Gebruik voor interieurprojecten een cementsteunplaat over standaard gips om het gewicht van natuurlijke leisteen of kwartsiet te kunnen dragen.
Als u panelen droog op de vloer legt voordat u ze aanbrengt, kunt u variaties uit verschillende kratten met elkaar combineren. Dit proces zorgt ervoor dat de “Consistentie van dezelfde batch” blijft over de gehele oppervlakte intact. We raden aan om volledige paneelreeksen te berekenen om kleine, onstabiele splinters aan de bovenkant of randen van het project te voorkomen.
Lijmtoepassing voor hechting met hoge sterkte
Voor hoogwaardige projecten zijn met polymeer gemodificeerde mortels nodig, zoals Mapei Ultralite of Type S metselmortel. Gebruik een getande troffel van 1/4 inch om een uniforme laag op het substraat aan te brengen. Om loslaten te voorkomen, moet u elk paneel aan de achterkant beboteren door een dunne laag lijm op de achterkant van de steen aan te brengen. Dit zorgt voor 100% dekking en elimineert holtes die vocht zouden kunnen vasthouden in externe vries-dooi-omgevingen.
| Functie | Standaard flatpanels | Topbron Z-vormige panelen |
|---|---|---|
| Verbindingssysteem | Stootverbinding (rechte rand) | Man-vrouw koppeling |
| Gezamenlijke zichtbaarheid | Hoog (zichtbare verticale lijnen) | Naadloos (gecamoufleerde verbindingen) |
| Randprecisie | Handmatig / Handgesneden | CNC-diamantbladafwerking |
Structurele uitlijning en in elkaar grijpende technieken
Begin met de installatie in de onderste hoek en werk horizontaal. Druk het eerste paneel in de mortel en tik er zachtjes op met een rubberen hamer. Deze actie doet de mortelruggen instorten en vormt een solide mechanische verbinding. Schuif de daaropvolgende panelen strak tegen elkaar, gebruik de Z-vorm om het substraat te verbergen en zichtbare verticale naden te elimineren.
- Gebruik een waterpas van 1,20 meter om de horizontale uitlijning elke twee rijen te controleren.
- Zet de man-vrouw randen stevig vast om de visuele stroom van de film te behouden natuursteen textuur.
- Verwijder eventuele overtollige mortel onmiddellijk van de voorkant van de steen met een vochtige spons.
Hoekovergangen en naadloos voegbeheer
Maak het project af met bijpassende L-vormige hoekstukken. Deze geprefabriceerde eenheden elimineren de noodzaak van moeilijk verstekzagen op locatie en zorg ervoor dat de textuur gesynchroniseerd blijft bij muurovergangen. Verspreid de verticale voegen tussen de lagen om de structurele integriteit te verbeteren en een meer natuurlijke esthetiek te creëren.
Voor buiteninstallaties dient u een opening van 1/16 inch tussen de panelen aan te houden om thermische uitzetting op te vangen. Dit is vooral van vitaal belang in klimaten met extreme temperatuurschommelingen, omdat het voorkomt dat de steen barst of knikt. Maak het stenen oppervlak grondig schoon zodra de mortel zijn oorspronkelijke harding heeft bereikt, en zorg ervoor dat er geen residu achterblijft op de gespleten oppervlaktextuur.
Kunt u perfecte hoeken bereiken zonder verstekzagen ter plaatse?
Moderne geprefabriceerde L-vormige hoekelementen elimineren de structurele risico's en arbeidsintensiteit van handmatig verstekzagen en zorgen tegelijkertijd voor een naadloze esthetische overgang voor natuurstenen muren.
Traditioneel metselwerk vereist vaak dat installateurs urenlang aan een natte zaag moeten werken, in een poging twee afzonderlijke stenen stukken in een perfecte hoek van 45 graden uit te lijnen. Dit proces is langzaam en resulteert vaak in gekartelde randen of zichtbare gaten die de premium uitstraling van het project in gevaar brengen. Topbronsteen lost dit op door in de fabriek gemaakte L-vormige hoekeenheden te leveren die twee loodrechte vlakken bieden in één enkele, massieve eenheid.
Gebruikmakend van voorgefabriceerde L-vormige hoekeenheden
Deze units gebruiken dezelfde natuursteen als onze vlakke panelen om kleur- en textuurconsistentie gedurende het hele project van 2026 te garanderen. Door materiaal uit dezelfde steengroeve te betrekken, behouden we een kleuruniformiteit van 95%, waardoor het vlekkerige uiterlijk wordt voorkomen dat vaak voorkomt bij het mengen van verschillende batches. De units zijn gereed voor installatie en zorgen voor een structurele overgang waarbij een 100% echte steen stijlvol.
- Met precisie vervaardigde stukken zorgen voor een structurele omhullende afwerking zonder de kwetsbaarheid van handmatige verbindingen.
- Het in elkaar grijpende ontwerp zorgt ervoor dat de hoek opgaat in de muur, waardoor verticale naden worden verborgen die normaal gesproken bij stootvoegen verschijnen.
- In de fabriek gecontroleerde randen zorgen ervoor dat de textuur van het hoekstuk perfect aansluit bij de aangrenzende vlakke panelen.
Verlaging van de arbeidskosten en installatietijdlijnen
Moderne bouwschema's vereisen snellere doorlooptijden. Voorgesneden hoekoplossingen vergemakkelijken dit door het verwijderen van gespecialiseerde metselwerkzaamheden. Aannemers besparen aanzienlijk tijd omdat ze niet langer elke steen op de bouwplaats hoeven te meten, markeren en nat zagen. Deze efficiëntie is een belangrijke drijfveer voor B2B-kopers die de winstmarges op grootschalige ontwikkelingen willen maximaliseren.
- Dankzij vereenvoudigde processen kunnen algemene installateurs professionele resultaten bereiken die voorheen voorbehouden waren aan meester-steenhouwers.
- Materiaalverspilling ter plaatse wordt geminimaliseerd door het elimineren van breuk en stof die gepaard gaan met handmatig verstekzagen.
- Gestandaardiseerde hoekafmetingen zorgen voor een voorspelbare logistiek en een snellere voorraadomloop voor retailers.
Visuele integriteit behouden met in elkaar grijpende naden
Het Z-vormige of gevingerlaste ontwerp van deze hoeken zorgt ervoor dat de overgang van hoek naar muur vrijwel onzichtbaar is. Tijdens de productie gebruiken we CNC-diamantzaagapparatuur om ervoor te zorgen dat elk stuk nauw aansluit op onze platte serie. Dit “man-vrouw” Het verbindingssysteem camoufleert de installatieondergrond en voorkomt vervorming “stapte” hiaten gevonden in lagere kwaliteit stenen fineer.
- Verspringende verbindingen voorkomen ‘stapelen’’ lijnen, die zijn a veelvoorkomend faalpunt bij handsteen toepassingen.
- Nauwkeurige productie zorgt voor een uniforme pasvorm terwijl de unieke natuurlijke variaties van elk stuk steen behouden blijven.
- De naadloze afwerking vergroot de architecturale waarde van het gebouw door een solide, monolithische uitstraling te creëren.
Omgaan met niet-standaard hoeken en aangepaste vereisten
Hoewel hoeken van 90 graden standaard zijn voor de meeste residentiële en commerciële projecten, vereisen sommige architecturale ontwerpen handmatige aanpassingen voor unieke geometrieën. Voor hoeken die niet precies 90 graden zijn, gebruiken installateurs nog steeds natte zagen met diamantzaagbladen om op maat gemaakte verstekverbindingen te maken. De natuurlijke duurzaamheid van onze leisteen en kwartsiet zorgt voor zuivere sneden zonder overmatig afbrokkelen tijdens deze aanpassingen.
- Zeer sterke epoxyhars zorgt ervoor dat handmatige verbindingen permanent en stabiel blijven in aangepaste toepassingen.
- Diamantzaaggereedschappen zijn essentieel voor het behouden van strakke lijnen bij het werken met materialen met een hoge dichtheid, zoals Sierra Blue of Glacier White.
- Een goede planning en droge montage blijven van cruciaal belang bij de overgang van geprefabriceerde hoeken naar op maat gesneden secties.

Hoe veelvoorkomende installatieproblemen zoals uitbloeiing oplossen?
Uitbloeiing treedt op wanneer oplosbare zouten via vocht naar het steenoppervlak migreren; preventie vereist het elimineren van zoutbronnen in de mortel en het blokkeren van waterwegen door middel van hoogwaardige barrières.
Selecteer zoutarme materialen en schone waterbronnen
Het beheersen van uitbloeiingen begint bij de chemische samenstelling van uw installatiematerialen. In professionele B2B-toepassingen geven we voor fineerwerk voorrang aan Type N-mortel boven Type S of M. Type N bevat lagere cementniveaus, waardoor het interne reservoir van oplosbare zouten aanzienlijk wordt verminderd en tegelijkertijd de flexibiliteit wordt geboden die nodig is voor de uitzetting van natuursteen. We gebruiken uitsluitend gewassen, goed gesorteerd zand om de introductie van ongeraffineerde mineralen, die vaak oppervlaktevlekken veroorzaken, te voorkomen.
- Meng alle mortels met gefilterd water of drinkwater om het hoge mineraalgehalte in bronwater te vermijden.
- Kies voor dichte natuursteen zoals leisteen of graniet, die een lager absorptievermogen hebben dan poreuze alternatieven.
- Controleer of alle metselwerkonderdelen aan elkaar voldoen ASTM-normen voor een laag oplosbaar zoutgehalte.
- Handhaaf de consistentie van de steengroeve van dezelfde batch om uniforme chemische eigenschappen gedurende het hele project te garanderen.
Implementeer robuuste vochtbarrières en drainage
Omdat water het belangrijkste voertuig voor zoutmigratie is, is vochtbeheer de meest kritische preventieve factor. Installeer een hoogwaardig waterdichtingsmembraan op de ondergrond om de ondergrond te isoleren steenfineer van de muur structuur. Deze barrière voorkomt capillaire opstijging en voorkomt dat vocht zouten uit het beton of de baksteen achter de steen trekt. Elk project moet geïntegreerde gootstukken rond ramen, deuren en daklijnen omvatten om te voorkomen dat water achter de panelen sijpelt.
Afwatering over de hele locatie speelt ook een rol bij de bescherming van de steen. Wij zorgen ervoor dat landschapssortering en dakgootsystemen het water ver weg van de fundering leiden. Voor betonnen ondergronden verplichten wij vooraf een volledige uithardingsperiode steeninstallatie. Bij jong beton komen vluchtige verbindingen en hoge vochtniveaus vrij; deze achter zich te laten stenen panelen is een gegarandeerd recept voor onmiddellijke uitbloei.
Pas afdichtingsprotocollen toe om migratieroutes te blokkeren
Het verminderen van de porositeit van de totale installatie beperkt de routes die water gebruikt om het oppervlak te bereiken. Zodra de steen en mortel volledig zijn opgedroogd, brengen we een ademende, hydrofobe sealer aan. Deze op silaan gebaseerde impregneermiddelen laten waterdamp ontsnappen, waardoor drukopbouw wordt voorkomen, terwijl wordt voorkomen dat vloeibaar water van buitenaf de steen binnendringt.
- Gebruik technieken voor het aanbrengen van dichte mortel en mechanische trillingen om holtes te elimineren waar vocht zich ophoopt.
- Gebruik Z-vormige in elkaar grijpende panelen met CNC-diamantbladprecisie om strakke verbindingen te creëren die het substraat beschermen.
- Stel een onderhoudsschema op om de integriteit van de hydrofobe laag elke 3 tot 5 jaar opnieuw te verifiëren.
Veilige verwijderingstechnieken voor oppervlakteafzettingen
Wanneer er witte resten verschijnen, is mechanische verwijdering de eerste verdedigingslinie. We gebruiken een droge borstel met stijve haren om oppervlaktezouten weg te vegen voordat ze opnieuw kunnen worden opgelost. Vermijd ten koste van alles hogedrukreiniging; de extreme kracht duwt opgeloste zouten vaak dieper in de steenporiën, waardoor het probleem met grotere intensiteit terugkeert zodra de muur droogt.
Voor hardnekkige afzettingen raden wij pH-neutrale natuursteenreinigers aan, speciaal ontwikkeld voor metselwerk. Zure oplossingen kunnen reageren met bepaalde mineralen in natuursteen, vooral kwartsiet of kalksteen, wat kan leiden tot permanente verkleuring of etsing. Test een schoonmaakmiddel altijd op een onopvallende plek om er zeker van te zijn dat het de natuurlijke textuur en tint van de steen behoudt voordat u het op de hele gevel aanbrengt.
Wat zijn de afdichtingsprotocollen na installatie?
Effectieve afdichting dient als de laatste structurele verdediging, waarvoor een specifiek uithardingsvenster en chemische compatibiliteit nodig zijn om het ademend vermogen en de kleurintegriteit van de natuursteen te garanderen.
Wacht tot het lijm- of mortelbed de volledige structurele rijpheid heeft bereikt voordat u afdichtingsmiddelen aanbrengt. Als u te vroeg chemicaliën aanbrengt, blijft er vocht in de steen achter, wat het hydratatieproces van de cementgebonden verbinding verstoort en tot langdurig falen kan leiden. Bij projecten waarbij grout betrokken is, werkt het behandelen van de steen met een sealer eerst als lossingsmiddel. Dit voorkomt dat het poreuze natuurlijke oppervlak groutpigmenten absorbeert, wat vaak permanente vlekken veroorzaakt op lichtere materialen zoals Alaska Grey of Glacier White kwartsiet.
Voordat u met de applicatie begint, verwijdert u alle cementfilm, bouwstof en bouwresten met een pH-neutraal reinigingsmiddel. Het stenen oppervlak moet kurkdroog zijn. Zelfs sporen van opgesloten vocht kunnen leiden tot “blozen”—een troebele witte film die zich onder de sealer vormt en moeilijk te verwijderen is zonder professionele strippers.
Doordringende sealers selecteren en toepassen
Vermijd filmvormende sealers die een plasticachtige coating op het oppervlak creëren. Gebruik in plaats daarvan op silaan gebaseerde, ademende, doordringende afdichtingsmiddelen die vochtdamp laten ontsnappen terwijl het binnendringen van vloeibaar water wordt geblokkeerd. Dit ademende vermogen is essentieel voor het voorkomen van afbladderen en delaminatie tijdens vries-dooicycli in noordelijke klimaten. Het aanbrengen van meerdere lichte lagen is veel effectiever dan een enkele zware, verzadigde applicatie.
- Breng de sealer aan met een lagedrukspuit of een pluisvrije doek om een gelijkmatige verzadiging van het natuurlijke gespleten oppervlak te garanderen.
- Werk in kleine, hanteerbare delen om te voorkomen dat de sealer op het oppervlak uitdroogt voordat deze kan worden gepolijst.
- Verwijder eventuele overtollige sealer met een schone doek binnen 10 minuten na het aanbrengen om kleverige resten of een wazige afwerking te voorkomen.
Waterdichtingsvereisten voor buiten- en natte zones
Omgevingen met een hoog vochtgehalte, zoals zwembadranden, waterpartijen en buitengevels in gebieden met een hoge luchtvochtigheid, vereisen de meest rigoureuze afdichtingsprotocollen. Poreuze materialen zoals kalksteen, leisteen en travertijn vereisen een diep doordringende bescherming om interne ijzeroxidatie te voorkomen, wat zich vaak manifesteert als lelijke roestvlekken. Zeehondenjagers in deze zones verminderen de aantasting van het milieu en voorkomen dat de steen een gastheer wordt voor organische groei.
Houd er rekening mee dat een sealer geen primair waterdichtingsmiddel is. Voor buitentoepassingen is de stenen paneelsysteem moet werken in combinatie met een secundaire vochtbarrière en een goede afdichtlaag. De rol van de sealer is om het esthetische en structurele oppervlak van de steen te beschermen, terwijl het onderliggende drainagevlak de penetratie van bulkwater beheert. Zorg ervoor dat alle verbindingen en randen goed bedekt zijn om te voorkomen dat water achter de panelen migreert.
Uithardingsschema's en onderhoudstests
Bescherm het verzegelde oppervlak gedurende minimaal 2 uur na het aanbrengen tegen elk contact. Het gebied moet minimaal 12 uur volledig droog blijven, hoewel de chemische binding doorgaans een volledige uithardingsperiode van 24 uur vereist om maximale weerstand tegen vlekken en water te bereiken. Door de toegang tijdens dit venster te beperken, wordt voorkomen dat verontreinigingen in de nieuwe afdichting terechtkomen.
Om de installatie te onderhouden, dient u periodiek een waterdruppeltest uit te voeren. Als er geen water op het oppervlak druppelt en binnen twee uur in de steen dringt, is de sealer waarschijnlijk versleten en moet deze opnieuw worden aangebracht. Vermijd bij routinematige reiniging zure chemicaliën of hogedrukreinigers. Deze methoden verwijderen de sealer en kunnen de delicate texturen van natuursteen eroderen, waardoor zowel het uiterlijk als de levensduur van de muur in gevaar komen.
Conclusie
Goede installatietechnieken zoals back-boteren en een correcte voorbereiding van de ondergrond beschermen de structurele integriteit van natuurstenen muren. Het gebruik van nauwkeurig gesneden Z-vormige panelen en geprefabriceerde hoeken vermindert de arbeidstijd en zorgt tegelijkertijd voor een naadloze, hoogwaardige architecturale afwerking. Deze normen voorkomen veelvoorkomende problemen zoals delaminatie of uitbloeiing van stenen, waardoor een langdurig resultaat voor commerciële en particuliere klanten wordt gegarandeerd.
Bekijk uw huidige projectvereisten en controleer of uw inventaris de bijpassende L-hoeken bevat die nodig zijn voor een professionele omhullende afwerking. Neem contact op met Top Source Stone om een technische catalogus aan te vragen of om bulksourcingopties voor uw volgende installatie te bespreken.
Veelgestelde vragen
Kun je zonder lat gestapelde steen over bestaande baksteen leggen?
Ja, dat kan installeer gestapelde steen direct over bestaande baksteen zonder metalen lat, op voorwaarde dat de steen ongeverfd, schoon en structureel gezond is. Het oppervlak moet poreus genoeg zijn om water te absorberen; als de baksteen geglazuurd of geverfd is, moet u het oppervlak zandstralen of een metalen lat plaatsen om een mechanische verbinding te garanderen. Gebruik een hoogwaardige, polymeergemodificeerde mortel die voldoet aan de ANSI A118.4-normen om maximale hechting aan de ondergrond van metselwerk te garanderen.
Metalen lat nodig voor natuursteenfineer op gipsplaat?
Standaard gipsplaat is geen aanbevolen structureel substraat Natuurlijke stenen fineer vanwege het gewicht en de gevoeligheid voor vocht. Voor een professionele installatie moet u een metalen lat over een vochtscherm installeren of, bij voorkeur, de gipsplaat vervangen door een cementsteunplaat. De metalen lat zorgt voor de noodzakelijke mechanische sleutel voor de schraaplaag om de zware steen veilig op te hangen en voorkomt dat het gipsplaatpapier onder de belasting loslaat.
Wat is de beste lijm voor zwaar gestapelde steen op een haard?
De beste lijm voor zwaar gestapelde steen op een open haard is een professionele, polymeer-gemodificeerde dunbedmortel die voldoet aan de ANSI A118.15-specificaties of deze zelfs overtreft. Deze “Grote en zware tegel” (LHT)-mortels zijn speciaal ontworpen om een hoge hechtsterkte en superieure weerstand tegen uitzakken te bieden, wat van cruciaal belang is voor verticale toepassingen. steen toepassingen. Bovendien zijn deze mortels ontworpen om bestand te zijn tegen de thermische uitzettings- en krimpcycli die gebruikelijk zijn in open haardomgevingen.
Hoe zaag je natuursteenpanelen zonder afbrokkelen of barsten?
Om afbrokkelen of barsten te voorkomen, gebruikt u een hoogwaardige natte zaag uitgerust met een diamantzaagblad met doorlopende rand speciaal ontworpen voor natuursteen. Handhaaf een langzame, stabiele voedingssnelheid en zorg voor een constante waterstroom naar het snijoppervlak om hitte en trillingen te verminderen. Voor ingewikkelde sneden of randen die zichtbaar worden, kan het afwerken van de snede met een haakse slijper met variabele snelheid en een diamantpolijstpad eventuele kleine microchips verder gladstrijken.
Hoe losse of vallende steenpanelen na jarenlang gebruik repareren?
Om losse panelen te repareren, verwijdert u eerst eventuele gebreken stenen en schraap de oude mortel Verwijder zowel de achterkant van de steen als de ondergrond van de muur totdat u een schoon, stevig oppervlak bereikt. Breng vervolgens een hechtmiddel aan op de ondergrond “rug-boter” de stenen paneel met een hoogwaardige, polymeergemodificeerde mortel. Druk de steen stevig op zijn plaats, zorg voor 100% dekking, en zet hem indien nodig vast totdat de mortel uithardt. Als vocht de oorzaak van het defect was, zorg er dan voor dat het gebied goed wordt afgedicht nadat de reparatie is uitgehard.
Moet u gestapelde steen voor of na het uitharden van de mortel afdichten?
Gestapelde steen moet na de mortel altijd worden afgedicht volledig is uitgehard, wat doorgaans tussen 72 uur en 28 dagen duurt, afhankelijk van de omgevingsomstandigheden. Afdichten voordat de mortel is uitgehard, kan vocht en gassen in het wandsysteem vasthouden, wat kan leiden tot uitbloeiingen (lelijke witte zoutafzettingen) of het falen van de hechting. Voor het beste resultaat zorgt u ervoor dat de steen is volledig droog en schoon voordat u een ademende, doordringende sealer van hoge kwaliteit aanbrengt.
