
Ever dreamed of giving your kitchen a jaw-dropping upgrade without breaking the bank or your back? I’ve got good news—installing a stacked stone backsplash is simpler than you might think, thanks to modern panel systems. With over 15 years in the stacked stone industry at Top Source Slate, I’ve seen firsthand how homeowners and designers transform spaces with our premium stacked stone tile products, all while keeping costs low and quality high.
My mission has always been to empower clients—whether you’re a DIY enthusiast or a seasoned interior designer—to achieve stunning results without the hassle. At Top Source Slate, we’ve perfected the art of crafting modular stone panels that make installation a breeze, even if you’ve never picked up a trowel before. In this guide, I’ll walk you through every step of the process, from choosing the right materials to sealing your masterpiece, so you can elevate your kitchen with confidence and a touch of elegance.
Getting Started with Your Stacked Stone Backsplash
I’ve spent years working with various backsplash materials, and I can confidently say that a stacked stone backsplash offers that perfect blend of rustic charm and contemporary appeal. Whether you’re a first-time DIYer or a seasoned home improver, installing stacked stone tile is now more accessible than ever thanks to modern panel systems.
Why Choose a Stacked Stone Backsplash for Your Kitchen?
The appeal of stone goes beyond mere aesthetics. A stacked stone backsplash adds texture and dimension that ceramic tile simply can’t match. The natural variation in each piece creates a one-of-a-kind installation that becomes the focal point of your kitchen.
Beyond the visual impact, stone offers practical benefits:
- Exceptional durability against kitchen splashes and heat
- Timeless appeal that won’t go out of style
- Ability to complement any kitchen design from rustic to modern
- Increased home value due to premium material perception
Natural Stone vs. Manufactured Panels: Pros and Cons
When planning your backsplash project, you’ll need to decide between natural stone and manufactured stone veneer panels. Each option has distinct advantages:
| Feature | Natural Stone | Manufactured Panels |
|---|---|---|
| Authenticity | 100% natural material | Engineered to mimic natural stone |
| Installation Difficulty | More challenging (individual pieces) | Easier (interlocking panel system) |
| Weight | Heavier (may require additional support) | Lighter (suitable for standard drywall) |
| Cost | Generally higher | More affordable |
| Maintenance | Requires periodic sealing | Often pre-sealed or lower maintenance |
The Hidden Advantage of Modern Systems
While traditional stone masonry required specialized skills, today’s modular stone panels have revolutionized DIY installation. These systems feature precisely cut pieces arranged on mesh or interlocking backing, making alignment and installation significantly simpler.
How Modular Stone Panels Simplify DIY Installation
The secret to successful DIY stacked stone tile installation lies in the modern modular panel design. These panels typically measure around 6″ x 24″, allowing you to cover substantial area with each piece.
The benefits of modular stone panels include:
- Interlocking edges for seamless connections
- Pre-arranged stone patterns for consistent appearance
- Reduced installation time compared to individual stones
- Simplified cutting with standard wet saws or even some tile cutters
For the best stacked stone panels for DIY installation, look for systems that offer corner pieces and finished edge options. These specialized pieces create professional-looking transitions around windows, electrical outlets, and cabinet edges.
Tools and Materials Checklist for Success
Before learning how to install stacked stone backsplash in kitchen areas, gather these essential supplies:
Required Tools:
- Measuring tape and level
- Wet saw with diamond blade (for cutting stone panels)
- Notched trowel (¼” x ¼” recommended)
- Rubber mallet and spacers
- Mixing bucket for thinset mortar
- Caulking gun for seams and edges
- Safety glasses and work gloves
Required Materials:
- Stone veneer panels (calculate square footage plus 10% extra)
- Polymer-modified thinset mortar
- Stone sealer (if using natural stone)
- Matching caulk for edges
- Plastic sheeting to protect countertops
“The quality of your substrate preparation directly impacts the longevity of your stone installation. Never skip the crucial step of ensuring your wall surface is clean, solid, and properly prepared.”
Top Source Slate specializes in providing high-quality modular stone panels that are ideal for kitchen backsplash installations. Their panels are specifically designed for DIY projects, with easy-to-follow interlocking systems that make installation straightforward even for first-time installers. They offer small-batch ordering options and local delivery that can save both time and money compared to big-box retailers.
In the next chapter, we’ll walk through the step-by-step process of preparing your kitchen walls and installing your first row of stacked stone backsplash panels. With proper preparation and quality materials, you’ll be well on your way to a stunning stone backsplash that will be the envy of your neighborhood.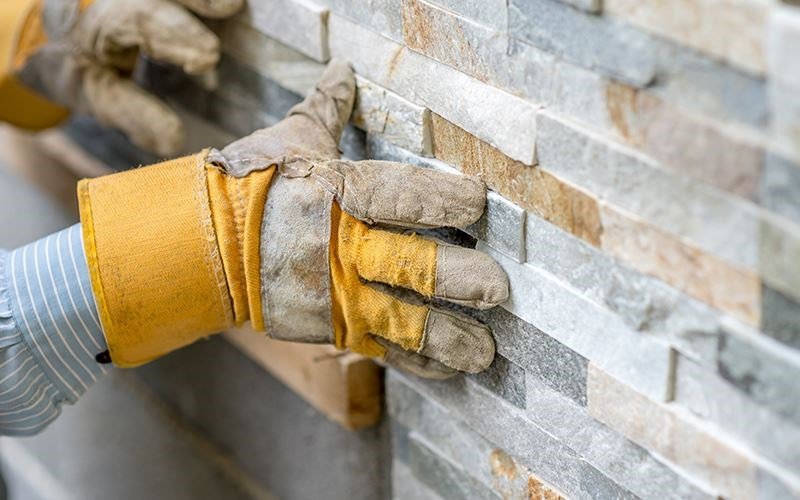
Step-by-Step Installation Process for a Stacked Stone Backsplash
After having installed several stacked stone tile backsplashes in kitchens, I can assure you that with the right approach, this is a very achievable DIY project. Modern modular systems make what was once a specialized trade accessible to determined homeowners. Let me walk you through the process that has consistently delivered professional-quality results.
Prepping Your Surface: Cleaning, Sanding, and Priming
The foundation of any successful stacked stone backsplash installation is proper surface preparation. Many installation failures stem from inadequate prep work.
Essential Preparation Steps:
- Remove all outlet covers and switch plates
- Clean the wall thoroughly with a degreaser, especially important in kitchens
- Sand glossy surfaces to create a rough texture for better adhesion
- Repair any holes or significant imperfections with drywall compound
- Apply a quality primer designed for masonry adhesion
For backsplashes going behind stoves or high-moisture areas, consider installing cement board instead of relying on drywall. Based on my experience, spending extra time on preparation can save hours of troubleshooting later.
Measuring and Planning Your Layout with a Ledger Board
Before placing a single stone, proper layout planning is crucial when working with ledger panels. Unlike traditional tile with uniform shapes, natural stone stack tiles require strategic placement for a balanced look.
Layout Planning Process:
- Measure the installation area and mark the center point
- Install a level ledger board (a straight piece of wood) at the bottom of your installation area
- Dry-fit several panels to test the layout and determine optimal pattern
- Mark cut lines and transitions, especially around outlets and edges
- Plan for the visibility of finished edges where the backsplash ends
A common mistake I’ve seen is starting at one corner and working across, which can result in awkward cuts at the opposite end. Starting from the center or most visible area ensures the most attractive stones remain intact in high-visibility areas.
Cutting Stacked Stone Panels: Tools and Techniques
Precise cutting is essential when installing stacked stone tile around outlets, windows, or uneven edges. The modular nature of modern panels makes them easier to work with than individual stones.
| Cutting Tool | Best Used For | Pros | Cons |
|---|---|---|---|
| Wet Saw with Diamond Blade | Straight cuts through panels | Clean, precise cuts; Minimizes dust | More expensive; Requires water source |
| Angle Grinder with Diamond Blade | Irregular cuts; Notching | Versatile; Good for detail work | Creates significant dust; Less precise |
| Circular Saw with Masonry Blade | Long straight cuts | Fast for larger projects | Very dusty; Rougher edges |
| Tile Nippers | Small adjustments; Individual stones | Inexpensive; Easy to control | Limited to small adjustments |
When cutting stone cladding panels, I recommend measuring twice and cutting once. For outlets, it’s safer to make multiple smaller cuts rather than attempting to remove a large section all at once, which risks cracking the panel.
Applying Adhesive and Installing Panels Strategically
Learning how to install stacked stone backsplash in kitchen settings requires understanding proper adhesive application. The weight of stone demands stronger adhesives than standard ceramic tile.
Installation Process:
- Apply a polymer-modified thinset mortar with a ¼-inch notched trowel
- Butter the back of each panel with additional adhesive
- Press panels firmly into place, starting from your planned position
- Use spacers if necessary to ensure consistent grout lines
- Stagger seams between panels for a natural appearance
- Use a level frequently to check alignment
“The key to professional-looking results is patience. Never rush the installation process, especially when working with natural stone. Allow sufficient time for adhesive to set between rows when working vertically.”
Top Source Slate’s modular panels significantly streamline this process compared to traditional methods. Their interlocking design reduces installation time by up to 50%, making the project more manageable for DIYers. Their panels come with consistent thickness and built-in spacing, eliminating much of the guesswork in achieving a professional appearance.
Finishing Touches: Grouting and Sealing for Durability
The final steps in your stacked stone backsplash installation are critical for longevity and aesthetics. While some stone cladding systems are designed for dry-stack installation (no grout), others benefit from grouting.
Finishing Process:
- Allow adhesive to cure fully (typically 24-48 hours)
- Apply grout if desired using a grout bag for precision
- Clean excess grout promptly with a damp sponge
- Wait for grout to cure (follow manufacturer recommendations)
- Apply a high-quality stone sealer to protect against kitchen splashes
- Reinstall outlet covers using spacers if needed
Following stacked stone backsplash maintenance tips is essential for lasting beauty. I recommend resealing natural stone annually, while manufactured panels may require less frequent maintenance. For everyday cleaning, avoid acidic or abrasive cleaners that can damage the stone’s surface.
The modular design of contemporary stone panels makes what once required specialized masonry skills accessible to DIYers. This often-overlooked aspect of modern systems transforms what was historically a labor-intensive trade project into a weekend DIY accomplishment. With careful preparation and quality materials, your stacked stone backsplash will provide lasting beauty and value to your kitchen.
Based on recent research, homeowners find that kitchen backsplashes made from stone veneer typically take 1-3 days to complete as a DIY project, compared to 5-7 days for traditional individual stone installation. The ease of working with modular systems means you can transform your kitchen without taking it out of commission for extended periods.
Mastering Maintenance and Enhancing Your Stacked Stone Backsplash
Now that your stacked stone tile backsplash is installed, it’s time to focus on preserving its beauty and functionality. Having worked with stone installations for years, I’ve gathered essential maintenance strategies that will protect your investment and keep it looking spectacular for decades.
Why Sealing Matters: Protecting Against Moisture and Stains
Natural stone is porous by nature, making your stacked stone backsplash susceptible to moisture penetration and staining, especially in kitchen environments where oil, water, and food particles are constant threats.
According to research from stone preservation specialists, unsealed natural stone can absorb up to 10 times more liquid than properly sealed stone. This absorption doesn’t just cause staining—it can potentially lead to:
- Bacterial growth in porous surfaces
- Deterioration of adhesive bonds over time
- Discoloration that becomes permanent
- Increased difficulty in routine cleaning
Even manufactured split face tiles benefit from sealing, though they typically require less frequent application than natural stone options.
Annual Maintenance: When and How to Reseal
Maintaining the protective barrier on your stone is perhaps the most important aspect of stacked stone backsplash maintenance tips. I recommend following this maintenance schedule:
| Stone Type | Initial Sealing | Resealing Frequency | Recommended Sealer Type |
|---|---|---|---|
| Natural Stone (Slate, Quartzite) | Immediately after installation | Every 6-12 months | Penetrating silicone-based sealer |
| Marble & Limestone | Immediately after installation | Every 3-6 months | Enhancing sealer with stain protection |
| Manufactured Stone Veneer | After installation if recommended | Every 1-2 years | Water-based acrylic sealer |
| Factory-Sealed Modular Panels | Often pre-sealed | Every 2-3 years | Follow manufacturer recommendations |
The Resealing Process:
- Clean the surface thoroughly and allow to completely dry (24+ hours)
- Apply sealer with a clean, lint-free cloth or dedicated sprayer
- Allow first coat to penetrate for 5-10 minutes (follow product instructions)
- Wipe away excess sealer before it dries
- Apply a second coat for maximum protection if recommended
- Allow 24-48 hours before exposing to water or cooking activity
The water-drop test is a simple way to determine if resealing is needed: sprinkle a few drops of water on the stone surface. If the water beads up, your seal is still effective. If it darkens or absorbs quickly, it’s time to reseal.
Troubleshooting Common DIY Installation Mistakes
Even with the best stacked stone panels for DIY installation, some issues may emerge over time. Here are solutions to common problems:
Addressing Loose or Cracked Tiles:
If individual stones become loose, carefully remove them along with any old adhesive. Clean both the stone and wall surface before reapplying appropriate adhesive and repositioning the stone. For cracks in the stone itself, specialized stone epoxy can often provide an invisible repair.
Fixing Grout Line Issues:
While many modular stone panels are designed for dry stacking without grout, some installations use grout to fill gaps. Discolored or cracking grout should be carefully removed using a grout saw and replaced with new grout matched to your existing color.
“The difference between a professional-looking stone installation and an amateur one often comes down to the details of maintenance and troubleshooting small issues before they become major problems.”
Top Source Slate provides comprehensive post-installation support for their customers, including detailed maintenance guides specific to each stone variety they offer. Their customer service team is available to troubleshoot issues and recommend appropriate sealers and cleaning products based on your specific installation, making them a valuable resource long after your initial purchase.
Design Tips: Pairing Your Backsplash with Kitchen Décor
The beauty of natural stacked stone tile is its versatility in complementing various design aesthetics. Here are my favorite ways to enhance your backsplash’s visual impact:
Lighting Enhancements:
- Install under-cabinet LED lighting to create dramatic shadows that highlight the texture
- Consider small pendant lights that cast downward light along the backsplash surface
- For dark stone, increase overall kitchen lighting to prevent the space from feeling closed-in
Complementary Materials:
- Pair warm-toned stone with copper or brass fixtures
- Cool gray or blue-toned stone works beautifully with stainless steel or chrome
- Consider wood elements to soften the stone’s mineral character
- Glass upper cabinets can create a beautiful transition with stone backsplashes
The modular nature of modern stone panel systems represents a significant advancement in making what was historically a specialized masonry skill accessible to average homeowners. The dimension stability and installation consistency of these engineered systems transform a potentially complex project into something manageable for DIY enthusiasts.
For daily cleaning, a simple solution of warm water with a few drops of pH-neutral dish soap is typically sufficient for most stone backsplashes. Use a soft cloth rather than abrasive scrubbers, and always avoid acidic cleaners like vinegar or lemon-based products, which can etch and damage natural stone.
With proper care and maintenance, your stacked stone backsplash will continue to be both a visual focal point and a functional kitchen surface for many years to come. The time invested in regular maintenance is minimal compared to the lasting value and beauty this unique feature adds to your home.
Conclusion
Transforming your kitchen with a stacked stone backsplash is more achievable than ever, thanks to modern modular panels that simplify the process. From selecting durable, stylish materials to mastering installation and maintenance, this guide equips you with the tools for success. The result? A timeless, elegant focal point that elevates your space effortlessly.
I’m Coco from Top Source Slate, where my 15 years in the stacked stone industry drive our mission to deliver premium, cost-effective solutions. At Top Source Slate, we’re committed to empowering DIYers and designers alike with high-quality products and expert guidance. Take the leap—your dream kitchen is just a weekend project away!
