Padroneggiare i segreti degli angoli senza soluzione di continuità è l'unico modo per evitare che le applicazioni di rivestimento sottile sembrino amatoriali e corrodano il valore del progetto. I bordi esterni gestiti in modo improprio rivelano spazi vuoti nel substrato e profili grezzi dei pannelli, comportando elevate richieste di garanzia e maggiori costi di manodopera per installatori e grossisti.
Risolviamo questo problema attraverso angoli a L prefabbricati in fabbrica con precisione della lama diamantata CNC e uniformità della tonalità del 95%. Acquistando componenti dalla stessa cava, queste unità mantengono l'integrità architettonica riducendo i tempi di installazione in loco del 50% rispetto ai tagli obliqui manuali.
Perché gli angoli definiscono la qualità dell'intero progetto in pietra?
Gli angoli rivelano o nascondono la natura del materiale. Una corretta esecuzione crea un'illusione strutturale in muratura, aumentando direttamente il valore architettonico e distinguendo il professionista lavoro in pietra da impiallacciatura sottile applicazioni.
Autenticità visiva ed effetto Plane-Break
I progettisti e gli ispettori si concentrano sugli angoli perché rappresentano a naturale rottura dell’uniformità visiva. Questo cambiamento di piano è il punto in cui l'occhio atterra naturalmente. Se l'esecuzione dell'angolo è trascurata, rivela il profilo sottile del rivestimento, segnalando un'applicazione a livello della superficie piuttosto che una muratura strutturale. Le transizioni professionali nascondono i bordi del pannello, garantendo la l'installazione mantiene il peso e la presenza della pietra autentica.
La precisione in questi punti focali determina il valore percepito a lungo termine del progetto. Un camino o una facciata che mostra il sottofondo in un angolo perde immediatamente il suo fascino di lusso. Mascherando la giuntura in cui due piani si incontrano, si crea l'aspetto di una muratura solida e a tutta profondità. Questo dettaglio separa un appaltatore medio da uno specialista.
Tecnologia degli angoli a L abbinata per la sincronizzazione strutturale
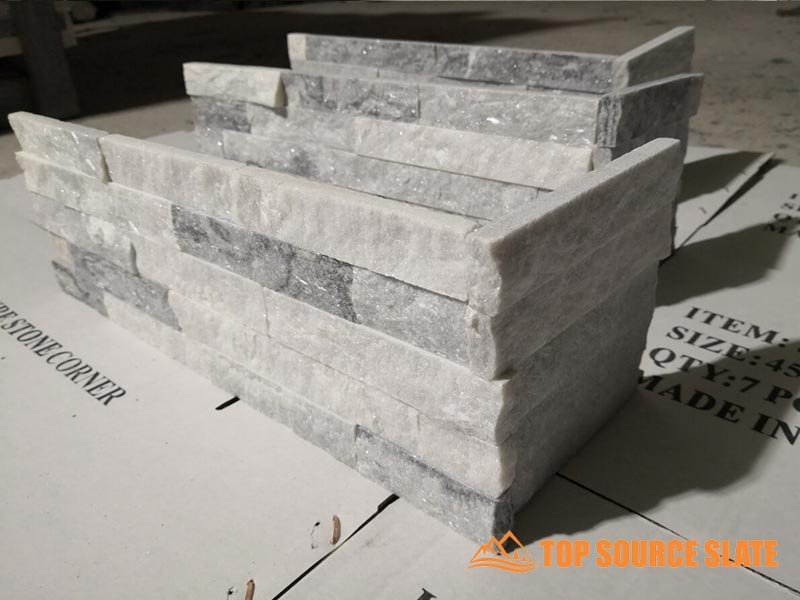
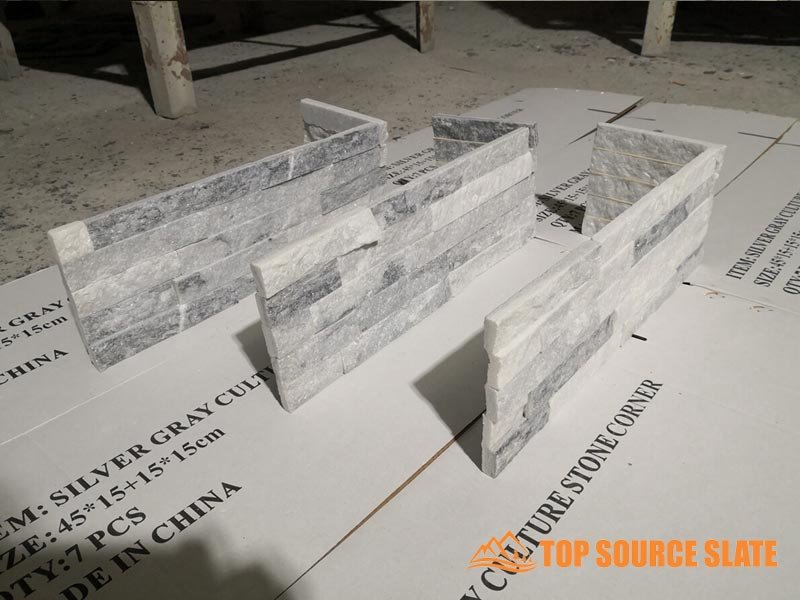
Il taglio obliquo sul campo spesso porta a spazi irregolari e trame non corrispondenti. Superiore Pietra sorgente risolve questo problema attraverso angoli a L a 90 gradi prefabbricati progettati per la sincronizzazione strutturale. Proveniamo questi componenti dalla stessa cava dei pannelli piatti per garantire un'uniformità di tonalità del 95% nell'intero lotto, evitando l'aspetto irregolare comune con l'approvvigionamento angolare di terze parti.
- Efficienza del lavoro: Le unità prefabbricate riducono i tempi di installazione in cantiere del 50% ed eliminano la necessità di competenze specializzate nella troncatrice.
- Precisione CNC: I bordi della lama diamantata forniscono una tenuta “maschio-femmina” interblocco che mimetizza i giunti verticali e impedisce il “effetto cerniera.”
- Dimensioni: Angoli corrispondenti disponibile in 6″ X 24″ o 6″ x22″ formati adatti alle serie ledgestone standard.
- Tecnologia senza soluzione di continuità: La struttura ad incastro nasconde il substrato di installazione ed elimina visibile “fatto un passo” lacune nella facciata finale.
L'utilizzo di corner realizzati in fabbrica protegge i margini di profitto di grossisti e rivenditori riducendo gli sprechi di materiale e gli errori di cantiere. Queste unità forniscono una finitura avvolgente che imita il blocco a tutta profondità, fornendo un risultato professionale che resiste a un'ispezione ravvicinata in ambienti commerciali e residenziali ad alto traffico.
La scelta dei professionisti: vantaggi in termini di efficienza degli angoli a L prefabbricati in fabbrica
Gli angoli a L di fabbrica riducono i tempi di installazione del 50% e i costi di manodopera del 25%. Il taglio CNC con lama diamantata garantisce una sincronizzazione perfetta delle texture ed elimina l'effetto cerniera’ comune nel taglio manuale del sito.
| Metrica di efficienza | Angoli a L prefabbricati in fabbrica | Taglio manuale del sito |
|---|---|---|
| Velocità di installazione | Riduzione del 50% delle ore in sede | Alto (richiede tagli obliqui individuali) |
| Spese di manodopera | Ridotto fino al 25% | Premium (richiede maestri scalpellini) |
| Rifiuti materiali | Riduzione del 90% (zero scarti nel sito) | Elevata (rottura/perdita di scarto del 10-15%) |
| Precisione & Adatto | Precisione del diamante CNC (90°) | Variabile (suscettibile all'errore umano) |
Installazione accelerata e riduzione dei costi di manodopera
I metodi standard di taglio diagonale in un cantiere consumano un numero eccessivo di ore fatturabili e richiedono competenze murarie di alto livello. I nostri angoli a L prefabbricati aggirano questo collo di bottiglia arrivando come unità pronte per il montaggio. Questi componenti riducono il tempo totale di installazione del 50% perché gli equipaggi dedicano il loro tempo all'impostazione pietra anziché misurare e angoli di rettifica.
Gli sviluppatori di progetti traggono vantaggio anche dai flussi di lavoro di costruzione paralleli. Produciamo le unità angolari in fabbrica mentre il tuo team prepara il substrato del sito. Questa pianificazione sovrapposta comprime la sequenza temporale del progetto. Utilizzando l'assemblaggio modulare, gli appaltatori riducono le spese totali di manodopera del 25% e minimizzano lo spreco di materiale del 90% rispetto a quello tradizionale pratiche di taglio della muratura.
Integrità architettonica grazie alla precisione della lama diamantata CNC
I tagli manuali dei campi spesso comportano la “effetto cerniera”—giunti irregolari e spazi visibili a gradini che rivelano il pietra come rivestimento. Risolviamo questo problema utilizzando bordi a lama diamantata CNC che garantiscono un rigoroso allineamento a 90 gradi. Questa precisione industriale garantisce che l'angolo sembri un solido blocco di pietra a letto intero anziché due pezzi che si incontrano in una cucitura.
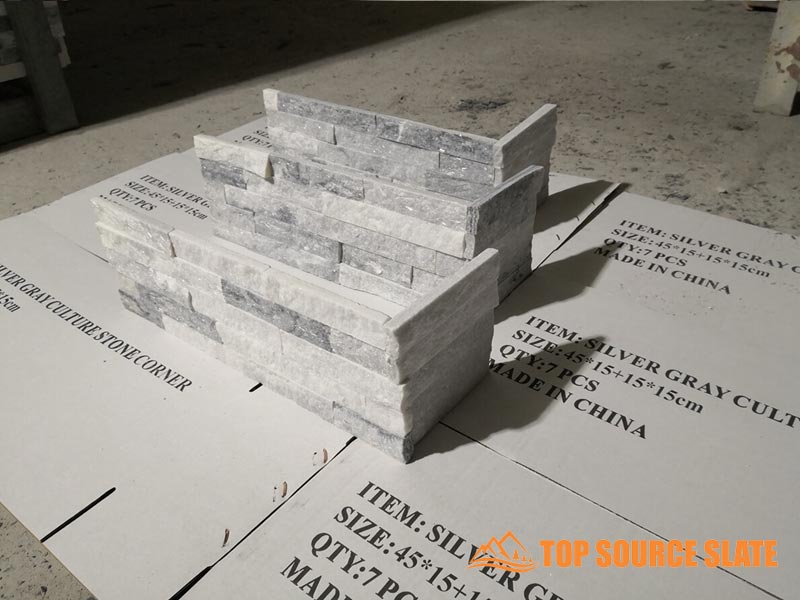
- Consistenza del lotto: Proveniamo unità angolari dalla stessa cava dei pannelli piatti per garantire un'uniformità di tonalità del 95%.
- Stabilità strutturale: I giunti di fabbrica sono stabili ai raggi UV e resistenti al gelo e al disgelo e soddisfano gli standard climatici del 2026 per gli ambienti estremi settentrionali e costieri.
- Continuità visiva: Le dita tagliate con precisione consentono una sincronizzazione della texture avvolgente che i tagli manuali non possono replicare.
- Controllo della tolleranza: L'automazione CNC mantiene una precisione di 90 gradi che impedisce la deriva dell'allineamento attraverso lunghe transizioni verticali.
La scelta di unità prefabbricate protegge l'intento architettonico del progetto. Questi angoli forniscono una transizione senza soluzione di continuità tra i piani delle pareti, mantenendo l'estetica di lusso attesa dai clienti commerciali e residenziali di fascia alta.
Pietra impilata premium per esigenze architettoniche

Come eseguire tagli obliqui perfetti sul posto (se necessario)?
Utilizza uno smusso posteriore di 44,9 gradi e dischi diamantati a bordo continuo per creare angoli stretti e professionali quando gli angoli a L prefabbricati non vengono utilizzati per le transizioni tra le pareti.
Mentre la fonte principale La pietra fornisce angoli a L abbinati per ogni serie per ridurre la manodopera in loco del 50%, alcuni progetti architettonici richiedono una smussatura del campo personalizzata. Ottenimento di una finitura di fabbrica pannelli in pietra naturale richiede una calibrazione specifica della sega e una manipolazione del materiale per evitare di rivelare il bordo del rivestimento.
Tecniche di calibrazione dell'angolo e smussatura posteriore
La precisione nell'angolo determina se l'installazione sembra un autentico letto matrimoniale pietra o una sottile patina. La maggior parte degli errori del sito si verificano perché gli installatori tentano un taglio piatto di 45 gradi su irregolare superfici murali.
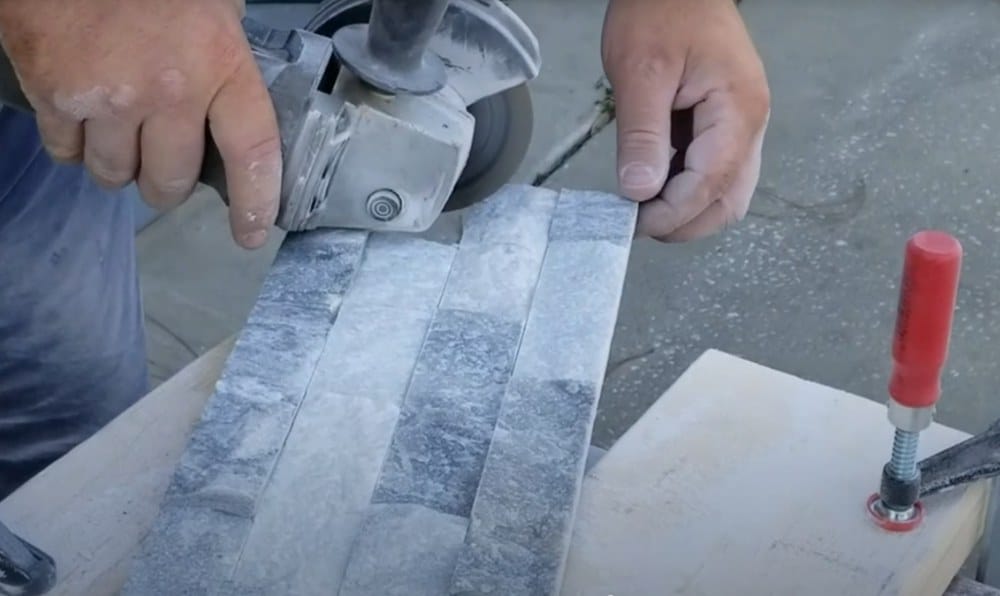
- Impostazione smusso posteriore: Impostare la troncatrice a 44,9 gradi. Questa leggera regolazione garantisce che la faccia visibile della pietra stabilisca un contatto primario, risultando in una giuntura visibile più stretta lasciando un piccolo spazio interno per la malta a presa sottile.
- Recinto sacrificale: Fissare una recinzione di compensato al letto della sega. Ciò fornisce un punto di riferimento a gioco zero per il percorso della lama e supporta il pietra per prevenire “scoppi” alla fine del taglio.
- Verifica: Eseguire tagli campione su pezzi di scarto dello stesso spessore per verificare prima l'ortogonalità elaborazione completa 6″ x24″ pannelli.
Taglio professionale sul campo con la precisione della lama diamantata
I materiali naturali come l'ardesia e la quarzite reagiscono in modo diverso all'attrito della lama rispetto alla ceramica o al legno. Mantenere l'integrità della trama a faccia divisa durante un taglio è essenziale per una finitura architettonica di fascia alta.
- Tipo di lama: Scegli i dischi diamantati a corona continua piuttosto che quelli segmentati. Il bordo continuo previene scheggiature sulla superficie naturale della fessura e imita la precisione della lama diamantata CNC utilizzata nella nostra fabbrica.
- Selezione del materiale: Estrarre i pezzi dalla stessa cassa per garantire la consistenza della cava dello stesso lotto. Questa sincronizzazione di colore e consistenza è fondamentale nella transizione angolare dove l'occhio cerca naturalmente le rotture nella vena.
- Il taglio in rilievo: Usa il “taglio a urto” metodo per la messa a punto. Picchietta delicatamente la pietra contro la lama rotante in posizione abbassata per radere piccole quantità di materiale e ottenere una perfetta aderenza.
Per evitare queste complessità tecniche, consigliamo i nostri angoli a L pronti per il progetto. Forniscono un rivestimento a 90 gradi rifinito in fabbrica che garantisce la sincronizzazione della trama ed elimina la necessità di tagli sul campo altamente qualificati.
Giunti sovrapposti: il “Giunto di testa” Tecnica per principianti
I giunti di testa si sovrappongono pannelli in pietra per creare angoli a 90 gradi senza complessi tagli obliqui. Questa tecnica accessibile fornisce una finitura intrecciata professionale per fai da te e installatori principianti.
Una giunzione di testa è il metodo più pratico per la finitura angoli di pietra quando non è disponibile una sega a umido o uno strumento per troncatura di precisione. Sovrapponendo il bordo di uno pannello in pietra all'estremità di un altro, si crea una svolta strutturale di 90 gradi che protegge l'integrità del muro pur mantenendo un'estetica pulita.
Esecuzione del modello di angoli alternati
L'obiettivo di un giunto di testa di successo è nascondere i bordi grezzi e creare un “tessuto” aspetto che imita la muratura tradizionale. Seguendo una specifica sequenza meccanica, l'angolo rimane stabile e visivamente bilanciato su tutta l'altezza della parete.
- Posizionamento: Posizionare il primo pannello in modo che l'estremità sia perfettamente a filo con il bordo dell'angolo del supporto.
- Sovrapposizione: Imposta il pannello perpendicolare in modo che si sovrapponga al primo, nascondendo completamente il taglio vivo della pietra iniziale.
- Alternato: Cambia la direzione di sovrapposizione su ogni riga per creare un aspetto ad incastro che imita la pietra a letto intero.
- sconcertante: Sfalsare i giunti lungo la superficie della parete per evitare linee verticali continue che indeboliscano l'installazione.
Garantire spazi senza soluzione di continuità con i bordi della lama diamantata CNC
La precisione della pietra stessa determina quanto stretto apparirà il giunto finale. Mentre la pietra tradizionale tagliata a mano spesso se ne va “lacune di luce del giorno,” l'ingegneria a livello di fabbrica garantisce che questi pezzi sovrapposti siano a filo per una finitura architettonica di fascia alta.
- Bordi di precisione: Utilizziamo i bordi della lama diamantata CNC di Top Source Stone per garantire che le superfici sovrapposte incontrino zero spazi visibili.
- Corrispondenza dei colori: I pannelli provenienti dalla stessa vena di cava mantengono un'uniformità di tonalità del 95%, rendendo invisibile la transizione tra i due pezzi.
- Sigillatura: Applicare resina epossidica ad alta resistenza nel punto di contatto per bloccare la penetrazione dell'umidità e rinforzare la cucitura.
- Allineamento delle texture: Abbina il faccia a spacco naturale della pietra alla transizione d'angolo per creare l'illusione di un blocco solido e pesante.
Concentrandosi su questi dettagli tecnici, gli installatori possono ottenere un risultato professionale che protegge il valore del progetto senza le spese generali di manodopera legate al lavoro di smussatura personalizzato in loco.
Risolvere lo spazio tra gli angoli interni: opzioni di sovrapposizione e smussatura
Ottieni angoli interni professionali scegliendo tra tagli obliqui altamente dettagliati o efficienti giunzioni sovrapposte, utilizzando pannelli di precisione CNC per eliminare gli spazi visibili e l'esposizione del substrato.
Confronto tra la precisione del taglio obliquo e l'efficienza dei giunti sovrapposti
Gli angoli interni fungono da punti focali che definiscono il valore percepito di a installazione in pietra. Gli appaltatori selezionano i metodi di giunzione in base alla struttura della pietra e alla velocità di costruzione richiesta. Mentre la smussatura offre un aspetto finito tradizionale, i giunti sovrapposti servono meglio collezioni specifiche ad alta struttura.
- Tagli obliqui: Gli installatori inclinano la pietra a 45 gradi per mantenere un flusso continuo della trama attraverso l'angolo, essenziale per i pannelli lineari o con superficie liscia.
- Giunti di testa sovrapposti: Questo metodo prevede il posizionamento di un pannello a filo con la faccia di un altro. Questo funziona meglio per pietre a struttura elevata come la nostra serie Rough, dove le variazioni naturali dello spessore rendono difficile l'allineamento obliquo.
- Offset dell'angolo della lama: L'impostazione delle lame della sega a 44,9 gradi anziché esattamente a 45 gradi garantisce che i bordi anteriori si incontrino saldamente, nascondendo gli spazi interni e il substrato.
Garantire adattamenti senza soluzione di continuità con la precisione della lama diamantata CNC
I tagli di fabbrica standard spesso portano al “effetto cerniera” o colori non corrispondenti all'angolo. Fonte principale Stone riduce al minimo questi rischi in loco utilizzando la produzione automatizzata per stabilizzare le dimensioni dei pannelli prima che raggiungano la cassa.
- Taglio con lama diamantata CNC: La precisione automatizzata garantisce un'uniformità della tonalità del 95% e bordi perfettamente diritti, consentendo giunzioni di testa strette che non richiedono riempitivi manuali.
- Approvvigionamento da cava nello stesso lotto: Estraiamo i materiali dalla stessa vena di cava per ordine per evitare variazioni di colore nelle transizioni, rendendo i giunti angolari effettivamente invisibili.
- Compatibilità angolo L: Le nostre unità angolari a 90 gradi fabbricate in fabbrica eliminano la necessità di smussare manualmente il sito, riducendo manodopera di installazione del 50% per progetti B2B ad alto volume.
Come garantire l'allineamento orizzontale attraverso le transizioni degli angoli?
Stabilire una linea di base livellata al laser e utilizzarla Le migliori fonti di pietre Angoli a L tagliati a CNC. Lavorare verso l'esterno dagli angoli garantisce corsi di pietra paralleli ed elimina quelli visibili “fatto un passo” lacune nelle transizioni.
Mantenere la coerenza lineare durante una svolta di 90 gradi richiede più di un semplice occhio fermo. Qualsiasi deviazione all'angolo si amplifica man mano che ci si sposta lungo la parete piana, portando a percorsi irregolari che rovinano l'estetica architettonica. Gli installatori professionisti si concentrano sulla fase di preparazione per evitare che si verifichino questi errori cumulativi.
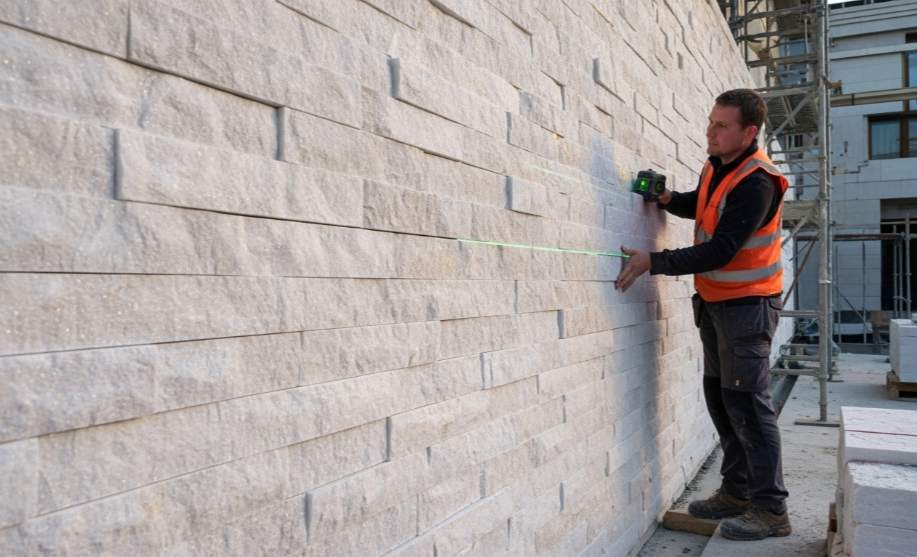
Stabilire una linea di base e linee di controllo unificate
La fondazione dell'allineamento orizzontale inizia nel punto più basso dell'installazione. Se la prima fila si sposta anche di pochi millimetri, il “effetto cerniera” diventerà evidente quando raggiungerai l'altezza degli occhi. Consigliamo di stabilire un unico riferimento orizzontale che avvolga il tutto facce delle pareti prima che la prima pietra tocchi il substrato.
- Configurazione di riferimento: Imposta un livello laser standard 2026 nel punto più basso per creare un riferimento orizzontale coerente su ogni superficie della parete.
- Monitoraggio verticale: Segna le linee di controllo digitali o fai scattare le linee di gesso a intervalli verticali di 12 pollici per mantenere costante l'altezza del percorso durante la salita.
- Compensazione del piano: Taglia la fila inferiore di pietre per adattarla alla pendenza del pavimento mantenendo il bordo superiore della prima fila perfettamente a livello.
- Controllo dell'adattamento a secco: Posare a secco i primi due corsi dietro l'angolo per verificare che i giunti ad incastro siano a filo senza deriva verticale.
Utilizzo degli angoli a L di precisione CNC per la sincronizzazione delle texture
Le mitre tagliate in loco spesso lottano con lacune di trama e discrepanze di colore perché i due pezzi di pietra non erano originariamente uniti. Top Source Stone risolve questo problema fornendo angoli a L prefabbricati in fabbrica. Queste unità assicurano che la pietra è naturale il personaggio scorre dietro l'angolo come se fosse un solido blocco a letto pieno.
- Continuità visiva: Utilizziamo angoli a L abbinati prefabbricati per garantire la sincronizzazione del colore e della trama con transizioni di 90 gradi.
- Vestibilità modulare: I bordi della lama diamantata CNC forniscono linee pulite che si allineano perfettamente con lo standard 6×Pannelli piatti da 24 pollici.
- Gestione delle cuciture: Alterna il "lungo-corto".’ schema di installazione sfalsato con angoli prefabbricati per interrompere le giunture verticali e mantenere il flusso orizzontale.
- Efficienza del lavoro: La tecnologia senza soluzione di continuità elimina la necessità di calcoli complessi di smussatura e di molatura manuale, riducendo il tempo di manodopera in loco del 50%.
Installare sempre prima i pezzi angolari. Impostando l'angolo e lavorando verso l'esterno nel campo, ti assicuri che eventuali aggiustamenti necessari avvengano al centro del muro dove sono meno visibili, piuttosto che nel punto focale critico dell'angolo stesso.
Finitura del bordo: lucidatura dei tagli grezzi per adattarli al viso naturale
Rimuovi i segni della sega utilizzando cuscinetti diamantati con grana 60–320, quindi utilizza spazzole metalliche e scalpelli per replicare la trama a faccia divisa per una transizione architettonica senza soluzione di continuità.
I bordi modificati nel sito spesso espongono l'interno liscio “cuore” della pietra, che appare artificiale rispetto al volto preparato in fabbrica. Quando gli installatori tagliano i pannelli per adattarli a dimensioni specifiche o creano angolari personalizzati, devono unire meccanicamente questi tagli grezzi per mantenere l'integrità estetica del pannello. Installazione di Top Source Stone.
Sequenze di levigatura graduali per la levigatura dei bordi
L'obiettivo principale della levigatura è eliminare le scanalature verticali lasciate dalle lame bagnate. Una transizione graduale impedisce il “effetto cerniera” dove il bordo tagliato incontra la superficie naturale della fessura. Utilizza la seguente progressione per una finitura professionale:
- Dischi diamantati grana 60: Levigare le scanalature pesanti e allineare il piano del tagliato con i pannelli di pietra adiacenti.
- Grana da 120 a 220: Ammorbidisci gli angoli acuti del taglio per imitare l'aspetto leggermente invecchiato Pietra naturale.
- Finitura grana 320: Crea una sensazione tattile che corrisponda ai nostri standard preparati in fabbrica senza lucidare eccessivamente la pietra trasformandola in una superficie riflettente.
- Tecnica: Lavora con movimenti brevi e circolari per evitare la creazione di avvallamenti o avvallamenti nel materiale.
Replica della struttura della fessura naturale sui tagli esposti
La levigatura fornisce la levigatezza, ma manca la robustezza “Faccia divisa” carattere essenziale per un look di lusso. Gli installatori devono invecchiare manualmente il bordo per rispecchiare i bordi di precisione della lama diamantata CNC presenti sulle nostre unità standard a forma di Z e ad angolo di L.
- Spazzolatura metallica: Applicare una spazzola metallica per carichi pesanti sul bordo levigato per estrarre i minerali più morbidi e rivelare la struttura cristallina della quarzite o dell'ardesia.
- Lavoro con scalpello in pietra: Scheggia con attenzione l'angolo superiore del taglio con un angolo poco profondo. Questo replica la profondità robusta e il profilo d'ombra dei pannelli split-face di fabbrica.
- Corrispondenza dei colori: Sigillare il bordo modificato con un potenziatore per pietre a pH neutro. Ciò garantisce il “Cava dello stesso lotto” la consistenza del colore rimane uniforme su tutta la superficie della parete.
I bordi adeguatamente rifiniti trasformano un lavoro di impiallacciatura standard in un elemento architettonico di fascia alta. Seguendo questi passaggi meccanici, rivenditori e installatori possono garantire un angolo che sembri solido, scolpito a mano pietra piuttosto che un pannello sottile prodotto.
Domande frequenti
Posso realizzare angoli professionali senza una tradizionale scatola per angoli?
SÌ. Gli installatori possono utilizzare una sega a mano smussata e a denti fini o un modello di cartone personalizzato per guidare il taglio. Segnare il muro direttamente con un ferro angolare garantisce un adattamento preciso, anche se successivamente è necessario levigare i bordi con carta vetrata per rimuovere le linee frastagliate che creano spazi visibili.
Quali sono le tecniche principali per l'installazione degli angoli in pietra?
I progetti utilizzano tipicamente tre metodi: angoli a L prefabbricati, taglio obliquo o tecnica di tessitura. Top Source Stone fornisce angoli a L a 90 gradi realizzati in fabbrica per ogni serie per velocizzare l'installazione e garantire la sincronizzazione del colore attraverso la transizione della parete.
I pannelli in pietra impilati richiedono pezzi angolari dedicati?
Gli angoli a L dedicati sono essenziali per ottenere un aspetto senza soluzione di continuità e ad incastro. Questi componenti sono realizzati per avvolgere angoli di 90 gradi, mantenendo la modularità a forma di Z o a S del sistema nascondendo il substrato di installazione e i giunti verticali.
Come posso nascondere i bordi tagliati al vivo su un angolo esterno?
Il metodo più efficace prevede il taglio obliquo a 45,5 gradi anziché esattamente a 45. Questo leggero taglio eccessivo garantisce che le facce esterne si incontrino saldamente, seppellendo il bordo tagliato all'interno della giuntura. Se qualche bordo grezzo rimane visibile, lucidarlo con un tampone diamantato aiuta a farlo corrispondere alla naturale struttura della faccia divisa.
Qual è il modo più accurato per tagliare una mitra su una pietra naturale spessa?
Utilizzare una sega ad umido per un taglio a doppio obliquo. Esegui il primo taglio a 45 gradi, capovolgi il pezzo di pietra ed esegui il taglio opposto per il ritorno. Tagliare il pezzo di ritorno di circa 1/8 di pollice più lungo della profondità richiesta aiuta a nascondere le linee di malta sottili e crea un'estetica più pulita.
Pensieri finali
Gli angoli di precisione differenziano un progetto architettonico premium da un'applicazione di rivestimento economica. Affidarsi al taglio manuale sul campo comporta una perdita di materiale pari al 15% ed è costoso “effetto cerniera” affermazioni che erodono la reputazione del tuo rivenditore. I nostri angoli a L progettati da CNC salvaguardano i vostri profitti dimezzando i tempi di manodopera e garantendo al tempo stesso un'uniformità del colore del 95% sull'intero lotto.
Assicurate la vostra posizione sul mercato con i nostri pannelli in pietra accatastati, pronti per la spedizione entro 15 giorni. Consigliamo un ordine di prova di 300 metri quadrati per verificare in prima persona la nostra tecnologia di interblocco continuo e la resistenza al congelamento-scongelamento. Inviaci un'e-mail per un catalogo dettagliato o per organizzare il branding del marchio del distributore per la tua rete di distribuzione.
