コーナーレイアウトは、大規模開発における空間上の重大な課題であり、暖炉の位置が悪いと平方フィートが無駄になり、ユニットの市場価値が低下する可能性があります。建築家や請負業者は、石材の仕上げが標準以外の角度で計算されていない場合に技術的なリスクに直面し、品質管理の欠如を示唆する継ぎ目が目に見えることになります。
この文書では、135 度のコーナーの課題に対処し、天然石パネルの中心から外側への位置合わせ戦略を実装するための技術プロトコルを提供します。私たちは、垂直の継ぎ目を隠す特定のメカニズム、影のトラップを避けるための光の回折の管理、および平らでない石の表面にハードウェアを取り付けるための構造要件に取り組みます。
コーナー暖炉が究極である理由 “スペースセーバー” B2B プロジェクトでは?
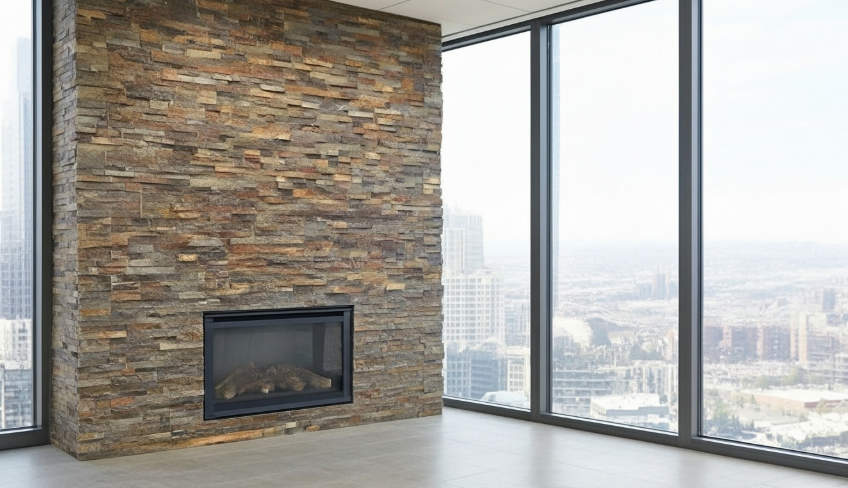
コーナー配置により、建築上のデッドゾーンが価値の高い焦点に変わり、開発者は高密度都市プロジェクトの機能的な窓ガラスや保管用に主要な壁スペースを再利用できるようになります。
高密度開発におけるフロアプランの最適化
2026 年の現代の都市部の住宅および商業施設のレイアウトでは、あらゆる平方フィートに最大の実用性が求められます。暖炉を隅に移動することで、建築家は主な壁面を床から天井までの窓や高級テナントが期待する統合型収納システムのために解放します。この戦略的な配置により、中央のリビングエリアや作業エリアを妨げない自然な焦点が生まれます。
- 建築家はコーナー配置を使用して大規模なガラス窓を優先し、 主壁に自然光が入る。
- コーナーユニットは、ブティックホテルの客室やエグゼクティブスイートなどのコンパクトなB2B環境での動線を改善します。
- 天然石 サラウンドは、使用可能な床面積を侵害することなく、高級感のある美しさを提供します。
軽量石材単板の構造上の利点
従来の石積みでは、特に耐荷重要件が複雑なコーナーに設置される場合、高価な基礎や構造補強が必要になることがよくあります。トップソースストーンの天然 積み上げられた石のパネル 100% 天然スレートまたは珪岩仕上げで、重量が 1 平方フィートあたりわずか 8 ~ 12 ポンドのプロファイルを提供します。この軽量設計により、標準的な設置が可能になります。 内壁 レンガの棚は必要ありません。
- パネル重量は 1 平方フィートあたり 8 ~ 13 ポンドでコーナーを作成します 標準的なインテリアでも設置可能 フレーミング。
- 軽量化により構造補強の必要がなくなり、材料費と人件費が大幅に削減されます。
- 天然石 不燃性を維持し、暖炉周囲の商業防火基準に確実に準拠します。
大規模な設置スケジュールの効率化
集合住宅や商業施設では、スピードが収益性を左右します。私たちの連動 Z型パネル システムは CNC ダイヤモンドブレードの精度を使用して、 “男性-女性” 縦の継ぎ目をカモフラージュする接続。このモジュール式のアプローチにより、通常、隅の暖炉の石造りで最も時間のかかる部分である、現場での複雑な留め継ぎ切断の必要がなくなりました。
- インターロッキングデザインにより、コーナー移行部全体にシームレスな外観を提供し、目に見えることはありません “段差のある” ギャップ。
- 既成L字型 コーナーピースにより、現場で特殊な石材が必要なくなります。 切断。
- 精密にカットされたパネルにより、数百のユニットにわたって一貫したフィット感が保証され、大規模プロジェクトの品質管理が維持されます。
不動産所有者向けの長期価値保持
天然石は投資です 耐久性的には。製造されたものとは異なります “偽物” 石 コンクリートと顔料を使用しており、珪岩やスレートなどの 100% 天然鉱物は固有の UV 安定性と高い耐塩性を備えています。不動産管理者にとって、これはメンテナンスサイクルが短縮され、交通量が多いにもかかわらず表面が高級な質感を維持できることを意味します。
- 天然石 紫外線による色あせに強く、劣化を防ぎます。 “斑点のある” 古くなった人工石によく見られる外観です。
- 耐久性が高いため、不動産管理者にとって修理の必要性が少なくなります。 商業B2B 設定。
- 本物の石 表面は、不動産投資家にとって資産価値の認識に目に見える増加をもたらします。
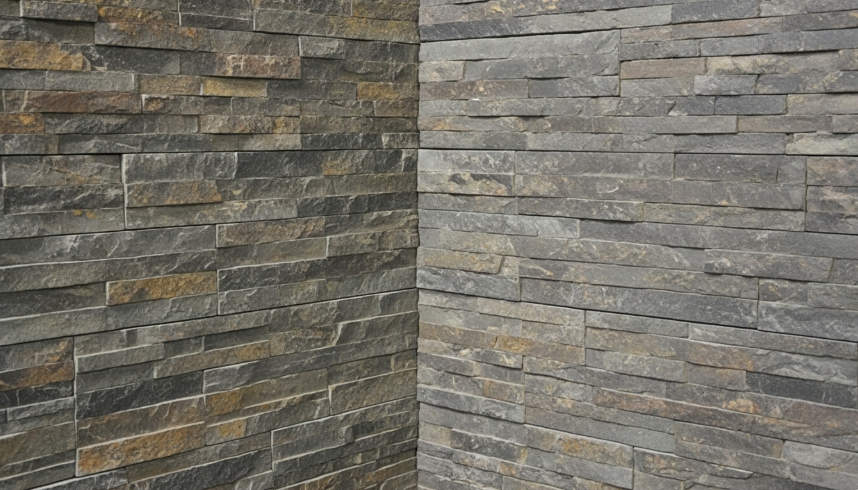
135 度の課題への対応: 標準の 90 度コーナーを超えて
135 度の暖炉コーナーで建築的な連続性を実現するには、プレハブ L ユニットをバイパスして、精密なマイター カットと特殊なエポキシ接着を採用して接合部の分離を防ぐ必要があります。
非標準角度の精密マイターカット
標準的な 90 度のプレハブコーナーは市場を支配していますが、ベイスタイルの暖炉や八角形の柱の 135 度の形状に遭遇すると完全に失敗します。 設置者は各石に正確な 67.5 度の留め継ぎカットを実行する必要があります パネルには赤外線誘導 CNC ダイヤモンドブレードを使用し、きれいでプロフェッショナルな接合部を作成します。この技術により、アラスカ グレーまたはミッドナイト スレートの自然な裂け目は、強制的に 90 度に配置されたユニットにありがちな構造的な隙間がなく、角を曲がって流れるようになります。
- 接着剤を塗布する前にすべてのパネルをドライフィットして、角度の付いた継ぎ目全体でテクスチャが揃っていることを確認します。
- これらの角度では、標準的な湿式鋸を使用しないでください。より真っ直ぐで欠けのないエッジを得るには、特殊なブリッジソーを使用してください。
- 135 度の頂点の両側に長いパネルと短いパネルを交互に配置して、垂直線を分割し、模倣します。 天然石積み。
鈍角コーナーの安定性を高めるための接着戦略
角度が 90 度を超えると、特有の機械的ストレスに直面します。建物の振動や暖炉からの熱膨張により、標準的な薄い硬化モルタルの留め継ぎ部分で亀裂が生じることがよくあります。特に留め継ぎエッジに高強度エポキシ樹脂を使用することで、壁に逆らうのではなく、壁とともに動く統一された構造結合が形成されます。これらのカスタム角度レイアウトの特定の重量分布に対処するために、セメントボードで基板を補強することをお勧めします。
| コーナー仕様 | 標準90°回転 | 鈍角 135° ターン |
|---|---|---|
| 製造方法 | 組立式Lコーナーユニット | カスタムマイター(67.5°×2) |
| インストール速度 | 高速 (クリックアンドセット) | 熟練した労働力が必要 |
| ジョイントボンディング | 標準ポリマーモルタル | 高強度エポキシ樹脂 |
135 度のトランジション全体でテクスチャをブレンドする
鈍角全体の視覚の流れを維持するには、細心の注意を払ったパネルが必要です 選択。カスタムマイタージョイントが構造上の欠陥のように見える可能性がある深い影を最小限に抑えるために、135度のコーナーにはフラットシリーズを使用することをお勧めします。原因となる微小な隙間を隠すため 天然石 違いは、取り付けカットからの石の粉を透明なシーラーで混ぜます。これにより、継ぎ目を埋める色が一致したペーストが作成され、標準的な照明条件下では消えます。
- 95% の色相の均一性を確保するために、コーナーのすべての石片が同じ採石場鉱脈から由来していることを確認します。
- 露出した天然ミネラルを湿気やほこりの蓄積から保護するために、留め継ぎジョイントにシーラーの最終コートを塗布します。
- 設置環境の湿度を監視してください。過剰な水分は、高性能接着剤の硬化プロセスを妨げる可能性があります。
工場直送のプレミアム積み上げ石台帳パネル

石パネルを中心から外側に対称に配置するにはどうすればよいですか?
対称的な配置により、視覚が偏るリスクが排除されます。 設置物を固定することによる重量 測定された中心軸に合わせて、鏡面エッジカットが暖炉面全体の建築上のバランスを確実に維持します。
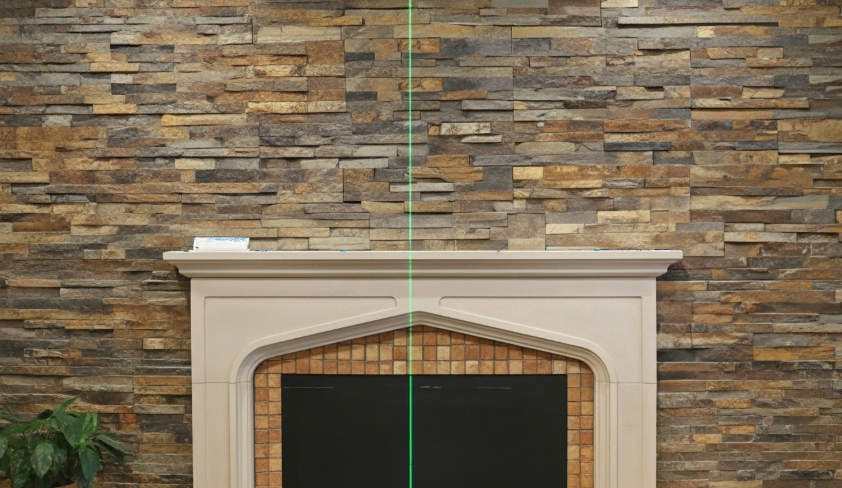
中央の垂直基準線の確立
正確な対称性は、設置面を正確に測定して開始点を定義することから始まります。壁の全幅を測定し、正確な中間点に垂直の垂線でマークを付けます。視覚的な推定に依存すると、誤差が累積してしまうことが多く、石が天井や隣接する隅に達すると、誤差がはっきりとわかります。レーザーレベルを使用することで、一定の基準を投影します。 最初の石パネルの配置をガイドします、プロジェクト全体を通じてアセンブリ全体の垂直性が確実に維持されます。
接着剤を塗布する前に、床にパネルの列を乾式配置します。このステップにより、エッジがどのように角に接するかを視覚化することができます。ドライレイで境界に細い切り込みが見つかった場合は、中心線をわずかに移動して、エンドピースが実質的で構造的に健全であることを確認します。この事前の調整により、 “断片化した” これは、計画が無視されたアマチュアのインスタレーションでよく見られるものです。
Center-to-Edge インストール シーケンスの実行
パネルを中央から外側に向かって配置すると、端のカットピースの大きさが均一になります。最初のパネルを中心マークに直接配置して、壁の視覚的な重みを固定します。この中央の石はコース全体の基礎として機能します。このアンカーから、外側に向かって左右の境界に向かって同時に作業します。この双方向のワークフローによりバランスが維持され、素材に小さな凹凸がある場合でもリアルタイムの調整が可能になります。
| 調整戦略 | 視覚的な対称性 | カッティングロジック |
|---|---|---|
| 中心から外側へ (B2B 標準) | 高: ミラーリングされたエッジがバランスの取れた焦点を作成します。 | 均一: 左右のエンドカットは両方とも同じ寸法を共有します。 |
| 隅から隅まで | 低: 視覚的な重みが開始側に移動します。 | ランダム: 最終的なカットは、多くの場合、ぎこちないスライバーになります。 |
| ランダムオフセット | 中: テクスチャによって多少の位置ずれがマスクされます。 | 変数: すべての行に対して一定の測定が必要です。 |
高強度エポキシ接着剤またはプロ仕様のシンセットを基板に塗布し、位置合わせ後すぐにパネルを固定します。のために B2Bプロジェクト Z字連動シリーズは、 “男性-女性” 接続システムにより、各パネルが次のパネルに確実にロックされ、中央のアンカー ポイントがさらに安定します。
2026 年のサイト基準に基づく水平方向の整合性の検証
現在の 2026 年の建設慣行では、不測の事態を防ぐために一定の水準を保つことが優先されています。 “階段を上る” インターロックシステムで一般的な効果。 Z 字型の連結ジョイントが完全に水平に保たれていることを確認するために、2 列ごとにレベルをチェックします。基部での 2 mm のずれでも、石が目の高さに達するまでに大きな隙間が生じる可能性があります。
- シムを使用して基板のわずかな変動を調整し、スパン全体にわたってコースを真っすぐに保ちます。
- 間の継ぎ目を監視します。 石を確認するための天然スレートまたは大理石片 目に見える隙間なくしっかりとフィットします。
- パネルには CNC ダイヤモンド ブレード エッジを利用して一貫したフィット感を確保し、現場での手動研磨の必要性を排除します。
対称的なエッジカットとコーナートランジションの管理
仕上げ中 設置には壁にミラーカットが必要です プロフェッショナルな外観を維持するために終了します。両端の残りのスペースを測定し、 石のパネルをカットする 寸法を一致させます。この細部へのこだわりにより、暖炉はスクラップから組み立てられたものではなく、意図的に作られたように見えます。壁が 90 度回転する場合は、在庫から一致する L 字型のコーナーピースを統合して、テクスチャと色の同期を維持するきれいなラップアラウンドトランジションを提供します。
当社では、赤外線切断ツールまたは高性能湿式鋸を使用して、中央パネルの工場仕上げを模倣した正確なエッジを作成します。珪岩や粘板岩などの 100% 天然鉱物を扱う場合、このレベルの精度は非常に重要です。粗いエッジは高級感を損なう可能性があります。これらの最終カットを反映することにより、インスタレーションは最高の商業基準を満たす、対称的で建築的に健全な仕上がりを実現します。
隅に石の壁があると、小さな部屋が広く感じられますか、それとも小さく感じられますか?
戦略的に隅石を配置することで、実際の床面積を維持する薄いベニヤのプロファイルを利用しながら、部屋の最も遠い建築上の境界に視線を集めることで、知覚される平方フィートを拡大します。
知覚される平方フィートに対する石のテクスチャの影響
で モダンなインテリアデザイン、石のテクスチャの深さは、人間の目が狭い領域の壁の境界をどのように認識するかを決定します。ラフ シリーズに見られるような深みのあるテクスチャは、重要な影の遊びを生み出します。この視覚的な重みにより、コーナーが部屋の中心に向かって進んでいるように感じられ、居心地の良い空間が生まれます。 “包まれた” 大きなホールでは感覚が感じられますが、非常に狭い空間では侵入を感じる場合があります。
フラット シリーズの滑らかな表面や磨かれた大理石のオプションは、オープンな雰囲気を維持するクリーンで建築的な背景を提供します。これらのパネルは、次のような贅沢を提供します。 天然石 視覚的なボリュームを消費する攻撃的な突起はありません。
- ラフ シリーズのテクスチャは建築的特徴を強調しますが、衝撃を避けるためにより大きな部屋容積を必要とします。 “近づく” 効果。
- 一貫性6×24 インチのパネル サイズにより、目が壁面をスムーズに移動できるため、小さくて不規則なパネルに比べて乱雑な印象が軽減されます。 モザイクタイル。
- ミニマリストの分割面仕上げは、壁のプロファイルをスリムに保ちながら、下地の欠陥を隠すのに十分な深さを提供します。
色の選択と光の反射率
石のカラーパレットは部屋にどれだけの光が残るかを決定し、空間の感覚に直接影響します。当社の Big 10 在庫のアラスカ グレーやグレイシャー ホワイトなどの明るい色調の石は、周囲の光を反射します。この反射率により、光を吸収するのではなくリビングエリアに反射させて、小さな部屋をより風通しが良く、より広く感じさせます。
濃い色のスレートまたは炭状珪岩は、洗練されていると同時に、大幅な深みを加えます。デザイナーは、コーナーが暗い空洞のように感じられないように、これらの暗い色調を戦略的な照明と組み合わせる必要があります。なぜなら私たちの 天然石パネル 100% ミネラルベースで、色あせしにくい永久的な仕上げを提供し、何十年にもわたって空間を鮮やかに保ちます。
薄板石材の省スペース化のメリット
モダンな 天然石積み上げパネル 物理的なスペースを最小限に抑えながら、全厚の石積みの外観を提供します。従来の 4 インチの石材ブロックでは、小規模オフィスやアパートで使用可能な床面積が大幅に減少する可能性があります。対照的に、当社の標準パネル厚さは 0.75 ~ 1.5 インチの範囲で、使用可能な平方フィートのほぼすべてを維持します。
- スリムなプロファイルのパネルにより、 高価値の自然を追加するインストーラー 構造改修をすることなく、小規模なアパートや商業オフィスに資材を供給できます。
- 軽量構造 (8 ~ 12 ポンド/平方フィート) により、床面積を消費するかさばる構造基礎が不要になります。
- 当社の CNC ダイヤモンドブレードの精度により、すべてのパネルがしっかりとフィットし、歪みを最小限に抑えます。 “厚さのクリープ” ハンドカットされた石でよく見られます。
コーナー配置による視覚的な固定
隅に戦略的に石を配置すると、部屋の知覚される寸法を実際に拡大できる焦点が生まれます。目を上方と隅に引き寄せることで、このインスタレーションは建築レイアウトの高さと幅全体を強調します。これ “アンカリング” この効果は、小さな部屋に永続性と構造強度の感覚を与えます。
プロフェッショナルな結果を保証するために、すべてのモデルに適合する L 字型のコーナーピースを提供しています。これらの組み立て済みユニットは、垂直方向の接合部をカモフラージュする、しっかりとした包み込むような外観を作り出します。単一のコーナーにテクスチャを集中させることで、石が部屋を圧倒することを防ぎます。これは、コンパクトな環境で完全な 4 壁の石の設置を試みるときによくあるリスクです。
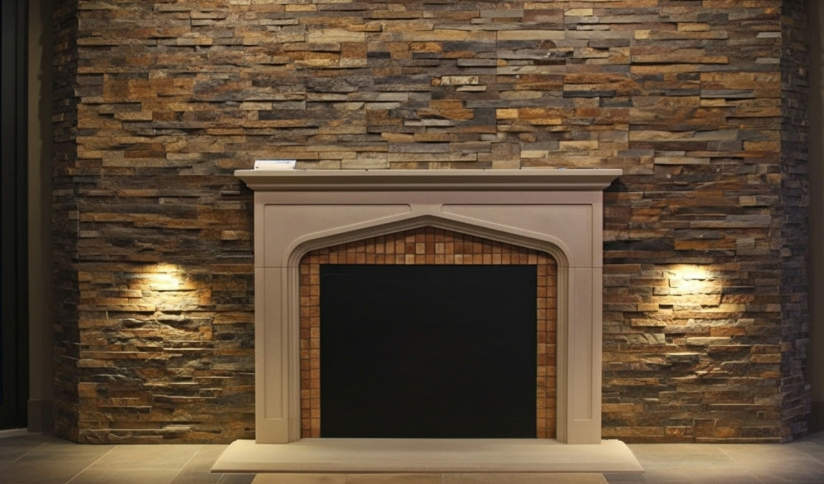
隅の暖炉に火をつける: 厄介な影の罠を避ける
有効コーナー 暖炉の照明では、石を強調するために指向性グレージングのバランスをとる必要があります 中和しながらテクスチャーを “デッドゾーン” そして建築の接合部に特有の厳しい影。
コーナーインスタレーションの照明には、独特の幾何学的な課題があります。平らな壁に使用する場合とは異なり、器具が正確に配置されていない場合、2 つの石材の平面が交差する部分に暗い隙間が生じたり、まぶしさの邪魔をする可能性があります。成功は、光が自然の特有のレリーフとどのように相互作用するかを理解するかどうかにかかっています。 石のパネル。
質感を高めるための表面グレージング
最適なグレージング効果を実現するには、天井埋め込み型器具を石の表面から 12 ~ 18 インチ離して配置することをお勧めします。この特定の距離により、最大 1.75 インチまでの厚さのバリエーションを特徴とするラフ シリーズ パネルの不規則な隆起を光が捉えることができます。幅の広い投光照明ではなく指向性ビームを使用することで、設置業者は天然スレートと珪岩の 3D 特性を強調する意図的な影を落とすことができます。
- 天井埋め込み型器具を石の表面から 12 ~ 18 インチ離して配置し、グレージング効果を生み出します。
- 指向性ビームを使用して、天然スレートや珪岩の凹凸のある表面全体に光を下に向けます。
- 有機的な色のバリエーションを洗い流すことなく、石の3D特性を強調します。
影を軽減するためのバランスの取れた周囲照明
単一の頭上の光源に依存すると、多くの場合三角形が作成されます。 “シャドウトラップ” 角の頂点にあると、暖炉が空洞になったり、部屋の他の部分から切り離されて見えたりすることがあります。これを解決するには、横方向の光源を統合することをお勧めします。コーナー頂点の真上に配置された高輝度のダウンライトは、垂直の継ぎ目が強調され、厳しいコントラストを生み出すため、避けてください。
- 隣接する壁に壁取り付け用燭台を取り付けて、深い影のポケットを埋める横からの光を提供します。
- 高輝度のダウンライトをコーナー暖炉の頂点に直接設置することは避けてください。
- タスク照明と調光可能なアンビエント レイヤーを組み合わせて、2026 年のインテリア デザインに期待される居心地の良い美学を維持します。
石の突起に対する治具の配置
L 字型のコーナーピースの物理的寸法には、壁間の移行が視覚的にシームレスに保たれるようにするために、特定の光の角度が必要です。治具を中心に合わせて配置する 石のパネル コーナージョイント全体の対称性を促進し、一方の側がもう一方の側よりも明るく見えるのを防ぎます。当社の天然大理石およびスレート シリーズでは、土っぽい顔料を強調するために 2700K ~ 3000K の範囲の暖色スペクトル LED を指定しています。
- 治具を中心に合わせます コーナー全体の対称性を高めるための石のパネル ジョイント。
- Marble および Slate シリーズの素朴な色調を補完するには、暖色スペクトル LED (2700K ~ 3000K) を選択してください。
- 光の角度によって、フラット シリーズまたはペンシル シリーズ製品の滑らかな表面にぎらつきが生じないことを確認してください。
結論
成功したコーナー 暖炉プロジェクトは、建築上の対称性と技術的なバランスをとることに依存しています。 あらゆるトランジションでの精度。工場で適合した L コーナーとインターロック パネル システムを利用することで、設置業者は非標準の角度や複雑なレイアウトを操作しながら、シームレスな自然な質感を維持できます。この統合されたアプローチにより、建設スケジュールが合理化され、開発者は大規模な集合住宅プロジェクト全体で一貫したハイエンドな仕上がりを実現できます。
天然スレートと珪岩棚石の現在の在庫を確認して、特定のプロジェクト要件に適合する材料を選択してください。次の商業開発のための製品サンプルまたは卸売見積もりをリクエストするには、お問い合わせください。
よくある質問
45度の角の暖炉に石を取り付けるにはどうすればよいですか?
に 45度の角に石を設置します、各石の背面を、点で交わる部分で 22.5 度の角度で留め継ぎカットする必要があります。これにより、クリーンでプロフェッショナルな環境が作成されます。 “鳥の口” ジョイント。下地がシンセットとグラスファイバーメッシュテープでコーナーシームで補強されたセメントバッカーボードであることを確認してください。高品質のポリマー改質シンセットを両方に適用します。 壁と石の裏側 (バックバタリング)アングルの独特な形状を考慮した永久的な結合を確保します。
90度以外の暖炉には特別なコーナーピースが必要ですか?
ほとんど 加工された石 メーカーは 90 度のコーナーリターンのみを製造しています。 45 度の暖炉のような非標準的な角度の場合は、通常、既製のコーナーピースを使用しません。代わりに、次を使用します。 “フラット” 石をカットし、ダイヤモンドブレードを備えた湿式鋸を使用して現場でカスタムカットします。これにより、90度のピースを無理に浅い角度にしようとするよりも、はるかにタイトなフィット感とより自然な美しさが可能になります。
コーナー暖炉のどこから石を打ち始めますか:中央または端でしょうか?
常に角(端)から始めて、壁または暖炉の開口部に向かって外側に向かって作業を進める必要があります。コーナーはインスタレーションの中で最も視覚的に目立つ部分です。そこから始めることで、留め継ぎジョイントが完全に位置合わせされていることを確認できます。隅石を設置して水平にしたら、残りの石を端に向けて、切り込みが目立ちにくい場所、またはトリムやキャビネットで隠せる場所に配置します。
暖炉の隅の縦の継ぎ目を隠す最良の方法は?
最も効果的な方法は、 “織る” 石を使用するか、正確なマイターカットを使用します。ウィービングするには、コースごとに石のどちらの面がもう一方の面に重なるかを交互に行い、連続した垂直線を防ぎます。 45 度の角度でシームレスな外観を得るには、同色の石材コーキングまたは混合物を使用します。 切り傷から出た石の粉 少量の透明なエポキシを使用して留め継ぎ部分の微小な隙間を埋め、2 つの石を単一の結合ユニットにブレンドします。
隅石の暖炉にテレビを取り付けるにはどうすればよいですか?
テレビの取り付けには固定が必要です ブラケットを石の後ろの壁の間柱に直接差し込みます。石材ビットを備えたハンマードリルを使用して、穴を開けます。 ストーンベニア次に、非常に長いラグボルト (通常は 4 ~ 6 インチ) を使用して木製フレームに到達します。コーナー暖炉の場合は、フルモーション多関節アーム マウントをお勧めします。これを使用すると、テレビを引き出して座席エリアに向かって角度を付けることができ、暖炉の斜めの向きを補うことができます。
