アウトドアキッチン & BBQ プロジェクトは、設計意図と高額な保証請求、再作業時間の延長、および潜在的な安全性違反との間の最前線です。実際、BBQ アイランドの天然石は、接着力、熱計画、詳細設計が請負業者の許容範囲を下回った場合に失敗し、仕様の小さなギャップがコールバック、マージンの損失、クライアントとの関係の悪化につながります。所有者は耐久性のある仕上げを期待しています。設置者はタイトなスケジュールで作業し、熱、グリース、紫外線への曝露、および接着剤や接合部のあらゆる細部のリスクを高める構造上の制限を管理する必要があります。
このガイドは、天然石のバーベキューアイランド設置に関する技術 SOP として機能します。長期的な性能の中核を形成する接着基準を設定し、熱近接の安全性、油汚れを防ぐための専門的なプレシーリング、耐紫外線性について説明します。 石の選択、トーキックとカウンタートップのオーバーハングのディテール、ステンレススチールフレームに石を取り付ける方法、重要な1/8″ グリルの周りの拡張ギャップ、およびパティオのスラブをいつ補強するか。各セクションは接着に関連しており、請負業者がすぐに使用できるチェック、仕様メモ、入札、施工図、現場検査で使用できるフィールド テスト ポイントが含まれています。
なぜ屋外キッチンには最高の接着基準が要求されるのでしょうか?
Outdoor kitchens fail at joints and cutouts unless you use flexible bonds, engineered supports, and site-verified adhesives.
Evaluate thermal loads and design movement joints
Map every heat source and quantify expected temperature swings before you detail joints. Direct sunlight, grill/barbecue radiant heat and diurnal surface changes produce the largest strains; design movement joints to accommodate those cycles rather than rely on rigid adhesion. Leave a continuous perimeter of movement joints and isolate heat-producing equipment so expansion concentrates in planned gaps, not at bonded interfaces.
- Expected heat sources: direct sun, grill radiant heat, and diurnal swings — document worst-case surface temperature rise near grills for joint sizing.
- ワークトップから機器までのクリアランス: 少なくとも 3/16 を維持する″ ワークトップの端と金属または熱を発生する機器の間(約 5 mm)。その隙間を耐熱シリコンで塞ぎます。
- パネルと隣接構造物とのシーラント接合部: 最小 1/8″ (≈3 mm) 水の浸入を防ぎ、差動を可能にします。
接着剤とシーラントの選択: 仕様と用途の制限
熱サイクル性能をリストし、予想される温度範囲全体にわたって弾性を維持する、柔軟な外装グレードのポリウレタン接着剤を指定します。グリル近くの水平ワークトップにはセメントベースの硬質エポキシ接着剤を使用しないでください。伸びが低いため脆性が生じます 石ができたときの失敗ゾーン と基材は異なる速度で膨張します。目に見える接合部には耐熱シリコンを使用し、外観が重要な部分は色を合わせます。
- 接着剤の選択: 屋外での使用と熱サイクルに耐える柔軟性のあるポリウレタン。スレート、珪岩、砂岩、花崗岩、大理石との適合性を確認します。
- シーラント: 露出した接合部には耐熱性シリコン。仕上げの一致が必要な場合は、カラーシリコンを使用してください。
- 適用制限: 基材の温度、湿度、オープンタイム、硬化時間についてはメーカーの制限に従ってください。現場で技術データシート (TDS) を収集します。
- 検証: ボンドラインが予想される温度下で必要な移動能力を提供することをモックアップ接着テストまたは TDS 証明する必要があります。
カットアウトと点荷重に対する構造サポートを設計する
すべてのカットアウトとオーバーハングを構造の詳細として扱います。シンクやバーベキューの開口部の下に継続的なサポートを提供し、荷重をパネルの端や応力集中から遠ざけるようにフレームを設計します。断熱によって接着面積が減少する場合は、機械的な固定具またはブラケットを追加しますが、留め具が石を割る点応力を引き起こさないように移動できるようにします。
- 荷重の計算: 標準的なフラット パネルの場合、パネルの死荷重 ~30 ~ 40 kg/m² (8 ~ 12 ポンド/平方フィート) を使用します。サポートのサイズを決めるときは、粗いパネルには ~55 kg/m² を使用してください。
- パネルの厚さ: 1.0 ~ 2.5 cm の標準を指定します。頑丈な片持ち梁式または交通量の多い設置の場合は、最大 3.5 cm を選択してください。
- 固定: 軸方向および横方向の滑りを許容するブラケットとアンカーを選択します。フレームを固定しますので、 石は圧縮荷重に耐えますが、固定具には制限があります 別居のみ。
- バッキングとボンドパターン: 負荷を分散し、開口部での点の曲がりを軽減するために、バッキング素材と接着剤ビード/こてパターンの詳細を示します。
表面の準備、パネルの取り扱い、および設置順序
色の不一致を避け、再作業を減らすために、目に見えるランでは同じバッチの採石材料から始めます。両方とも掃除して乾燥させてください 下地と石 合わせ面: 接着剤を塗布する直前に、ほこり、グリース、浮遊粒子を取り除きます。連動する Z/S 字型パネルと L コーナーをドライフィットして位置合わせとフィット感を確認します。最終的な接着の前に、必要に応じて基板のフレームを調整します。
- 取り扱い: パネルは平らにして保護して保管してください。微細な亀裂を生じさせるエッジ衝撃を避けてください。
- Adhesive application: apply beads or trowel pattern per manufacturer and maintain recommended bead thickness to preserve bond-line flexibility.
- Installation sequence: allow full cure in load-bearing zones before cutting openings or applying point loads; complete mock-ups first when using new adhesive systems.
Verification tests and ongoing inspection protocols
Validate performance on site with representative mock-ups. Perform pull-off or peel tests to confirm adhesion under the project’s specific thermal and moisture conditions, and run thermal cycling plus water infiltration tests on the mock-up before you install production panels. Inspect seals and bonded joints after initial cure and at scheduled intervals to catch adhesion loss, cracking or water penetration early.
- Testing: run pull-off tests and thermal cycles on mock-ups; document results against acceptance criteria.
- Inspection schedule: inspect after initial cure, then quarterly for the first year and annually thereafter, or increase frequency in freeze-thaw or high-salinity environments.
- Record-keeping: log adhesive batch numbers, environmental conditions during installation, and cure times for warranty and troubleshooting.
- Maintenance: prescribe sealant replacement intervals and cleaning procedures for UV exposure, salt spray and freeze-thaw climates, and confirm product UV and freeze-thaw ratings before specifying for coastal or cold regions.
Managing Intense Heat Proximity: Is Stone Safe Near Commercial Grills?
自然の積み石 素材を一致させ、熱ギャップを許容し、柔軟な接着剤を使用し、耐熱性の基材を使用すると、市販のグリルに近い性能を発揮します。
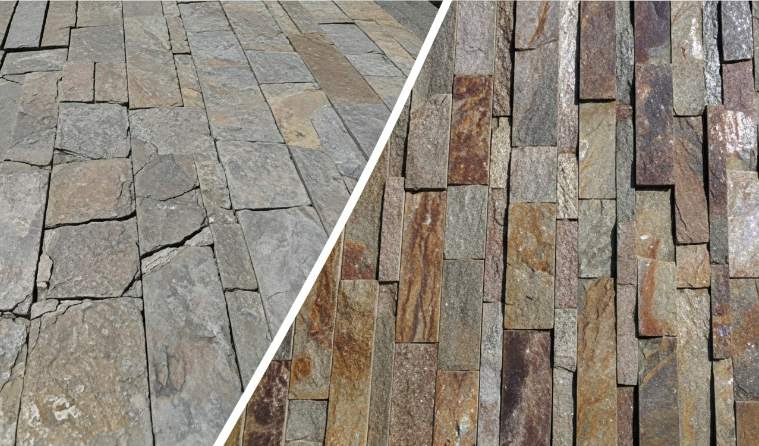
天然石積み石の材料耐熱性とパネル挙動
トップソース 石の自然な積み上げ 石(スレート、珪岩、砂岩、花崗岩、大理石)は高い表面温度に耐えますが、動きます。公開されているパネル フォーマット (150 x 600 mm または 150 x 550 mm) を、標準厚さ 10 ~ 25 mm および最大 35 mm のプレミアム/ラフ パネルで使用します。フラットパネルの重量は約 30 ~ 40 kg/m² (8 ~ 12 ポンド/ft²)、粗いパネルの重量は約 55 kg/m² であると予想してください。それらの負荷に対応する基板と固定具を計画します。
- Choose quartzite or granite where sustained radiant heat and UV stability matter; slate and sandstone work for lower-exposure areas.
- Design for differential movement between stone, adhesive, and backing to avoid localized stress at cutouts or corners.
- Use interlocking Z/S panels or matching L-corners to reduce visible seams and improve mechanical continuity at heated transitions.
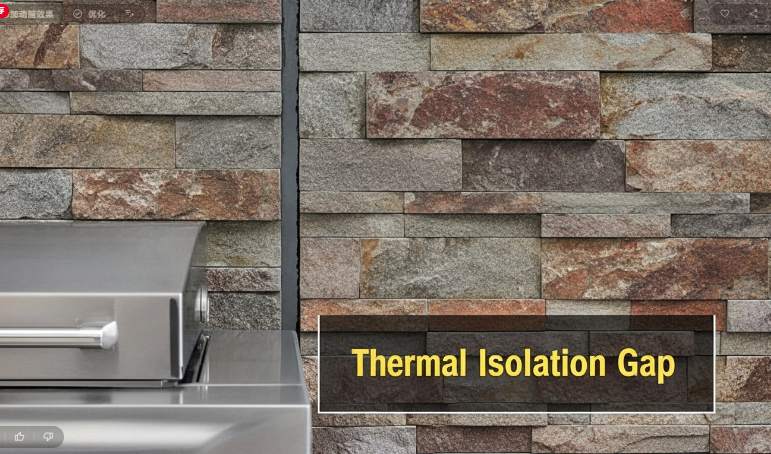
Clearance, thermal isolation and joint detailing next to commercial grills
Maintain intentional thermal isolation between the stone そして熱を発する金属。石の表面やワークトップと直接グリル構造や膨張する金属の間には、少なくとも 3/16 インチ (約 4.8 ~ 5 mm) の隙間を空けてください。高温暴露に耐えられる耐熱性シリコンを使用して、目に見える接合部を最小幅 1/8 インチ (約 3.2 mm) でシールします (一般的な製品の耐熱温度は 200 ~ 300 °C)。
- グリルが持続的な輻射熱を生成する場合は、ベニヤの後ろに空隙または不燃性の断熱層を挿入して、基板を保護し、熱伝達を遅らせます。
- 家電メーカーが指定する下面とエアフローの隙間を確保してください。グリルの熱を和らげるための換気口を決して覆わないでください。
- Use interlocking Z/S panels or pre-fabricated L-corners at edges to concentrate load paths away from exposed heated seams and simplify sealing details.
Adhesives, substrates and mechanical support for high-heat installations
Specify flexible bonding systems and heat-rated substrates. Prefer flexible polyurethane adhesives for exterior and high-heat conditions; avoid rigid cement-based mortars and standard epoxies that crack under thermal cycling. Mount stone to a non-combustible, heat-resistant backer such as cement board and provide continuous mechanical anchorage where loads concentrate.
- Use stainless-steel anchors and fasteners for mechanical fixings; add supplemental brackets beneath heavy grill mounts, cutouts, and countertop openings.
- Reinforce cutout perimeters and sink/grill interfaces with structural backing to distribute stress and prevent point failure.
- Mock up a representative assembly and test adhesion plus sealant compatibility under expected radiant and convective heat before full installation.
- Follow grill manufacturer clearances and local code for required gaps, venting, and load limits; adjust stone detailing to meet those constraints.
Premium Natural Stone, Faster Installs

How to prevent grease stains: the science of professional pre-sealing
Stop grease before it bonds: apply professional protective treatments to fabrics and seal porous stone surfaces to block oil penetration. Oil binds to fibers and stone pores at a molecular level, so pre-treatment creates a repellant barrier that reduces stain adhesion and makes cleanup mechanical rather than chemical.
Use physical barriers under cooking surfaces—under-grill splatter mats (typical size 43.5″ × 30.5″) and silicone griddle covers—to catch drip and embers. For accidental contact, start with mild cleaning (Dawn dish soap + OxiClean paste), use absorbents (kitty litter or sawdust) for fresher oil, and reserve aggressive chemicals (muriatic acid) for trained professionals with PPE.
Why UV-Proof Natural Stone Won’t Fade on Your BBQ Island in 20 Years?
Select quarry-matched quartzite or slate and design for thermal movement to keep stone color and integrity stable for two decades.
Material selection and same-batch sourcing for 20-year color stability
Choose 100% natural stone—quartzite, slate, sandstone, granite or marble—because these minerals carry inherent UV stability and will not undergo resin-driven fading like engineered quartz. For large runs, source from the same quarry vein to hold hue uniformity; トップソースストーン reports roughly 95% color consistency within a single batch, which prevents patchy appearances on long BBQ islands.
Specify panel geometry and mass up front to simplify joint layout and structural design. Use the standard rectangle panel formats (6″ ×24″ / 150 x 600 mm or 6″ ×22″ / 150 x 550 mm) for predictable vertical alignment. Standard thickness ranges 1.0–2.5 cm; specify up to 3.5 cm for exposed edges or heavy-use islands. Plan substructure loads for approximately 30–40 kg/m² for flat panels and ~55 kg/m² for rough-stack panels and confirm slab or frame capacity before ordering.
- Materials: Quartzite, Slate, Sandstone, Granite, Marble (100% 天然石))
- Same-batch quarry consistency: ~95% hue uniformity per order
- Panel formats: 6″ ×24″ (150 x 600 mm) or 6″ ×22″ (150 x 550 mm)
- Thickness: 1.0–2.5 cm standard; up to 3.5 cm for heavy-use edges
- Weight to plan for: ~30–40 kg/m² (flat) or ~55 kg/m² (rough)
Installation tolerances, joint sealing and adhesive strategy for thermal exposure
Bond using flexible polyurethane adhesives and avoid rigid cement-based mortars or epoxies that crack under thermal cycling. Maintain thermal isolation gaps where stone meets metal or direct heat: keep at least 3/16″ (~5 mm) clearance between the worktop/stone and BBQ metal or other heat sources and seal that gap with heat-resistant colored silicone to allow expansion while preventing water entry.
Specify movement joints no narrower than 1/8″ (~3 mm) and seal them with high-temperature silicone rated for outdoor UV exposure. Use interlocking Z-shape or S-shape panel formats with CNC diamond-blade precision edges to reduce visible vertical joints and improve long-term joint stability. Always provide continuous structural support at cutouts and around sinks or barbecue openings, and reinforce concentrated-load zones to eliminate stress risers. For coastal or Gulf installations, use corrosion-resistant anchors and compatible, salt-spray-rated sealants to protect fastenings and adhesive bonds.
- Adhesive: Flexible polyurethane (avoid rigid cement-based or epoxy adhesives)
- Thermal isolation: ≥3/16″ (~5 mm) gap to BBQ metal, sealed with heat-resistant colored silicone
- Movement joints: ≥1/8″ (~3 mm) 耐熱シリコンで密封
- ジョイント戦略: インターロッキング Z/S パネル + CNC ダイヤモンド カット エッジによる垂直ジョイントの隠蔽
- 海岸のベストプラクティス: 耐食性アンカーと耐塩性シーラント
仕上げを20年間維持するための構造裏打ち、荷重計画、メンテナンス
パネルの死荷重に加えて、機器やユーザーの活荷重にも耐えられるように基礎構造を設計します。粗いパネルを使用する場合、サポートのサイズは最大 55 kg/m² までとなります。一致する L コーナーと完全にカバーされるパネルを使用して、露出したエッジを減らし、材料が移行する部分の風化ラインを避けます。器具の開口部にまぐさまたは連続した裏地を設け、応力点での亀裂を防ぐためにカットアウトがサポートされたスパン上にあることを確認します。
Set an inspection and maintenance routine: visually inspect joints, silicone seals and mechanical anchors annually and reseal or tighten as needed. Clean stone with a pH-neutral detergent and low-pressure rinse; avoid strong acids and abrasive cleaners that degrade the finish. If you apply a sealer, choose a breathable stone sealer and plan reapplication every 5–10 years based on exposure. Capture pre-shipment verification photos and on-site installation images to confirm same-batch appearance and correct joint details for warranty and quality control.
- Substructure design: size for dead + live load; plan for up to ~55 kg/m²
- Edge protection: matching L-corners and full-coverage panels to reduce weathering
- Inspection: annual visual check of joints, silicone seals and anchors
- Cleaning: pH-neutral detergent, low-pressure rinse; avoid acids and abrasives
- Sealer policy: breathable sealer only; reapply every 5–10 years as exposure dictates
- Verification: pre-shipment photos/videos and on-site documentation to confirm same-batch match and joint workmanship
How to Design Toe-Kicks and Countertop Overhangs with Rugged Stone Panels?
Correct support, panel choice and flexible sealing prevent structural failure and reduce lifetime repair costs on outdoor kitchen islands.
Structural support and load distribution for toe-kicks and overhangs
Select panel thickness to match the load: use standard 1.0–2.5 cm panels for vertical cladding and plan for up to 3.5 cm (rough/premium) where you cantilever or expect high stress. Account for panel mass when sizing your subframe and fasteners — flat panels weigh roughly 30–40 kg/m² while rough-texture panels approach 55 kg/m². Where you cut for sinks, grills or service access, carry loads into the framing by providing continuous substrate or reinforced blocking under those cutouts so the stone transfers stress to structure, not adhesive.
Place mechanical supports across the full width of any overhang instead of relying on adhesive alone, and combine those supports with flexible adhesive bonding to absorb thermal cycling. Always add local blocking or brackets beneath aperture edges and specify support at every corner and junction to prevent concentrated bending and cracking at exposed returns.
- Pick thickness by use: 1.0–2.5 cm for cladding; up to 3.5 cm for cantilevers and heavy overhangs.
- Design subframe and fasteners for panel weight: 30–40 kg/m² (flat), ~55 kg/m² (rough).
- Provide continuous substrate or reinforced framing under cutouts and openings.
- Use mechanical supports across overhang width and add blocking at corners and junctions.
Panel selection, edge configuration and modular detailing
Standardize on rectangular formats for linear runs — 150×600 mm (6×24 in) or 150×550 mm (6×22 in) — to keep coursing consistent and speed installation. For overhang returns and visible edges, choose interlocking Z-shape or S-shape panels with CNC diamond-blade precision so male–female joints hide vertical seams and deliver the seamless technology Top Source Stone engineers for tight returns.
Match pre-fabricated L-corners for all 90° transitions and toe-kick returns to maintain texture and color continuity; specify same-batch quarry sourcing to preserve about 95% hue uniformity across contiguous runs. Select surface finish by application: use natural cleft or split-face for rugged exposed faces and a seamless finish where tight toe-kick junctions demand minimal shadow lines.
- Panel formats: 150×600 mm or 150×550 mm for linear, modular runs.
- Edge types: Z-shape / S-shape interlocks with CNC diamond-blade precision to conceal vertical joints.
- Transitions: matching L-corners for 90° wraps and toe-kicks to keep texture continuity.
- Batch control: source from the same quarry vein to achieve ~95% hue uniformity.
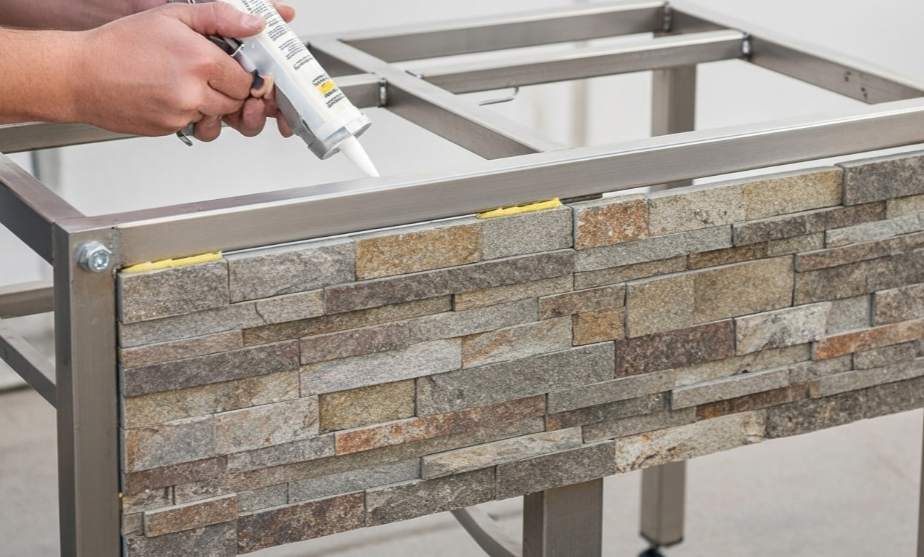
Adhesive, sealing and thermal-isolation practices for outdoor kitchen conditions
Use flexible polyurethane adhesives for exterior stone installations and avoid rigid cement-based or epoxy systems that crack under thermal cycling. Dimension joints and isolation gaps to manage moisture and heat: seal vertical and horizontal joints at least 1/8″ wide with heat-resistant silicone and maintain minimum 3/16″ isolation gaps between worktops and adjacent heat sources or metal to prevent heat transfer and buckling.
Specify color-matched, heat- and UV-resistant silicone at appliance interfaces and where stone meets metal; require adhesive plus mechanical fastening wherever possible and design for movement by leaving isolation gaps and using flexible sealants. Verify installation performance by dry-fitting インターロックパネル, confirming full substrate coverage behind stone, and inspecting bond lines and sealant depth before final closure.
- Adhesive: specify flexible polyurethane; do not use rigid cement or epoxy on exterior grills or islands.
- シール & gap sizes: joints ≥1/8″ sealed with heat-resistant silicone; maintain ≥3/16″ clearance to heat sources/metal.
- Sealant spec: color-match and require UV, humidity and salinity resistance for coastal or Gulf installations.
- Combine adhesive bonding with mechanical fastening and plan thermal movement with isolation gaps.
- Verification steps: dry-fit panels, confirm concealed substrate coverage, inspect bond lines and sealant depth before final closure.
Can You Install Natural Stone Over a Stainless Steel Island Frame?
Natural stacked stone performs on stainless steel islands when designers provide clear load paths, flexible adhesives, thermal movement joints, and continuous backing at cutouts.
Assess structural capacity and load distribution of the stainless steel island frame
Start by sizing the frame for the stone dead load: flat-profile 積み上げられた石 weighs about 30–40 kg/m² (8–12 lbs/sq.ft), and rough/oversized profiles approach 55 kg/m². Use standard panel dimensions (150 × 600 mm or 150 × 550 mm) and thickness bands (10–25 mm typical, up to 35 mm premium) to calculate distributed loads and reactions rather than treating pieces as point loads.
Design the frame so unsupported spans under the veneer do not exceed 300 mm (12″) or provide continuous bearing to eliminate point-loading. Reinforce zones around sink and barbecue cutouts with continuous support members or steel brackets and add a rigid intermediate substrate—cement backer or marine-grade exterior plywood with a vapor barrier—to spread loads and deliver a uniform fastening plane. Confirm stainless grade and weld quality so the frame resists permanent deformation under combined dead load and expected live loads (equipment, users, service access).
Choose adhesives and mechanical fastenings for exterior stone-on-metal installation
Select an exterior-grade polyurethane adhesive that retains flexibility at high temperatures and during thermal cycling; avoid rigid cement-based adhesives and epoxies where the stone will see direct sun or grill heat. Apply adhesive for full contact where possible using continuous beads or fillets sized per the adhesive manufacturer—target a bondline in the 3–5 mm range—and respect cure-time and ambient temperature limits during installation.
Use stainless-steel mechanical anchors or screws in the same corrosion class as the frame and fit neoprene or EPDM washers to isolate the stone from metal. Space fasteners by panel size and local loads—typical spacing falls between 150–300 mm. For interlocking Z-Shape or S-Shape panels, rely on male/female engagement to reduce vertical screw count and use CNC-fitted edges to minimize gaps. Pre-fabricated L-corners and matched corner panels reduce field cutting and stress at 90° transitions. Pre-drill stone where required, torque fasteners to a controlled value to avoid cracking, and use non-metallic shims or adhesive pads to prevent direct metal-to-stone contact.
- Adhesive: exterior polyurethane; bondline 3–5 mm.
- Fasteners: stainless-steel anchors with neoprene/EPDM washers; spacing 150–300 mm.
- Panels: 150×600 mm or 150×550 mm; thickness 10–25 mm (standard), up to 35 mm (premium).
Detail joint treatment, thermal movement allowance, and water-management measures
Leave thermal isolation gaps where stone adjoins heat sources or adjacent metalwork: a minimum 3/16″ (≈4.5 mm) gap and a high-temperature silicone seal will reduce heat transfer and allow movement. Seal horizontal and vertical stone joints at least 1/8″ (≈3 mm) with exterior-grade, heat-resistant silicone; insert a backer rod in wider gaps to control sealant depth and bonding geometry. Provide perimeter movement joints where stone meets cabinetry, appliances, or tertiary elements so thermal expansion and contraction do not force stresses into the veneer or anchor system.
Install a non-absorbent backing layer and create ventilation or drainage paths behind the 石 to prevent trapped moisture against the stainless frame. Specify stone grades with proven UV stability and high salinity/humidity resistance for coastal or high-salt environments. Complete the work with a verification sweep: confirm joint widths, check sealant adhesion and depth, verify panel alignment, and inspect anchorage points for correct corrosion protection and positive load transfer.
- Thermal gap: ≥3/16″ (≈4.5 mm) to heat sources; seal with heat-resistant silicone.
- Joint width: ≥1/8″ (≈3 mm); use backer rod for wider gaps.
- Moisture control: non-absorbent backing plus ventilation/drainage behind veneer.
- Final checks: joint dimensions, seal adhesion, anchor corrosion protection, and load path verification.
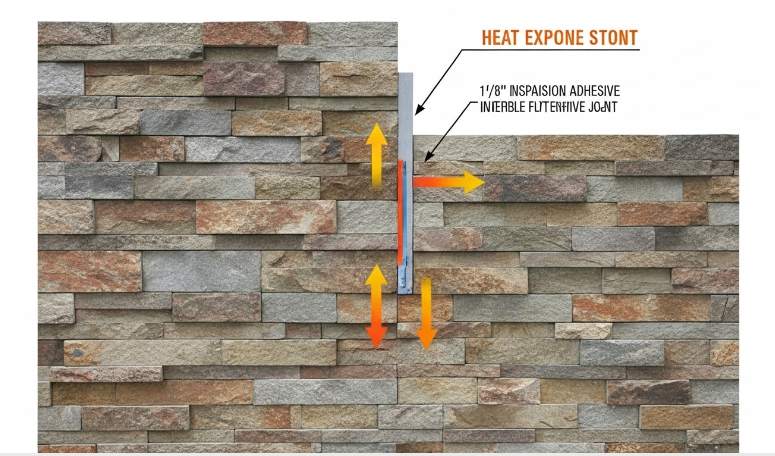
Dealing with Expansion: Why a 1/8″ Gap Around the Grill is Critical?
A controlled 1/8″ clearance prevents thermal stress damage to 積み上げられた石 and preserves sealant and adhesive performance around hot appliances.
Calculate thermal movement using ΔL = α · L · ΔT to validate a 1/8″ clearance
Use ΔL = α × L × ΔT and keep units consistent: convert L to meters when α is in /°C, then report ΔL in millimetres or inches. 自然の積み石 (slate, quartzite, granite) typically shows α in the 4–10 ×10⁻⁶ /°C range; pick a conservative design value (for example 8 ×10⁻⁶ /°C) to cover quarry variability and worst-case cycles.
Example: a 24 in (0.6 m) panel with ΔT = 60°C and α = 8×10⁻⁶ /°C gives ΔL = 8e-6 × 0.6 × 60 = 0.000288 m → 0.288 mm (~0.011 in). A 1/8 in (3.175 mm) gap therefore provides roughly a 10× margin plus room for sealant movement and tooling tolerances. If panel length (L) or expected ΔT increases, scale the gap proportionally or adopt the appliance-specified clearance when that value exceeds 1/8″. For very long runs or localized grill temperatures above the assumed ΔT, increase the clearance and re-run ΔL calculations using the panel dimensions (standard Top Source Stone rectangle panels are 6″ ×24″ / 150×600 mm) and the conservative α value.
Specify joint filler and adhesives: heat-rated sealant, backer rod, and flexible bonding
Seal the 1/8″ gap with a heat-resistant, UV-stable neutral-cure silicone formulated for outdoor grill exposure. Select a non-sag, neutral-cure silicone rated for continuous service at least 200°C (392°F) so the sealant retains elasticity under repeated heating cycles and sun exposure. For color-critical installations, pick a sealant shade that matches the stone finish to keep the aesthetic seamless。
Bond stone panels using flexible polyurethane adhesives designed for thermal cycling; they absorb movement and prevent brittle failures that cement-based mortars or rigid epoxies produce near heat sources. Place a closed-cell polyethylene backer rod sized to leave sealant depth at roughly half the joint width (for a 1/8″ gap, target ~1/16″ sealant depth) to control joint movement and avoid three-sided adhesion. Tool the sealant so it contacts only the stone faces; this forces movement into compression/extension of the sealant and prevents adhesion to the backer rod.
On-site controls and verification checklist for installing a 1/8″ gap around grills
- Mock-up and thermal cycle: install representative stacked-stone panels and the actual grill model, heat to operating temperature, and confirm the 1/8″ gap and chosen sealant accommodate thermal movement without cracking, smoke staining, or adhesion loss.
- Mechanical isolation: install thermal isolation clips or non-compressible spacers between stone and metal to reduce direct heat transfer and prevent differential movement stress; isolate vertical seams from appliance frames where possible.
- Follow appliance clearances: check the grill manufacturer’s required clearances; if the appliance specifies a larger gap (for example 3/16″), use that value instead of 1/8″. Document that you verified those requirements on-site.
- Inspect and document: check sealant adhesion and panel edges after 24–72 hours and again after initial heat cycles; photograph any shrinkage, delamination, or loss of adhesion and log observations in the project quality file.
- Traceability record: record adhesive and sealant product names, batch numbers, suppliers, application and cure times, and link these records to the stone batch (same-batch quarry consistency) for warranty and service traceability.
Managing Structural Load: Does Your Patio Slab Need Reinforcement?
Assess slab capacity early: 積み上げられた石 can add roughly 6–11.3 psf (use a +20% contingency) and trigger costly reinforcement if ignored.
Calculate dead load from natural stacked stone panels
Start with the manufacturer’s mass data and panel geometry: standard Top ソースストーンパネル measure 150×600 mm or 150×550 mm with thickness typically 1.0–2.5 cm and up to 3.5 cm for premium pieces. Use the published mass ranges: flat panels ≈ 30–40 kg/m² (8–12 lbs/sq.ft) and rough panels ≈ 55 kg/m². Apply a contingency allowance for mortar, adhesives, backer boards and fixings—typical practice: +20%—before you convert to psf for structural checks.
- Convert area loads: 30–40 kg/m² → 6.1–8.2 psf; 55 kg/m² → 11.3 psf. With +20% contingency these become ~36–48 kg/m² → 7.4–9.8 psf and ~66 kg/m² → 13.6 psf.
- Compute linear loads for benches or short walls: multiply the area load (kg/m²) by the stone-covered width (m) to get kg per linear metre. Example: contingency flat panel 36 kg/m² × 0.6 m wide = 21.6 kg/m per linear metre (≈14.5 lb/ft).
- Logistics to structure: account for box coverage (standard boxes cover 0.63–0.72 m²) when estimating total added dead load per pallet or crate for transport and handling checks.
Assess patio slab condition and triggers that require reinforcement
Perform a targeted slab inspection before you commit to 石のクラッディング. Use visual and simple load checks to identify ongoing cracks, active settlement, visible deflection under load, or repairs that reopen after loading. Treat slabs thinner than typical residential practice (4–6 in) or slabs on poor soils as higher risk when you add heavy veneer that raises dead load by up to ~13.6 psf with contingency.
- Signs that demand action: hairline cracks that propagate, uneven settlement, deflection under a known load, and recurring repair lines.
- Capacity check: sum existing dead load + added stone dead load + expected live loads. If slab capacity or safety margin is unknown, engage a structural engineer to verify or run calculations.
- If analysis shows the slab cannot carry combined loads with an appropriate safety factor, plan reinforcement before installation to avoid rework and liability.
Select reinforcement and attachment methods compatible with stacked stone cladding
Choose reinforcement that routes load paths to soil or structural beams rather than concentrating loads on thin concrete. Viable reinforcement strategies include bonded structural toppings with fiber or rebar, added edge or turned-down beams, underpinning footings, and localized mechanical supports that transfer load off the slab. For any option, coordinate the structural detail with the stone supplier so panel type, weight and L-corner usage match the engineering solution.
- Bonded overlays: follow mechanical-prep steps—clean the slab, profile (grind or shot-blast) to achieve a key, apply a bonding agent—and place the engineer-specified overlay thickness and reinforcement (fiber or mesh; or top-layer rebar). Specify overlay thickness and reinforcement layout in the engineer’s drawing.
- Mechanical attachment: specify corrosion-resistant anchors (316 stainless or equal), distribute anchors to avoid point loads, and use interlocking Z/S panels and matching L-corners to spread shear and reduce concentrated stress at edges and transitions.
- Site coordination: confirm same-batch quarry consistency with the supplier, order matching L-corners for transitions, and factor box coverage (0.63–0.72 m² per box) and pallet loads into handling and temporary support planning to prevent local overloading during installation.
- When in doubt, specify a structural engineer to size turned-down beams or underpinning. Use reinforcement spacing rules as a guide (keep reinforcement grid spacing generally ≤ 2× slab thickness) and place the top-layer reinforcement where it will limit cracking and control deflection.
結論
Proper natural stone installation on commercial BBQ islands protects users and equipment, meets OSHA and local building standards, and prevents costly callbacks. Prioritizing adhesion, heat management, and structural reinforcement extends warranty coverage and reduces long-term maintenance.
Start by auditing your current project setups for adhesion, grill clearances, and slab capacity, or contact トップソースストーン for certified samples and a commercial catalog tailored to outdoor kitchens. Request same-batch color confirmation and pre-shipment visuals to protect margins and ensure on-site consistency.
よくある質問
Can you put natural stacked stone on a commercial BBQ island?
Yes — 自然の積み石 can be used on a commercial BBQ island provided it’s installed to outdoor-kitchen adhesion standards: use flexible polyurethane adhesives (not rigid cement-based or epoxy), allow thermal-isolation gaps (minimum 3/16″ ) between stone and barbecue/metal, seal joints (minimum 1/8″) with heat-resistant silicone, and ensure adequate support at openings and cutouts so stress points won’t cause cracking or separation.
Best natural stone for an outdoor kitchen in a hot climate?
Rather than a single “最高” stone, select a 天然石 with low thermal expansion, good dimensional stability in direct sunlight and heat, and low porosity so it resists moisture. Equally important is installation: use flexible polyurethane adhesives, leave thermal-isolation gaps (≥ 3/16″) from heat sources, and seal joints (≥ 1/8″) with heat-resistant silicone to accommodate temperature swings and moisture exposure.
How to protect stone from grease stains near the grill?
Protect stone by preventing infiltration and allowing movement: install joints at least 1/8″ wide sealed with heat-resistant silicone to block grease and moisture; maintain isolation gaps (≥ 3/16″) to limit direct heat transfer; use flexible polyurethane adhesives so bonds and seals remain intact under temperature cycles; and provide proper support at stress points to avoid cracks or gaps that trap grease.
Is stone veneer safe for outdoor fireplace/BBQ combos?
石材化粧板 can be safe if installed to outdoor adhesion and thermal-isolation standards: avoid rigid adhesives (cement-based or epoxy), use polyurethane adhesives for flexibility, maintain gaps of at least 3/16″ to isolate heat sources, and seal joints (minimum 1/8″) with heat-resistant silicone. Also ensure adequate backing/support at stress points so thermal cycling won’t cause separation or cracking.
How to install stone around outdoor kitchen doors?
Allow for thermal movement and moisture control: leave gaps of at least 3/16″ between stone and door or metal frames, seal joints of at least 1/8″ with heat-resistant silicone, use flexible polyurethane adhesives for bonding, and provide sufficient support around cutouts and openings to distribute loads and avoid stress concentrations that lead to cracking or separation.
