
Winter installation is the most critical factor in preventing costly mortar failures and stone panel delamination in cold climates. Installing natural stacked stone below 40°F risks incomplete mortar hydration, leading to internal cracks, structural weakness, and expensive warranty claims down the line.
This analysis benchmarks top North American suppliers against Top Source Stone’s same-batch quarry consistency and CNC diamond-blade precision. We evaluate masonry unit preheating, mortar curing methods, and MOQ strategies to secure durable, scalable winter installation solutions.
Why Cold Weather is the Silent Enemy of Mortar Hydration?
Cold weather slows cement hydration below 40°F, delaying curing and risking cracks from water freezing inside mortar.
低温がモルタルの水和を遅らせる仕組み
ポルトランド セメントと水の化学反応によりモルタルの強度が生成されますが、40°F (4.4°C) を下回ると強度が大幅に低下します。モルタルの温度が下がると反応速度が低下し、硬化時間が長くなり、強度の向上が遅れます。乾燥が完了する前に水和が停止すると、モルタルの最終強度が低下し、構造が損なわれます。
予熱した石材と加熱したモルタルを使用して冷害を防ぐ
To protect mortar quality in cold weather, mix with heated water to keep mortar temperature between 40°F and 120°F during preparation. Preheat masonry units before installation to reduce heat loss from the mortar, preventing its temperature from dropping too low. After laying, apply heated curing blankets or maintain heated enclosures to keep mortar temperatures above 40°F, ensuring proper curing and preventing freeze damage.
Understanding the 40°F (4°C) Rule: The Science of Curing Temperature
Hydration reactions drop sharply below 40°F, risking incomplete cure and weak stone installations without proper temperature control.
| Aspect | Detail |
|---|---|
| Critical Temperature | 40°F (4°C) minimum for curing |
| Effect Below Threshold | Slowed hydration, possible freezing, structural weakness |
| Standard Guidelines | ACI, ASTM recommend >40°F for placement |
| Installation Impact | Ensures proper mortar bond, preventing freeze-thaw failures |
The Chemistry Behind the 40°F (4°C) Threshold
Cement hydration slows dramatically once temperatures fall below 40°F. This delay stalls setting and strength gain as the chemical reaction between cement and water loses speed.
If water in the mix freezes, it expands and breaks down the developing crystalline structure. Such damage leads to permanent internal cracks and weaker cured material.
Long cold exposure can stop hydration completely, making cured mortar less durable over time. Industry standards like ACI and ASTM define 40°F as the minimum temperature to place or work mortar and concrete to avoid these issues.
Implications for Natural Stacked Stone Installation
Mortar hydration above 40°F is essential to maintain strong adhesion for natural 積み上げられた石のパネル. If temperatures dip below this threshold during curing, bond strength suffers, increasing risks of panel detachment and damage from freeze-thaw cycles.
トップソースストーン emphasizes keeping substrate temperatures above 40°F during curing. This supports proper mortar bonding for their Z-shape インターロックパネル and matching L-corners, which rely on effective curing to ensure installation longevity and appearance.
Following the 40°F rule protects both structural integrity and visual quality of natural stone applications in cold climates, avoiding premature failures caused by cold exposure during and shortly after installation.
Premium Stacked Stone for Every Project

How to Use Heated Enclosures and Tenting for Exterior Projects?
Heated enclosures combine temporary structures with heating and insulation to maintain suitable conditions, enabling cold-weather exterior construction safely and cost-effectively.
Overview of Heated Enclosure Types and Materials
仮設囲いでは、透明なビニール カーテンやモジュラー パネルなどの素材を使用して、柔軟で短期間の暖房スペースを作成します。頑丈な防水シートは頭上の保護にもなります。建設フレームには多くの場合、次の 2 つの要素が含まれます。×4本の木材とポリエチレンシートがしっかりと固定され、天候を遮断します。
アルミニウムパネルを備えた断熱パティオカバーや、ビニールまたはアルミニウムフレームを備えたモジュラーウィンドウシステムなどの恒久的または半恒久的な構造物は、より優れた断熱性と耐久性を実現します。これらは、繰り返し使用または長期間の使用が必要なプロジェクトに適しています。
材料の選択は、柔軟性、初期費用、および断熱ニーズのバランスに依存します。一時的なビニール カーテンはコスト効率とセットアップの容易さを提供し、断熱パネルは長時間の寒さにさらされる場合に不可欠な断熱性能を提供します。
Heating Systems, Safety, and Operational Considerations
Heating options vary by project scale and ventilation: indirect-fired systems place combustion units outside and deliver heated air inside for large tents, maintaining air quality. Propane or kerosene torpedo heaters heat smaller or open spaces quickly. Electric heaters suit focused areas like entryways, and radiant heated flooring supplies uniform warmth beneath walking surfaces.
Effective insulation on walls and floors helps reduce heat loss, improving energy efficiency and lowering operational costs. Insulated sidewalls and thermal liners limit drafts and retain warmth, while insulated flooring prevents cold transfer from the ground.
- Safety Protocols: すべての燃焼ヒーターをテントの外に配置します。一酸化炭素の蓄積を避けるために、温風を供給するために断熱ダクトを使用してください。
- 換気: 一酸化炭素レベルを定期的に監視してください。通気性のある状態を維持するために、吸気と排気のバランスを確保します。
- サイトの準備: 事前に排水性と地盤の安定性を評価してください。遅延や構造上の歪みを防ぐために除雪の準備をしてください。
- 専門家の監督: システムのパフォーマンスを監督し、必要に応じて加熱を調整し、運用上の問題に迅速に対応するために、訓練を受けた担当者を割り当てます。
適切な計画と安全基準の順守により、寒冷地での外装工事中に作業員の健康や材料の完全性を危険にさらすことなく、加熱されたエンクロージャが効果的に機能することが保証されます。
Does Anti-freeze Mortar Additive Compromise the Natural Stone Bond?
Anti-freeze additives protect mortar from freezing during installation but reduce long-term bond strength between mortar and 天然石, mainly due to calcium chloride’s chemical effects.
Impact of Anti-freeze Additives on Mortar Bond Strength
Anti-freeze additives allow masons to place mortar in temperatures as low as 15°F (-9°C). They effectively reduce freeze-thaw damage risks during installation by preventing water in the mortar from freezing and causing internal cracks. But this convenience comes at a cost: the long-term bond strength between mortar and 天然石 deteriorates. Over time, the weakened bond can cause stone delamination and eventual structural failure.
Chemical Effects of Calcium Chloride in Mortar Additives
Calcium chloride is the most common anti-freeze accelerator used in mortar additives. It speeds up mortar setting and improves early strength, allowing projects to progress faster in cold conditions. However, calcium chloride promotes corrosion of metal reinforcements and fixtures embedded in the masonry. This corrosion undermines the bond integrity and can cause structural problems years down the line. Stone masons must carefully specify these additives and implement ongoing maintenance protocols when using calcium chloride-based products during winter installations.
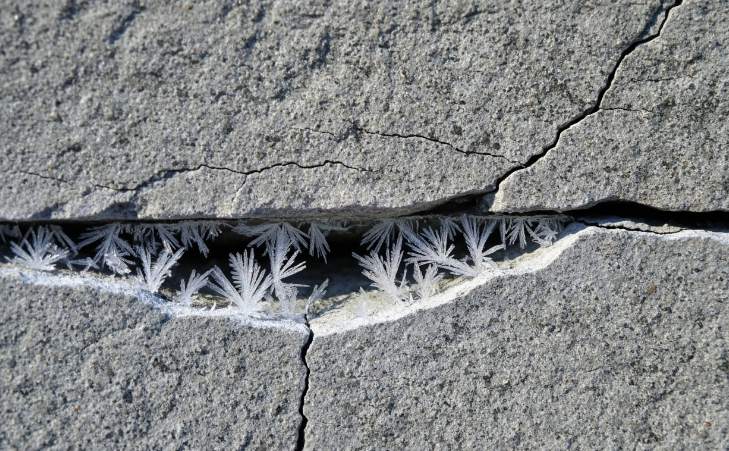
なぜ “Flash Freezing” Leads to Massive Stone Failure in Spring?
Flash freezing traps moisture inside stone or mortar, and rapid freezing then expands water, causing cracks and stone failure.
How Flash Freezing Causes Structural Damage in Natural Stone
Water enters porous stone or mortar through existing cracks or insufficient sealing. When temperatures suddenly drop in spring, trapped moisture freezes rapidly, expanding by about 9%, and creating intense pressure inside the stone veins.
Repeated freeze-thaw cycles during spring worsen any fractures. This process causes cracking, surface spalling, and eventual failure of the stone installation. The fluctuating temperatures typical of spring trigger these recurring freeze-thaw cycles, making 天然石 vulnerable if moisture is present.
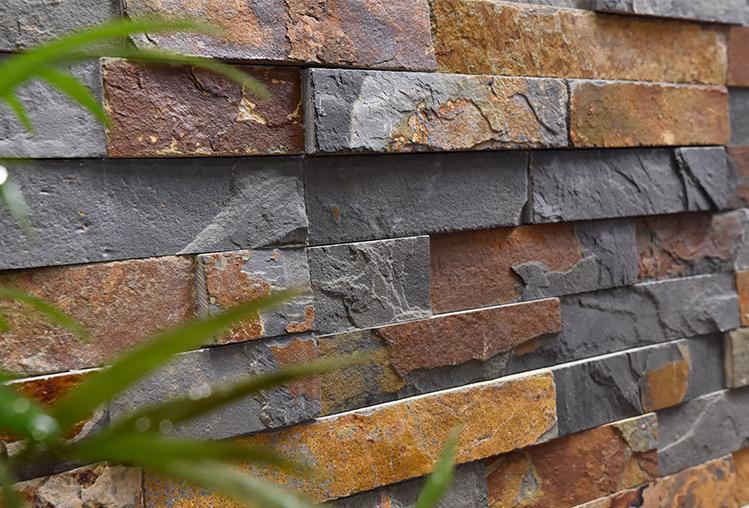
Preventing Flash Freezing Damage with Top Source Stone Specifications
Top Source Stone reduces flash freezing risks by sourcing stone strictly from the same quarry layer to ensure uniform water absorption. This same-batch quarry consistency avoids uneven moisture retention and structural variability that could make freeze-thaw damage worse.
- 使用 天然石 materials like quartzite and slate, known for high freeze-thaw resistance, limits water penetration and damage.
- Precision CNC diamond-blade edge cutting produces tightly interlocking panels, which minimizes gaps and prevents water ingress behind the stone.
- High-strength epoxy bonding improves panel integrity, maintaining adhesion and structural resistance under freeze-thaw stresses.
By controlling the stone quality and manufacturing precision, Top Source Stone offers natural stacked stone products engineered to resist the damaging cycles of flashing freezing common in spring installations.
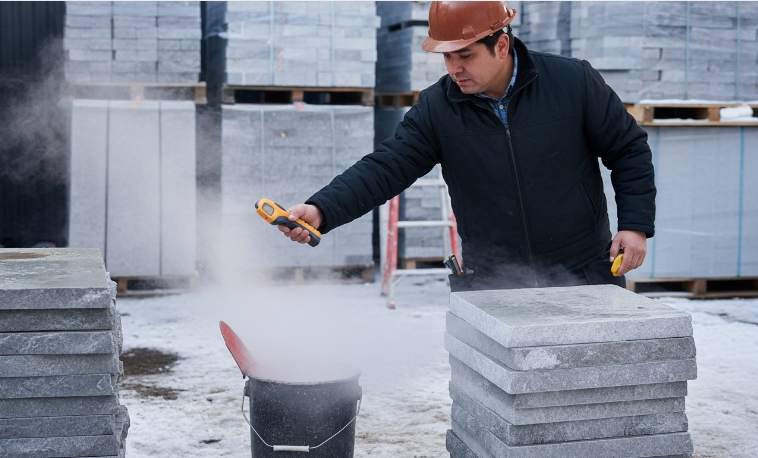
How to Pre-heat Your Stone Panels and Substrate for Better Adhesion?
Pre-heating 石のパネル and substrates prevents mortar freezing, enabling proper curing and stronger adhesion. Keep installation temperature above 40°F for lasting bond strength.
Why Preheating Stone Panels and Substrate is Crucial in Cold Weather
Mortar contains water that freezes below 40°F, which stops the curing process. Frozen moisture interrupts the chemical reactions needed for a strong bond. Without preheating, curing will be delayed or insufficient, leading to bond failure. Keeping temperatures at least 40°F during critical curing periods avoids these issues.
Best Practices for Preheating Using Top Source Stone Specifications
- Warm cement and mixing water to approximately 70°F for optimal mortar curing and strength development.
- Store 石のパネル in a warm, dry environment to prevent moisture absorption and freezing before installation.
- Use heated enclosures or tents to maintain stable temperatures between 40°F and 90°F during and for seven days after installation.
- Keep tools warm and dry to maintain mortar consistency and accuracy in cutting and installation。
Managing Humidity: Why Dry Winter Air Dehydrates Your Mortar?
Dry winter air speeds up water loss from mortar and pulls moisture into masonry units, reducing cement hydration and weakening mortar strength.
How Dry Air Accelerates Mortar Dehydration
Dry air increases water evaporation directly from exposed mortar surfaces. This evaporation happens faster on the surface than deeper layers, causing uneven moisture loss that weakens the mortar’s outer layer compared to its core.
Masonry units also dry out in low humidity and cold conditions, which boosts their suction. These units pull water from the mortar more aggressively than usual, further accelerating dehydration.
The combined effect of surface evaporation and increased suction from masonry causes faster moisture loss than the mortar can tolerate, compromising the hydration process needed for strength development.
Mitigating Moisture Loss in Cold, Dry Conditions with Protective Measures
Immediately covering masonry walls after construction slows down water evaporation significantly. Using weather-resistive membranes or plastic sheeting provides a barrier that maintains moisture levels within the mortar.
Applying fog sprays during the first 24 to 72 hours after laying mortar boosts local humidity around the masonry. This helps counteract the drying pressure from cold, dry air and wind.
Understanding the critical temperature threshold for mortar hydration is essential. Below 40°F (4.4°C), cement hydration slows drastically and can stop. Protective measures should aim to maintain mortar temperature above this level during the curing period to ensure proper strength gain.
Post-Installation Insulation: Protecting Your Wall During the First 48h
Proper ventilation, restricted occupancy, and sealing prevent damage and ensure safety during the first 48 hours after spray foam insulation installation.
Understanding the 48-Hour Curing and Off-Gassing Phase
Spray foam insulation releases volatile organic compounds (VOCs) and isocyanates as it cures, a process called off-gassing. This release peaks within the first 24 to 36 hours but varies by foam type and conditions.
- Open-cell foam off-gasses for 24 to 48 hours.
- Closed-cell foam extends off-gassing up to 72 hours.
- Indoor air quality drops significantly during this period, so evacuating occupants is necessary.
- Lower temperatures and high humidity can prolong off-gassing duration.
The curing chemicals need time to bond and harden. During this period, the air inside will contain irritants harmful to humans and possibly damaging to delicate finishes like natural stacked stone walls。
Protective Measures for Stone Wall Integrity During the First 48 Hours
Safeguarding natural stacked stone walls during insulation off-gassing requires deliberate steps to prevent damage from chemicals and moisture exposure while maintaining air quality.
- Initially seal windows and doors tightly to contain off-gassing; remove plastic sheeting only after the full curing period.
- Keep HVAC systems sealed or turned off for at least 24 hours post-installation to avoid circulating harmful gases near the stone 表面。
- Maintain continuous mechanical ventilation to replace indoor air and rapidly reduce VOC concentration.
- Use visible warning signs and physical barriers to stop accidental contact with curing insulation close to the stone.
- Confirm manufacturer off-gassing timelines and adapt ventilation strategies based on local temperature and humidity.
- Follow natural 石パネルの設置 best practices to avoid moisture or chemical damage during the off-gassing phase.
These measures limit exposure to airborne chemicals and moisture that can discolor or erode the 天然石 finish. Balanced ventilation controls air quality without introducing moisture that could damage the mortar or stone adhesion in the critical curing window.
よくある質問
Can natural stone be installed in freezing temperatures?
No, natural stone cannot be reliably installed below 40°F (4°C) because mortar hydration stops freezing temperatures, risking permanent bond failure. Proper curing requires temperatures above 40°F to ensure adequate adhesion and durability.
What happens if mortar freezes before curing?
When mortar freezes before fully curing, the expanding water breaks the internal cement bonds, causing up to 50% permanent strength loss, cracks, scaling, and long-term durability issues. This can lead to structural failures months or years later.
What are effective cold-weather additives for natural stone mortar?
Accelerating admixtures (like calcium chloride-based), air-entrainers, and polymer-modified mortars help cold-weather mortar performance by speeding set times, improving frost resistance, and enhancing strength. These additives aid curing but do not protect uncured mortar from freezing.
How long should heated enclosures maintain temperature after installation?
There is no fixed duration, but maintaining temperatures above 40°F during and for several days post-installation is critical to prevent moisture damage and ensure proper drying. Consistent heating is recommended in cold climates to avoid condensation and bonding issues.
Does winter installation increase efflorescence risk?
Yes, winter conditions promote efflorescence due to higher salt solubility in cold, increased bleed water, saturation from freeze-thaw cycles, and use of calcium chloride accelerators. Proper precautions like moisture barriers and curing methods help minimize this risk.
最終的な考え
安価でありながら 石のパネル may reduce initial expenses, only Top Source Stone’s direct quarry source and same-batch quarry consistency guarantee uniform color and freeze-thaw resistance vital for winter masonry reliability. Cutting corners risks costly bond failures and structural cracks that harm your reputation and client trust. Investing in premium inventory safeguards your projects and long-term dealer relationships.
Don’t rely on assumptions—validate our product’s quality and fit by requesting a sample kit today. Connect with our technical team to explore private label options and ensure your winter installations maintain unmatched durability and aesthetics.
