Wiedza o montażu telewizorów może zadecydować o różnicy między zgodną instalacją a kosztownymi karami OSHA, uszkodzeniem konstrukcji i przedłużonymi przestojami w działaniu. Kominki z kamienia naturalnego stwarzają trzy bezpośrednie zagrożenia operacyjne: ukryte ramy za warstwowymi fornirami, kruchą skałę, która pęka w przypadku nieprawidłowego wiercenia oraz ścieżki ciepła przyspieszające awarie elektroniki. Projekty kończą się niepowodzeniem, gdy zespoły zakotwiczają się w kamiennej ścianie zamiast na słupkach, wybierają niewłaściwe kotwy lub bity albo ignorują prześwity termiczne – stwarza to zagrożenie dla bezpieczeństwa, przeróbki i odpowiedzialność dla wykonawców i zarządców obiektów.
Ten przewodnik pełni rolę standardowej procedury operacyjnej: wyjaśnia, czy telewizor z dużym ekranem należy do klasy A kamienny kominek, dlaczego głównym zadaniem jest zawsze przebijanie kołków przez warstwy kamienia, technika wiertła diamentowego umożliwiająca penetrację kwarcytu bez jego pękania, metody podkładek dystansowych wsporników w celu wyrównywania nierównych powierzchni, taktyki dyskretnego prowadzenia kabli w przypadku ścian z teksturą oraz zabezpieczenia termiczne zapewniające bezpieczeństwo elektroniki. Znajdziesz listy kontrolne, zalecane typy kotew i zakresy momentów obrotowych, prędkości wiercenia i wybór bitów, tolerancje podkładek oraz szybkie testy weryfikacyjne w celu potwierdzenia solidnego mocowania, które pomyślnie przejdzie kontrolę i minimalizuje przestoje i odpowiedzialność.
Czy można bezpiecznie zamontować telewizor z dużym ekranem nad kamiennym kominkiem?
Sprawdź pojemność podłoża, kontroluj narażenie na ciepło i użyj kotew konstrukcyjnych, aby uniknąć awarii mocowania, uszkodzenia elektroniki oraz problemów z gwarancją lub odpowiedzialnością.
Oceń wytrzymałość kamienia i zlokalizuj solidne punkty kotwiczenia
Zidentyfikuj rodzaj kamienia i gęstość, zanim zaplanujesz kotwy: gęsty granit będzie przenosił znacznie większe obciążenia punktowe niż bardziej miękkie materiały, takie jak wapień czy fornir. Zaznacz lokalizacje pilotażowe i wywierć małe otwory testowe za pomocą wierteł rdzeniowych z węglików spiekanych lub diamentowych, używając wiertarki udarowej SDS/SDS-Plus; sprawdź każdy otwór pod kątem obecności stałego materiału lub ukrytych pustek i nasłuchuj pustych dźwięków, które wskazują na kieszenie powietrzne za okładziną.
Nie umieszczaj kotew w spoinach zaprawowych – zaprawa zaprawowa nie ma struktury strukturalnej i może się kruszyć pod długotrwałym obciążeniem. Jeśli kamień pokrywa obramowaną ścianę, użyj głęboko skanującej wyszukiwarki kołków, aby zmapować słupki lub bloki betonowe za fornirem przed ostatecznym rozmieszczeniem kotew.
Wybierz typ mocowania, aby zarządzać ciepłem i ergonomią oglądania
Wybierz uchwyt uwzględniający zarówno kąt widzenia, jak i ryzyko termiczne. Uchwyty wysuwane (na kominku) pozwalają zamocować telewizor wyżej na przodzie kominka, jednocześnie przechylając go w dół do poziomu oczu, zwiększając odległość od rosnącego ciepła. Jeśli potrzebujesz pozycji bocznej, użyj pełnoobrotowego uchwytu przegubowego; unikaj stałych uchwytów do wysokich kominków, ponieważ blokują zestaw zbyt wysoko, aby zapewnić wygodne oglądanie.
Postępuj zgodnie ze wskazówkami producenta telewizora i przetestuj miejsce: przyklej taśmą termometr w miejscu montażu telewizora, włącz kominek na kilka godzin i sprawdź, czy temperatura utrzymuje się poniżej ~30°F, aby zapewnić bezpieczną pracę. W przypadku kominków elektrycznych należy zachować odstęp co najmniej 12 cali; w przypadku ogólnych konfiguracji naściennych należy wybrać 15–20 cali, jeśli jest to wykonalne. Ustaw uchwyt i dowolną osłonę termiczną, aby odbijały ciepło promieniowania od telewizora.
Przygotuj powierzchnię, wybierz elementy złączne i wykonaj listę kontrolną instalacji
Przygotuj kamienną ścianę tak, aby uchwyt znajdował się poziomo, a każdy element mocujący przylegał do solidnego podłoża. W przypadku kamienia teksturowanego zainstaluj podkładki dystansowe lub podkładki, aby utworzyć płaską płaszczyznę montażową i sprawdź zamocowanie kotwy przed powieszeniem telewizora.
- Za solidne Kamień naturalny, wywierć otwory w podłożu kamiennym i zainstaluj wytrzymałe kotwy do muru lub kotwy klinowe dostosowane do ciężaru TV; klasa handlowa 1/4″ × 5″ Kotwy przegubowe lub klinowe są powszechnie stosowane w instalacjach modernizacyjnych.
- Dla okleina kamienna nad ramą użyj bardzo długich śrub do drewna, które wnikają w drewniane kołki na głębokość od 1,5 do 2,0 cali; potwierdź lokalizację kołków za pomocą głęboko skanującego wykrywacza kołków i wywierć otwory prowadzące przez fornir w kołku.
- Do penetracji kamienia używaj wierteł z węglikami spiekanych lub diamentów z wiertłem typu SDS; unikać nadmiernego ciśnienia, które może spowodować pęknięcie powierzchni. W przypadku bardzo twardego materiału należy umożliwić cykle dziobania i chłodziwo tam, gdzie jest to wymagane.
- Podłóż i wypoziomuj uchwyt: użyj rozciętej sklejki lub specjalnie zaprojektowanych podkładek (1/8″–1/4″ tam, gdzie to konieczne), aby płyta ścienna była płaska; zachować co najmniej 2-calowy prześwit pomiędzy uchwytem a kamień powierzchnia do prowadzenia kabli i obsługi wspornika.
- Sprawdź kotwy, wykonując kontrolę obciążenia i kontrolę wzrokową po montażu; zastosuj stopniowe obciążenie testowe i potwierdź brak ruchu. Jeśli integralność podłoża lub nośność pozostają niepewne, zatrudnij specjalistę instalator lub wykonawca konstrukcji.
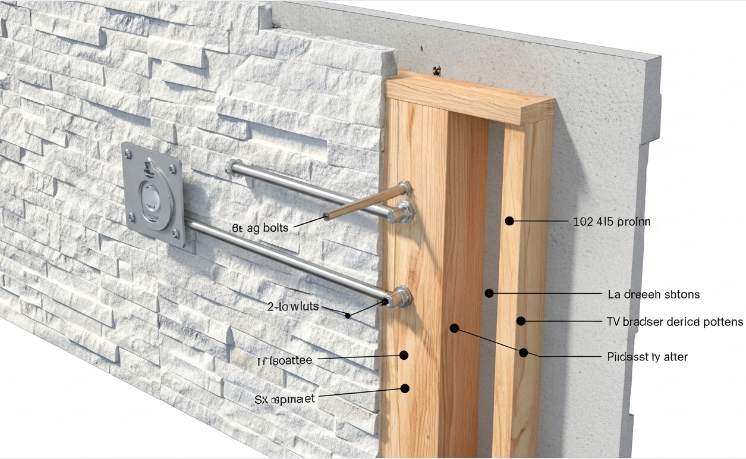
Dlaczego musisz celować w kołki przez warstwy kamienia?
Zakotwicz w konstrukcji budynku, a nie w kamieniu dekoracyjnym, aby zagwarantować nośność, długoterminową niezawodność i bezpieczną pracę nad kominkiem.
Oceń rodzaj kamienia, konstrukcję kominka i nośność
Zacznij od zidentyfikowania rodzaj kamienia i konstrukcja, dzięki czemu można przewidzieć obciążenie wydajność i zachowanie podczas wiercenia. Gęste materiały, takie jak granit, tolerują ciężkie kotwy murarskie; bardziej miękkie materiały, takie jak wapień lub fornir, mogą pękać, ukrywać puste przestrzenie lub nie zapewniać żadnego wsparcia strukturalnego. Oblicz łączne obciążenie jako: ciężar telewizora + ciężar mocowania + oczekiwane siły dynamiczne, a następnie dodaj margines bezpieczeństwa 25–50%, aby określić minimalne wymagania dotyczące kotwy i głębokości osadzenia.
- Nagrywać gęstość/porowatość kamienia oraz to, czy kamień jest murem pełnej grubości, czy fornirem dekoracyjnym nad szpilkami.
- Użyj boroskopu lub weź mały rdzeń badawczy, aby wykryć puste przestrzenie, ubytki lub podłoże niekonstrukcyjne przed ostatecznym wyborem rodzaju łącznika.
- Jeśli podłoże pozostaje niepewne, zaplanuj mocowanie do kołków lub użyj śrub przelotowych, zamiast ufać zaprawie lub fornirowi jako podparciu nośnemu.
Znajdź kołki i wewnętrzne ramy poprzez warstwy kamienia
Trianguluj centra kołków za pomocą wielu trybów wykrywania, zamiast polegać na jednym narzędziu. Szerokopasmowe lub wielomodowe skanery kołków, szukacze magnetyczne i tryby pojemnościowe ujawniają różne sygnały przez kamień i fornir; połączyć swoje odczyty, aby pewnie umieścić sondy pilotujące. Potwierdź rozstaw kołków — zwykle 16″ lub 24″ na środku — i przenieś te linie środkowe na tymczasową tablicę dociskową do kamienia, aby można było dokładnie ustawić uchwyt pomimo nierównej powierzchni.
- Wiertło 1/8″ otwory sondy pilotażowej w planowanych miejscach montażu, aby sprawdzić obecność kołków, a następnie uszczelnij sondy po kontroli, aby chronić podłoże.
- Jeśli skany i sondy nie zgadzają się, otwórz mały otwór inspekcyjny w płycie gipsowo-kartonowej lub użyj boroskopu, aby sprawdzić podłoże drewniane przed przystąpieniem do kotew.
- Zaznacz wyraźnie spoiny zaprawy i unikaj umieszczania kotew w zaprawie; zaprawa nie jest elementem konstrukcyjnym i będzie się kruszyć pod długotrwałym obciążeniem.
Wybierz kotwy, rozmiary łączników i głębokość osadzenia
Wybierz kotwy pasujące do rzeczywistego podłoża: solidne wymaga kamienia kotwy do muru, natomiast fornir na kołkach wymaga długich łączników, które wgryzają się w drewno. Dopasuj średnicę kotwy i osadzenie do obliczonych obciążeń i danych producenta i zawsze przed rozpoczęciem pracy sprawdź rozmiary wierteł i narzędzia montażowe.
- Lity kamień: należy stosować wytrzymałe kotwy murarskie (kliny, tuleje lub pręty gwintowane z żywicą epoksydową) z osadzeniem w litym kamieniu na głębokość minimalną 2,5–3,0 cala.
- Fornir na kołkach: określić śruby do drewna lub śruby zamkowe 3/8″–1/2″ średnicy przy minimalnej penetracji 1,5–2,0 w znajdujący się pod spodem słupek drewniany.
- W przypadku stosowania kotew epoksydowych przed załadowaniem kotwy należy przestrzegać czasów utwardzania i temperatur roboczych podanych przez producenta żywicy.
- Dopasuj średnicę wiertła do muru do średnicy nominalnej kotwy (na przykład: 3/8″ kotwica → 3/8″ wiertło do muru z węglików spiekanych) i użyj wiertarki udarowej SDS lub SDS-Plus do kamienia litego.
- Zaplanuj zasilanie ścienne zgodnie z kodem: użyj 14/2 NM dla gałęzi 15 A lub 12/2 dla gałęzi 20 A, zainstalować zestaw zasilania znamionowego do montażu w ścianiei zatrudnij licencjonowanego elektryka, jeśli nie możesz spełnić wymagań lokalnych przepisów elektrycznych.
Wywierć, zakotwicz i zamontuj: procedura instalacji krok po kroku
Rozłóż wspornik, korzystając z zaznaczonych środków kołków i wypoziomuj płyta ścienna na kamieniu. Przenieś położenie otworów wspornika na kamień, a następnie wywierć otwory prowadzące za pomocą odpowiedniego wiertła węglikowego lub diamentowego, trzymając wiertło prostopadle, aby uniknąć przemieszczania się lub pękania. Usuń kurz pomiędzy otworami, aby kotwy zostały całkowicie osadzone i sprawdź głębokość oparcia podczas wiercenia; zatrzymaj się, jeśli trafisz w pustkę i ponownie oceń typ kotwicy lub przejdź do sąsiedniej pozycji kołka.
- Przenieś środki otworów wspornika za pomocą taśmy lub ołówka i przed wierceniem sprawdź ponownie poziom na całej płytce.
- Wywierć otwory prowadzące w murze za pomocą dopasowanego wiertła węglikowo-diamentowego i wiertarki udarowej SDS; często odsysaj kurz za pomocą odkurzacza lub dmuchawy.
- Zamontuj kotwy według typu: dokręć kotwy mechaniczne zgodnie ze specyfikacją producenta, wstrzyknij żywicę epoksydową, a następnie włóż pręt gwintowany do kotew żywicznych lub wbij śruby do drewna całkowicie w kołki z podkładkami i nakrętkami zabezpieczającymi w przypadku montażu forniru na kołku.
- Umieść podkładki lub plastikowe elementy dystansowe za wspornikiem, aby utworzyć zlicowaną, poziomą płaszczyznę montażową względem teksturowanego kamienia i stopniowo dokręcaj łączniki na krzyż, aby wyrównać płytę bez nadmiernego naprężania pojedynczej kotwy.
Weryfikacja, testowanie obciążenia i protokół bieżącej kontroli
Przed opuszczeniem obiektu sprawdź instalację pod obciążeniem i zaplanuj ponowne kontrole krótkoterminowe. Zawieś telewizor, sprawdź mocowanie i zastosuj niewielką siłę w dół, aby upewnić się, że nie ma poślizgu ani ruchu. Po pierwszych 24–48 godzinach normalnego użytkowania ponownie dokręcić mechaniczne elementy złączne zgodnie z wartościami producenta lub specyfikacją kotwy, aby uwzględnić osiadanie i utwardzenie żywicy.
- Użyj termometru na podczerwień, gdy kominek pracuje na typowych ustawieniach; upewnij się, że temperatura powierzchni w uchwycie pozostaje poniżej limitów producenta telewizora (zwykle poniżej ~ 90°F). Jeśli przekracza bezpieczne limity, przenieś telewizor lub dodaj osłonę termiczną.
- Sprawdź uchwyt, kotwy i kamień wokół elementów złącznych po pierwszym użyciu, a następnie ponownie po 3 miesiącach i raz w roku. Poszukaj pęknięć, kruszenia się zaprawy, migracji kotew lub jakichkolwiek oznak poluzowania.
- Jeśli wykryjesz luzy, pęknięcia lub awarię kotew, natychmiast usuń obciążenie i skonsultuj się ze specjalistą z branży budowlanej lub murarskiej w celu naprawy lub wzmocnienia.
Kamień skumulowany premium, szybsze instalacje

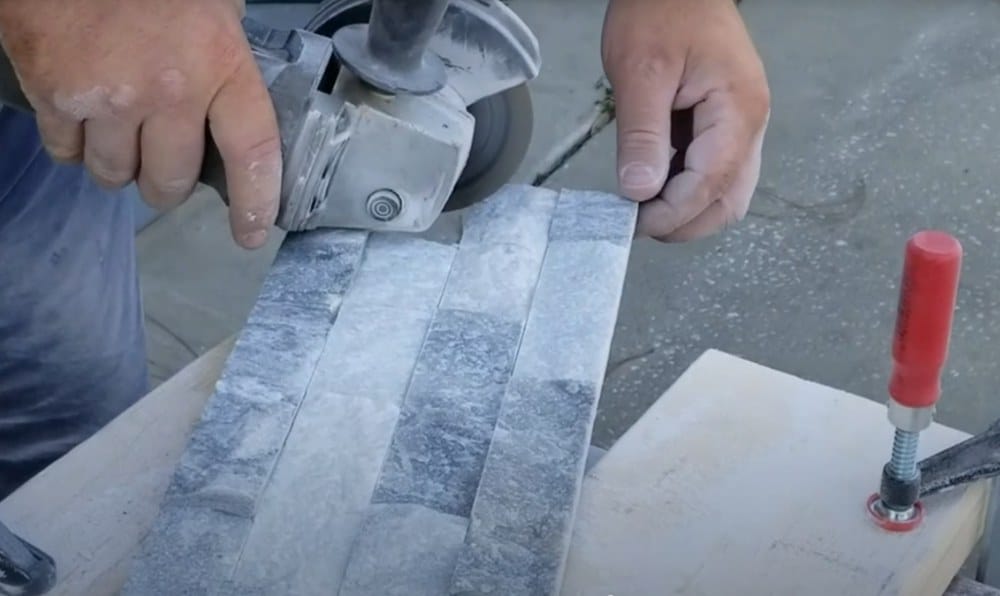
Sekret diamentowego bitu: jak penetrować kwarcyt bez pękania
Prawidłowe oprzyrządowanie diamentowe i kontrolowane wiercenie zapobiegają pękaniu kwarcytu i zapewniają, że kotwy łączą się z solidnym podłożem, zapewniając bezpieczne i trwałe mocowania.
Wybór narzędzia i bitu: dopasuj oprzyrządowanie diamentowe do średnicy kwarcytu i kotwy
Wybierz koronkę diamentową lub koronkę koronową pasującą do średnicy kotwy lub łącznika, którą planujesz zainstalować; dopasowana średnica minimalizuje obciążenie niecentryczne i zmniejsza ryzyko pęknięć obwodowych. Należy wybrać obrzeże ciągłe lub turbo przeznaczone do bardzo twardego kamienia naturalnego — wysoka zawartość kwarcytu wymaga matrycy wiążącej i ziarna odpowiedniego do formacji ściernych. Sprawdź, czy chwyt wiertła pasuje do wiertnicy lub wiertnicy (jeśli jest to zalecane, chwytem SDS-Plus lub trójpłaskim) i potwierdź, że narzędzie wytrzyma pracę na mokro, jeśli zastosujesz chłodziwo.
- Dopasuj wiertło do kotwy: ostateczna średnica otworu powinna odpowiadać specyfikacji kotwy, aby zapewnić pełne osadzenie kotwy.
- Wybierz typ obręczy dla twardego kamienia (ciągłe lub turbo) i wybierz ziarno/spoiwo dla kwarcytu ściernego.
- Potwierdź zgodność chwytu z wiertnicą lub wiertnicą i wybierz oprzyrządowanie przystosowane do pracy na mokro, jeśli używasz wody lub chłodziwa.
- Zaplanuj kotwy wyłącznie do litego kamienia; używaj kotew murowych o dużej wytrzymałości (na przykład klasy handlowej 1/4″ × 5″ kołki lub kotwy klinowe) i nigdy nie polegać na spoinach zaprawowych.
- Jeśli kamień nakłada się na ościeżnicę, zaplanuj śruby do drewna, które wnikają na głębokość 1,5 do 2 cali w drewniane kołki za fornirem.
Technika wiercenia minimalizująca pękanie i naprężenia termiczne
Stosować wiercenie na mokro lub ciągły dopływ wody do chłodzenia wiertła diamentowego i spłukiwania zawiesiny ściernej; chłodzenie zmniejsza naprężenia termiczne i zmniejsza tarcie. Pracuj ze stałym, lekkim naciskiem w dół i umiarkowaną prędkością obrotową, nie używaj trybu udarowego ani udarowego – siły uderzenia powodują mikropęknięcia w kruchym kwarcycie. Jeśli praca wymaga szybszej penetracji, należy rozważyć dodanie anionowego detergentu do płynu chłodzącego w stężeniu około 8% objętościowych; testy pokazują, że ta mieszanka zmniejsza tarcie i poprawia szybkość penetracji w porównaniu ze zwykłą wodą.
- Zacznij od małego otworu prowadzącego lub rdzenia prowadzącego, a następnie zwiększaj średnicę do ostatecznej, aby zmniejszyć naprężenia krawędziowe i zapobiec łuszczeniu.
- Zastosuj cykl dziobania: wierć przez około 30 sekund, wycofaj, aby usunąć wióry i pozwól, aby chłodziwo dotarło do czoła wiertła, a następnie kontynuuj. Powtarzające się cofanie zapobiega zatykaniu i przegrzaniu.
- Zatrzymuj się okresowo, aby usunąć szlam, sprawdź ściany otworów i wcześnie wykryj mikropęknięcia; natychmiast napraw wszelkie pęknięcia, zamiast wciskać wiertło głębiej.
- Monitoruj obciążenie i stan wiertła: utrzymuj obciążenie posuwu poniżej równowartości 2000 funtów na cal kwadratowy obszaru szczeliny i obserwuj RPC — jeśli RPC zbliży się do 100, wiertło zacznie się polerować i należy zmienić oprzyrządowanie lub dostosować parametry.
Przygotowanie miejsca montażu i weryfikacja zakotwienia przed ostatecznym zamocowaniem
Sprawdź kamień w przypadku pustych przestrzeni lub rozwarstwień za pomocą kontroli wzrokowych, próby gwintowania i średnicyomierza, jeśli jest dostępny; ukryte puste przestrzenie lub luźne powierzchnie zniszczą wydajność kotwicy. Zakotwicz bezpośrednio w litym kamieniu; nigdy nie osadzaj kotew krytycznych w spoinach zaprawowych. Jeśli kamień jest fornirem nad ramą, znajdź kołki i wkręć śruby do drewna, które wnikają w drewno na głębokość co najmniej 1,5 do 2 cali, aby zapewnić bezpośrednie połączenie mechaniczne.
Wypoziomuj uchwyt na teksturowanym lub nierównym kamieniu, używając podkładek lub podkładek, aby stworzyć stabilną płaszczyznę nośną. Najpierw wywierć płytkie otwory pilotowe, aby potwierdzić integralność podłoża; jeśli piloci ujawnią puste przestrzenie lub nierówną gęstość, zatrzymaj się wcześniej i skonsultuj ze specjalistą ds. konstrukcji montaż ostatecznego, wytrzymałego muru kotwice.
- Sprawdź za pomocą próby kranu i lunety; zaznacz podejrzane obszary przed wierceniem pełnych otworów.
- W przypadku forniru zlokalizuj kołki za pomocą głęboko skanującej wyszukiwarki kołków i zaplanuj wyjątkowo długie śruby do drewna, aby osiągnąć 1,5–2″ penetracja drewna.
- Użyj podkładek lub płytek dystansowych, aby utworzyć płaską powierzchnię montażową; przyciąć podkładki regulacyjne tak, aby wspornik przylegał równo po dokręceniu kotew.
- Wywiercić otwory pilotowe, aby sprawdzić podłoże; skonsultuj się ze specjalistą budowlanym, jeśli za kamiennymi fasadami napotkasz puste przestrzenie, rozwarstwienia lub zniszczoną zaprawę.
Poziomowanie na nierównych powierzchniach: technika podkładek wspornikowych
Właściwy wybór podkładek i kotew zapobiega awariom mocowania, uszkodzeniom cieplnym i kosztownym przeróbkom w przypadku nieregularnych elementów instalacje kominkowe z kamienia.
Zbadaj kamień i leżące pod nim podłoże pod kątem nośności i ukrytych pustek
Zacznij od określenia rodzaju kamienia i stanu wizualnego: gęsty granit i kwarcyt przenoszą znacznie większe obciążenia nośne niż miękki wapień czy cienki fornir. Mapuj złącza zaprawy i zaznaczaj potencjalne lokalizacje kotwic tylko na ścianach z litego kamienia; nigdy nie planuj kotew w zaprawie. Zbadaj podejrzane obszary za pomocą wiertarki pilotującej do muru lub boroskopu, aby wykryć puste przestrzenie lub ubytki – zatrzymaj się i skonsultuj ze specjalistą, jeśli kotwy przekroczą puste strefy.
Jeśli kamień jest fornirem, zlokalizuj leżące pod spodem słupki lub ramy konstrukcyjne za pomocą głęboko skanującej wyszukiwarki kołków i potwierdź za pomocą małych ćwiczeń eksploracyjnych. Oblicz łączne obciążenie (ciężar telewizora + mocowanie + siły dynamiczne wynikające z ruchu) i potwierdź kamień lub kołki mogą utrzymać ten ładunek z zabezpieczeniem współczynnik co najmniej 2. Przed zamówieniem okuć lub wycięciem otworów należy udokumentować rodzaj kamienia, ustalenia sondy i zaznaczone miejsca zakotwienia.
Wybierz kotwy i podkładki regulacyjne wraz z wymiarowaniem, osadzeniem i kontrolą korozji
Dopasuj rodzaj kotwy do podłoża: do podłoża stałego kamień użyj wytrzymałego muru kotwy (tulejowe, klinowe lub kotwy specyficzne dla muru) powszechnie stosowane w rozmiarze 3/8″–1/2″ średnica w zależności od obciążenia. Jeżeli konieczne jest dotarcie do słupków za fornirem, należy określić śruby do drewna o długości wystarczającej do osiągnięcia 1,5″–2″ osadzenie w drewnie. Priorytetowo traktuj odporność na korozję każdego łącznika i podkładki, gdy uchwyt znajduje się nad kominkiem, gdzie występują cykle temperaturowe.
- Kotwy: kotwy tulejowe, klinowe lub murowe do litego kamienia; śruby do drewna do kołków — rozmiar umożliwiający osiągnięcie wymaganego osadzenia.
- Materiały podkładek: podkładki ze stali nierdzewnej lub konstrukcyjny HDPE/nylon w odstępach od 1/16″ do 1/4″ w celu ustalenia płaszczyzny spłukiwania.
- Kontrola korozji: w przypadku narażenia na cykle cieplne należy stosować elementy złączne i podkładki ze stali nierdzewnej lub cynkowane ogniowo.
- Wiercenie: użyj wierteł do muru z węglików spiekanych lub wierteł diamentowych, ustaw ogranicznik głębokości wiercenia i wykonaj czyszczenie podciśnieniowe lub sprężonym powietrzem, aby zapewnić pełne osadzenie kotwy.
Zamontuj wspornik z podkładkami regulacyjnymi, sprawdź poziom i luz cieplny oraz przeprowadź kontrolę obciążenia
Zaznacz dokładnie płaszczyznę montażową i otwory wspornika przenoszącego. Wsuń podkładki w górne szczeliny za płytą ścienną i dokręć kotwy w kolejności progresywnej, tak aby wspornik wsunął się równo i wypoziomował bez nadmiernego naprężania żadnego pojedynczego elementu mocującego. Dokręcić kotwy zgodnie ze specyfikacjami producenta i sprawdzić brak ruchu na każdej kotwie; zaplanować ponowne dokręcenie po pierwszym użyciu kominka, jeśli zaleca to producent kotwy.
Wybierz uchwyt wysuwany lub przegubowy, aby zmniejszyć wysokość oglądania i odchyl telewizor z dala od rosnącego ciepła. Sprawdź odstęp pionowy od kominka i zmierz temperaturę w miejscu ustawienia telewizora, gdy kominek działa — jeśli temperatura utrzymuje się poniżej około 30°F, większość telewizorów mieści się w bezpiecznych granicach. Wykonaj kontrolę obciążenia statycznego: zawieś telewizor, sprawdź, czy nie ma dryfu, zmian szczelin lub poluzowanych kotew, a także udokumentuj typy kotew, głębokość osadzenia i grubość podkładek na potrzeby przyszłych kontroli.
- Zaznacz i wypoziomuj wspornik; umieść podkładki regulacyjne w szczelinach przed podaniem końcowego momentu obrotowego.
- Dokręcaj kotwy stopniowo i zgodnie ze specyfikacją; ponownie sprawdź i dokręć ponownie, jeśli jest to zalecane, po pierwszym cyklu ogrzewania.
- Zmierz temperaturę roboczą w miejscu ustawienia telewizora, gdy kominek jest włączony; utrzymuj odczyty poniżej ~100°F.
- Dokument: typ kotwy, średnica, głębokość osadzenia, materiał i grubość podkładki oraz wyniki badań w dokumentacji konserwacji.
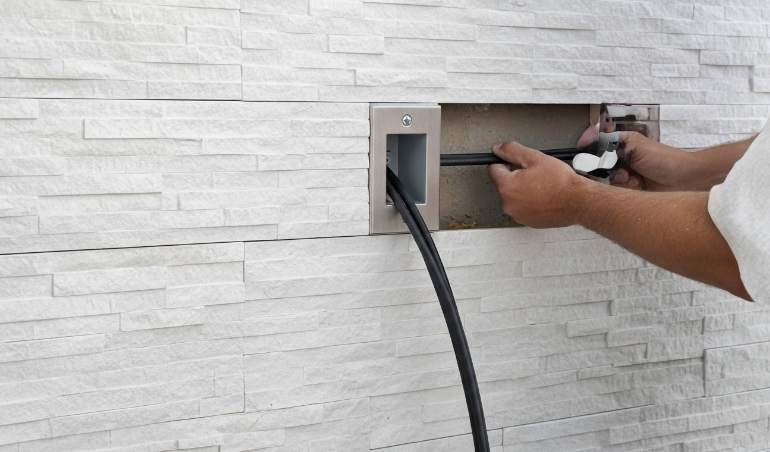
Ukryte zarządzanie kablami: prowadzenie przewodów w kamiennych ścianach z teksturą
Zaplanuj przewody, zakotwicz je w litym kamieniu i kontroluj ekspozycję na ciepło, aby uniknąć przeróbek, zachowując jednocześnie nienaruszone sygnały i bariery przeciwpożarowe.
Przed frezowaniem należy ocenić stan kamienia i ścian
Zidentyfikuj rodzaj kamienia i gęstość mapy przed cięciem: traktować granit i kwarcyt jako podłoża o wysokiej nośności, a wapień lub piaskowiec jako materiały o mniejszej nośności. Zaznacz na rysunku spoiny zaprawowe zamiast litego kamienia, ponieważ należy unikać polegania na zaprawie w przypadku kotew nośnych. Zeskanuj ścianę za pomocą detektora wielomodowego, aby zlokalizować kołki, metal i ubytki, a następnie przed rozpoczęciem wiercenia potwierdź podejrzane puste przestrzenie kamerą boroskopową.
Postępuj zgodnie z konserwatywnym protokołem wiercenia rdzeniowego: zacznij od 3/8″ pilota murarskiego, aby sprawdzić podłoże, a następnie zwiększyć do 1/2″–1″ diamentowe wiertła rdzeniowe do tworzenia kieszeni na przewody lub kotwy o wymiarach dostosowanych do wybranej kotwy. Zmierz temperaturę powierzchni i spalin za pomocą termometru na podczerwień; jeśli odczyty w planowanej lokalizacji telewizora są bliskie lub przekraczają 100°F, należy zmienić położenie kabli lub dodać osłonę termiczną.
- Określ: zapisz rodzaj kamienia (granit, kwarcyt, piaskowiec, wapień) i dokładne położenie spoin zaprawowych.
- Skanowanie: użyj detektora głęboko skanującego, a następnie potwierdź ukryte puste przestrzenie za pomocą boroskopu.
- Wiertło: 3/8″ pilot, potwierdź substrat, następnie 1/2″–1″ rdzenie diamentowe do kieszeni na przewody/kotwice.
- Kontrola termiczna: dokonaj pomiaru za pomocą termometru na podczerwień i unikaj prowadzenia przez strefy powyżej temperatur roboczych producenta (≈100°F).
Zaplanuj i zainstaluj chroniony kanał kablowy przez teksturowany kamień
Określ kanał dla obciążenia i przyszłej obsługi. Użyj minimum 3/4″ Zaplanuj 40 rur PVC lub elastycznych rur metalowych (FMC) dla pojedynczego przebiegu niskiego napięcia; wybierz 1″ kanał kablowy, gdy potrzebujesz wielu kabli lub wolnej przestrzeni. Używaj kabli do montażu w ścianie: CL2 lub CL3 do niskiego napięcia oraz do montażu w ścianie zestawów HDMI lub HDBaseT z certyfikatem UL, gdy potrzebujesz aktywnych przebiegów wideo. Zatrudnij licencjonowanego elektryka, aby zainstalował wszelkie źródła napięcia sieciowego lub zatwierdzony zestaw zasilania ściennego.
Kotwicz wyłącznie w litym kamieniu, nigdy w zaprawie. Wybierz kotwy murowe, kotwy klinowe lub kotwy tulejowe o wymiarach odpowiednich dla gęstość kamienia i ustaw je na producenta specyfikacje osadzania i momentu obrotowego; jeśli za fornirem znajdują się kołki, należy zastosować śruby do drewna o penetracji 1,5″–2″ w szpilki. W przypadku ciągów kablowych zamontuj przelotowe zakończenia przewodów, użyj taśmy rybiej ze smarem do kabli i chroń wiązki niskiego napięcia wewnątrz dodatkowej tulei, aby zapobiec ścieraniu o teksturę kamienne krawędzie.
- Przewód: 3/4″ Zaplanuj 40 PVC lub FMC dla pojedynczych serii; 1″ dla wielu lub wolnych mocy produkcyjnych.
- Specyfikacja kabla: CL2/CL3 do montażu w ścianie niskiego napięcia; Do montażu ściennego HDMI/HDBaseT z certyfikatem UL do wideo.
- Zasilanie: zatrudnij licencjonowanego elektryka w celu uzyskania napięcia sieciowego lub zatwierdzonych zestawów zasilania do montażu w ścianie.
- Kotwy: wiercić wyłącznie w litym kamieniu; rozmiar kotew do gęstości kamienia i ustawić zgodnie ze specyfikacjami momentu obrotowego/osadzenia. W przypadku kotwienia na kołkach należy użyć śrub do drewna o średnicy 1,5″–2″ penetracja.
- Ciągnięcie: zamontuj końcówki z pierścieniami uszczelniającymi, użyj taśmy rybiej i smaru i poprowadź kabel w tulejach ochronnych, aby uniknąć przetarcia.
Chroń przejścia i sprawdzaj długoterminową niezawodność
Uszczelnij wszystko przejścia przez ściany za pomocą ogniochronnej lub pęczniejącej masy uszczelniającej i zamontować gumowe przelotki, które zapobiegają otarciom i chronią barierę ogniową i powietrzną ściany. Zachowaj separację niskiego napięcia od napięcia sieciowego: zachowaj zalecaną odległość 300 mm (≈12″) odstępy między przewodami zasilającymi i bardzo niskim napięciem lub umieść jeden obwód całkowicie w kanale kablowym, gdy bliskość wymusza bliższe prowadzenie.
Szanuj każdy kabel minimalny promień zgięcia określony przez producenta i unikać ostrych zakrętów na kamieniu krawędzie. Zaprojektuj dostęp serwisowy, dodając przyciski spłukujące lub zdejmowane osłony w strategicznych punktach. Zleć instalację, przeprowadzając kontrolę elektryczną i sygnałową: sprawdź ciągłość, zmierz napięcie i uziemienie pod obciążeniem, potwierdź uzgodnienia HDMI/HDBaseT i integralność sygnału oraz oznacz każdy kabel na obu końcach w celu przyszłej konserwacji.
- Uszczelnienie: zamknąć wejścia przewodów pęczniejącą lub ognioodporną masą uszczelniającą i zamontować gumowe pierścienie uszczelniające na wszystkich przejściach.
- Separacja: zachowaj 300 mm (≈12″) pomiędzy siecią a niskim napięciem lub całkowicie zamknąć jeden obwód w kanale kablowym.
- Trasowanie: należy przestrzegać minimalnych promieni zgięcia producenta i unikać punktów ściskających na krawędziach.
- Łatwość serwisowania: należy zapewnić płytki spłukujące lub zdejmowane osłony ramy na potrzeby przyszłych przeciągnięć i napraw.
- Uruchomienie: sprawdź ciągłość, sprawdź uzgodnienie HDMI/HDBaseT i jakość sygnału, potwierdź uziemienie i napięcie pod obciążeniem oraz oznacz kable na obu końcach.
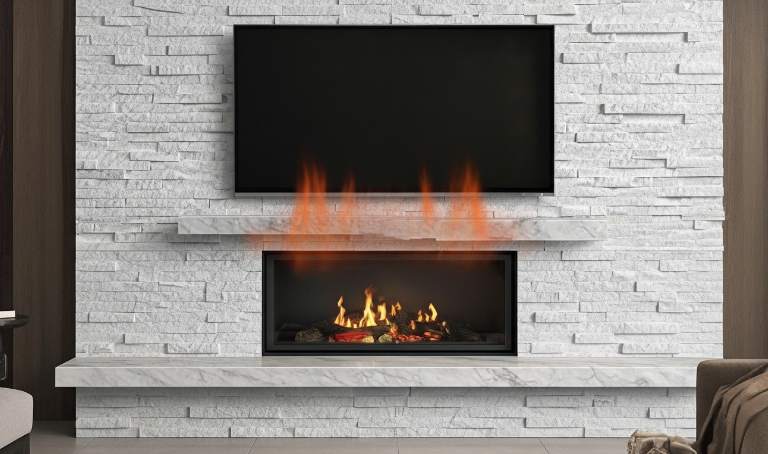
Radzenie sobie z ciepłem: ochrona elektroniki przed wzrostem temperatury w kominku
Zmierz ciepło, zakotwicz do konstrukcji i sprawdź integralność kamienia, aby zapobiec awariom sprzętu i odpowiedzialność przy montażu elektroniki nad kominkiem.
Mierz i kontroluj ciepło w proponowanym miejscu montażu
Użyj termometru na podczerwień lub termopary, aby zarejestrować temperaturę powierzchni i powietrza na dokładnej płaszczyźnie montażu, wykonując reprezentatywny cykl spalania przez kilka godzin. Zapisz wartości szczytowe i porównaj je z maksymalną temperaturą roboczą producenta telewizora; jeśli producent nie opublikuje limitu, należy unikać lokalizacji, w których podczas normalnej pracy stale występują wysokie wartości.
Zainstaluj pasywne środki zarządzania ciepłem — osłony kominkowe, deflektory ciepła lub szklane drzwiczki kominka — aby odciąć ciepło promieniowania i konwekcji skierowane na telewizor. Dokonaj ponownego pomiaru po każdej zmianie: jeśli w środku planowanego uchwytu podczas długotrwałej pracy temperatura będzie niższa niż około 30°C, lokalizacja jest ogólnie akceptowalna dla nowoczesnych telewizorów; jeśli odczyty przekraczają tę wartość, przesuń uchwyt wyżej lub dodaj ekranowanie, aż temperatura będzie zgodna ze wskazówkami producenta telewizora.
Wybierz elementy montażowe i konfigurację pod kątem odprowadzania ciepła i ergonomii oglądania
Preferuj uchwyty wysuwane (na kominku), dzięki którym możesz zakotwiczyć telewizor wyżej kamień, jednocześnie przechylając go w dół, aby był prawidłowy kąt widzenia; W pełni ruchome uchwyty przegubowe sprawdzają się, gdy potrzebujesz regulacji w poziomie lub na głębokość, ale unikaj stałych uchwytów, które blokują telewizor zbyt wysoko. Zachowaj odstęp: staraj się zachować odległość co najmniej 12 cali od kominków elektrycznych i 15–20 cali, jeśli to możliwe, w przypadku telewizorów montowanych na ścianie i unikaj pozycji, które wymuszają skierowanie ekranu na bezpośrednią drogę rosnącego ciepła.
Zawsze kotwij w litym kamieniu lub znajdujących się pod nim słupkach – nigdy w spoinach zaprawowych. Dla okleina kamienna na kołkach użyj bardzo długich śrub do drewna, które wnikają w drewniane kołki na głębokość co najmniej 1,5–2,0 cala. W przypadku kamienia teksturowanego użyj podkładek dystansowych lub podkładek za płytą montażową, aby utworzyć poziomą, stabilną płaszczyznę, tak aby wspornik przenosił obciążenie na kotwy, a nie na nierówne kamienne powierzchnie.
- Wybierz uchwyty wysuwane lub przegubowe, aby kontrolować wysokość i ekspozycję na ciepło.
- Do litego kamienia należy stosować kotwy murarskie o dużej wytrzymałości; nigdy nie polegaj na zaprawie.
- W przypadku forniru należy zastosować śruby do drewna o średnicy 1,5–2,0″ wbić się w kołki i dodać podkładki, aby wypoziomować płytę.
Potwierdź integralność kamienia i zmniejsz ryzyko ukrytych pustych przestrzeni przed ostateczną instalacją
Zbadaj otwory pilotowe i sprawdź za kamieniem za pomocą boroskopu lub endoskopu, aby wykryć szczeliny, kieszenie powietrzne lub puste przestrzenie, które zapobiegną wgryzaniu się kotwic. Wywiercić próbne elementy złączne i sprawdzić wytrzymałość na wyrywanie zgodnie ze specyfikacjami producenta kotwy; traktuj te zmierzone wartości jako kryteria pozytywne/niezaliczone dla wybranego typu kotwicy.
Tam, gdzie znajdziesz puste przestrzenie, cienki fornir lub niewystarczające podłoże, zmodernizuj rozwiązanie konstrukcyjne: przykręć stalową płytę mocującą do ramy lub przymocuj uchwyt bezpośrednio do kołków, zamiast polegać na fornirze. Kiedy rodzaj kamienia, gęstość lub warunki ukryte wydają się niepewne, zatrudnij profesjonalistę instalatora lub murarza, aby zapobiec przeróbkom i zapewnić bezpieczeństwo niepowodzenia.
- Przed przystąpieniem do mocowania miejsc kotwiczenia należy sprawdzić ubytki za pomocą boroskopu.
- Sprawdź wytrzymałość kotwy na wyrywanie za pomocą łączników testowych zgodnie ze specyfikacją.
- Zamontuj płyty nośne lub przymocuj je do kołków, jeśli fornir nie ma wystarczającej wytrzymałości strukturalnej.
- Zatrudnij A profesjonalista, gdy kamień stan lub ścieżki obciążenia są niejasne.
Wniosek
Prawidłowy montaż telewizora z dużym ekranem kamień naturalny chroni pasażerów i zapobiega uszkodzeniom konstrukcji. Ukierunkowanie kołków, użycie odpowiednich wierteł, wypoziomowanie za pomocą podkładek, zarządzanie kablami i uwzględnienie ciepła zapewniają zgodność z OSHA i wydłużają żywotność sprzętu.
Sprawdź aktualne konfiguracje swojej floty pod kątem powyższych kroków lub skontaktuj się z nami, aby poprosić o katalog i próbkę certyfikowanego oświetlenia oraz umówić się na przegląd certyfikowanego instalatora.
Często zadawane pytania
Czy można bezpiecznie zamontować telewizor nad kamiennym kominkiem?
Tak, ale tylko przy starannym planowaniu i właściwym podejściu: sprawdź integralność strukturalną kamienia (różne kamienie mają różną nośność), upewnij się, że telewizor nie będzie narażony na działanie szkodliwego ciepła, użyj specjalistycznych rozwiązań montażowych (preferowane są mocowania do dołu/mantel) i zakotwij elementy bezpośrednio w litym kamieniu (nigdy w zaprawie). Ponieważ powierzchnie kamienne są nierówne, należy zastosować podkładki dystansowe lub podkładki w celu uzyskania równej podstawy i wytrzymałych kotew murowych; jeśli kamień jest fornirem, przymocuj do znajdujących się poniżej kołków za pomocą śrub do drewna o odpowiednim rozmiarze. Biorąc pod uwagę ukryte puste przestrzenie i problemy związane z ciepłem, zdecydowanie zaleca się profesjonalną ocenę i instalację.
Jakie wiertło jest potrzebne do paneli z kamienia naturalnego?
Użyj wiertła do muru o rozmiarze pasującym do wytrzymałych kotew murowych, które planujesz zainstalować; za solidne kamień naturalny oznacza to solidną konstrukcję wiertła murarskiego do kamienia (i, jeśli to konieczne, odpowiedni młotek lub wiertarka udarowo-obrotowa). Celem jest wiercenie bezpośrednio w litym kamieniu, aby kotwy mogły prawidłowo wgryźć się w podłoże – nie należy polegać wyłącznie na spoinach zaprawowych lub fornirze.
Jak ukryć przewody telewizyjne za naturalnym kamieniem?
Zaplanuj okablowanie w oparciu o to, co znajduje się za kamieniem: elewacje z kamienia dekoracyjnego mogą mieć szczeliny, puste przestrzenie lub znajdujące się pod spodem kołki. Najbezpieczniejszym sposobem jest poprowadzenie kabli do wnękę w ścianie lub w słupki za kamieniem jeśli jest to możliwe, lub użyj zatwierdzonych rozwiązań w zakresie okablowania ściennego; jeśli nie ma bezpiecznej ścieżki wewnętrznej, użyj bieżni powierzchniowych lub poproś specjalistę o wykonanie kanału. Unikaj wiercenia na ślepo w kamieniu lub zaprawie bez znalezienia solidnego podłoża i skonsultuj się ze specjalistą, aby zapewnić rozwiązanie zgodne z przepisami i odporne na wysoką temperaturę.
Czy ciepło z kominka z czasem uszkodzi mój telewizor?
Tak — zamontowanie telewizora zbyt blisko rosnącego ciepła może skrócić jego żywotność i z czasem uszkodzić elektronikę. Właściwe odstępy w pionie i specjalistyczne mocowania zapobiegające ekspozycji na ciepło (takie jak mocowania opuszczane/mocowane do kominka) pomagają zmniejszyć ryzyko; oceń rozkład ciepła przed montażem i rozważ profesjonalną instalację, aby zrównoważyć bezpieczną odległość i komfort oglądania.
Jak naprawić chwiejny uchwyt do telewizora na nierównej kamiennej powierzchni?
Utwórz stabilną, poziomą powierzchnię montażową, używając podkładek dystansowych lub podkładek, aby zrekompensować teksturę kamienia, a następnie zakotwij w litym kamieniu za pomocą wytrzymałych kotew murarskich – nigdy w zaprawie. Jeśli kamień jest forniremprzesuń łączniki tak, aby śruby do drewna wniknęły w znajdujące się pod nimi kołki na głębokość co najmniej 1,5–2 cali. Rozważ zmianę uchwytu na uchwyt przeznaczony do danego zastosowania (z możliwością ściągania w dół lub z pełnym ruchem) i poproś specjalistę o sprawdzenie i wzmocnienie kotew, jeśli drgania będą się utrzymywać.
