Oświetlenie podszafkowe zainstalowane bez precyzyjnej kontroli olśnienia i planowania okablowania powoduje konieczność przeróbek, opóźnia przekazanie i stwarza ryzyko niepowodzeń inspekcji, które skutkują kosztownymi karami finansowymi. Na osłonach tylnych wyłożonych kamieniami źle rozmieszczone kąty wiązki światła i niewłaściwa temperatura barwowa wzmacniają niespójności tekstur, odsłaniają szwy i tworzą widoczne artefakty kurzu i cieni, które skłaniają klientów do zmiany zamówień i roszczeń gwarancyjnych – problemy, które mocno obciążają budżety i harmonogramy.
Ten przewodnik pełni funkcję gotowej do zastosowania w terenie procedury SOP dla projektantów, instalatorów i zespołów zajmujących się obiektami: opisuje, dlaczego światło grabiące spłaszcza ułożone kamienie, jak wybrać temperaturę barwową diod LED w przypadku kamieni ciepłych lub chłodnych, a także – co najważniejsze – zawiera instrukcje krok po kroku dotyczące rozmieszczania pasków LED, aby uniknąć ostrego odblasku i odsłonięcia szwów. Znajdziesz szablony montażowe, zalecane zakresy lumenów i kąty rozsyłu światła, strategie przyciemniania umożliwiające przejście od zadania do nastroju, plany okablowania w celu skierowania zasilania przed instalacja kamieniaoraz zwięzłe często zadawane pytania dotyczące typowych decyzji podejmowanych na miejscu. Skorzystaj z list kontrolnych i diagramów, aby ograniczyć niespodzianki na miejscu, przyspieszyć uzyskiwanie zatwierdzeń i dostarczać wykończenia z kamienia, które wyglądają spójnie w rzeczywistym oświetleniu i na zdjęciach klientów.
Dlaczego Raking Light jest najlepszym przyjacielem tekstury ułożonego kamienia?
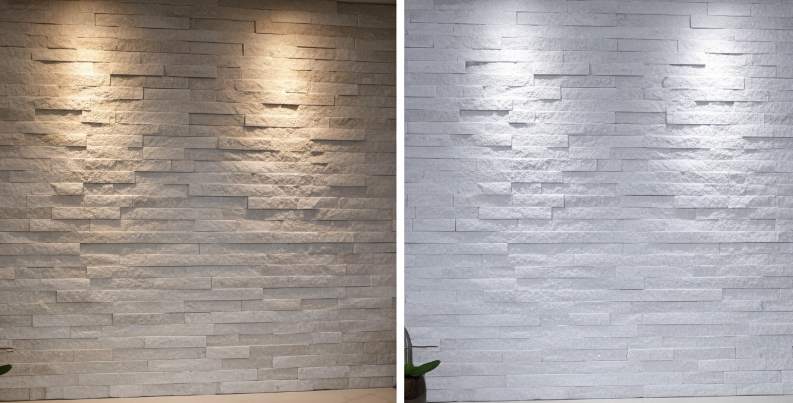
Światło grabiące zmienia zmienność powierzchni w mierzalną wizualną głębię, poprawiając spójność estetyczną i ograniczając konieczność wykonywania dodatkowych prac w przypadku dużych instalacji z ułożonych kamieni.
Jak pasące się światło wyolbrzymia relief, cień i naturalny kolor
Padające światło oświetla kamień pod niskim kątem, tworząc mikrocienie w szczelinach i rozjaśnienia na podwyższonych półkach, zwiększając postrzeganą głębię na podzielonej powierzchni i panele półkowe. Zastosuj tę technikę do paneli o grubości 10–35 mm (standardowo 1,0–2,5 cm, premium do 3,5 cm), aby zmaksymalizować separację cieni przy jednoczesnym zachowaniu ostrej definicji krawędzi.
Określ źródła o wysokim CRI (CRI ≥ 90), aby prawdziwy odcień kamienia pozostał widoczny w dużych seriach, i wymagaj spójności kamieniołomu w tej samej partii (jednolitość odcienia na poziomie 95%) w przypadku zamówień projektowych. Dopasuj skorelowaną temperaturę barwową do rodziny kamienia: 2700–3000 K dla ciepłych odcieni kwarcytu lub piaskowca oraz 3500–4000 K dla chłodnych szarości i bieli, aby zachować naturalny kontrast i uniknąć wyblaknięć.
- Docelowa grubość panelu: 10–35 mm (1,0–3,5 cm) dla najlepszych wyników wypasu.
- Jakość światła: CRI ≥ 90; wymagają jednorodności odcienia w tej samej partii ≥ 95% w przypadku dużych elewacji.
- Wytyczne CCT: 2700–3000 K (ciepłe kamienie); 3500–4000 K (chłodne kamienie).
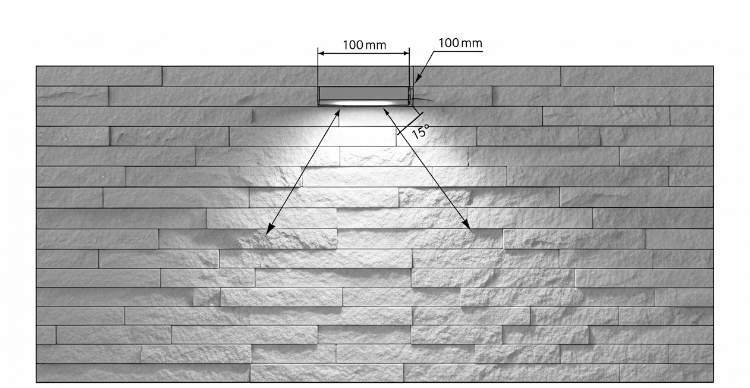
Geometria mocowania i zasady kąta wiązki dla efektywnego grabienia (umieszczenie, odległość, kąt)
Position fixtures parallel to the twarz ściany with a low tilt so light travels across the stone rather than into it. For highly irregular textures place the fixture 50–150 mm (2–6 inches) from the stone to avoid hard, distracting shadows while keeping the grazing effect. Use narrow to medium beam angles—10°–25°—to emphasize texture; wider beams will wash the surface and reduce three-dimensionality.
For long akcentujące ściany umieść ciągłe oprawy liniowe (ciągłe listwy lub asymetryczna optyka liniowa) wzdłuż ściany zamiast rozmieszczonych w odstępach opraw punktowych, aby zachować jednolity gradient cienia. W przypadku wypasu z góry na dół umieść oprawę w obrębie górnych 10–15% wysokości ściany, aby zapewnić nieprzerwany cień; użyj bocznego wypasu dla elementów pionowych i at narożniki z pasującymi narożnikami w kształcie litery L, aby zachować spójną krawędź definicja.
- Odległość: 50–150 mm (2–6 cali) od bardzo nieregularnych powierzchni kamiennych.
- Kąt świecenia: 10°–25° dla wyraźnej tekstury; szersze kąty dla bardziej miękkiego efektu.
- Umieszczenie: w górnych 10–15% wysokości ściany w przypadku wypasu od góry do dołu; uruchamiaj urządzenia w sposób ciągły w przypadku długich ścian.
Specyfikacje dotyczące osprzętu, stopnia ochrony IP i konstrukcji wewnętrznych i zewnętrznych instalacji grabiących
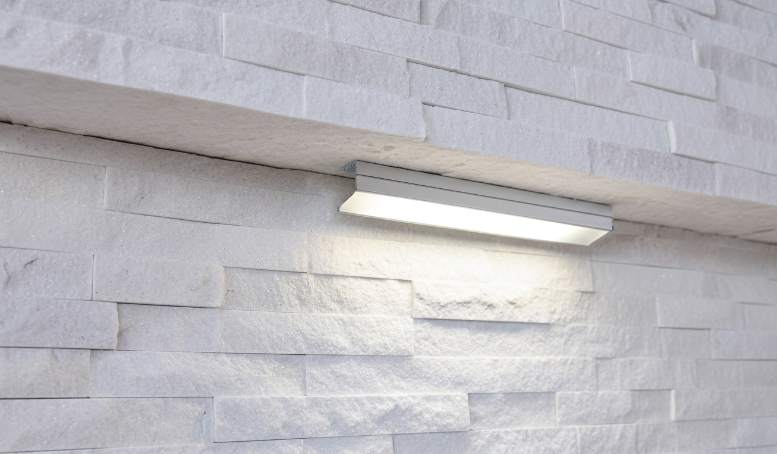
Wybierz typy opraw w zależności od środowiska: użyj niskoprofilowych liniowych listew LED lub asymetrycznych opraw ściennych do wnętrz i wybierz oprawy o stopniu ochrony IP65–IP66 z mocowaniami ze stali nierdzewnej klasy morskiej do odsłoniętych ścian zewnętrznych. Do ciągów świetlnych należy zastosować paski LED 24 V DC montowane w aluminiowych kanałach z dyfuzorami w celu ukrycia szwów i wyeliminowania odblasków; w przypadku opraw na miejscu należy stosować ściemnialne sterowniki 120/230 VAC, jeśli wymaga tego dystrybucja mocy. Jeśli potrzebujesz dostrojenia kontrastu lub sterowania sceną, określ sterowniki z możliwością ściemniania i kompatybilne protokoły sterowania (0–10 V, DALI lub PWM).
Projektując podłoże i kotwy, należy wziąć pod uwagę ciężar panelu: standardowe panele płaskie ważą około 30–40 kg/m², a panele szorstkie mogą osiągnąć ≈55 kg/m², dlatego należy stosować kotwy mechaniczne i szyny nośne przystosowane do tych obciążeń, zamiast polegać na samym kleju. W przypadku zakupów i logistyki wymagana jest wizualna weryfikacja przed wysyłką, potwierdzenie rozmiarów paneli (150 × 600 mm lub 150 × 550 mm) i zamówienie pasujących narożników w kształcie litery L, aby efekty oświetleniowe pozostały spójne we wszystkich przejściach.
- Oprawy wewnętrzne: niskoprofilowe listwy liniowe lub asymetryczne listwy; użyj aluminiowych kanałów + dyfuzorów do szwów i kontroli olśnienia.
- Oprawy zewnętrzne: stopień ochrony IP65–IP66; mocowania ze stali nierdzewnej klasy morskiej do miejsc przybrzeżnych lub o dużym zasoleniu.
- Opcje zasilania: Taśmy LED 24 V DC do linii ciągłych; Sterowniki ściemnialne 120/230 VAC do rozproszonych opraw. Jeśli precyzja ściemniania ma znaczenie, określ sterowanie 0–10 V, DALI lub PWM.
- Konstrukcyjne: zaprojektuj kotwy i szyny dla płyt 30–40 kg/m² (płaskie) lub ≈55 kg/m² (szorstkie); w przypadku stałych instalacji nie należy polegać wyłącznie na kleju.
- Lista kontrolna zakupów: wymagaj konsystencji kamieniołomu w tej samej partii (równomierność odcienia ≥95%), potwierdź wymiary panelu (150 × 600 mm lub 150 × 550 mm) i zamów pasujące narożniki L.
Wybór odpowiedniej temperatury barwowej LED dla ciepłych i chłodnych kamieni
Wybierz kelwiny LED, CRI, optykę i okablowanie, aby zachować kolor i teksturę kamienia, minimalizując jednocześnie konieczność przeróbek w terenie i roszczeń gwarancyjnych.
Dopasuj kelwiny LED i CRI do odcieni kamienia i przykładów wyposażenia
Dopasuj temperaturę barwową do naturalnego odcienia kamienia, aby materiał był zgodny z zamierzeniami kamieniołomu. W przypadku kamieni o ciepłej tonacji, takich jak California Gold, Golden Honey, Gold Rush i Copper Canyon, wybierz temperaturę 2700–3000 K, aby zachować bursztynowe i złote refleksy. W przypadku kamieni neutralnych użyj temperatury 3000–3500 K w celu uzyskania zrównoważonego renderowania. W przypadku kamieni o chłodnych odcieniach, takich jak Alaska Grey, Glacier White, Sierra Blue i Carbon Black, ustaw temperaturę 3500–5000 K, w zależności od tego, czy chcesz uzyskać wyraźny, nowoczesny wygląd, czy neutralną prezentację.
Określ wierność kolorów, aby zapobiec niespodziankom między partiami: wymagaj CRI ≥ 90 i MacAdam 3-etapowy lub lepszy instalatorzy konsekwentnie reprodukują odcienie w przypadku długich serii i paneli zamiennych. W przypadku ciepłych kamieni wymagany jest wysoki współczynnik R9 (≥ 50) lub nasycony wskaźnik koloru, aby zachować odcienie czerwieni i bursztynu ujawniane przez ciepłe światło.
- Ciepłe kamienie: 2700K–3000K; wymagają CRI ≥ 90 i R9 ≥ 50.
- Kamienie neutralne: 3000K–3500K; CRI ≥ 90 i MacAdam ≤ 3-stopniowy.
- Chłodne kamienie: 3500K–5000K; CRI ≥ 90 dla dokładnych odcieni szarości i błękitu.
- Test terenowy: scena w temperaturze 2700 K, 3000 K i 4000 K w nocy na próbnej ścianie o długości 1–2 m, aby potwierdzić postrzegane ciepło i zachowanie podświetlenia.
Wybierz typ oprawy, optykę i mocowanie, aby uzyskać efektywny wypas na ułożonych kamieniach
Użyj padającego światła, aby przesunąć kamienną twarz i odkryć teksturę; wybierz liniowe profile aluminiowe z asymetrycznymi soczewkami lub regulowanymi punktami o wąskiej wiązce, aby stworzyć kontrolowane cienie na półkach. Umieść oprawy bezpośrednio nad lub z boku płaszczyzny i ułóż ciągłe profile liniowe na długich ścianach, aby uniknąć karbowanych wzorów świetlnych. W przypadku powierzchni o dużej teksturze należy umieścić oprawy nieco dalej od ściany, aby złagodzić ostre cienie.
Wybierz optykę i mocowanie, aby zrównoważyć kontrast i czytelność. Użyj wąskich wiązek (10°–30°) lub asymetrycznej optyki, aby podkreślić relief; jeśli zależy Ci na prawdziwym wypasie, unikaj szerokich dyfuzorów 120°. Do środowisk zewnętrznych lub wilgotnych wybierz oprawy o stopniu ochrony IP65 lub wyższej z obudowami odpornymi na korozję do projektów w Zatoce Perskiej i na wybrzeżach, aby chronić przed zasoleniem i wilgocią.
- Typy opraw: liniowe kanały aluminiowe z dyfuzorami, soczewkami asymetrycznymi lub regulowanymi punktami wąskostrumieniowymi.
- Kąty rozsyłu światła: 10°–30° wąskie wiązki lub optyka asymetryczna; unikaj soczewek o szerokości 120° do wypasu.
- Odległość montażowa: 20–50 mm dla powierzchni o niskim reliefie; 50–150 mm w przypadku bardzo nieregularnych, szorstkich twarzy w celu zmniejszenia ostrego kontrastu.
- Umiejscowienie: zamontować bezpośrednio nad lub z boku płaszczyzny ściany; używaj ciągłych przebiegów, aby zachować równomierne podkreślenie tekstury na długich ścianach.
- Specyfikacja do pracy na zewnątrz/wilgotno: IP65+ i obudowy odporne na korozję do projektów przybrzeżnych/zatokowych.
Wytyczne elektryczne, dotyczące gęstości strumienia świetlnego i ściemniania dla listw i opraw liniowych
Zaplanuj napięcie, gęstość światła i okablowanie przed wysyłką kamienia, aby uniknąć przeróbek. Używaj systemów o stałym napięciu 12 V lub 24 V i preferuj 24 V w przypadku odcinków dłuższych niż 5 m, aby zmniejszyć spadek napięcia. Docelowo 8–24 W/m i około 800–1600 lm/m w zależności od reliefu: określ wyższą granicę dla głębokich, chropowatych tekstur i dolną granicę dla subtelnych ścian półek skalnych.
Projektuj przebiegi elektryczne i elementy sterujące pod kątem niezawodności: ogranicz długość pojedynczego odcinka do 5–10 m dla 12 V i 10–20 m dla 24 V, a w przypadku długich odcinków wprowadzaj zasilanie co 5–10 m. Do krótkich serii używaj 18 AWG (<5 m), 16 AWG dla średnich przebiegów (5–15 m) i 14 AWG dla dłuższych linii zasilających (>15 m). Rozmiar przetworników zapewniający co najmniej 20% zapasu mocy i ochronę przeciwprzepięciową dla instalacji przybrzeżnych. Wybierz sterowniki pozbawione migotania, kompatybilne z 0–10 V, DALI lub PWM/DMX i przetestuj krzywe ściemniania na próbce kamienia przed pełną instalacją.
- Napięcie: stałe napięcie 12 V lub 24 V; preferuj 24 V do pracy >5 m.
- Moc & lumenów: 8–24 W/m; ~800–1600 lm/m (w przypadku głębokiego reliefu należy stosować wyższe wartości).
- Długość biegu: maks. 5–10 m dla 12V; maks. 10–20 m dla 24 V; na długich dystansach dodawaj moc co 5–10 m.
- Przekrój drutu: 18 AWG (<5 m), 16 AWG (5–15 m), 14 AWG (>Podajniki 15 m).
- Rozmiar sterownika: dopuszczaj ≥20% prześwitu powyżej obliczonego obciążenia; obejmują ochronę przeciwprzepięciową dla obszarów zasolonych/przybrzeżnych.
- Sterowanie: wybierz sterowniki pozbawione migotania, kompatybilne z 0–10 V, DALI lub PWM/DMX; sprawdzić krzywe ściemniania na miejscu za pomocą przykładowej ściany.
Kamień skumulowany premium — szybsze zyski

Jak ustawić paski LED, aby uniknąć ostrego odblasku i odsłonięcia szwów?
Umieść i określ oświetlenie, aby chronić wygląd gotowego kamienia, ograniczyć przeróbki w terenie i zachować marginesy instalacji dzięki przewidywalnym wypasom i definicji szwów.
Zaplanuj geometrię montażową pod kątem efektywnego wypasu i podkreślenia szwów
Umieść paski LED nad lub z boku, tak aby światło padało na kamienną ścianę; ustaw kąt otarcia około 10–30° od płaszczyzny ściany, aby podkreślić teksturę bez jej spłaszczania. Zachowaj przesunięcie montażowe w zakresie 25–150 mm (1–6 cali); w przypadku bardzo nieregularnych półek zacznij od 75–150 mm (3–6 cali), aby zmiękczyć głębokie wgłębienia w cieniu, zachowując jednocześnie czytelność reliefu powierzchni.
Jeśli potrzebujesz kontrastu szwów, zlokalizuj wąską belkę lub boczne biegi boczne wyrównane ze złączami pionowymi i użyj ciągłych przebiegów górnych, aby podkreślić poziomo, z przerywanymi biegami bocznymi, gdzie liczy się definicja szwów. Przed zamocowaniem kanałów zaznacz złącza paneli w kształcie Z lub S oraz narożniki L na rysunkach rozmieszczenia, tak aby osprzęt, kanały i profile końcowe pasowały do siebie narożnikach i uniknąć nieoczekiwanych gorących punktów na panelu przejścia.
- Kąt opasania: 10°–30° od płaszczyzny ściany.
- Przesunięcie montażowe: 25–150 mm (1–6 cali); w przypadku bardzo nieregularnych tekstur użyj 75–150 mm.
- Zaplanuj wąskie biegi boczne w szwach pionowych; narysuj połączenia Z/S na układzie.
- Określ pasujące narożniki L i profile końcowe, aby uniknąć źle ustawionych gorących punktów.
Wybierz charakterystykę taśmy LED: napięcie, gęstość, kolor i stopień ochrony IP
Select 24 V strips for runs longer than 5 m to reduce voltage drop; use 12 V only for short accents under 5 m. Pick LED density to match the wash: 60 LEDs/m delivers textured accent with visible point sources, while 120 LEDs/m or higher produces a smoother wash suitable behind a diffuser. Use the rule I (A) = P (W) ÷ V (V) when sizing runs and drivers, and plan common power densities like 4.8 W/m, 9.6 W/m or 14.4 W/m into that calculation.
Specify color temperature and color rendering that flatter the stone: 2700–3500 K (warm) enhances Kamień naturalny tonów, 3000–3500 K rozjaśnia bez klinicznego wyglądu i wymaga CRI ≥ 90 dla dokładnego koloru. W przypadku lokalizacji wilgotnych lub zewnętrznych wybierz paski i uszczelnione kanały o stopniu ochrony IP65 lub IP67; w przypadku ścian wewnętrznych, klimatyzowanych należy zastosować taśmy IP20 wewnątrz profili zamkniętych.
- Napięcie: 24 V dla >biegi na 5 m; 12 V dla <Akcenty 5m.
- Gęstość diod LED: 60 diod LED/m dla akcentów teksturowanych; Ponad 120 diod LED/m zapewnia gładkie pranie.
- Gęstości mocy: 4,8 W/m, 9,6 W/m, 14,4 W/m — oblicz prąd na przebieg (I = P ÷ V).
- Kolor: 2700–3500 K zalecany dla większości kamieni; CRI ≥ 90.
- IP: IP65/IP67 na zewnątrz/na mokro; Dopuszczalny stopień ochrony IP20 w pomieszczeniach zamkniętych.
Wybierz profile, dyfuzory i akcesoria kontrolujące olśnienie
Choose angled aluminium channels (0°, 15°, 30°) to steer light and control grazing incidence; pick the angle that creates the shadow depth you want. Fit frosted diffusers to soften diode hotspots and use micro-prism or louvered covers when you must reduce perceived glare while preserving surface texture.
Place narrow-beam channels or exposed linear fixtures at seams to expose mortar lines, and balance them with wider top grazing runs. Recess low-profile channels into reveals or behind stone overhangs to hide the light source and keep direct lines-of-sight off the diodes. Use blackout tape or internal baffles inside profiles to stop light leak onto adjacent surfaces and keep illumination focused on the stone face.
- Kanały: kątowe aluminiowe 0°, 15°, 30° do kontroli wypasu.
- Dyfuzory: matowe dla zmiękczenia; mikropryzmat lub raster do kontroli olśnienia.
- Strategia szwów: wąski kanał na stawie + szerszy górny wypas.
- Ukrycie: niskoprofilowe kanały można wbudować w ościeża lub za nawisami.
- Kontrola oświetlenia: zastosuj taśmę zaciemniającą lub wewnętrzne przegrody, aby zapobiec wyciekom.
Dobór elementów elektrycznych, przebieg okablowania i strategia sterowania
Oblicz prąd na przebieg za pomocą I (A) = P (W) ÷ V (V) i dodaj 20–25% zapasu sterownika podczas doboru zasilacza. Użyj 18 AWG dla krótkich odcinków 24 V do około 3–5 m, 16 AWG dla odcinków do 8–10 m i 14 AWG lub zasilania równoległego dla dłuższych lub obwodów o większej mocy, aby ograniczyć spadek napięcia.
Zaplanuj punkty zasilania co 5–10 m lub użyj kanałów końcowych i środkowych, aby utrzymać równomierną jasność na długich ścianach. Wybierz protokoły ściemniania pasujące do sterownika i systemu sterowania: użyj sterowników obsługujących PWM do konfiguracji DMX/DALI/PWM; wybierz 0–10 V lub DALI do integracji komercyjnej, gdzie wymagane jest płynne rampowanie i ustawienia wstępne. Zawsze uwzględniaj zabezpieczenie nadprądowe (bezpiecznik/wyłącznik), dostępne rozłączniki oraz przestrzegaj lokalnych przepisów i uszczelnienia IP w przypadku instalacji zewnętrznych.
- Dobór: I = P ÷ V; dodaj 20–25% zapasu pojemności sterownika.
- Przekrój drutu: 18 AWG do 3–5 m, 16 AWG do 8–10 m, 14 AWG do dłuższych zastosowań/wysokiej mocy.
- Strategia karmienia: karmić co 5–10 m lub stosować zasilanie równoległe/pośrodku, aby uniknąć przyciemnienia.
- Controls: PWM drivers for DMX/DALI; 0–10 V or DALI for commercial presets.
- Safety: add fuses/breakers, accessible disconnects, and follow local electrical code.
Commissioning, measurement and on-site troubleshooting
Target wall illuminance around 100–300 lux for accent work and verify with a lux meter; adjust distance or angle until uniformity meets the design intent. Measure voltage at strip ends and keep voltage drop under about 2–5%; if you measure excessive drop, add parallel feeds or increase conductor size.
Jeśli widzisz odblaski lub gorące punkty diod, dodaj matowy dyfuzor lub odsuń pasek o 25–50 mm (1–2 cale) dalej od ściany. Jeśli pojawią się paski, przełącz na większą gęstość diod LED lub przesuń podwójne przebiegi. Sprawdź spójność kolorów za pomocą kolorymetru i potwierdź, że wszystkie paski pochodzą z tego samego pojemnika CCT i partii producenta. Dokumentuj końcowe pozycje pasków, miejsca podawania, modele sterowników i ustawienia ściemniacza na arkuszu przekazania na potrzeby przyszłych prac serwisowych i gwarancyjnych.
- Natężenie oświetlenia: ustaw 100–300 luksów dla akcentu; sprawdź luksomierzem.
- Spadek napięcia: utrzymuj poniżej ~2–5%; mierzyć na końcach paska.
- Eliminacja olśnienia: dodaj matowy dyfuzor lub zwiększ odległość listwy od ściany o 25–50 mm.
- Poprawki pasmowania: zwiększ gęstość diod LED lub rozłóż podwójne przebiegi.
- Kontrola koloru: użyj kolorymetru; potwierdź ten sam pojemnik i partię CCT.
- Przekazanie: pozycje rekordów, punkty zasilania, modele sterowników i ustawienia ściemniacza.
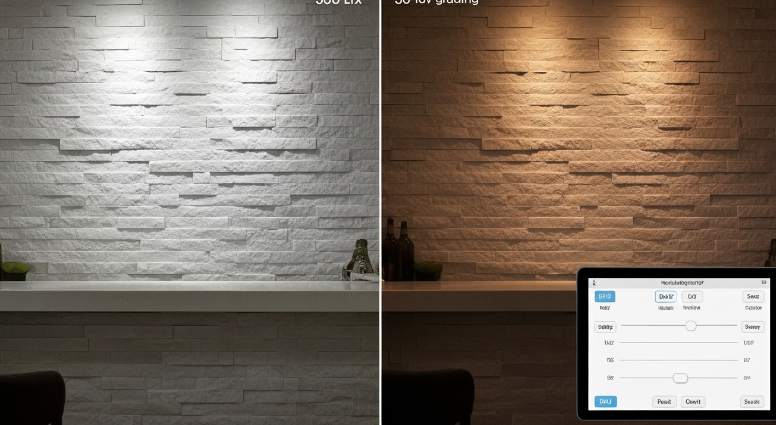
Używanie elementów sterujących ściemniaczem do przejścia od oświetlenia zadaniowego do oświetlenia nastrojowego
Prawidłowe przyciemnianie i wypasanie chronią kolory, zapobiegają migotaniu i umożliwiają szybkie przełączanie między oświetleniem zadaniowym a nastrojowym instalacje z kamienia ułożonego w stosy.
Wybierz protokół ściemniania i sprzęt pasujący do opraw LED
Dopasuj protokół ściemniacza do sterownika. Użyj sterowników 0–10 V lub DALI tam, gdzie potrzebujesz niezawodnego podziału na strefy komercyjne, możliwości adresowania i przywoływania scen; sparuj te sterowniki z pasującymi kontrolerami. Używaj ściemniaczy krawędzi opadającej (ELV) dla większości nowoczesnych sterowników LED; unikaj krawędzi wiodącej (triaka) w diodach LED o małej mocy, ponieważ może to powodować migotanie. Sprawdź, czy częstotliwość PWM na wyjściu sterownika jest powyżej 1 kHz, aby zapobiec widocznemu efektowi strobowania przy niskim poziomie przyciemnienia.
Przed instalacją należy określić parametry elektryczne i zgodność ściemniacza. Wymagaj ściemniaczy obsługujących obciążenia LED do 5 W na kanał lub dopuszczających obciążenie fikcyjne zalecane przez producenta. Potwierdź maksymalny prąd kanału i całkowity VA obwodu z arkuszami danych sterownika i urządzenia, a następnie wybierz komponenty wymienione na liście UL/CE/IEC. Przed wdrożeniem na dużą skalę przetestuj jedną przykładową kombinację urządzenia i sterownika z listy kompatybilności producenta.
- Protokół: wybierz 0–10 V dla prostego sterowania analogowego (dwa przewody sterujące na bieg) lub DALI dla magistrali cyfrowej z adresowaniem i przywoływaniem scen.
- Dopasowanie sterownika: wybierz sterowniki wyraźnie ocenione dla wybranego protokołu i potwierdź PWM >1 kHz przy niskim poziomie przyciemnienia.
- Specyfikacje ściemniacza: wymagają obsługi na kanał do 5 W lub dostarczają fikcyjne obciążenie; sprawdź maksymalny prąd kanału i całkowitą VA.
- Zgodność & testowanie: użyj ściemniaczy/sterowników znajdujących się na liście UL/CE/IEC i przetestuj reprezentatywną próbkę przed wdrożeniem.
Zdefiniuj poziomy oświetlenia i docelowe temperatury barwowe dla trybów zadań i nastroju
Ustaw mierzalne cele dla każdej sceny. W przypadku oświetlenia zadaniowego należy dążyć do poziomu 300–500 luksów na powierzchniach roboczych; użyj 100–200 luksów do akcentowania wypasu, aby odsłonić teksturę kamienia; ustaw nastrojowe lub otoczenia sceny na 20–80 luksów, aby uzyskać dyskretną prezentację. Określ CRI ≥ 90 tzw odcienie kamienia i żyłki renderowane są naturalnie zarówno w ustawieniach zadań, jak i nastroju.
Choose color temperature by function and material. Use 3000–3500 K for task scenes where clarity matters, and 2700–3000 K for mood scenes to warm stone tones and soften contrast. For linear grazing, size luminous output to the effect: 1,000–2,000 lm/m for high-impact accent or task, and 200–800 lm/m for subtle mood lighting. Require dimmers with a perceptual (log or gamma) dim curve and configurable fade times of 0.5–2 seconds to avoid abrupt jumps between scenes.
- Lux targets: Task 300–500 lx | Accent 100–200 lx | Mood 20–80 lx.
- Lumen guidance: Linear wall-wash 1,000–2,000 lm/m (accent/task) | 200–800 lm/m (mood).
- Color temperature: Task 3000–3500 K | Mood 2700–3000 K; keep per-project samples for final tuning.
- Color quality: CRI ≥ 90 required for accurate stone rendering.
- Dimming behavior: perceptual/log curve with 0.5–2 s fade time; avoid hard steps.
Place fixtures and configure grazing geometry for stacked stone surfaces
Mount fixtures low and close to the face to produce grazing shadows that emphasize depth. For moderate texture set fixture-to-wall distances at 2–6 in (50–150 mm); for highly irregular stone increase to 4–8 in (100–200 mm) to soften high-contrast shadows. Use narrow-to-medium beam wall-washers or adjustable spot fixtures to shape shadows precisely; continuous linear profiles give uniform grazing across panel joints when you need even texture emphasis.
Account for panel dimensions and serviceability. Plan for Top Source Stone standard panel modules (150 x 600 mm) and thicknesses from 1–3.5 cm when concealing tracks behind reveals or Z/S interlock panels to hide seams. Mount and space linear fixtures 30–60 cm on center depending on beam angle; aim lights parallel to the surface for a raking effect or offset slightly for softer relief. Use IP65-rated fixtures for exterior or damp locations, provide adequate heat dissipation for LED strips, and allow driver/dimmer access for servicing. Measure lux and uniformity with a light meter, save dimmer presets for task and mood scenes, then fine-tune distance and aim until the texture reading meets the design target.
- Mount distance: 50–150 mm (2–6 in) moderate texture; 100–200 mm (4–8 in) for heavy texture.
- Beam/spacing: narrow–medium beams; linear fixtures spaced 30–60 cm on center based on beam angle.
- Panel fit: design for 150 x 600 mm modules and 1–3.5 cm thickness; conceal tracks behind Z/S interlock reveals where possible.
- Environment: use IP65 fixtures outdoors or in damp zones; ensure thermal management and service access for drivers/dimmers.
- Verification: measure lux/uniformity, save presets, and iterate aim/distance until texture meets the design target.
Hidden Wiring: How to Plan Power for Lighting Before Installing Stone?
Plan power and service access before stone goes up to avoid rework, guarantee dimmer and driver compatibility, and protect project margins.
Select lighting system and power topology (mains vs low-voltage, driver sizing)
Choose mains (120V/240V AC) when you can locate drivers remotely in service spaces and choose low-voltage (12V/24V DC) when fixtures sit embedded directly behind or inside kamienne panele. Size branch circuits to the load: use 14 AWG on 120V circuits for typical 15A runs, step up to 12 AWG for 20A runs or long 240V feeders. Sum the total fixture watts, add 20% headroom, and select a driver that meets that continuous output; for constant-voltage systems pick 12V or 24V drivers, and for COB strips or linear arrays select constant-current drivers with the correct mA rating (for example 350mA, 700mA or as specified by the LED module).
Specify dimming type at design stage so panels and drivers match: triac/ELV for line-voltage dimming, PWM for many low-voltage LED drivers, and digital controls like 0–10V or DALI for networked systems. Choose IP65 or higher fixtures for exterior or damp locations and pick drivers rated for outdoor or enclosed-box use when you locate them outside conditioned spaces. Protect outdoor circuits with GFCI and follow local code for in-wall vs surface-rated enclosures.
- Driver sizing: Total watts × 1.2 = required driver capacity.
- Low-voltage choice: Use 12V/24V CV for tape in channels; use CC drivers for COB/linear arrays and match mA rating.
- Dimming compatibility: Lock in triac/ELV, PWM, 0–10V, or DALI at specification stage.
- Environment: Select IP65+ for exterior fixtures and GFCI-protect outdoor feeds.
Map conductor routes, junction boxes and conduit before panel installation
Locate and mark junction boxes on the substrate where installers can access them after stone installation; align access boxes to matching L-corners or removable panels that coincide with Top Source Stone seams. Specify conduit and cable types: use EMT, PVC, or liquid-tight flexible metal conduit (LFMC) to protect runs into junction boxes. Use 1/2″ trade conduit for single runs of 14–12 AWG conductors and use 3/4″ when you pull multiple conductors or run driver output and control wiring together.
Keep low-voltage runs short to limit voltage drop and maintain less than 3% drop to the furthest fixture. If a run exceeds ~10 m, calculate current (I = W/V) and upsize conductors to 12–10 AWG as required by conductor resistance and acceptable drop. Provide 40–60 mm of clear cavity behind kamienne panele for slim drivers and junctions, or plan remote driver locations inside service cabinets when cavity depth is insufficient. Label every pull at both ends: circuit ID, conductor gauge, supply voltage and control protocol so field crews avoid cutting interlocking Z/S panels during stone installation.
- Conduit sizing: 1/2″ for single 14–12 AWG; 3/4″ for multiple conductors or driver bundles.
- Voltage drop rule: Keep <3% to the furthest low-voltage fixture; upsize to 12–10 AWG if runs exceed ~10 m depending on load.
- Box clearance: Reserve 40–60 mm behind stone for slim drivers or plan remote driver locations.
- Documentation: Tag circuits, gauge, and control type at each junction.
Integrate wiring with stone system and grazing-light placement for best texture reveal
Design recesses and mounting channels around Górny panel z kamienia źródłowego geometry before you fix panels: standard panels measure 150×600 mm (150×550 mm variant) with thickness from 10–35 mm. Pre-install aluminum LED channels or rigid mounting rails to the substrate so strips sit at a consistent distance from the stone face and hide wiring behind panels. Position linear or spot fixtures for grazing light so beams skim the surface; start with fixture-to-face offsets between 25–150 mm (1–6 inches) and tune on-site to the stone’s irregularity to avoid overly harsh shadows.
Reserve vertical or horizontal service channels behind interlocking Z- or S-shaped profiles or at L-corners so technicians access drivers and junctions without removing panels. Energize the system during commissioning and measure voltage at the furthest fixture to verify <3% drop for low-voltage circuits, test dimming for flicker under all levels, confirm IP seals on exterior fittings, and photograph wiring and junction locations for future maintenance records.
- Panel specs to plan around: 150×600 mm or 150×550 mm; thickness 10–35 mm.
- Grazing offset: 25–150 mm from face; adjust on-site for texture.
- Pre-install channels: Use aluminum channels with diffusers to control glare and conceal seams.
- Commissioning checklist: Measure voltage at furthest fixture, check dimming performance, verify IP ratings, and photograph layouts.
Wniosek
Correct placement, concealed wiring, and dimmer planning do more than shape appearance: they protect installers, ensure OSHA and local code compliance, and cut glare and electrical risks. They also extend fixture life and reduce long-term maintenance costs.
Review your current installations against the positioning and wiring checklist above, or contact Top Source Stone for a certified lighting catalog and sample kit to plan a compliant, high-performing finish.
Często zadawane pytania
What color LED light is best for natural white stone?
The provided research does not specify a particular LED color. It emphasizes that grazing (raking) light — positioned to skim across the stone face — is the key factor for bringing out the texture and natural shadows of white stone.
Where should the LED strip be mounted: front or back of the cabinet?
Position the light so it achieves grazing: directly above or to the side of the kamienny mur so light travels across the face at a low angle. Whether the strip is mounted at the front or back of a cabinet is secondary to ensuring the fixture creates that low-angle skim across the stone surface.
Does under-cabinet lighting show dust on the stone texture?
The research doesn’t directly address dust, but because grazing skims the surface and emphasizes small shadows and highlights, it increases the visual contrast of texture and can make surface irregularities — including dust — more noticeable.
Can I use puck lights instead of tape lights for stone walls?
The provided research does not compare puck versus tape lights. It focuses on achieving grazing by placing the light source along the top or side so light skims across the face — which implies a continuous, well-placed source is desirable for even grazing; point sources may produce hotspots rather than a uniform skim.
Will the heat from the LED lights damage the stone sealer?
The research content does not address heat or effects on stone sealer; it only covers the visual impact of grazing light. For heat and sealer compatibility, consult product specifications from the light and sealer manufacturers.
