Dominar los secretos de las esquinas sin costuras es la única manera de evitar que las aplicaciones de revestimiento fino parezcan amateur y erosionen el valor del proyecto. Los bordes exteriores mal manipulados revelan huecos en el sustrato y perfiles de paneles en bruto, lo que genera altas reclamaciones de garantía y mayores costos de mano de obra para instaladores y mayoristas.
Resolvemos esto mediante esquinas en L prefabricadas en fábrica que cuentan con precisión de hoja de diamante CNC y una uniformidad de tono del 95 por ciento. Al obtener componentes de la misma veta de la cantera, estas unidades mantienen la integridad arquitectónica y al mismo tiempo reducen el tiempo de instalación en el sitio en un 50 por ciento en comparación con los cortes a inglete manuales.
¿Por qué las esquinas definen la calidad de todo su proyecto de piedra?
Las esquinas revelan u ocultan la naturaleza del material. La ejecución adecuada crea una ilusión de mampostería estructural, lo que aumenta directamente el valor arquitectónico y distingue a los profesionales. trabajo de piedra de chapa fina aplicaciones.
Autenticidad visual y efecto de ruptura de avión
Los diseñadores e inspectores se centran en las esquinas porque representan una natural ruptura de la uniformidad visual. Este cambio de plano es donde el ojo se posa naturalmente. Si la ejecución de la esquina es descuidada, revela el perfil delgado del enchapado, lo que indica una aplicación a nivel de superficie en lugar de mampostería estructural. Las transiciones profesionales ocultan los bordes del panel, asegurando la La instalación mantiene el peso y la presencia de la piedra auténtica..
La precisión en estos puntos focales determina el valor percibido a largo plazo del proyecto. Una chimenea o fachada que muestra el sustrato en la esquina pierde inmediatamente su atractivo de lujo. Al enmascarar la unión donde se unen dos planos, se crea la apariencia de mampostería sólida y de profundidad total. Este detalle diferencia a un contratista promedio de un especialista.
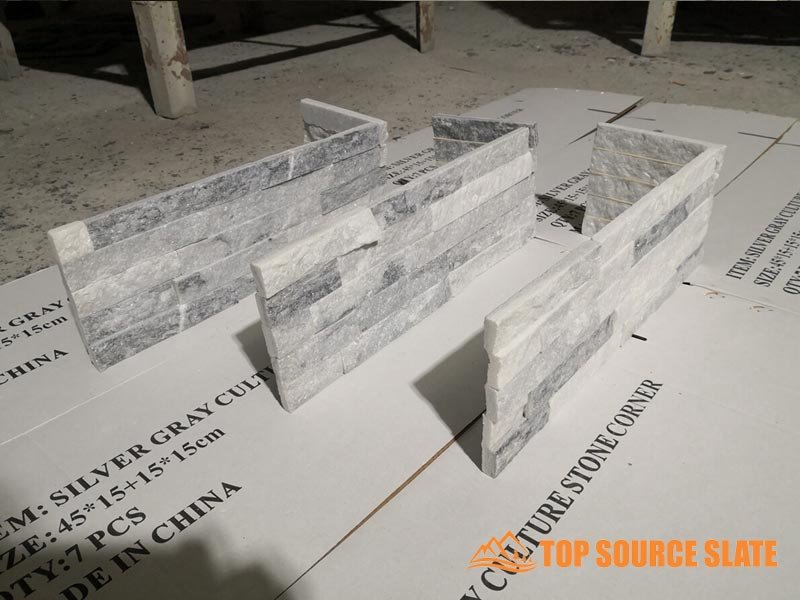
Combinación de la tecnología L-Corner para la sincronización estructural
El corte de ingletes en el sitio a menudo genera espacios desiguales y texturas que no coinciden. Arriba Piedra fuente resuelve esto mediante esquinas en L prefabricadas de 90 grados diseñadas para la sincronización estructural. Obtenemos estos componentes de la misma cantera que los paneles planos para garantizar una uniformidad de tono del 95% en todo el lote, evitando el aspecto irregular común con el abastecimiento de esquinas de terceros.
- Eficiencia Laboral: Las unidades prefabricadas reducen el tiempo de instalación en el sitio en un 50% y eliminan la necesidad de habilidades especializadas en sierras ingletadoras.
- Precisión CNC: Los bordes con forma de hoja de diamante proporcionan una sujeción firme. “hombre-mujer” interlock que camufla las juntas verticales y evita la “efecto cremallera.”
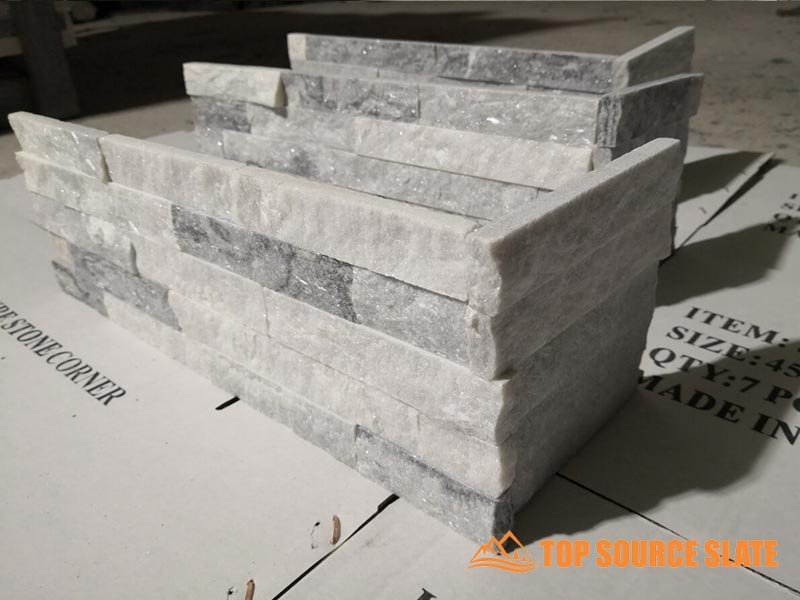
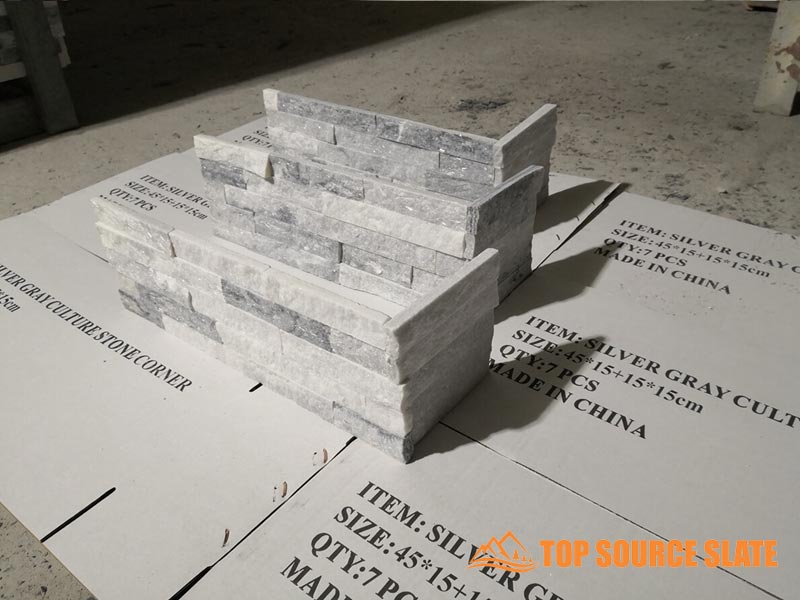
- Dimensiones: Esquinas a juego disponible en 6″ incógnita 24″ o 6″ x22″ formatos para adaptarse a las series estándar de ledgestone.
- Tecnología perfecta: La estructura entrelazada oculta el sustrato de instalación y elimina visible “pisó” huecos en la fachada final.
El uso de esquinas fabricadas en fábrica protege los márgenes de beneficio de mayoristas y distribuidores al reducir el desperdicio de material y los errores en el sitio. Estas unidades brindan un acabado envolvente que imita un bloque de profundidad total, brindando un resultado profesional que resiste una inspección minuciosa en entornos comerciales y residenciales de alto tráfico.
La elección profesional: beneficios de eficiencia de las esquinas en L prefabricadas en fábrica
Las esquinas en L de fábrica reducen el tiempo de instalación en un 50 % y los costos de mano de obra en un 25 %. El corte con disco de diamante CNC garantiza una sincronización perfecta de la textura y elimina el efecto de cremallera.’ común en el corte manual del sitio.
| Métrica de eficiencia | Esquinas en L prefabricadas de fábrica | Corte manual del sitio |
|---|---|---|
| Velocidad de instalación | Reducción del 50% en horas presenciales | Alto (Requiere cortes a inglete individuales) |
| Gasto Laboral | Rebajado hasta en un 25% | Premium (Requiere maestro albañil) |
| Desperdicio de materiales | Reducción del 90 % (cero desechos del sitio) | Alto (10-15% de rotura/pérdida de restos de corte) |
| Precisión & Adaptar | Precisión de diamante CNC (90°) | Variable (Susceptible a error humano) |
Instalación acelerada y mitigación de costos laborales
Los métodos estándar de corte diagonal en un lugar de trabajo consumen excesivas horas facturables y exigen un alto nivel de experiencia en albañilería. Nuestras esquinas en L prefabricadas evitan este cuello de botella al llegar como unidades listas para montar. Estos componentes reducen el tiempo total de instalación en un 50 % porque los equipos dedican su tiempo a configurar piedra en lugar de medir y ángulos de rectificado.
Los desarrolladores de proyectos también se benefician de los flujos de trabajo de construcción paralelos. Fabricamos las unidades de esquina en la fábrica mientras su equipo prepara el sustrato del sitio. Este cronograma superpuesto comprime el cronograma del proyecto. Al utilizar el ensamblaje modular, los contratistas reducen los gastos totales de mano de obra en un 25 % y minimizan el desperdicio de material en un 90 %. comparado con el tradicional Prácticas de corte de mampostería.
Integridad arquitectónica mediante precisión de hoja de diamante CNC
Los cortes manuales en el campo a menudo resultan en la “efecto cremallera”—juntas desiguales y espacios escalonados visibles que revelan la piedra como chapa. Resolvemos esto mediante el uso de bordes de hoja de diamante CNC que garantizan una estricta alineación de 90 grados. Esta precisión industrial garantiza que la esquina parezca un bloque de piedra sólido y completo en lugar de dos piezas que se juntan en una costura.
- Consistencia del lote: Obtenemos unidades de esquina de la misma veta de cantera que los paneles planos para garantizar una uniformidad de tono del 95 %.
- Estabilidad estructural: Las juntas de fábrica son estables a los rayos UV y resistentes al hielo y el deshielo, y cumplen con los estándares climáticos de 2026 para ambientes costeros y del norte extremo.
- Continuidad visual: Los dedos cortados con precisión permiten una sincronización de textura envolvente que los cortes manuales no pueden replicar.
- Control de tolerancia: La automatización CNC mantiene una precisión de 90 grados que evita la desviación de la alineación en transiciones verticales largas.
La elección de unidades prefabricadas protege la intención arquitectónica del diseño. Estas esquinas brindan una transición perfecta entre los planos de las paredes, manteniendo la estética de lujo que esperan los clientes residenciales y comerciales de alto nivel.
Piedra apilada de primera calidad para necesidades arquitectónicas

¿Cómo ejecutar cortes a inglete perfectos en el sitio (si es necesario)?
Utilice un bisel posterior de 44,9 grados y discos de diamante de borde continuo para crear esquinas estrechas y profesionales cuando no se utilizan esquinas en L prefabricadas para las transiciones de paredes.
Mientras que la fuente principal La piedra proporciona Al combinar esquinas en forma de L para cada serie para reducir la mano de obra en el sitio en un 50%, ciertos diseños arquitectónicos requieren ingletes de campo personalizados. Lograr un acabado de calidad de fábrica en paneles de piedra natural Requiere calibración específica de la sierra y manejo del material para evitar revelar el borde de la chapa.
Técnicas de calibración de ángulos y biselado posterior
La precisión en las esquinas determina si la instalación parece una cama completa auténtica piedra o una fina chapa. La mayoría de los errores del sitio ocurren porque Los instaladores intentan realizar un corte plano de 45 grados en superficies irregulares. superficies de las paredes.
- Configuración de bisel posterior: Ajuste la sierra ingletadora a 44,9 grados. Este ligero ajuste garantiza que la cara visible de la piedra haga contacto primario, lo que da como resultado una costura visible más ajustada y al mismo tiempo deja un pequeño espacio interno para el mortero de capa delgada.
- Valla de sacrificio: Asegure una cerca de madera contrachapada a la mesa de la sierra. Esto proporciona un punto de referencia de espacio libre cero para la trayectoria de la hoja y soporta el piedra para prevenir “reventones” al final del corte.
- Verificación: Realice cortes de muestra en piezas de desecho del mismo espesor para verificar la cuadratura antes procesamiento completo 6″ x24″ paneles.
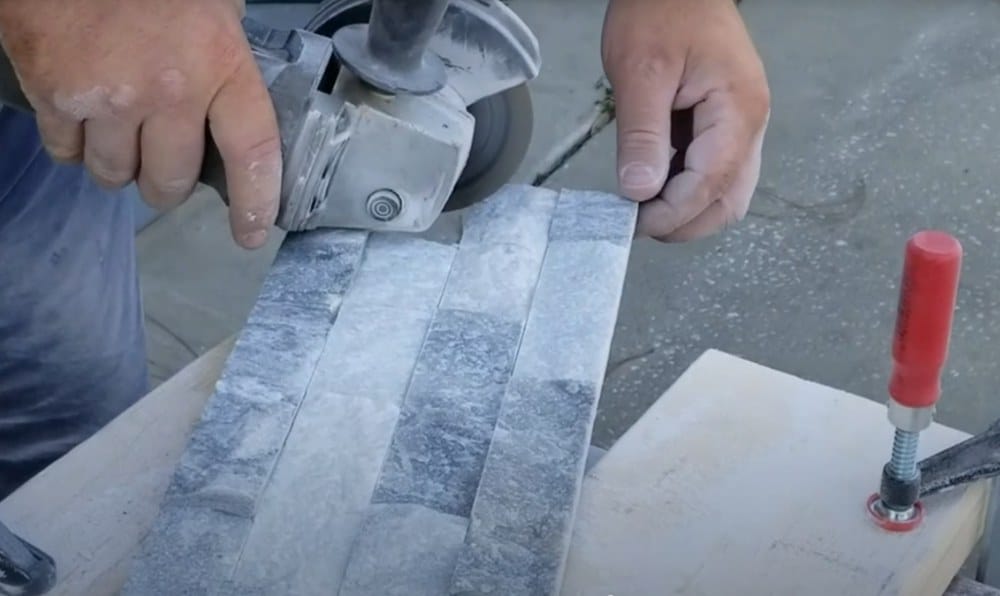
Corte de campo profesional con precisión de disco de diamante
Los materiales naturales como la pizarra y la cuarcita reaccionan de forma diferente a la fricción de las cuchillas que la cerámica o la madera. Mantener la integridad de la textura de la cara dividida durante un corte es esencial para un acabado arquitectónico de alta gama.
- Tipo de hoja: Seleccione discos de diamante de borde continuo en lugar de discos segmentados. El borde continuo evita astillas en la superficie hendida natural e imita la precisión del disco de diamante CNC utilizado en nuestra fábrica.
- Selección de materiales: Saque piezas de la misma caja para garantizar la consistencia de la cantera en el mismo lote. Esta sincronización de color y textura es fundamental en la transición de las esquinas, donde el ojo busca naturalmente roturas en la vena.
- El corte de protuberancia: Utilice el “corte de protuberancia” método para realizar ajustes finos. Golpee suavemente la piedra contra la cuchilla giratoria en la posición hacia abajo para afeitar cantidades finas de material y lograr un ajuste perfecto.
Para evitar estas complejidades técnicas, recomendamos nuestras esquinas en L listas para proyectos. Proporcionan una envoltura de 90 grados con acabado de fábrica que garantiza la sincronización de la textura y elimina la necesidad de realizar cortes en el campo con alta habilidad.
Uniones superpuestas: las “Junta a tope” Técnica para principiantes
Las juntas a tope se superponen paneles de piedra para crear esquinas de 90 grados sin complejos cortes a inglete. Esta técnica accesible proporciona un acabado tejido profesional para aficionados al bricolaje y instaladores principiantes.
Una junta a tope es el método más práctico para el acabado. esquinas de piedra cuando no se dispone de una sierra húmeda o una herramienta ingletadora de precisión. Al superponer el borde de uno panel de piedra over the end of another, you create a structural 90-degree turn that protects the integrity of the wall while maintaining a clean aesthetic.
Executing the Alternating Corner Pattern
The goal of a successful butt joint is to hide raw edges and create a “tejido” look that mimics traditional masonry. Following a specific mechanical sequence ensures the corner remains stable and visually balanced across the entire height of the wall.
- Positioning: Place the first panel so the end is perfectly flush with the edge of the substrate corner.
- Overlapping: Set the perpendicular panel so it overlaps the first, completely hiding the raw cut of the initial stone.
- Alternating: Switch the overlap direction on every row to create an interlocking appearance that mimics full-bed stone.
- Staggering: Compense las juntas a lo largo de la superficie de la pared para evitar líneas verticales continuas que debiliten la instalación.
Garantizar espacios perfectos con bordes de hojas de diamante CNC
La precisión de la piedra misma determina qué tan apretada parece la unión final. Mientras que la piedra tradicional tallada a mano a menudo deja “lagunas de luz diurna,” La ingeniería a nivel de fábrica garantiza que estas piezas superpuestas queden al ras para lograr un acabado arquitectónico de alta gama.
- Bordes de precisión: Utilizamos los bordes de los discos de diamante CNC de Top Source Stone para garantizar que las superficies superpuestas no tengan espacios visibles.
- Coincidencia de colores: La obtención de paneles de la misma veta de cantera mantiene una uniformidad de tono del 95%, lo que hace invisible la transición entre las dos piezas.
- Caza de focas: Aplique resina epoxi de alta resistencia en el punto de contacto para bloquear la penetración de humedad y reforzar la costura.
- Alineación de textura: Match the natural cleft face of the stone to the corner transition to create the illusion of a solid, heavy block.
By focusing on these technical details, installers can achieve a professional result that protects the project’s value without the labor overhead of custom on-site miter work.
Solving the Interior Corner Gap: Overlapping vs. Miter Options
Achieve professional interior corners by choosing between high-detail miter cuts or efficient overlapping joints, using CNC-precision panels to eliminate visible gaps and substrate exposure.
Comparing Miter Precision and Overlapping Joint Efficiency
Las esquinas interiores actúan como puntos focales que definen el valor percibido de un instalación de piedra. Los contratistas seleccionan los métodos de unión según la textura de la piedra y la velocidad de construcción requerida. Si bien el inglete ofrece una apariencia de acabado tradicional, las juntas superpuestas sirven mejor para colecciones específicas de alta textura.
- Cortes a inglete: Los instaladores inclinan la piedra. a 45 grados para mantener un flujo de textura continuo a lo largo de la esquina, lo cual es esencial para paneles lineales o de cara lisa.
- Juntas a tope superpuestas: Este método implica colocar un panel al ras de la cara de otro. Esto funciona mejor para piedra de alta textura como nuestra Serie Rough, donde las variaciones naturales de espesor dificultan la alineación de ingletes.
- Compensación del ángulo de la hoja: Ajustar las hojas de sierra a 44,9 grados en lugar de exactamente 45 grados garantiza que los bordes frontales se unan firmemente, ocultando los espacios internos y el sustrato.
Garantizar ajustes perfectos con la precisión de la hoja de diamante CNC
Los cortes estándar de fábrica a menudo conducen a la “efecto cremallera” o colores que no coinciden en la esquina. Fuente superior Stone minimiza estos riesgos en el sitio mediante el uso de fabricación automatizada. para estabilizar las dimensiones del panel antes de que lleguen a la caja.
- Corte CNC con disco de diamante: La precisión automatizada garantiza una uniformidad de tono del 95 % y bordes perfectamente rectos, lo que permite uniones a tope ajustadas que no requieren rellenos manuales.
- Abastecimiento de canteras en el mismo lote: Extraemos materiales de la misma veta de la cantera por pedido para evitar cambios de color en las transiciones, haciendo que las juntas de las esquinas sean efectivamente invisibles.
- Compatibilidad con esquinas en L: Our factory-fabricated 90-degree corner units eliminate the need for manual site mitering, reducing installation labor by 50% for high-volume B2B projects.
How to Ensure Horizontal Alignment Across Corner Transitions?
Establish a laser-leveled baseline and use Piedras de origen superior CNC-cut L-corners. Working outward from corners ensures parallel stone courses and eliminates visible “pisó” gaps at transitions.
Maintaining linear consistency across a 90-degree turn requires more than just a steady eye. Any deviation at the corner amplifies as you move across the flat wall, leading to uneven courses that ruin the architectural aesthetic. Professional installers focus on the preparation phase to prevent these cumulative errors from occurring.
Establishing a Unified Baseline and Control Lines
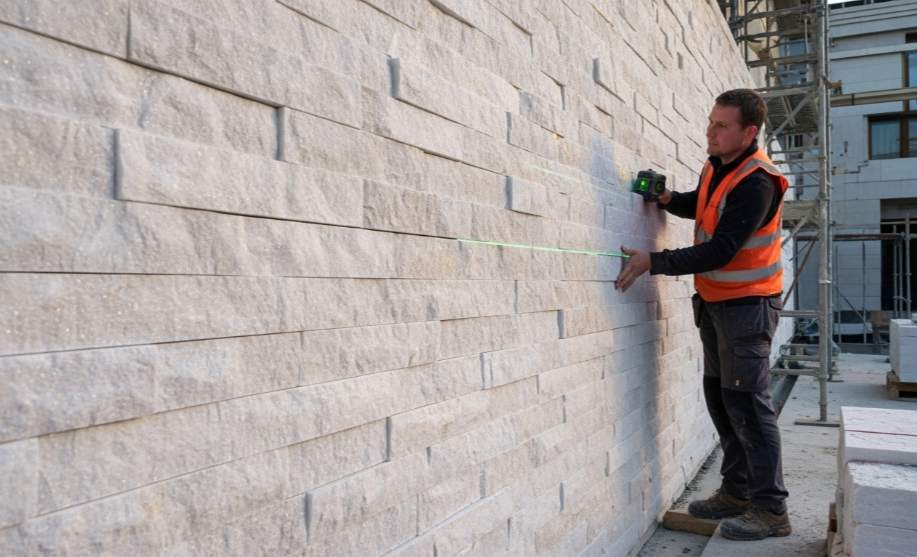
La base de la alineación horizontal comienza en el punto más bajo de la instalación. Si la primera fila se desplaza aunque sea unos pocos milímetros, la “efecto cremallera” se volverá notoriamente obvio cuando llegue al nivel de los ojos. Recomendamos establecer una única referencia horizontal que envuelva a todos caras de la pared antes de que la primera piedra toque el sustrato.
- Configuración de referencia: Configure un nivel láser estándar 2026 en el punto más bajo para crear una referencia horizontal consistente en cada cara de la pared.
- Monitoreo vertical: Marque líneas de control digitales o trace líneas con tiza a intervalos verticales de 12 pulgadas para mantener la altura del recorrido constante durante el ascenso.
- Compensación de piso: Recorte la fila inferior de piedras para que se ajuste a la pendiente del piso mientras mantiene el borde superior de esa primera fila perfectamente nivelado.
- Comprobación de ajuste seco: Coloque en seco las dos primeras hileras alrededor de la esquina para verificar que las juntas entrelazadas queden al ras sin desplazamiento vertical.
Utilización de esquinas en L de precisión CNC para sincronización de texturas
Las ingletes cortadas en el lugar a menudo tienen problemas con los espacios en la textura y las discrepancias de color porque las dos piezas de piedra no estaban unidas originalmente. Top Source Stone resuelve esto proporcionando esquinas en L prefabricadas de fábrica. Estas unidades garantizan que el la piedra natural El personaje fluye alrededor de la esquina como si fuera un bloque sólido de cama completa.
- Continuidad visual: Utilizamos esquinas en L prefabricadas a juego para garantizar la sincronización de color y textura en transiciones de 90 grados.
- Ajuste modular: Los bordes de los discos de diamante CNC proporcionan líneas limpias que se alinean perfectamente con el estándar 6×Paneles planos de 24 pulgadas.
- Gestión de costuras: Alternar el 'largo-corto'’ Patrón de instalación escalonado con esquinas prefabricadas para romper las uniones verticales y mantener el flujo horizontal.
- Eficiencia Laboral: La tecnología sin costuras elimina la necesidad de realizar complejos cálculos de inglete y esmerilado manual, lo que reduce el tiempo de mano de obra en el sitio en un 50 %.
Instale siempre primero las piezas de las esquinas. Al establecer la esquina y trabajar hacia afuera en el campo, se asegura de que los ajustes necesarios se realicen en el centro de la pared, donde son menos visibles, en lugar de en el punto focal crítico de la esquina misma.
Terminando el borde: puliendo cortes en bruto para que coincidan con la cara natural
Elimine las marcas de sierra usando almohadillas de diamante de grano 60–320, luego use cepillos de alambre y cinceles para replicar la textura de la cara dividida para una transición arquitectónica perfecta.
Los bordes modificados en el sitio a menudo exponen el interior liso “corazón” de la piedra, que parece artificial en comparación con la cara preparada en fábrica. Cuando los instaladores cortan paneles para que se ajusten a dimensiones específicas o crean ingletes personalizados, deben combinar mecánicamente estos cortes en bruto para mantener la integridad estética del Instalación de piedra de origen superior.
Secuencias de lijado graduadas para suavizar los bordes
El objetivo principal del lijado es eliminar las ranuras verticales que dejan las hojas de sierra mojadas. Una transición suave evita que “efecto cremallera” donde el borde cortado se encuentra con la superficie hendida natural. Utilice la siguiente progresión para un acabado profesional:
- Almohadillas de diamante de grano 60: Pula las ranuras pesadas y alinee el plano de la cortar con los paneles de piedra adyacentes.
- Grano 120 a 220: Suaviza las esquinas afiladas del corte para imitar el aspecto ligeramente desgastado de piedra natural.
- Acabado de grano 320: Cree una sensación táctil que coincida con nuestros estándares preparados en fábrica sin pulir demasiado la piedra hasta convertirla en una superficie reflectante.
- Técnica: Trabaje con movimientos circulares cortos para evitar la creación de puntos planos o hundimientos en el material.
Replicando la textura natural de la hendidura en cortes expuestos
El lijado proporciona suavidad, pero carece de rugosidad. “Cara dividida” carácter esencial para un look de lujo. Los instaladores deben desgastar manualmente el borde para reflejar los bordes de precisión del disco de diamante CNC que se encuentran en nuestras unidades estándar con forma de Z y esquinas en L.
- Cepillado de alambre: Apply a heavy-duty wire brush to the sanded edge to pull out softer minerals and reveal the crystalline structure of Quartzite or Slate.
- Stone Chisel Work: Carefully chip the top corner of the cut at a shallow angle. This replicates the rugged depth and shadow profile of factory split-face panels.
- Coincidencia de colores: Seal the modified edge with a pH-neutral stone enhancer. This ensures the “Same-Batch Quarry” color consistency remains uniform across the entire wall surface.
Properly finished edges transform a standard veneer job into a high-end architectural feature. By following these mechanical steps, dealers and installers can guarantee a corner that looks like solid, hand-hewn stone rather than a thin panel product.
Preguntas frecuentes
Can I achieve professional corners without a traditional miter box?
Sí. Los instaladores pueden utilizar una sierra de mano de dientes finos y biselados o una plantilla de cartón personalizada para guiar el corte. Marcar la pared directamente con un ángulo de hierro garantiza un ajuste preciso, aunque luego debes alisar los bordes con papel de lija para eliminar las líneas irregulares que crean espacios visibles.
¿Cuáles son las técnicas principales para la instalación de esquinas de piedra?
Los proyectos suelen utilizar tres métodos: esquinas en L prefabricadas, corte a inglete o la técnica de tejido. Top Source Stone proporciona esquinas en L de 90 grados fabricadas en fábrica para cada serie para acelerar la instalación y garantizar la sincronización del color en la transición de la pared.
¿Los paneles de piedra apilados requieren piezas de esquina dedicadas?
Las esquinas en L dedicadas son esenciales para lograr una apariencia perfecta y entrelazada. Estos componentes están fabricados para envolver ángulos de 90 grados, manteniendo la modularidad en forma de Z o S del sistema mientras ocultan el sustrato de instalación y las juntas verticales.
¿Cómo disimulo los bordes cortados sin rematar en una esquina exterior?
El método más eficaz consiste en cortar la inglete a 45,5 grados en lugar de exactamente 45. Este ligero sobrecorte garantiza que las caras exteriores se unan firmemente, enterrando el borde cortado dentro de la junta. Si queda algún borde sin rematar visible, pulirlo con una almohadilla de pulido de diamante ayuda a que coincida con la textura natural de la cara dividida.
¿Cuál es la forma más precisa de cortar una inglete sobre piedra natural gruesa?
Utilice una sierra húmeda para un corte de doble inglete. Ejecute el primer corte de 45 grados, voltee la pieza de piedra y haga el corte opuesto para el regreso. Cortar la pieza de retorno aproximadamente 1/8 de pulgada más larga que la profundidad requerida ayuda a ocultar las líneas de mortero de capa delgada y crea una estética más limpia.
Pensamientos finales
Las esquinas de precisión diferencian un proyecto arquitectónico premium de una aplicación de revestimiento económica. Depender del corte manual en el campo conlleva riesgos de pérdida de material del 15% y es costoso “efecto cremallera” afirmaciones que erosionan la reputación de su distribuidor. Nuestras esquinas en L diseñadas por CNC protegen sus ganancias al reducir el tiempo de mano de obra a la mitad y al mismo tiempo garantizar una consistencia del color del 95 % en todo el lote.
Asegure su posición en el mercado con nuestros paneles de piedra apilados, listos para su envío en 15 días. Recomendamos un pedido de prueba de 300 metros cuadrados para verificar de primera mano nuestra tecnología de interconexión perfecta y nuestra durabilidad en caso de congelación y descongelación. Envíenos un correo electrónico para obtener un catálogo detallado o concertar una marca privada para su red de distribución.
