Effective stone troubleshooting is the only way for dealers to prevent the cascading costs of facade failure and warranty claims. Loose panels and salt deposits are not just aesthetic issues; they are liabilities that signal bond degradation and structural stress in vertical commercial builds.
Our manufacturing approach targets these failure points using CNC diamond-blade precision and same-batch quarry sourcing. We ensure 95% hue uniformity and interlocking Z-shape geometry to remove the moisture pathways and alignment gaps that lead to high-cost on-site repairs.
Why Do Stone Panels Fall Off? Identifying Root Causes of Failure
Panels fail due to thermal hysteresis, moisture-driven freeze-thaw, and poor bonding. Structural settling and rigid anchors often pop panels off facades in modern vertical builds.
Environmental Stressors and Mechanical Movement
Vertical facades face intense physical pressure that compromises lower-quality installations. Research indicates that pannelli in pietra often detach because the material cannot relieve internal stress caused by temperature shifts and moisture.
- Thermal Hysteresis: Sunlight heats the stone surface more than the back. This differential causes panels to bow and fail to contract fully, permanently weakening the stone’s flexural strength.
- Cicli di congelamento-scongelamento: Moisture intrusion leads to ice expansion within the stone pores. This ruptures minerals and corrodes internal anchors, leading to sudden detachment.
- Undersized Expansion Joints: If joints are too small, they restrict Pietra naturale movement. The resulting pressure eventually pops panels off the substrate.
- Structural Settling: Concrete contraction and building movement in new 2026 builds exert massive external pressure on rigid veneer systems that lack flexibility.
High-Strength Epoxy Bonding and CNC Precision
Superiore Source Stone addresses these failure points at the manufacturing level. We move the assembly process from the unpredictable job site to a controlled factory environment to ensure bond integrity.
- Specialized Epoxy Resin: We use high-strength epoxy formulated for Pietra naturale to ensure a permanent bond that resists the delamination common in field-applied mortar.
- CNC Diamond-Blade Edges: Precision cutting creates an interlocking fit. This reduces gaps and prevents the moisture entry that typically triggers freeze-thaw damage.
- 100% Natural Sourcing: By using only 100% Pietra naturale (Slate, Quartzite, Granite), we avoid the structural decay and UV instability found in “falso” composite materials.
- Controlled Assembly: Factory settings allow for specific temperature and pressure during adhesive curing, creating a bond that exceeds the reliability of manual on-site applications.
What is White Efflorescence and How Can You Prevent it During Curing?
Efflorescence is a salt deposit signaling moisture movement. You stop it by blocking water entry and mineral migration during the critical initial curing phase.
The Mechanics of Moisture-Driven Mineral Deposits
Efflorescence isn’t a stone defect; it’s a chemical reaction. For those white, powdery crystals to appear on a facade, three specific conditions must exist simultaneously. If you remove just one, the “bloom” cannot form. Most commercial projects face this during the initial drying period when the building envelope is most vulnerable.
The three mandatory factors for efflorescence include:
- Water-soluble salts: These typically originate from the mortar, grout, or concrete substrate rather than the stone si.
- Available moisture: Liquid water must be present to dissolve these salts into a solution.
- A pathway: The stone must have enough porosity or the joints must be open enough for the solution to migrate to the surface.
We often see “New Construction Bloom” in early spring or winter cycles. This happens when rapid interior heating pulls moisture through uncured masonry walls toward the cold exterior. While surface powder is usually an aesthetic annoyance, it often serves as an early warning for deeper moisture intrusion or inadequate drainage that can eventually lead to anchor corrosion or freeze-thaw cracks.
Utilizing Humidity-Resistant Stone and Post-Installation Sealing
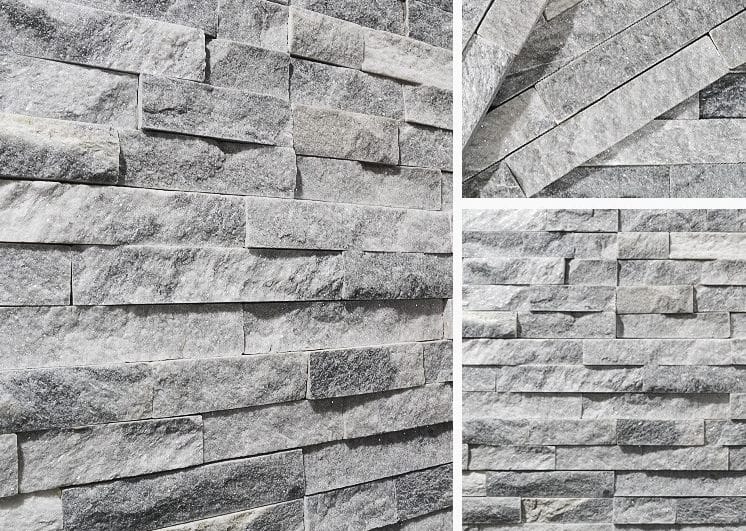
Prevention starts at the sourcing stage. For high-moisture geographic regions, we recommend materials with high salinity and humidity resistance, such as our Quartzite or Slate series. These stones have a lower absorption rate compared to soft limestones, making it harder for salts to find a pathway to the face of the wall.
Successful moisture management requires a multi-layered defense strategy during construction:
- Moisture Barriers: Install secondary flashing systems and vapor barriers on all exterior vertical commercial walls before the stone goes up.
- CNC Precision Fitting: We use CNC diamond-blade edges for our Z-Shape and S-Shape panels. This precision ensures tight interlocking, which minimizes the exposed mortar area where water ingress typically begins.
- Post-Curing Sealing: Apply a premium breathable natural stone sealer only after the wall has fully cured. This blocks evaporation pathways while allowing the substrate to “respirare” without trapping liquid water behind the veneer.
- Mortar Selection: Use polymer-fortified Type S mortar or calcium aluminate-based grouts which offer better resistance to water penetration than standard mixes.
Control the water, and you control the salt. By combining high-density natural minerals with precision-cut edges, dealers can significantly reduce the risk of post-installation callbacks related to staining and mineral bloom.
Premium Natural Stone for High-Value Projects

How to Handle Sagging Panels on High Vertical Commercial Walls?
Stop vertical sagging by using high-strength epoxy and interlocking Z-shape panels on rigid substrates to redistribute weight and eliminate moisture-driven displacement.
Identifying Structural Stress and Environmental Triggers
Vertical alignment issues in commercial facciate in pietra often start with moisture. High humidity weakens the bond between the Pietra naturale and its backing, leading to subtle shifts that worsen over time. Thermal hysteresis also plays a role; sunlight heats the outer stone surface more than the rear, causing the panel to bow outward. This physical warping puts extreme stress on anchors and adhesives.
Structural weight management is the second major factor. High vertical walls create massive cumulative downward pressure. If the base support is insufficient or the ceiling grid shifts, the panels inevitably lose their flush finish. You can spot early failure by looking for specific warning signs:
- Visible Gaps: Separation at the top of a panel run where the stone has pulled away from the substrate.
- Stepped Lines: Uneven horizontal joints where panels were once perfectly aligned.
- Hollow Sounds: Areas that sound empty when tapped, indicating a complete bond failure between the pietra e muro.
- Efflorescence: White powdery salt deposits that signal active moisture movement through the wall system.
Applying High-Strength Epoxy and Interlocking Reinforcement
Standard drywall cannot support the weight of natural stone on high vertical runs. We recommend using rigid cement board or reinforced masonry as the substrate. To ensure a permanent bond, installers should use high-strength epoxy resin adhesives specifically formulated for natural stone rather than standard mortars. This provides the flexural strength needed to resist thermal expansion and contraction.
For large-scale projects, the panel design itself dictates long-term stability. Our Z-shape interlocking panels utilize a precision-engineered male-female connection system. This design does more than just camouflage joints; it physically locks the panels together to distribute weight horizontally across the wall rather than letting it stack vertically on a single point.
- CNC Diamond-Blade Precision: We use CNC cutting to ensure tight modular fits, minimizing the risk of individual stones shifting within the panel.
- Mechanical Fixing Points: For walls exceeding standard heights, install secondary clips or tension wires to provide physical redundancy if the adhesive fails.
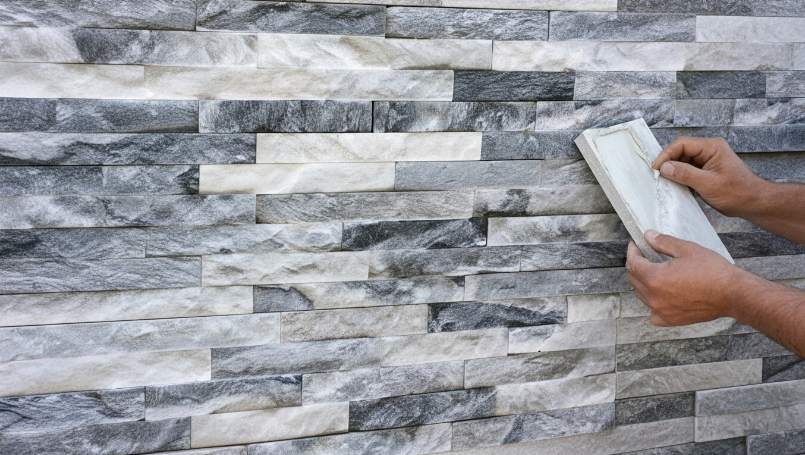
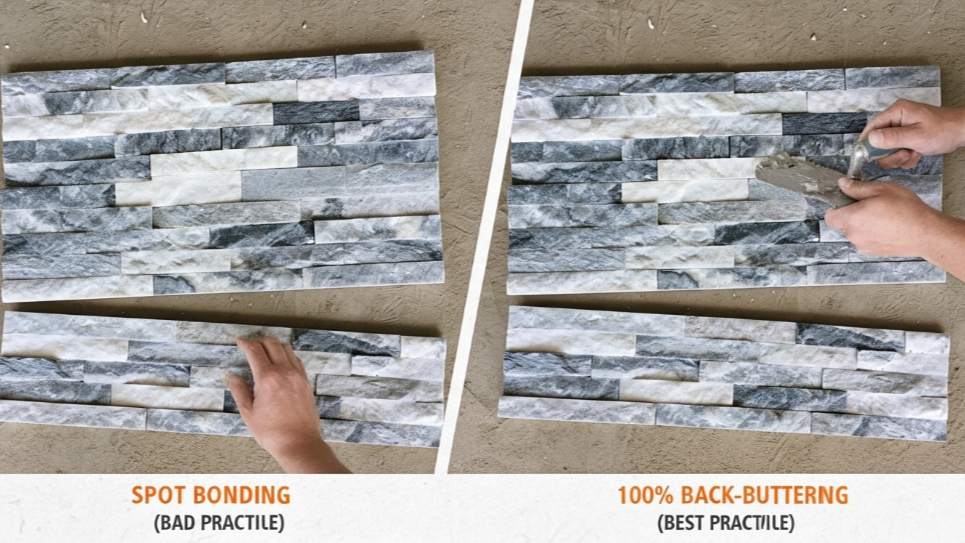
- Back-Buttering: Always apply adhesive to the back of the pannello in pietra and the substrate to ensure 95% contact coverage.
- Z-Shape Interlock: Use interlocking designs to hide vertical joints and prevent “fatto un passo” gaps in high-traffic commercial areas.
- Substrate Choice: Avoid standard drywall; use cement board or rigid masonry to prevent backing warp.
By combining mechanical fasteners with high-grade epoxy and interlocking panel geometry, you create a reinforced system that withstands both environmental moisture and structural settling. This approach ensures the facade remains flush and secure for the life of the building.
Solving the Mystery of “Hollow Sounds” in Your Stone Wall
Hollow sounds signal air voids between the stone and substrate. These gaps usually result from improper bonding, leading to loose panels and moisture failure over time.
Identifying Installation Gaps and Adhesive Voids
Air pockets develop when installers prioritize speed over bond integrity. When a panel sounds hollow, it means the stone lacks a physical connection to the wall, creating a drum-like echo. This often points to shortcuts taken during the adhesive application phase.
- Spot-Bonding: Applying mortar only to corners and centers leaves massive voids that trap air and moisture instead of providing full support.
- Back-Buttering Failures: Our 6″ x24″ panels require full mortar coverage on the back to ensure the entire stone surface contacts the substrate.
- Surface Contamination: Dust, grime, or residual curing compounds on dense concrete act as bond breakers, preventing the mortar from sticking.
- Moisture Trapping: Voids in high-humidity regions like the Gulf collect condensation, which accelerates delamination and eventual panel failure.
Ensuring Flush Installation with Same-Batch Quarry Consistency
Manufacturing precision eliminates the structural “rocking” that traps air during installation. When panels vary in thickness or edge quality, they cannot sit flush against the wall. This forced gap creates the perfect environment for hollow pockets to form.
- Same-Batch Quarry Consistency: Top Source Stone sources from the same quarry vein per order to maintain 95% hue and thickness uniformity across the project.
- CNC Diamond-Blade Precision: Our precision-cut edges allow panels to fit perfectly tight, removing the gaps that cause hollow echoes.
- Standardized Profiles: We maintain a strict 1cm – 2.5cm thickness range, helping contractors keep mortar beds even across large-scale commercial walls.
- Stabilità: Uniforme panels prevent the stone from shifting or lifting during the curing process, ensuring 100% surface contact.
How to Remove Mortar Stains Without Damaging the Natural Face?
Clean wet mortar immediately with water. For dried residue, use stiff brushes and pH-neutral cleaners; avoid brick acids to prevent permanent rust staining on slate and quartzite.
Maintaining the visual integrity of a split-face or natural cleft surface requires a specific cleaning protocol. Because Top Source Prodotti in pietra utilize 100% natural minerals like quartzite and slate, aggressive chemical treatments often do more harm than the stains themselves. The goal is to separate the cementitious bond from the stone face without altering the stone’s mineral composition or texture.
Mechanical Removal Methods for Dried Residue
Mechanical cleaning works best for localized spots where the mortar has already hardened. These methods rely on physical friction rather than chemical reactions to lift debris from the deep crevices of the stone face.
- Stiff Brushing: Scrub light mortar spots with warm soapy water and a stiff-bristled non-metallic brush to lift surface debris.
- Precision Sanding: Apply 60-grit sandpaper carefully to small, stubborn dried areas to grind away residue without flattening the natural cleft face.
- Wide-Nozzle Pressure Washing: Use a pressure washer at a safe distance with a wide nozzle to rinse away loose sand and cement particles without blowing out the grout joints.
Maintaining Surface Stability with pH-Neutral Cleaners and Sealants
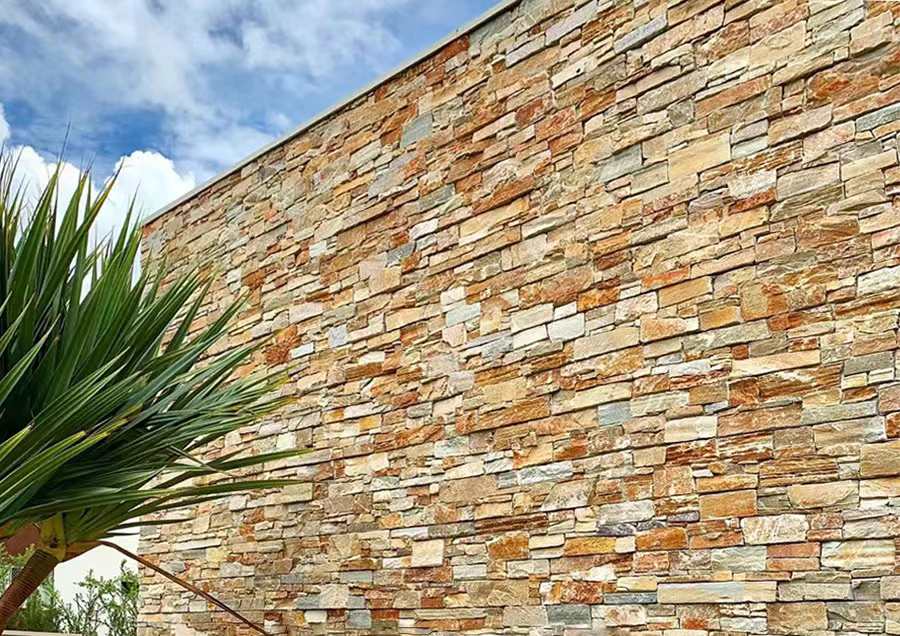
Chemical selection is critical when dealing with high-iron content stones like California Gold or Sierra Blue. Standard masonry cleaners often contain acids that trigger oxidation within the stone, leading to unsightly orange rust blooming.
- Acid Avoidance: Skip hydrochloric brick acids; these react with internal iron in natural quartzite and slate to cause permanent rust staining.
- pH-Neutral Solutions: Use specialized stone cleaners to dissolve cementitious bonds safely without pitting or etching the delicate mineral surface.
- Breathable Sealants: Apply a premium sealant after the cleaning process to shield the stone from future grout haze and moisture-driven efflorescence.
For large-scale commercial projects, we recommend testing any cleaning agent on a scrap panel first. This ensures the cleaner does not react with the specific quarry vein of your batch, protecting the 95% hue uniformity we maintain across our inventory crates.
Repair Guide: How to Replace a Single Damaged Stone Panel?
Extract damaged panels from the center out to protect the wall. Reinstall using matching batch units and back-buttering with polymer-fortified Type S mortar for a seamless finish.
| Replacement Phase | Requisito tecnico | Critical Tolerance |
|---|---|---|
| Extraction | Center-outward chiseling | Zero leverage on adjacent units |
| Bonding | Polymer-fortified Type S Mortar | 1/2″ a 1″ mortar thickness |
| Alignment | CNC Precision Interlocking | 95% Hue Uniformity Match |
Extracting Damaged Units Without Substrate Failure
Localized repairs focus on preserving the moisture barrier and the structural backing. Removing a single panel incorrectly often causes collateral damage to neighboring units or the cement board. We use a controlled destruction method to isolate the failure.
- Break from the center: Use a cold chisel and hammer to shatter the stone into smaller segments, starting specifically from the middle of the damaged piece.
- Edge caution: Work outward toward the borders. This prevents applying leverage against the edges of healthy, adjacent panels that could otherwise crack or delaminate.
- Substrate cleaning: Scrape the substrate clean of all cured mortar residue. You need a flat, receptive surface to ensure the new bond sits flush with the existing wall.
- Barrier inspection: Inspect the vapor barrier or cement board for punctures. Repair any structural damage before applying new adhesive to prevent future moisture intrusion.
Utilizing Back-Buttering and CNC Precision for Alignment
To make a repair invisible, we follow Pietra di alto livello engineering standards. Precision is the only way to maintain the interlocking grid and ensure long-term adhesion in high-traffic or weather-exposed environments.
- Visual matching: Select a replacement unit from the same batch. We maintain a 95% hue uniformity standard per order to prevent the “irregolare” look common with salvaged materials.
- Eliminate air pockets: Apply a 1/2-inch to 1-inch layer of polymer-fortified Type S mortar directly to the back of the stone (back-buttering). This ensures 100% coverage and prevents hollow sounds.
- Mechanical interlock: Leverage the CNC diamond-blade edges of the Z-shape or S-shape panel. These precision edges allow the unit to slide into the “maschio-femmina” connection of the existing grid.
- Setting the unit: Press the panel firmly until mortar squeezes from the sides. This ensures the interlocking connection is fully seated, maintaining the seamless architectural finish without visible stepped gaps.
Perché “Scrap” Quality Panels Lead to Structural Issues?
Low-grade salvaged panels suffer from 20% reduced bond strength and micro-fractures. Direct quarry sourcing with epoxy resin ensures structural stability and prevents moisture-driven delamination.
Material Fatigue and Reduced Adhesion Strength
Salvaged or low-grade stone components carry “hidden” damage from their previous environment. Unlike fresh stone, these materials have already endured thermal stress and load cycles that weaken their internal structure before they even arrive at a new job site.
- Forza del legame: Salvaged materials hit only 80% of the adhesion standards seen in new pannelli in pietra.
- Pore Clogging: Residual mortar and environmental grit clog the stone’s natural pores, which kills the mechanical bond during installation.
- Porosity Issues: Higher porosity in salvaged “salmon” bricks or low-grade slate makes the entire wall vulnerable to freeze-thaw ruptures.
- Micro-fractures: Previous environmental stress causes tiny internal cracks that compromise the load-carrying capacity of the sistema di pannelli.
Direct Quarry Sourcing and High-Strength Resin Bonding
Pietra di alto livello eliminates these risks by controlling the supply chain from the mountain to the crate. We focus on material fresh from the quarry to ensure the chemical and physical properties of the stone remain intact for the life of the building.
- Controllo della cava: We source from the same quarry vein per order to prevent natural color shifts and structural inconsistency.
- Epoxy Resin: We use high-strength epoxy resin specifically formulated for natural stone to create a permanent bond between the stone and the panel base.
- Bordi di precisione: CNC diamond-blade cutting ensures a modular fit that eliminates “fatto un passo” gaps where moisture typically penetrates.
- Verifica visiva: Strict 95% hue uniformity and pre-shipment checks ensure every panel meets 2026 structural durability standards.
Pensieri finali
Substrate failures and constant callbacks erode dealer margins far faster than a lower initial purchase price saves them. We mitigate these structural risks by using CNC diamond-blade precision and same-batch quarry sourcing to guarantee 95% hue uniformity and a seamless fit. Investing in high-density natural minerals and factory-controlled epoxy bonds ensures your inventory withstands environmental stress without the need for expensive remedial work.
Verify our material quality by requesting a sample kit or starting a 300-square-meter trial order with mix-and-match flexibility. We provide pre-shipment visual verification via high-definition media to protect your cash flow and ensure every crate meets your project standards. Reach out to our team to discuss private label options or to secure current stock from our “Grande 10” inventory.
