積み石を正しく設置する方法を学ぶことは、利益率の高い建築上の特徴と、パネルの故障によって引き起こされる高額な賠償請求の違いとなります。不適切な設置により石が下地から剥がれることが多く、これによりクライアントの安全が危険にさらされ、請負業者の評判が失墜します。これらのコールバックを回避するには、垂直方向の重量分布の物理学と、石と壁の間の結合の化学を理解することから始まります。
これ プロの石材の技術基準を確立するガイド 重要な下地処理やモルタルの選択から、接着力を最大限に高めるためのバックバタリングの詳細まで、すべてを網羅しています。 Z 型パネルを連動させる仕組みとその管理方法を見ていきます。 edge transitions without relying on complex on-site miter cuts. Following these onsite protocols ensures long-term durability and eliminates common post-installation issues like efflorescence or moisture traps.
Is Your Wall Ready? Critical Substrate Preparation Standards
Substrate integrity and moisture management determine whether a 天然石 facade maintains its structural bond for decades or fails during the first significant freeze-thaw cycle.
Evaluating Structural Integrity and Load Requirements
Standard natural 積み上げられた石のパネル from Top Source Stone weigh between 8 to 12 lbs per square foot, while premium rough-cut selections can reach 13.5 lbs per square foot. Installers must confirm the wall can support these dead loads without shifting. Any substrate deflection will telegraph through the stone, causing the precision-cut Z-shape interlocking joints to separate. Before installation, we require all surfaces to be plumb and free of contaminants like paint, wax, or form-release agents that act as bond breakers.
| 基板の種類 | 耐荷重 | Prep Requirement |
|---|---|---|
| Concrete / Masonry | High (>25 lbs/sq.ft) | Scarify or Skim Coat |
| Wood Frame + Lath | Moderate (15 lbs/sq.ft) | Galvanized Lath + Scratch Coat |
| Cement Backer Board | High (15-20 lbs/sq.ft) | Thin-set over Mesh Tape |
Substrate Compatibility for Interior and Exterior Walls
Interior and exterior environments demand different bonding strategies to ensure the Z-shape panels lock correctly. For interior drywall, installers should never apply stone 紙面の厚さに直接影響します。代わりに、セメントバッカーボードをスタッドに固定します。外装用途の場合、焦点は剛性と接着強度に移ります。
- 直接塗布は、清潔な未塗装のレンガ、コンクリート、または CMU ブロックにのみ許可されます。
- 連動パネル を維持するには完全に平らな表面が必要です “男性-女性” 縦の継ぎ目を隠す接続。
- 木製フレームの壁は、剥離につながるたわみを防ぐのに十分な剛性が必要です。
湿気管理と耐候性バリア
天然石 本質的に耐久性がありますが、防水バリアではありません。で 屋外または暖炉などの湿気の多いゾーン そして水の特徴、主な保護は石の後ろにあります。現在の 2026 年の規定では、白華や水の滞留を防ぐための特殊な排水面が強調されています。
- Install a code-compliant moisture-resistant barrier (WRB) and flashing around all openings.
- Use high-quality sealers after the mortar cures to block salt migration and simplify maintenance.
- Exterior projects in freeze-thaw climates require polymer-modified mortars that exceed ANSI A118.15 standards for water resistance.
Industry Standards for Scratch Coats and Lath
When installing over non-masonry surfaces, a metal lath and scratch coat provide the necessary mechanical key for the stone. Professionals use galvanized diamond mesh fastened 6 inches on center into the wall studs. A scratch coat of roughly 1/2 inch to 3/4 inch thickness must be applied and horizontally grooved. This layer needs to cure fully to prevent shrinkage cracks from transferring to the ストーンベニア. Using ANSI A118.4 or higher polymer-modified thin-sets ensures the bond strength meets the 300+ PSI shear requirements typical of high-performance modern builds.

Which Professional Tools Are Actually Required for a Clean Finish?
Professional-grade stacked stone results depend on high-torque thermal management during cutting and continuous horizontal reference lines to prevent cumulative alignment drift across large architectural facades.
Diamond-Blade Wet Saws for Precise Stone Cutting
Clean, accurate cuts distinguish top-tier commercial installations from amateur attempts. When handling high-density minerals like quartzite and slate, standard masonry blades often cause edge chipping or overheating. We utilize heavy-duty wet saws equipped with diamond-impregnated blades to maintain edge sharpness and structural integrity during custom sizing.
- Water-cooled cutting systems eliminate thermal stress on the stone, preventing micro-fractures in 6” x 24” panels during intricate cuts for outlets or fixtures.
- Precision diamond blades allow for tighter joints in the Flat Series, ensuring a minimalist aesthetic without the distraction of jagged edges.
- Constant lubrication during the cut ensures that the factory-sourced color remains consistent at the cut edge, preventing “white-out” from friction heat.
Square-Notched Trowels for Controlled Mortar Application
Mortar bed depth directly affects the bond strength and longevity of a wall. Standardized trowels ensure the adhesive layer supports the substantial weight of natural stone without sagging. We recommend specific notch geometries to accommodate the 8-13 lbs/sqft load typical of the Top Source Stone inventory.
- A 1/2-inch x 1/2-inch square-notched trowel creates the necessary depth for the mortar to “鍵” into the back of the stone。
- Proper notch sizing facilitates the back-buttering technique, achieving the 100% coverage required for a permanent bond in variable climates.
- Correct trowel usage prevents excess mortar from squeezing into interlocking Z-joints, keeping the finish clean and eliminating the need for tedious grout cleanup.
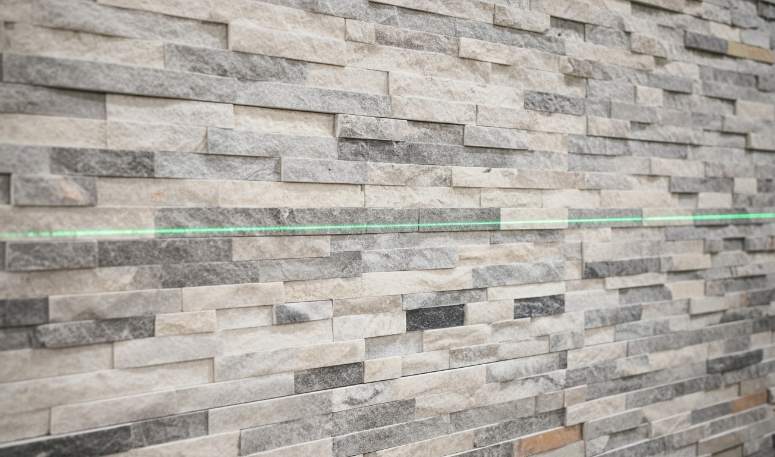
水平調整用レーザーレベリングシステム
高精度のレベリング ツールは、壁を登るときに悪化する位置合わせエラーを防ぎます。最初のコースで 1/16 インチのずれがあったとしても、10 行目までに大きなギャップや斜めのラインが発生する可能性があります。レーザー システムは、長距離では従来のバブルレベルでは実現できない安定した視覚ガイドを提供します。
- レーザーレベルは連続した水平基準線を投影し、基礎コースが基板全体にわたって完全に平坦であることを保証します。
- デジタル水準器は、設置者が壁の鉛直を確認するのに役立ちます。特にラフ シリーズでは、深いテクスチャーと影が垂直面の偏差を強調表示します。
- 自動レベリングギアにより速度が向上します。 インストールプロセス 手動シミングに費やす時間を削減することで、大規模な商業プロジェクトに最適です。
表面シール専用アプリケーター
最終的な美学 天然石は保護力に依存します シーラントが表面に供給されます。不適切な適用により、多くの場合次のような問題が発生します。 “プーリング” テクスチャの深い隙間や欠けた部分。適切なツールを選択すると、大理石やスレートが環境による汚れから保護されながら、鮮やかで自然な色合いを保つことができます。
- 柔らかい毛のブラシにより、凹部に液体の水たまりを残さずに、ラフおよびペンシルシリーズの石材のギザギザの輪郭にシーラントを浸透させることができます。
- 低圧ポンプ噴霧器は、大規模な塗装でも均一なコーティングを実現します。 外部ファサード、紫外線や高塩分に対する効果的なバリアを形成します。
- 中性PHのクリーニングスポンジは、シールする前に残留モルタルフィルムを除去し、曇りを防ぎます。 “ゴースティング” from being permanently trapped under the sealant layer.
プレミアム台帳パネルでビジネスを拡大

天然石のベニヤに最適なモルタルを選択するにはどうすればよいですか?
モダンな ストーンベニア 失敗の原因は通常、接着剤の選択が不適切であることが原因です。 8 ~ 12 ポンド/平方フィートを処理するために、ANSI A118.15 規格を満たすポリマー改質システムを優先します。死んだ 天然パネルの積載量。
ポリマー改質シンセットによる高い接着性能
ポリマーで改質された人工モルタルは、安全確保のための業界のベンチマークです。 天然石ベニヤ。これらの製品は ANSI A118.15 規格を上回り、8 ~ 13 ポンド/平方フィートのプロ仕様の重量を支えるのに必要な重要なせん断接着強度を提供します。 積み上げられた石のパネル。従来の混合物とは異なり、これらのモルタルには柔軟性を高める高濃度のポリマーが含まれています。これにより、接着は亀裂や層間剥離を起こすことなく、大規模な建築ファサードによく見られる小さな構造の変化や熱膨張に耐えることができます。
テストでは、これらの改良モルタルが 300 PSI を超える接着強度を発揮することが示されています。これは、重い珪岩やスレート材料の重量で破損することが多い従来の非改質混合物よりも大幅に高くなります。いつ トップソースストーンの取り付け 6″ ×24″ 高分子シンセットを使用したパネルは、建物の耐用年数の間、自然な裂け目と分割面のテクスチャが下地にしっかりと固定されたままになります。
耐荷重強度を高めるための S 型石積みモルタル
タイプ S モルタルは、従来のモルタルの信頼性が高く、高圧縮強度のオプションであり続けます。 石積みおよび重い石の設置。具体的には 外装用に設計された 高い横強度と耐衝撃性が必要とされる壁。のために 天然石の用途、タイプ S は 1,800 PSI の最小圧縮強度を提供し、厚切り石の垂直荷重を長期間にわたってサポートします。
| モルタル部門 | パフォーマンス指標 | 主な使用例 |
|---|---|---|
| S型石積み | 1,800+ PSI 圧縮 | 構造外装 壁と重い石の暖炉。 |
| ポリマー変性 (A118.15) | 300 PSI 以上のせん断接着力 | 連動する Z 字型パネル。高振動ゾーンまたは熱ゾーン。 |
| LHT 垂れ防止接着剤 | 垂直方向のグラブの安定性 | ラフカットプレミアムパネル(厚さ3.5cmまで)。 |
Contractors should mix Type S with a liquid bonding agent if the 石の下地 吸引力が低いです。これにより初期状態が改善されます “掴む” 硬化段階中、これは重いパネルにとって重要です。せん断強度に関してはシンセットの方が優れていますが、タイプ S は基材のレベリングが重要なバルク用途に優れています。 インストールプロセス。
重量垂直パネル用の垂れない接着剤
垂直 設置には石パネルを防ぐために特殊な垂れ下がり防止配合が必要です モルタルが硬化する前にズレるのを防ぎます。 Large and Heavy Tile (LHT) mortars are specifically labeled for vertical performance.これらの接着剤は、重い 6 インチ x 24 インチの連動 Z 型パネルを即座に吸引してサポートするため、機械的シムの必要性を排除します。
- 1/2 インチのノッチ付きこてを使用してモルタルを塗布し、100% の被覆率と機械的なロックを確保します。
- LHTモルタルを使用する “粗い” 厚さ3.5cmまでのシリーズパネル。
- シームレスな連動位置を維持するために、接着剤が接触直後に重量を支えていることを確認します。
凍結融解環境用の耐候性モルタル
For exterior projects in North America, Europe, or the Middle East, mortar selection must prioritize moisture resistance and temperature stability. High-performance mortars with low water absorption rates are essential for preventing efflorescence—the white salt deposits that can mar a dark slate or midnight quartzite wall. In colder climates, these mortars prevent internal ice damage by stopping water from penetrating the bond line.
Verify that the chosen adhesive is chemically compatible with the high-strength resins used in modern stacked stone panel manufacturing。水場や湿気の多い商業ロビーの近くに設置する場合は、湿潤環境用に特別に設計されたモルタルを指定してください。これにより、トップ ソース ストーン バッチの 95% の色相均一性が、時間の経過とともに湿気による鉱物の浸出や汚れから保護されます。
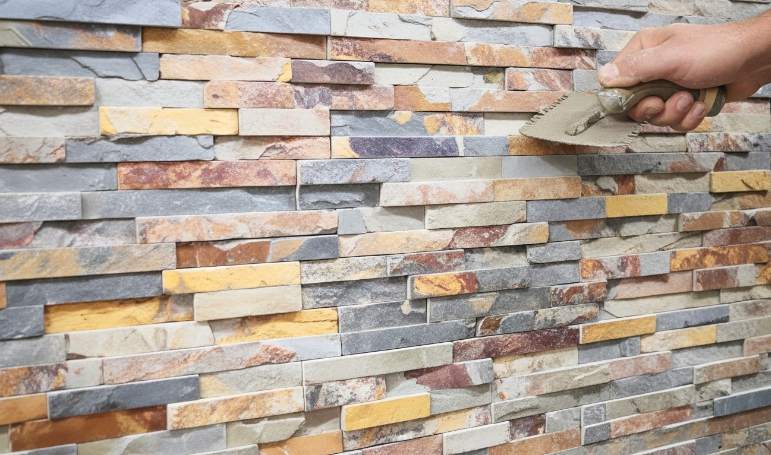
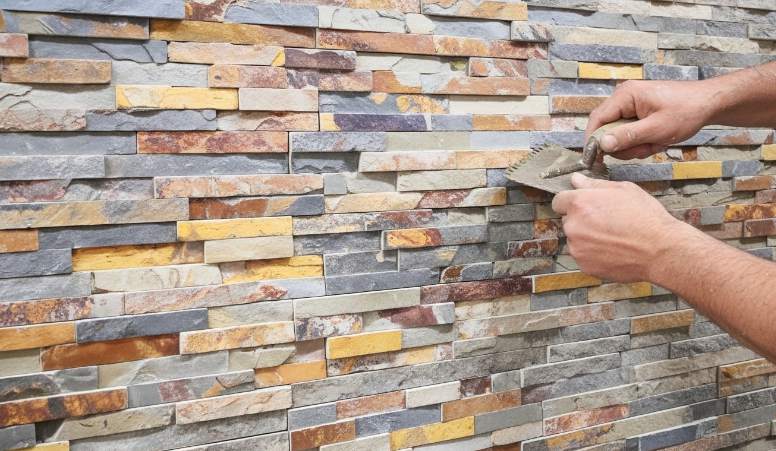
なぜ、 “バックバタリング” 長寿の秘訣はテクニック?
バックバタリングにより、基材と石の間の接着剤の転写が 100% 保証され、湿気による破損や石の層間剥離につながる空洞が効果的に除去されます。
接着剤を完全にカバーすることの達成
壁に標準的なノッチ付きこてを塗ると、モルタルの尾根の間に空隙が残ります。これらの隆起は軽量セラミックタイルには十分ですが、タイルの場合には重大なリスクをもたらします。 天然石積み上げパネル 重さは 8 ~ 12 ポンド/平方フィートです。バックバタリングでは、モルタルの薄く平らな層を背面全体に塗布します。 石を壁に押し込む前に。この作用により、尾根が崩れ、スレートまたは珪岩の自然な表面の凹凸が埋められ、材料のすべての平方インチが接着剤と確実に接触します。
- モルタルの尾根を潰して、パネル全体に強固で連続的な接着層を形成します。
- 自然な分割面または不規則なテクスチャを持つパネルに一貫した接着ベッドを提供します。
- 初期値を増やす “掴む” または吸引機能により、垂直設置時の重いパネルの垂れ下がりを防ぎます。
空隙と湿気ポケットの除去
Hollow spots behind a stone facade act as reservoirs for water. In exterior environments, this moisture undergoes freeze-thaw cycles, expanding and applying outward pressure that eventually pops the stone off the wall. By using the back-buttering technique, we remove the air pockets where water typically collects. This practice is essential for meeting modern durability standards in high-humidity or cold climates, as it also prevents the migration of salts that cause unsightly efflorescence on the stone face.
- Prevents water from pooling in the cavities behind the ストーンベニア, a primary cause of bond failure.
- Reduces the risk of efflorescence by removing the air pockets where moisture and minerals collect.
- Protects high-strength polymer-modified adhesives from environmental stress by sealing them within a solid layer.
Enhancing Structural Bond Strength
A permanent mechanical bond relies on the mortar penetrating the microscopic pores of the 天然石. A wet-on-wet connection—where fresh mortar on the stone meets fresh mortar on the wall—results in a much stronger lock than simply pressing a dry stone into a semi-skinned wall layer. This technique ensures that the stone and the substrate behave as a single structural unit during thermal expansion. For commercial projects where long-term liability is a concern, back-buttering is the standard for preventing stone fall-off and ensuring public safety.
- Forces mortar deep into the 天然石 pores for an unyielding mechanical key.
- Allows the 石のパネル and substrate to move as a single unit during extreme temperature shifts.
- Minimizes the risk of stone fall-off, addressing the primary concern for long-term structural integrity.
How to Correctly Install Interlocking Z-shape Stone Panels?
Achieving a professional-grade finish with Z-shape panels requires a rigorous male-female interlocking strategy and a 100% mortar transfer rate to support the 8-13 lbs per square foot typical of natural stone.
Layout Strategy and Wall Preparation
Effective installation begins with a level baseline. Use a horizontal chalk line to establish a starting point, as any deviation at the base amplifies into visible gaps as the wall rises. Installers must verify that the substrate is structurally sound; for interior projects, use cement backer board over standard gypsum to handle the weight of natural slate or quartzite.
Dry-fitting panels on the floor before application allows you to blend variations from different crates. This process ensures the “同一バッチ採石の一貫性” remains intact across the entire surface area. We recommend calculating full panel runs to avoid small, unstable slivers at the top or edges of the project.
Adhesive Application for High-Strength Bonding
High-performance projects require polymer-modified mortars like Mapei Ultralite or Type S masonry mortar. Use a 1/4-inch notched trowel to apply a uniform layer to the substrate. To prevent detachment, back-butter every panel by applying a thin layer of adhesive to the back of the stone. This ensures 100% coverage and eliminates voids that could trap moisture in exterior freeze-thaw environments.
| 特徴 | Standard Flat Panels | Top Source Z-Shape Panels |
|---|---|---|
| Connection System | Butt-joint (Straight Edge) | Male-Female Interlock |
| ジョイントの可視性 | High (Visible vertical lines) | Seamless (Camouflaged joints) |
| エッジの精度 | Manual / Hand-cut | CNC Diamond-Blade Finish |
Structural Alignment and Interlocking Techniques
Start installation at the bottom corner and work horizontally. Press the first panel into the mortar and tap it gently with a rubber mallet. This action collapses the mortar ridges and forms a solid mechanical bond. Slide subsequent panels together tightly, using the Z-shape to hide the substrate and eliminate visible vertical seams.
- Use a 4-foot level to check horizontal alignment every two rows.
- Tightly seat the male-female edges to maintain the visual flow of the 天然石 テクスチャー。
- Clear any excess mortar from the face of the stone immediately with a damp sponge.
Corner Transitions and Seamless Joint Management
Finish the project with matching L-shaped corner pieces. These pre-fabricated units eliminate the need for difficult miter cuts on-site and ensure the texture remains synchronized at wall transitions. Stagger the vertical joints between courses to enhance structural integrity and create a more natural aesthetic.
For exterior installations, maintain a 1/16-inch gap between panels to accommodate thermal expansion. This is particularly vital in climates with extreme temperature swings, as it prevents the stone from cracking or buckling. Clean the stone surface thoroughly once the mortar reaches its initial set, ensuring no residue remains on the split-face texture.
Can You Achieve Perfect Corners Without On-site Miter Cutting?
Modern pre-fabricated L-shaped corner units eliminate the structural risks and labor intensity of manual miter cutting while ensuring a seamless aesthetic transition for 自然石の壁。
Traditional masonry often requires installers to spend hours at a wet saw, trying to align two separate stone pieces at a perfect 45-degree angle. This process is slow and often results in jagged edges or visible gaps that compromise the project’s premium look. トップソースストーン addresses this by providing factory-made L-shaped corner units that provide two perpendicular faces in a single, solid unit.
Utilizing Pre-Fabricated L-Shaped Corner Units
These units use the same natural stone as our flat panels to ensure color and texture consistency across the entire 2026 project. By sourcing material from the same quarry vein, we maintain a 95% hue uniformity, preventing the patchy appearance common when mixing different batches. The units arrive ready to install, providing a structural transition that maintains a 100% 本物の石 美的。
- Precision-manufactured pieces provide a structural wrap-around finish without the fragility of manual joints.
- The interlocking design allows the corner to blend into the wall, hiding vertical seams that typically appear with butt joints.
- Factory-controlled edges ensure that the corner piece texture matches the adjacent flat panels perfectly.
Reducing Labor Costs and Installation Timelines
Modern construction schedules demand faster turnarounds. Pre-cut corner solutions facilitate this by removing specialized masonry tasks. Contractors save significant time because they no longer need to measure, mark, and wet-saw every stone at the job site. This efficiency is a major driver for B2B buyers looking to maximize profit margins on large-scale developments.
- Simplified processes allow general installers to achieve professional results previously reserved for master stonemasons.
- On-site material waste is minimized by eliminating the breakage and dust associated with manual miter cutting.
- Standardized corner sizes allow for predictable logistics and faster inventory turnover for retailers.
Maintaining Visual Integrity with Interlocking Seams
The Z-shape or finger-jointed design of these corners ensures that the transition from corner to wall is nearly invisible. We use CNC diamond-blade equipment during manufacturing to ensure every piece interlocks tightly with our flat series. This “男性-女性” connection system camouflages the installation substrate and prevents the “段差のある” gaps found in lower-quality ストーンベニア。
- Staggered joints prevent ‘stacking’ lines, which are a common failure point in manual stone アプリケーション。
- Precise manufacturing maintains a uniform fit while preserving the unique natural variations of each stone piece.
- The seamless finish enhances the architectural value of the building by creating a solid, monolithic appearance.
Handling Non-Standard Angles and Custom Requirements
While 90-degree corners are standard for most residential and commercial projects, some architectural designs require manual adjustments for unique geometries. For angles that are not exactly 90 degrees, installers still use wet saws with diamond blades to create custom mitered joints. The natural durability of our slate and quartzite allows for clean cuts without excessive chipping during these adjustments.
- High-strength epoxy resin ensures that manual joints remain permanent and stable in custom applications.
- Diamond-blade tools are essential for maintaining clean lines when working with high-density materials like Sierra Blue or Glacier White.
- Proper planning and dry-fitting remain critical when transitioning from pre-fabricated corners to custom-cut sections.

How to Solve Common Installation Issues Like Efflorescence?
Efflorescence occurs when soluble salts migrate to the stone surface via moisture; prevention requires eliminating salt sources in the mortar and blocking water pathways through high-performance barriers.
Select Low-Salt Materials and Clean Water Sources
Controlling efflorescence begins with the chemical composition of your installation materials. In professional B2B applications, we prioritize Type N mortar over Type S or M for veneer work. Type N contains lower cement levels, which significantly reduces the internal reservoir of soluble salts while providing the flexibility needed for natural stone expansion. We exclusively use washed, well-graded sand to prevent the introduction of unrefined minerals that often trigger surface staining.
- Mix all mortars with filtered or potable water to avoid the high mineral content found in well water.
- Opt for dense natural stones like slate or granite, which have lower absorption rates than porous alternatives.
- Verify that all masonry components meet ASTM standards for low soluble salt content.
- Maintain same-batch quarry consistency to ensure uniform chemical properties across the entire project.
Implement Robust Moisture Barriers and Drainage
Since water is the primary vehicle for salt migration, moisture management is the most critical preventative factor. Install a high-quality waterproofing membrane on the substrate to isolate the stone veneer from the wall structure. This barrier prevents capillary rise and stops moisture from drawing salts out of the concrete or brick behind the stone. Every project must include integrated flashing around windows, doors, and rooflines to prevent water from seeping behind the panels.
Site-wide drainage also plays a role in protecting the stone. We ensure landscape grading and gutter systems direct water far away from the foundation. For concrete substrates, we mandate a full curing period before 石の取り付け. Young concrete releases volatile compounds and high moisture levels; trapping these behind 石のパネル is a guaranteed recipe for immediate efflorescence.
Apply Sealing Protocols to Block Migration Pathways
Reducing the porosity of the overall installation limits the pathways water uses to reach the surface. Once the stone and mortar have fully dried, we apply a breathable, hydrophobic sealer. These silane-based impregnators allow water vapor to escape—preventing pressure buildup—while blocking liquid water from entering the stone from the outside.
- Use dense mortar application techniques and mechanical vibration to eliminate voids where moisture accumulates.
- Utilize Z-shape interlocking panels with CNC diamond-blade precision to create tight joints that shield the substrate.
- Establish a maintenance schedule to re-verify the integrity of the hydrophobic layer every 3 to 5 years.
Safe Removal Techniques for Surface Deposits
When white residue appears, mechanical removal is the first line of defense. We use a dry, stiff-bristle brush to sweep away surface salts before they can be re-dissolved. Avoid high-pressure washing at all costs; the extreme force often pushes dissolved salts deeper into the stone pores, causing the issue to recur with greater intensity once the wall dries.
For stubborn deposits, we recommend pH-neutral natural stone cleaners specifically formulated for masonry. Acidic solutions can react with certain minerals in natural stone—particularly in quartzite or limestone—leading to permanent discoloration or etching. Always test any cleaning agent on an inconspicuous area to ensure it preserves the stone’s natural texture and hue before applying it to the entire facade.
What Are the Post-Installation Sealing Protocols?
Effective sealing serves as the final structural defense, requiring a specific cure window and chemical compatibility to ensure the natural stone’s breathability and color integrity.
Wait for the adhesive or mortar bed to reach full structural maturity before introducing sealing agents. Applying chemicals too early traps moisture within the stone, which disrupts the hydration process of the cementitious bond and can lead to long-term failure. For projects involving grout, treating the stone with a sealer first acts as a release agent. This prevents the porous natural surface from absorbing grout pigments, which often causes permanent staining on lighter materials like Alaska Gray or Glacier White quartzite.
Before starting the application, remove all cement film, construction dust, and site residues using a pH-neutral cleaner. The stone surface must be bone-dry. Even trace amounts of trapped moisture can lead to “blushing”—a cloudy white film that forms under the sealer and is difficult to remove without professional-grade strippers.
Selecting and Applying Penetrating Sealers
Avoid film-forming sealers that create a plastic-like coating on the surface. Instead, use silane-based, breathable penetrating sealers that allow moisture vapor to escape while blocking liquid water ingress. This breathability is essential for preventing spalling and delamination during freeze-thaw cycles in Northern climates. Applying multiple light coats is far more effective than a single heavy, saturated application.
- Apply the sealer using a low-pressure sprayer or a lint-free cloth to ensure even saturation across the natural cleft surface.
- Work in small, manageable sections to prevent the sealer from drying on the surface before it can be buffed.
- Buff away any excess sealer with a clean cloth within 10 minutes of application to prevent a sticky residue or hazy finish.
Waterproofing Requirements for Exterior and Wet Zones
High-moisture environments, such as pool surrounds, water features, and exterior facades in high-humidity regions, demand the most rigorous sealing protocols. Porous materials like limestone, slate, and travertine require deep-penetrating protection to prevent internal iron oxidation, which often manifests as unsightly rust spotting. Sealers in these zones mitigate environmental degradation and prevent the stone from becoming a host for organic growth.
Note that a sealer is not a primary waterproofing agent. For exterior applications, the 石パネルシステム must work in conjunction with a secondary moisture barrier and proper flashing. The sealer’s role is to protect the stone’s aesthetic and structural surface, while the underlying drainage plane manages bulk water penetration. Ensure all joints and edges receive thorough coverage to block water from migrating behind the panels.
Curing Schedules and Maintenance Testing
Protect the sealed surface from all contact for at least 2 hours post-application. The area should remain completely dry for a minimum of 12 hours, though the chemical bond typically requires a full 24-hour curing period to reach peak resistance against stains and water. Restricting access during this window prevents contaminants from becoming embedded in the fresh seal.
To maintain the installation, perform a water droplet test periodically. If water fails to bead on the surface and soaks into the stone within two hours, the sealer has likely worn down and requires reapplication. For routine cleaning, avoid acidic chemicals or high-pressure washers. These methods strip the sealer and can erode the delicate textures of natural stone, compromising both the look and the longevity of the wall.
結論
Proper installation techniques like back-buttering and correct substrate preparation protect the structural integrity of 自然石の壁. Using precision-cut Z-shape panels and pre-fabricated corners reduces labor time while ensuring a seamless, high-end architectural finish. These standards prevent common issues like stone delamination or efflorescence, guaranteeing a long-lasting result for commercial and residential clients.
Review your current project requirements and verify if your inventory includes the matching L-corners needed for a professional wrap-around finish. Contact Top Source Stone to request a technical catalog or discuss bulk sourcing options for your next installation.
よくある質問
Can you put stacked stone over existing brick without a lath?
Yes, you can install stacked stone directly over existing brick without a metal lath, provided the brick is unpainted, clean, and structurally sound. The surface must be porous enough to absorb water; if the brick is glazed or painted, you must either sandblast the surface or install a metal lath to ensure a mechanical bond. Use a high-quality polymer-modified mortar meeting ANSI A118.4 standards to ensure maximum adhesion to the masonry substrate.
Do you need a metal lath for natural stone veneer on drywall?
Standard drywall is not a recommended structural substrate for 天然石ベニヤ due to its weight and susceptibility to moisture. For a professional installation, you should install a metal lath over a moisture barrier or, preferably, replace the drywall with a cement backer board. The metal lath provides the necessary mechanical key for the scratch coat to hang the heavy stone safely and prevents the drywall paper from delaminating under the load.
What is the best adhesive for heavy stacked stone on a fireplace?
The best adhesive for heavy stacked stone on a fireplace is a professional-grade, polymer-modified thin-set mortar that meets or exceeds ANSI A118.15 specifications. These “Large and Heavy Tile” (LHT) mortars are specifically engineered to provide high-bond strength and superior sag resistance, which is critical for vertical 石材の用途. Additionally, these mortars are designed to withstand the thermal expansion and contraction cycles common in fireplace environments.
How do you cut natural stone panels without chipping or cracking?
To prevent chipping or cracking, use a high-quality wet saw equipped with a continuous-rim diamond blade designed specifically for natural stone. Maintain a slow, steady feed rate and ensure a constant flow of water to the cutting surface to reduce heat and vibration. For intricate cuts or edges that will be exposed, finishing the cut with a variable-speed angle grinder and a diamond polishing pad can further smooth any minor micro-chips.
How to fix loose or falling stone panels after years of use?
To repair loose panels, first remove any failing stones and scrape the old mortar off both the back of the stone and the wall substrate until you reach a clean, solid surface. Apply a bonding agent to the substrate, then “back-butter” の 石のパネル with a high-performance polymer-modified mortar. Press the stone firmly into place, ensuring 100% coverage, and brace it if necessary until the mortar sets. If moisture was the cause of failure, ensure the area is properly sealed after the repair cures.
Should you seal stacked stone before or after the mortar cures?
Stacked stone should always be sealed after the mortar has fully cured, which typically takes between 72 hours and 28 days depending on environmental conditions. Sealing before the mortar cures can trap moisture and gases inside the wall system, leading to efflorescence (unsightly white salt deposits) or bond failure. For the best results, ensure the stone is completely dry and clean before applying a high-quality breathable penetrating sealer.
