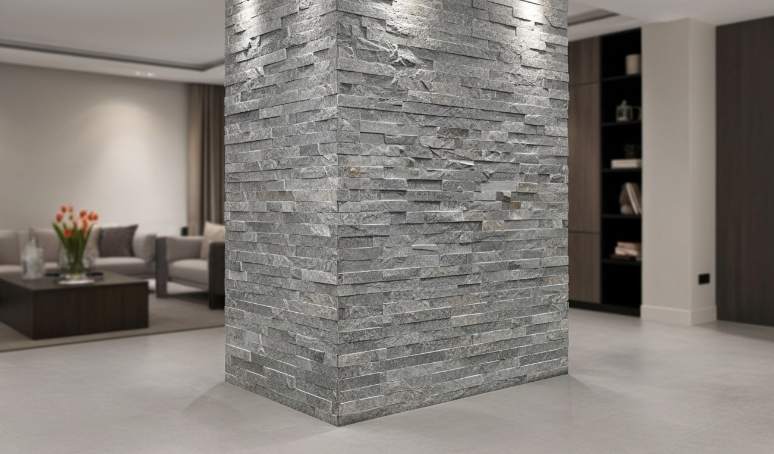
Precisiehoekverstektechnieken dienen als de belangrijkste maatstaf voor de kwaliteit van het plaatsen van stenen en hebben een directe invloed op de projectmarges en de structurele betrouwbaarheid op de lange termijn. Onjuist uitgevoerde steenwikkelingen leiden tot zichtbare naden en afbrokkelende voegen die wijzen op een goedkope installatie, wat vaak resulteert in dure herbewerkingen of afwijzing van de klant tijdens de laatste doorgangen. Het bereiken van een naadloze afwerking op schoorsteenzuilen en externe hoeken vereist een rigoureuze benadering van de steengeometrie, omdat zelfs kleine misrekeningen in de snijhoek de visuele continuïteit van het gehele architectonische kenmerk in gevaar kunnen brengen.
Dit gids stelt een technische standaardwerkwijze voor steen vast omwikkeling, die de mechanica van op locatie gebaseerde versteksneden van 45 graden bedekt en het gebruik van geprefabriceerde L-hoeken voor een natuurlijk uiterlijk van metselwerk. We beschrijven de specifieke workflows voor het beheren van aangepaste hoeken die niet 90 graden zijn, het selecteren van geschikte diamantbladen voor dicht kwartsiet en de uiteindelijke hoonmethoden die worden gebruikt om zichtbare snijlijnen te elimineren. Als u deze procedures volgt, zorgt u ervoor dat de buitenhoeken het uiterlijk behouden van solide, met de hand uitgehouwen steen terwijl het voldoet aan de duurzaamheidseisen van professionele bouwwerken.
Waarom slechte hoeken een low-budget installatiekwaliteit onthullen?
Precisie binnen stenen bochten dient als de belangrijkste maatstaf voor het onderscheiden van hoogwaardig architectonisch metselwerk van gehaaste, kostenbesparende arbeid.
Hoeken dienen als kritische kwaliteitsindicatoren in de bouw, omdat ze precisie en een juiste uitvoering van afwerkingstechnieken vereisen. Oneffen of slecht afgewerkte hoeken brengen direct tekortkomingen in arbeid en materialen aan het licht. Wanneer hoeken afgerond, scheef of inconsistent lijken, geeft dit aan dat het installatieproces overhaast was. Omdat hoekafwerking arbeidsintensief is en niet gemakkelijk kan worden verborgen, wordt het een transparante indicatie of een aannemer de nodige tijd heeft geïnvesteerd of sluiproutes heeft genomen om de kosten te verlagen.
Zichtbare naden en zichtbare ruwe steenkernen
Bij low-budget installaties blijven de interne, gezaagde randen van de steen vaak zichtbaar voor het oog, waardoor de illusie wordt doorbroken natuurlijk metselwerk. Bij goedkope arbeid wordt doorgaans het slijpen of polijsten van snijranden overgeslagen, waardoor er een doffe, onnatuurlijke grijze of witte streep langs de hoek achterblijft die scherp contrasteert met het oppervlak van de steen.
- Precisie gesneden grootboekpanelen moeten nauw samenkomen; zichtbare gaten of dikke voegen op de hoek duiden op een gebrek aan gespecialiseerde steenhouwapparatuur.
- Geavanceerd projecten geven prioriteit aan een naadloze overgang waar de steen is het gezicht lijkt voortdurend om de hoek te wikkelen.
- Blootgestelde kernen missen de UV-stabiliteit en minerale textuur van het natuurlijke gespleten oppervlak, wat leidt tot snellere verwering en a “vervaardigd” Look.
Patroondiscontinuïteit en visuele breuken
Slecht vakmanschap faalt behoud van de natuurlijke stroom van steen texturen rond een hoek van 90 graden, waardoor de installatie eruit ziet als een behangtoepassing. Goedkope installaties resulteren vaak in ‘gestapeld’ naden waar de horizontale lijnen van de steen zitten lijn niet uit van het ene vlak van de hoek naar het andere. Deze breuk in het visuele vlak vernietigt het architecturale “gewicht” dat natuursteen hoort te bieden.
- Ervaren installateurs selecteren specifieke stukken om de natuurlijke korrel van een massief rotsblok na te bootsen.
- Bij werk van lage kwaliteit wordt gebruik gemaakt van willekeurige afsnijdingen aan de randen, waarbij de kleur- en textuurmatching die nodig is voor een professionele afwerking wordt genegeerd.
- Als de textuur op de hoek niet bij elkaar past, is dit voor ontwerpers en high-end klanten meteen een signaal dat het project snelheid belangrijker vond dan esthetische integriteit.
Het gebruik van veldverstekvlakken in plaats van L-hoeken
Aannemers met een beperkt budget proberen vaak hoeken te creëren door platte panelen ter plaatse in een hoek van 45 graden met de hand te zagen in plaats van te investeren in geprefabriceerde L-vormige hoekstukken. In het veld verstekhoeken zijn gevoelig voor afbrokkeling en ongelijkmatige openingen, omdat handmatige natte zagen de precisie missen van fabrieks-CNC-diamantbladranden.
- Het gebruik van in de fabriek gemaakte L-vormige hoeken zorgt voor de steen is natuurlijk Het oppervlak loopt door langs de rand en geeft het structurele uiterlijk van steen met een volledige beddiepte.
- Bij handmatig zagen op locatie wordt vaak niet de lichte oversnijding (45,3 tot 45,5 graden) bereikt die nodig is om strakke, spleetvrije verbindingen te garanderen.
- Het vertrouwen op handgesneden hoeken vergroot het risico aanzienlijk steenverplaatsing in drukbezochte commerciële ruimtes of woonwijken.
Lijmbloedingen en structurele zwakte
Hoeken zijn zones met hoge impact die gespecialiseerde hechting vereisen; slechte installaties vertonen vaak rommelige lijmresten of structurele instabiliteit. Low-budget teams passen vaak te veel standaard thin-set toe, die door hoekopeningen kan sijpelen en permanent vlekken kunnen veroorzaken natuursteen oppervlak. Dit residu is moeilijk te verwijderen verwijderen zonder de natuursteen te beschadigen gespleten.
- Bij een juiste installatie wordt gebruik gemaakt van hoogwaardige epoxyhars die speciaal is samengesteld voor natuurlijk gebruik steen om te voorkomen dat panelen bij de voegen wegtrekken.
- Onvoldoende steun op de hoek leidt tot ‘lippen,’ waarbij het ene paneel hoger zit dan het andere, waardoor een scherpe en gevaarlijke rand ontstaat.
- Standaard thinset mist de laterale hechtsterkte die nodig is om verstekranden bij elkaar te houden tijdens langdurige vries-dooicycli.
Verstekzagen op locatie: precisiepunten voor natuurlijke randen van 45 graden
Het op locatie realiseren van professionele stenen hoeken vereist een verschuiving van standaard timmerwerklogica naar een precisiefabricagementaliteit die rekening houdt met natuursteendichtheid en onregelmatig oppervlakte texturen.
Essentiële uitrusting voor nauwkeurige steenproductie
Maak hoeken van 45 graden schoon natuurlijke grootboeksteen begin met de juiste mechanische opstelling. Wij raden u aan een hoogwaardige natzaag te gebruiken met een diamantzaagblad met doorlopende rand, met name een segmenthoogte van 15 mm als u met hard kwartsiet werkt, zoals onze Alaska Grey- of Sierra Blue-modellen. De doorlopende rand voorkomt de micro-chips die vaak voorkomen bij leisteen of marmer, terwijl de hoogte van 15 mm de randstabiliteit over de gehele lengte van een 24-inch paneel handhaaft.
Trillingen zijn de belangrijkste vijand van een schone mijter. Beveilig de panelen met behulp van gespecialiseerde steen mallen of stevige klemmen om beweging tijdens de pas te elimineren. Door gebruik te maken van een digitale hoekmeter om de kanteling van het mes te controleren, weet u zeker dat de eerste zaagsnede overeenkomt met de laatste, waardoor vervorming wordt voorkomen “drift” waardoor bulkinstallaties vaak kapot gaan.
De 45,5 graden overcut-techniek
Ervaren installateurs vermijden snijden in een perfecte hoek van 45 graden. Door de zaag in te stellen op 45,5 graden zorg je ervoor dat de “echte rand”– de zichtbare voorkant van de steen – maakt als eerste contact. Hierdoor ontstaat er een strakke, naadloze uitstraling op de buitenkant terwijl er een microscopisch klein interieur achterblijft holte aan de achterkant van het gewricht.
| Specificatie | Standaard veldsnede | Precisie B2B-standaard |
|---|---|---|
| Snijhoek | Exact 45,0° (risico op een botsing van achteren) | 45,3° tot 45,5° Overcut |
| Messelectie | Standaard gesegmenteerde diamant | 15 mm gesplitst segment of continu |
| Gezamenlijke binding | Siliconen of standaard kit | Op kleur afgestemde epoxy van meskwaliteit |
| Koelmethode | Onderbroken waternevel | Constante watersmering met hoog debiet |
Deze binnenholte biedt de nodige ruimte voor epoxyhars met hoge sterkte. Zonder deze ontlastingshoek kan de lijm de lijm forceren panelen uit elkaar tijdens het uithardingsproces, waardoor een zichtbaar “stapte” gat. Door de druk op de scherpe voorkant te concentreren, blijft de verbinding structureel verbonden en visueel verenigd.
Onregelmatige steendikte en -texturen beheren
Natuurstenen panelen zoals onze “Ruwe serie” variëren in diepte, wat de uitlijning van het verstek bemoeilijkt. Markeer altijd uw snijlijnen op de achterkant van de paneel om te beschermen het natuurlijke gezicht tegen krassen. Voordat u de snede maakt, lijnt u de dikste punten van de twee bijpassende panelen uit om een doorlopend profiel rond de hoek te garanderen.
- Maak alle hoekstukken droog voordat u lijm aanbrengt om te controleren of ze nog goed zitten “uitbarstingen” of dikteverschillen.
- Vertraag de zaagsnelheid aanzienlijk naarmate het zaagblad de steen verlaat, om kwetsbare randen van leisteen en marmer te beschermen.
- Zorg voor een constante waterstroom om sediment te verwijderen; Opeenhopingen kunnen het mes bot maken en ervoor zorgen dat de steen oververhit raakt.
Randafwerking en voegversterking
Het knippen zelf is slechts 90% van het werk. Nadat het verstek is gesneden, gebruikt u een diamantschuurpad met korrel 200 om de ruwe randen aan te scherpen. Hierdoor worden microbramen verwijderd en wordt de overgang tussen de twee panelen gladder “zacht” hoek die minder gevoelig is voor afbrokkelen na installatie.
Gebruik voor de uiteindelijke hechting vóór montage een pH-neutrale steenafdichting in bijpassende kleur op de snijranden. Dit voorkomt dat vocht de ruwe stenen kern binnendringt. Voor de eigenlijke verbinding raden wij een epoxy van meskwaliteit aan; het zorgt voor een permanente, weerbestendige verbinding die de door de fabriek gecontroleerde kwaliteit van onze geprefabriceerde L-hoeken nabootst, waardoor de installatie extreme vries-dooicycli overleeft zonder delaminatie.
Fabrieksgerichte prijzen voor Premium Ledger-panelen

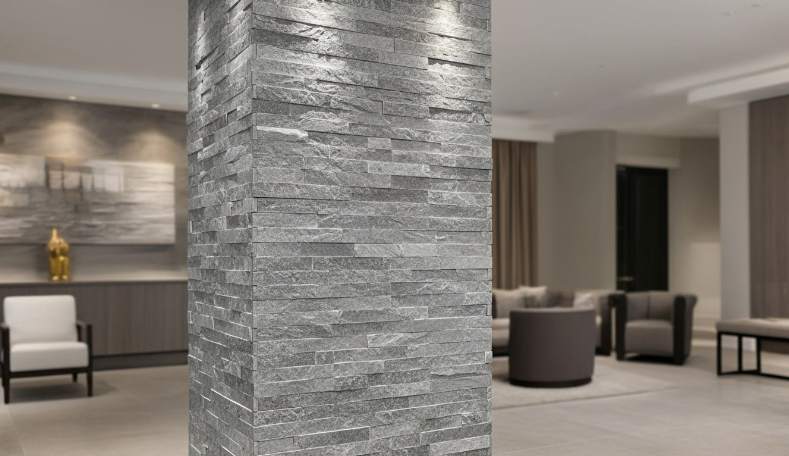
Het prefabvoordeel: waarom L-hoeken meer op natuurlijke rotsblokken lijken
Geprefabriceerde L-hoeken vervangen kwetsbare handmatige verstekverbindingen met een monolithisch stenen uiterlijk dat de structurele integriteit en textuurcontinuïteit bij elke muurovergang behoudt.
Naadloze visuele continuïteit en omhullende textuur
Handmatige verstekverbindingen slagen er vaak niet in om het interne aggregaat van de steen te verbergen, waardoor een verticale lijn ontstaat die schreeuwt “fineer.” Geprefabriceerde L-hoeken lossen dit op door te zorgen voor een doorlopende steen gezicht dat fysiek om de hoek wikkelt. Dit ontwerp verbergt de paneeldikte en zorgt ervoor dat de natuurlijke spleet en textuur van de ene zijde naar de andere ononderbroken blijven. Wij elimineren de “zaagsnede” ziet er helemaal uit, omdat het hoekstuk de geometrie nabootst van een massief, zwaar stenen blok dat te vinden is in traditioneel metselwerk.
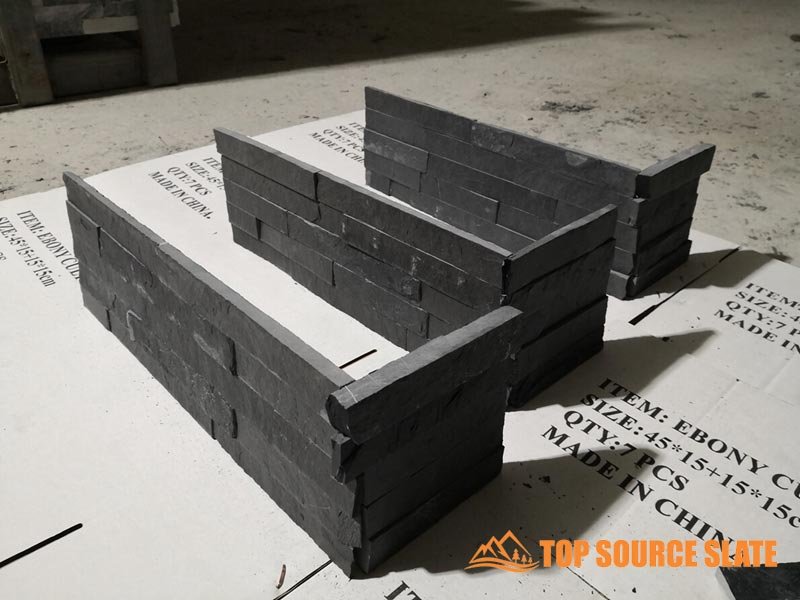
- L-vormige stukken wikkelen zich om de hoek om de substraat- en paneelranden te verbergen.
- Productieprocessen behouden de natuurlijke gespleten textuur over de overgang van 90 graden.
- Naadloze omhullende oppervlakken voorkomen het blootleggen van interne stenen kernen of toeslagstoffen.
Fabrieksprecisie 90 graden geometrie
Het bereiken van een perfecte hoek van 90 graden op een bouwplaats met een handbediende natte zaag is bij een grootschalig project vrijwel onmogelijk. We gebruiken geautomatiseerde infraroodsnijgereedschappen om de exacte afmetingen te behouden, zodat elk L-hoekstuk zonder gaten in elkaar past. Deze precisie maakt een voorspelbare uitlijning mogelijk tussen commerciële gevels met meerdere verdiepingen of grote pilaren voor open haarden in woningen. Om hoekscheiding na verloop van tijd te voorkomen, wordt bij onze fabrieksgecontroleerde verlijming gebruik gemaakt van zeer sterke epoxyharsen die speciaal zijn samengesteld voor de minerale samenstelling van natuurlijk leisteen en kwartsiet.
| Functie | Handmatig op locatie gesneden verstek | Prefab L-hoek (CNC) |
|---|---|---|
| Hoekprecisie | Variabele (menselijke fout) | Vast 90° (infraroodgeleid) |
| Installatiesnelheid | Langzaam (handmatig snijden) | Snel (klaar om te installeren) |
| Structurele band | Op locatie aangebrachte lijm | Epoxyhars van industriële kwaliteit |
| Afvalfactor | Hoog (rand afbrokkelend) | Bijna nul |
Consistentie in kleur- en materiaalbeoordeling
Het meest voorkomende esthetische falen in steeninstallatie is een kleurmismatch tussen de vlakke muur panelen en de hoekelementen. We verzachten dit door de grondstoffen op steengroeveniveau te sorteren, zodat de hoekstukken uit dezelfde mineraalader komen als de vlakke panelen. Dit “Consistentie van dezelfde batch” voorkomt het onsamenhangende, lappendeken dat ontstaat wanneer aannemers materialen afzonderlijk inkopen. Elke productiebatch uit 2026 ondergaat een kwaliteitscontrole in drie fasen om te bevestigen dat de tintuniformiteit voor de hele serie 95% of hoger blijft.
- De afstemming tussen de steenaders zorgt ervoor dat hoekmineraalpatronen in de vlakke wanddelen vloeien.
- Een controle in drie fasen bevestigt dat de zonwering uniform blijft over de hele productlijn van 2026.
- Unified batchsourcing voorkomt de “lapwerk” uiterlijk van niet-overeenkomende steen.
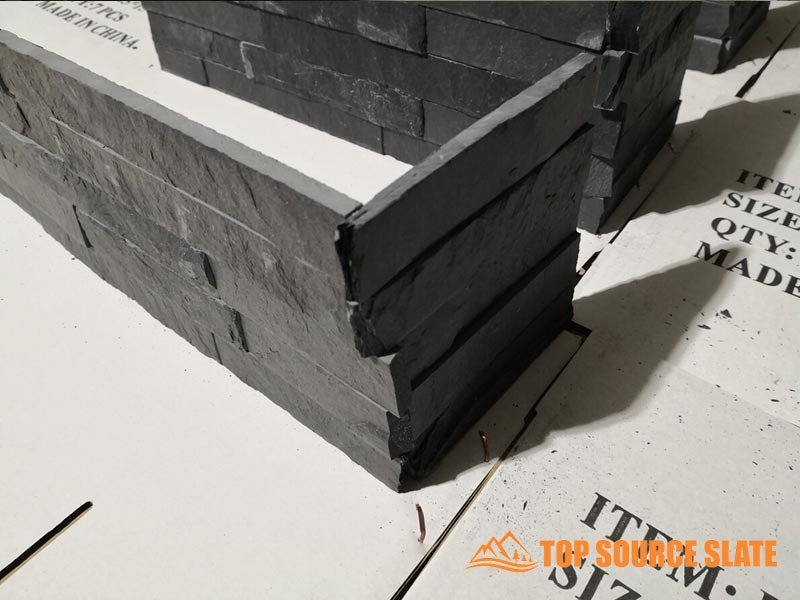
Vermindering van afval op locatie en arbeidsfouten
Het op locatie zagen van kwetsbaar kwartsiet of leisteen in verstekhoeken van 45 graden leidt onvermijdelijk tot afbrokkelende randen en veel materiaalverspilling. Kant-en-klare L-hoeken verlagen de technische vaardigheden die nodig zijn om een luxe afwerking te bereiken, terwijl de bouwtijdlijn drastisch wordt verkort. Het in elkaar grijpende Z-vormige systeem integreert rechtstreeks met onze hoeken, waardoor een voegvrije esthetiek behouden blijft die eruit ziet als professioneel met de hand gelegd metselwerk, maar in een fractie van de tijd kan worden geïnstalleerd.
- Aannemers besparen arbeid uur door handmatige versteksneden op elke baan te elimineren.
- Prefab units voorkomen breuk die gepaard gaat met het zagen van kwetsbare steensoorten.
- Het Z-vormige vergrendelingssysteem zorgt voor een naadloze, professionele afwerking zonder zichtbare verticale voegen.
Hoe om te gaan met hoeken die niet 90 graden zijn in aangepaste open haardvormen?
Nauwkeurige, op maat gemaakte hoeken vereisen opzettelijk oversnijden op 45,3 graden en diamantbladen van CNC-kwaliteit om zichtbare gaten in niet-standaard haardarchitectuur te elimineren.
Verstekzaagtechnieken voor nauwkeurige, aangepaste verbindingen
Het verkrijgen van strakke naden op zeshoekige of niet-90 graden open haardhoeken vereist specifieke hoekaanpassingen die verder gaan dan standaard 45 graden sneden. De meeste installateurs vinden dat een perfecte snede van 45 graden geen enkele marge overlaat voor onregelmatigheden in de ondergrond. Wij raden aan om uw zaag in een licht agressieve hoek van 45,3 tot 46 graden te zetten. Dit “terugsnijden” techniek zorgt ervoor dat de buitenste steenpunten strak bij elkaar komen, terwijl er een kleine interne opening overblijft voor zeer sterke epoxyhars.
Droogmontage elke stenen paneel is de enige manier om te verifiëren dat aangepaste hoeken uitgelijnd zijn met de unieke geometrie van de haard. Sinds natuursteen varieert in dikte en textuur, u moet de uitlijning van het oppervlak controleren voordat u lijm aanbrengt. Om de continuïteit van de korrel en textuur te behouden, knipt u de bijpassende hoekstukken eruit stenen paneel dat naadloos rond de aangepaste hoek wordt gewikkeld.
| Parameter | Standaardhoek van 90° | Aangepaste hoek van niet-90° |
|---|---|---|
| Verstekhoek | 45,0° Standaard | 45,3° tot 45,5° (achtersnede) |
| Messelectie | Doorlopende rand diamant | Gesplitste diamant (15 mm) |
| Bindingsmiddel | Polymeer-gemodificeerde mortel | Op kleur afgestemde epoxy van meskwaliteit |
Essentiële uitrusting voor het aanpassen van de steenhoek
Er zijn professionele hulpmiddelen nodig om de integriteit van de organisatie te behouden natuursteen tijdens complexe hoekfabricage. We gebruiken natte zagen uitgerust met infraroodgeleiders om nauwkeurige afmetingen uit te voeren sneden in grootboekstenen panelen. Deze geleiders elimineren het giswerk bij de overgang van een rechte snede naar een complexe versteksnede.
- Gebruik diamantzaagbladen met ultrafijne tanden om het afbrokkelen van delicate materialen zoals Alaska Grey of Midnight Slate tijdens steile hoeksneden tot een minimum te beperken.
- Breng blauwe schilderstape aan langs de snijlijn om de paden duidelijk te markeren en het steenoppervlak te beschermen tegen door trillingen veroorzaakte microscheurtjes.
- Zorg voor een hoge waterstroom om de hitte onder controle te houden en te voorkomen dat het mes beglaast bij het snijden van hard kwartsiet.
Grootboekpanelen aanpassen voor niet-standaard openhaardvormen
Het aanpassen van het Z-vormige vergrendelingssysteem voor zeshoekige of gebogen ontwerpen vereist strategische paneelaanpassing. Onze standaard Z-vormige panelen zijn ontworpen voor overgangen van 90 graden, dus u moet vlakke panelen in op maat gemaakte wiggen snijden voor open haarden die afwijken van de standaardarchitectuur. Hierdoor kan de steen dat doen “draai” de hoek terwijl het vergrendelingsmechanisme functioneel blijft.
Verlijm deze op maat gemaakte verstekranden met behulp van zeer sterke epoxyhars die is samengesteld voor de steennormen van 2026 om een permanente hechting te garanderen. De aanpassing ter plaatse van de in elkaar grijpende Z-tabs zorgt voor een naadloos uiterlijk bij op maat gemaakte overgangen, waardoor de “stapte” hiaten die vaak voorkomen bij installaties van lagere kwaliteit.
Randafwerking voor aangepaste hoeken
Handmatige verfijning van ruwe steenranden is vereist wanneer fabriekshoeken worden aangepast voor aangepaste vormen. Het polijsten en honen van de ruwe randen van versteksteen zorgt ervoor dat ze overeenkomen met de fabrieksafwerking van onze panelen uit de Flat- of Pencil-serie. Gebruik een progressief korrelsysteem, beginnend bij korrel 60 voor materiaalverwijdering en eindigend bij korrel 400 voor een gladde, matte scherpte.
Na de mechanische afwerking een pH-neutraal aanbrengen natuursteen sealer op de nieuw blootgestelde snijvlakken. Dit voorkomt het binnendringen van vocht en vlekken, terwijl de kleurconsistentie over de voeg behouden blijft. Voor kleine haarlijnopeningen in complexe voegen kunt u steenstof in bijpassende kleur mengen met hars om de naad te maskeren en een uniform architectonisch uiterlijk te creëren.
De rand afwerken: polijsten en honen van de ruwe steensnede
De technische verfijning van de steenrand bepaalt de uiteindelijke visuele kwaliteit en het veiligheidsprofiel, en overbrugt de kloof tussen de winning van ruwe steengroeven en bekleding van architecturale kwaliteit.
Precisieverfijning met infraroodsnijtechnologie
We maken gebruik van geavanceerde infraroodsnijapparatuur om nauwkeurige, rechte lijnen vast te stellen voordat enige oppervlakteverfijning begint. Deze uiterst nauwkeurige fase elimineert structurele onregelmatigheden in natuurlijk leisteen of marmer, waardoor de panelen in elkaar grijpen zonder de zichtbare gaten die doorgaans voorkomen bij producten van het lagere niveau. Door deze dimensionale normen in de fabriek te bereiken, verminderen we de noodzaak van agressieve aanpassingen aan de locatie die vaak leiden tot afbrokkeling van de randen of structurele compromissen.
- Geavanceerde infraroodtools creëren strakke lijnen waardoor Z-vormige en S-vormige panelen naadloos in elkaar passen.
- De eerste ruwe sneden bereiden de steen voor op specifieke gritbehandelingen door de oppervlaktespanning te verwijderen.
- Precisiefabriekssnijden behoudt de integriteit van de natuursteen rand, waardoor afbrokkelen tijdens het transport wordt voorkomen.
Progressieve korrelreeksen voor gezoete en gepolijste afwerkingen
Het bereiken van een specifieke architectonische textuur vereist een systematische korrelvolgorde. Honen omvat een mechanisch proces waarbij gebruik wordt gemaakt van een korrelbereik van 60 tot 400 om krassen op het oppervlak te verwijderen en tegelijkertijd een gladde, matte afwerking te creëren – een voorkeurskeuze voor 2026 moderne ontwerpen. Voor hoogglansvereisten gaan onze technici verder dan het slijpen om een reflecterend oppervlak te produceren dat de glans verdiept steen is natuurlijk kleurverzadiging.
Technici monitoren tijdens dit proces de mechanische druk en hitteniveaus om microbreuken langs de omtrek van de steen te voorkomen. Deze gecontroleerde materiaalverwijdering zorgt ervoor dat zelfs hard kwartsiet een scherpe, professionele scherpte behoudt zonder de “afronding” effect veroorzaakt door amateurpolijsttechnieken.
Randintegriteit behouden met pH-neutrale oplossingen
Chemisch beheer na het snijden is van vitaal belang voor de gezondheid van stenen op de lange termijn. Tijdens de polijstfase gebruiken we strikt pH-neutrale formuleringen om etsen van het oppervlak of kleurdegradatie te voorkomen. Het gebruik van op zuur gebaseerde reinigingsmiddelen in dit stadium zou de natuurlijke minerale structuur van materialen zoals kwartsiet of marmer aantasten, wat zou leiden tot voortijdige vervaging of vlekken. Een goede afdichting na het eindpolijsten voorkomt het binnendringen van vocht, wat van cruciaal belang is voor commerciële toepassingen met veel verkeer.
- We vermijden zuurhoudende reinigingsmiddelen om de natuurlijke tint en minerale stabiliteit van de steen te behouden.
- Zeer sterke epoxyhars zorgt ervoor dat de verbinding tussen de steen en de achterkant permanent blijft na het verfijnen van de randen.
- De laatste afdichtingsfasen beschermen het gepolijste oppervlak tegen olie en vuil uit de omgeving.
Esthetische textuur in evenwicht brengen met de veiligheidsnormen van 2026
De huidige designtrends beïnvloeden zowel de randtextuur als de esthetiek. Satijnen en matte afwerkingen worden steeds vaker toegepast omdat ze superieure slipweerstand bieden in verticale installaties die worden blootgesteld aan vocht of hoge luchtvochtigheid. In luxe lobby's creëren de geslepen randen van onze Pencil-serie een verfijnde, lineaire stroom die harde lichtreflecties minimaliseert, waardoor een zachtere visuele ervaring wordt geboden dan hoogglansalternatieven.
Regelmatig onderhoud met alleen zachte borstels en schoon water houdt deze verfijnde randen vrij van vuil. Deze eenvoudige verzorgingsroutine beschermt de integriteit van het steenoppervlak zonder dat er agressieve chemicaliën nodig zijn die de in de fabriek aangebrachte afwerking kunnen beschadigen of de in elkaar grijpende verbindingen kunnen beschadigen.
Conclusie
Het beheersen van hoekovergangen in de haard zorgt voor een naadloze omhulling die de kwaliteit van hoogwaardig metselwerk weerspiegelt. Het integreren van geprefabriceerde L-hoeken of het uitvoeren van nauwkeurige sneden op het terrein elimineert zichtbare gaten en handhaaft de structurele integriteit van de natuurlijke omgeving. stenen panelen. Deze technische details transformeren een standaardinstallatie in een duurzaam architectonisch middelpunt dat jarenlang zijn esthetische waarde behoudt.
Ontdek onze inventaris van natuurlijke gestapelde steen en bijpassende hoekoplossingen om uw volgende professionele installatie te vereenvoudigen. Neem contact op met ons team om monsters aan te vragen of om de consistentie van dezelfde batches te garanderen voor uw aanstaande grootschalige projecten.
Veelgestelde vragen
Hoe gestapelde steen in verstek zagen zonder dat de randen afbrokkelen?
Om afbrokkelen te voorkomen, dient u altijd een professionele natte zaag te gebruiken die is uitgerust met een nieuw diamantzaagblad met doorlopende rand. Zorg ervoor dat de steen volledig wordt ondersteund door de schuiftafel van de zaag om trillingen te minimaliseren. Breng een strook schilderstape aan over de snijlijn voordat u begint met het bij elkaar houden van de steenvezels, en beweeg de steen met een langzame, constante snelheid door het mes - forceer het nooit. Het aan de achterkant insmeren van de rand met een kleine hoeveelheid verdunning vóór het snijden kan ook zorgen voor extra structurele integriteit voor bijzonder broze stukken.
Heb ik hoekstukken nodig voor mijn haardzuil?
Hoewel je technisch gezien platte stukken in verstek kunt zagen om een hoek te vormen, wordt het gebruik van vooraf vervaardigde L-vormige hoekstukken ten zeerste aanbevolen voor een professionele installatie. Hoeken zijn kritische kwaliteitsindicatoren; het gebruik van speciale hoekstukken zorgt voor een naadloze, structurele uitstraling die de dikte van de steen verbergt en vermijdt “gelaagd” uiterlijk van een ruwe snede. Hierdoor ontstaat de illusie van stenen blokken met volledige diepte, wat een veel hogere esthetische waarde oplevert en de duurzaamheid van de pijlerranden vergroot.
Hoe verberg je de snijlijn op een buitenhoek?
De meest effectieve manier om een snijlijn te verbergen is het gebruik van steenepoxy of polyesterhars in dezelfde kleur, gemengd met een kleine hoeveelheid “steen stof” (vermalen resten van hetzelfde materiaal). Breng dit mengsel aan in de naad van het verstek. Zodra het begint te harden, gebruikt u een diamanten handpolijstpad om de rand lichtjes te polijsten. Dit proces combineert de textuur en kleur van de voeg met het natuurlijke oppervlak van de steen, waardoor de zichtbare overgangslijn effectief wordt gewist.
Beste zaagblad voor het verstekken van harde natuurlijke kwartsietsteen?
Voor hard natuurlijk kwartsiet moet u een premium diamantzaagblad met doorlopende rand gebruiken, speciaal ontworpen voor hardsteen of porselein. Vermijd gesegmenteerde messen, aangezien de openingen tussen de segmenten dit veroorzaken “hameren” waardoor het broze kwartsiet zal verbrijzelen. Een mes met dunne kerf heeft de voorkeur omdat het minder materiaal verwijdert en minder warmte genereert, wat resulteert in een veel schonere, chipvrije verstekrand. Gebruik altijd een watertoevoer met een hoog volume om het blad koel te houden en slib op te ruimen.
Hoe een opening in een stenen hoekverbinding repareren?
Naar gaten repareren gebruik in stenen hoeken een hoogwaardige, in kleur afgestemde geschuurde kit of een steenspecifiek vulmiddel. Voor het beste visuele resultaat mengt u een heldere steenepoxy met pigment of steenstof totdat de kleur overeenkomt met de donkerste nerven van de steen. Druk het vulmiddel in de opening en gebruik vervolgens een kleine stijve borstel of een stuk steen zelf “stippel” het oppervlak terwijl het nog nat is. Hierdoor ontstaat een natuurlijke textuur die lichtreflecties doorbreekt, waardoor de voegreparatie niet te onderscheiden is van het omringende metselwerk.
