Nauczenie się prawidłowego montażu ułożonego kamienia to różnica między elementem architektonicznym o wysokiej marży a kosztownym roszczeniem z tytułu odpowiedzialności cywilnej spowodowanej awarią panelu. Nieprawidłowy montaż często prowadzi do odrywania się kamieni od podłoża, co stwarza zagrożenie dla bezpieczeństwa klientów i rujnuje reputację wykonawcy. Unikanie tych wywołań zwrotnych zaczyna się od zrozumienia fizyki pionowego rozkładu ciężaru i chemii wiązania między kamieniem a ścianą.
Ten przewodnik ustanawia standard techniczny dla profesjonalnego kamienia murarskie, obejmujące wszystko, od krytycznego przygotowania podłoża i wyboru zaprawy po specyfikę szpachlowania w celu uzyskania maksymalnej przyczepności. Przyglądamy się mechanice blokowania paneli w kształcie litery Z i sposobom zarządzania przejścia krawędzi bez konieczności wykonywania skomplikowanych cięć ukośnych na miejscu. Przestrzeganie tych protokołów na miejscu zapewnia długoterminową trwałość i eliminuje typowe problemy pomontażowe, takie jak wykwity lub pułapki wilgoci.
Czy Twoja ściana jest gotowa? Krytyczne standardy przygotowania podłoża
Integralność podłoża i zarządzanie wilgocią decydują o tym, czy a Kamień naturalny fasada zachowuje swoje wiązanie strukturalne przez dziesięciolecia lub zawodzi podczas pierwszego znaczącego cyklu zamarzania i rozmrażania.
Ocena integralności konstrukcji i wymagań dotyczących obciążenia
Standardowo naturalny ułożone kamienne panele z Top Source Stone waży od 8 do 12 funtów na stopę kwadratową, podczas gdy wysokiej jakości surowe selekcje mogą osiągnąć 13,5 funta na stopę kwadratową. Instalatorzy muszą potwierdzić ścianę może utrzymać te ciężary własne bez przesuwania. Każde ugięcie podłoża przeniknie przez kamień, powodując rozdzielenie precyzyjnie wyciętych połączeń w kształcie litery Z. Przed montażem wymagamy, aby wszystkie powierzchnie były równe i wolne od zanieczyszczeń, takich jak farba, wosk lub środki antyadhezyjne, które działają jak przerywacze wiązania.
| Typ podłoża | Ładowność | Wymagania dotyczące przygotowania |
|---|---|---|
| Beton / Mur | Wysoki (>25 funtów/stopę kwadratową) | Wertykulacja lub odtłuszczona sierść |
| Rama drewniana + listwa | Umiarkowane (15 funtów/stopę kwadratową) | Listwa ocynkowana + powłoka chroniąca przed zarysowaniem |
| Płyta podkładowa cementowa | Wysoka (15-20 funtów/stopę kwadratową) | Cienki zestaw na taśmie siatkowej |
Zgodność podłoża dla ścian wewnętrznych i zewnętrznych
Środowisko wewnętrzne i zewnętrzne wymagają różnych strategii łączenia, aby zapewnić prawidłowe zablokowanie paneli w kształcie litery Z. Do płyt kartonowo-gipsowych do wnętrz, instalatorzy nigdy nie powinni nakładać kamienia bezpośrednio do grubości papieru. Zamiast tego przymocuj cementową płytę podkładową do kołków. W przypadku zastosowań zewnętrznych nacisk przesuwa się na sztywność i siłę wiązania.
- Bezpośrednie nakładanie jest dozwolone wyłącznie na czystą, niepomalowaną cegłę, beton lub bloczki CMU.
- Panele blokujące wymagają idealnie płaskiej powierzchni do utrzymania “mężczyzna-kobieta” połączenie maskujące złącza pionowe.
- Ściany o konstrukcji drewnianej muszą być wystarczająco sztywne, aby zapobiec zginaniu prowadzącemu do rozwarstwienia.
Bariery odprowadzające wilgoć i chroniące przed warunkami atmosferycznymi
Kamień naturalny jest z natury trwały, ale nie jest barierą wodoodporną. W na zewnątrz lub w strefach o dużej wilgotności, takich jak kominki i elementy wodne, podstawowa ochrona leży za kamieniem. Obecne przepisy na rok 2026 kładą nacisk na specjalistyczne płaszczyzny drenażowe, aby zapobiec wykwitom i zatrzymywaniu wody.
- Zainstaluj zgodną z przepisami barierę odporną na wilgoć (WRB) i obróbkę blacharską wokół wszystkich otworów.
- Po stwardnieniu zaprawy należy zastosować wysokiej jakości uszczelniacze, aby zablokować migrację soli i uprościć konserwację.
- Projekty zewnętrzne w klimacie zamarzania i rozmrażania wymagają zapraw modyfikowanych polimerami, które przekraczają standardy ANSI A118.15 w zakresie wodoodporności.
Normy branżowe dotyczące powłok zarysowanych i listew
W przypadku montażu na powierzchniach innych niż murowane należy zastosować metalową listwę i warstwę szpachlową zapewnić niezbędny klucz mechaniczny do kamienia. Profesjonaliści używają ocynkowanej siatki diamentowej przymocowanej 6 cali pośrodku do kołków ściennych. Należy nałożyć warstwę zarysowania o grubości od około 1/2 cala do 3/4 cala i wykonać poziome rowki. Warstwa ta musi całkowicie utwardzić się, aby zapobiec przeniesieniu się pęknięć skurczowych na powierzchnię okleina kamienna. Stosowanie cienkich zestawów modyfikowanych polimerami według ANSI A118.4 lub wyższej zapewnia, że siła wiązania spełnia wymagania dotyczące ścinania 300+ PSI, typowe dla nowoczesnych konstrukcji o wysokiej wydajności.

Które profesjonalne narzędzia są faktycznie potrzebne do czystego wykończenia?
Profesjonalna klasa Efekty ułożonego kamienia zależą od zarządzania ciepłem przy wysokim momencie obrotowym podczas cięcia oraz ciągłe poziome linie odniesienia, aby zapobiec skumulowanemu przesuwaniu się wyrównania na dużych fasadach architektonicznych.
Piły diamentowe na mokro do precyzyjnego cięcia kamienia
Czyste, dokładne cięcia wyróżniają najwyższą jakość instalacje komercyjne z amatorskich prób. Podczas obróbki minerałów o dużej gęstości, takich jak kwarcyt i łupek, standardowe ostrza murarskie często powodują odpryski lub przegrzanie krawędzi. Używamy wytrzymałych pił do pracy na mokro, wyposażonych w ostrza impregnowane diamentem, aby zachować ostrość krawędzi i integralność strukturalną podczas niestandardowego wymiarowania.
- Chłodzony wodą systemy cięcia eliminują naprężenia termiczne kamienia, zapobiegając mikropęknięciom paneli 6” x 24” podczas skomplikowanych cięć gniazd lub armatury.
- Precyzyjne tarcze diamentowe pozwalają na mocniejsze połączenia w serii Flat, zapewniając minimalistyczną estetykę bez rozpraszania postrzępionych krawędzi.
- Stałe smarowanie podczas cięcia zapewnia, że fabryczny kolor pozostaje spójny na krawędzi cięcia, co zapobiega powstawaniu zabrudzeń “wybielenie” od ciepła tarcia.
Pace z zębami kwadratowymi do kontrolowanego nakładania zaprawy
Głębokość złoża zaprawy bezpośrednio wpływa na siłę wiązania i trwałość ściany. Standaryzowane kielnie zapewniają, że warstwa kleju wytrzyma znaczną część waga kamienia naturalnego bez uginania się. Zalecamy określoną geometrię wycięć, aby wytrzymać obciążenie 8–13 funtów/stopę kwadratową typowe dla asortymentu Top Source Stone.
- Paca z zębami kwadratowymi 1/2 cala x 1/2 cala tworzy niezbędną głębokość, aby zaprawa mogła “klawisz” w tył kamienia.
- Właściwy rozmiar nacięcia ułatwia technikę nakładania masła, osiągając 100% pokrycia wymaganego dla trwałego połączenia w zmiennym klimacie.
- Prawidłowe użycie pacy zapobiega wciskaniu się nadmiaru zaprawy w złącza Z, utrzymując wykończenie w czystości i eliminując potrzebę żmudnego czyszczenia fug.
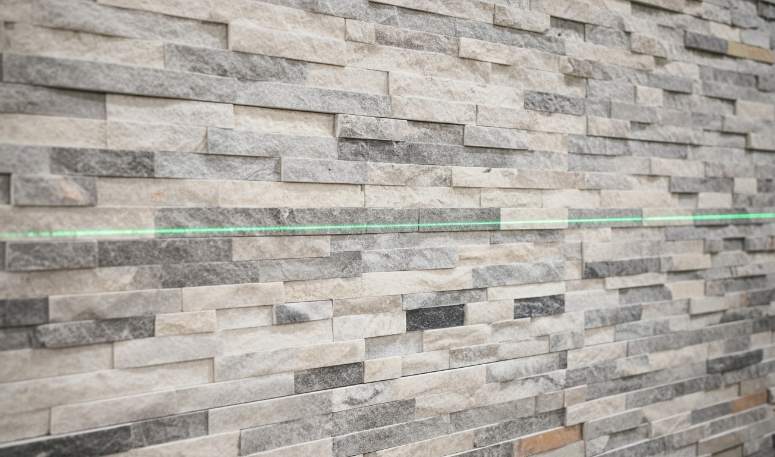
Laserowe systemy poziomowania do ustawiania w poziomie
Narzędzia do poziomowania o wysokiej dokładności zapobiegają błędom wyrównania, które pogłębiają się podczas przesuwania się po ścianie. Nawet odchylenie 1/16 cala w pierwszym rzędzie może prowadzić do dużych przerw lub ukośnych linii w dziesiątym rzędzie. Systemy laserowe zapewniają stały wizualny przewodnik, którego tradycyjne poziomice nie są w stanie dorównać na dużych dystansach.
- Poziomice laserowe tworzą ciągłą poziomą linię odniesienia, zapewniając idealnie płaską warstwę fundamentową na całym podłożu.
- Poziomice cyfrowe pomagają instalatorom zweryfikować pion ściany, szczególnie w przypadku serii Rough, w której głębokie tekstury i cienie podkreślają wszelkie odchylenia w płaszczyźnie pionowej.
- Automatyczna przekładnia poziomująca przyspiesza proces instalacji dla projektów komercyjnych na dużą skalę, redukując czas spędzony na ręcznym podkładkowaniu.
Specjalistyczne aplikatory do uszczelniania powierzchni
Ostateczna estetyka kamień naturalny zależy od tego, jak ochronny uszczelniacze są dostarczane na powierzchnię. Niewłaściwe zastosowanie często prowadzi do “łączenie” w głębokich szczelinach lub brakujących miejscach w fakturze. Wybór odpowiedniego narzędzia gwarantuje, że marmur lub łupek zachowa swój żywy, naturalny odcień, a jednocześnie będzie chroniony przed plamami środowiskowymi.
- Pędzle z miękkim włosiem umożliwiają penetrację uszczelniaczy w postrzępione profile kamieni z serii Rough i Pencil, nie pozostawiając kałuż cieczy we wgłębieniach.
- Opryskiwacze z pompą niskociśnieniową zapewniają równomierną powłokę w przypadku dużych powierzchni fasady zewnętrzne, tworząc skuteczną barierę przed promieniowaniem UV i wysokim zasoleniem.
- Gąbki czyszczące o neutralnym pH usuwają resztki warstwy zaprawy przed uszczelnieniem, zapobiegając zamgleniu “duchy” przed trwałym uwięzieniem pod warstwą szczeliwa.
Skaluj swój biznes dzięki panelom księgi głównej Premium

Jak wybrać najlepszą zaprawę do forniru z kamienia naturalnego?
Nowoczesny okleina kamienna awaria zwykle wynika ze złego doboru kleju; priorytetowo traktować systemy modyfikowane polimerami, które spełniają normy ANSI A118.15, aby obsłużyć obciążenia o masie 8–12 funtów/stopę kwadratową. martwy obciążenie panelami naturalnymi.
Cienka warstwa modyfikowana polimerami zapewniająca wysoką przyczepność
Zaprojektowane zaprawy modyfikowane polimerami stanowią branżowy punkt odniesienia w zakresie zabezpieczania okleina z kamienia naturalnego. Produkty te przekraczają normy ANSI A118.15, zapewniając krytyczną wytrzymałość wiązania na ścinanie niezbędną do utrzymania ciężaru profesjonalnej klasy 8-13 funtów/stopę kwadratową ułożone kamienne panele. W odróżnieniu od tradycyjnych mieszanek, zaprawy te zawierają duże stężenie polimerów, które zwiększają elastyczność. Dzięki temu połączenie jest w stanie wytrzymać niewielkie zmiany strukturalne i rozszerzalność cieplną typową dla fasad architektonicznych o dużej skali, bez pękania i rozwarstwiania.
Testy pokazują, że te modyfikowane zaprawy zapewniają siłę wiązania przekraczającą 300 PSI. To znacznie więcej niż w przypadku tradycyjnych niemodyfikowanych mieszanek, które często zawodzą pod ciężarem ciężkich materiałów kwarcytowych lub łupkowych. Gdy instalowanie Top Source Stone’s 6″ x 24″ paneli, zastosowanie cienkiej warstwy o wysokiej zawartości polimerów gwarantuje, że naturalne tekstury szczelin i rozcięć pozostaną bezpiecznie przymocowane do podłoża przez cały okres użytkowania budynku.
Zaprawa murarska typu S zapewniająca nośność
Zaprawa typu S pozostaje niezawodną opcją o wysokiej wytrzymałości na ściskanie w przypadku tradycyjnych zapraw instalacje murarskie i ciężkie kamienie. Jest konkretnie zaprojektowane do zastosowań zewnętrznych ścian, gdzie wymagana jest duża wytrzymałość poprzeczna i odporność na uderzenia. Dla zastosowania kamienia naturalnego, Typ S zapewnia minimalną wytrzymałość na ściskanie wynoszącą 1800 PSI, wytrzymując obciążenie pionowe grubo ciętego kamienia przez długi czas.
| Kategoria zaprawy | Metryka wydajności | Podstawowy przypadek użycia |
|---|---|---|
| Mur typu S | Kompresja 1800+ PSI | Zewnętrzna struktura ściany i ciężkie kamienne kominki. |
| Modyfikowany polimerem (A118.15) | Wiązanie ścinające 300+ PSI | Blokujące się panele w kształcie litery Z; strefy o wysokich wibracjach lub strefy termiczne. |
| Niezalegający klej LHT | Stabilność chwytania w pionie | Zgrubnie przycięte panele premium (do 3,5 cm grubości). |
Wykonawcy powinni wymieszać Typ S z płynnym środkiem wiążącym, jeżeli podłoże kamienne ma niskie ssanie. Poprawia to wartość początkową “złapać” w fazie wiązania, która jest istotna w przypadku ciężkich płyt. Podczas gdy cienkie warstwy są lepsze pod względem wytrzymałości na ścinanie, typ S przoduje w zastosowaniach masowych, gdzie częścią jest wyrównanie podłoża proces instalacji.
Niezalegające kleje do ciężkich paneli pionowych
Pionowy instalacje wymagają specjalistycznych, niespływających preparatów, aby zapobiec występowaniu paneli kamiennych przed przesuwaniem się przed stwardnieniem zaprawy. Zaprawy do dużych i ciężkich płytek (LHT) są specjalnie oznakowane pod kątem pracy w pionie. Kleje te eliminują potrzebę stosowania podkładek mechanicznych, zapewniając natychmiastowe ssanie i wsparcie dla ciężkich, blokujących się paneli w kształcie litery Z o wymiarach 6” x 24”.
- Nakładać zaprawę za pomocą pacy zębatej 1/2 cala, aby zapewnić 100% pokrycia i mechaniczne zabezpieczenie.
- Do tego należy używać zapraw LHT “Surowy” Seria paneli gdzie grubość dochodzi do 3,5cm.
- Upewnij się, że klej utrzymuje ciężar natychmiast po zetknięciu, aby zachować płynne dopasowanie.
Zaprawy odporne na warunki atmosferyczne do środowisk zamrażania i rozmrażania
W przypadku projektów zewnętrznych w Ameryce Północnej, Europie lub na Bliskim Wschodzie przy wyborze zaprawy należy przede wszystkim uwzględnić odporność na wilgoć i stabilność temperaturową. Aby zapobiec wykwitom – białym osadom soli, które mogą uszkodzić ciemny łupek lub ścianę kwarcytu o północy, niezbędne są wysokowydajne zaprawy o niskim współczynniku wchłaniania wody. W chłodniejszym klimacie zaprawy te zapobiegają wewnętrznym uszkodzeniom lodu, uniemożliwiając przenikanie wody do linii wiązania.
Sprawdź, czy wybrany klej jest chemicznie kompatybilny z żywicami o wysokiej wytrzymałości stosowanymi w nowoczesnych konstrukcjach produkcja ułożonych paneli kamiennych. W przypadku instalacji w pobliżu zbiorników wodnych lub lobby komercyjnych o dużej wilgotności należy wybrać zaprawy zaprojektowane specjalnie do środowisk wilgotnych. Zapewnia to 95% jednolitość odcienia partii Top Source Stone i jest chroniona przed wymywaniem minerałów lub plamami pod wpływem wilgoci w miarę upływu czasu.
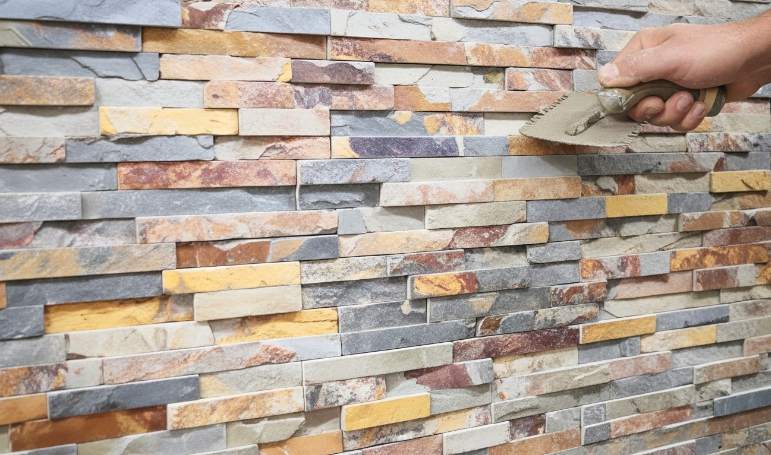
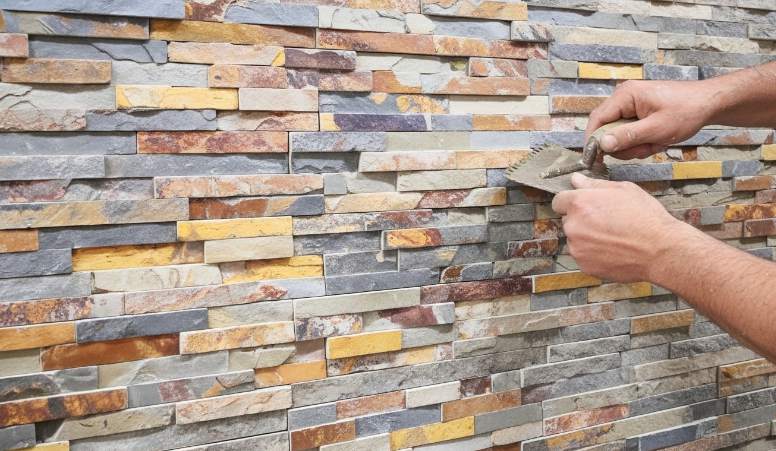
Dlaczego jest “Masło pleców” Technika sekretem długowieczności?
Back-buttering zapewnia 100% transfer kleju pomiędzy podłożem a kamieniem, skutecznie eliminując puste przestrzenie, które prowadzą do uszkodzeń spowodowanych wilgocią i rozwarstwiania się kamienia.
Osiągnięcie pełnego pokrycia klejem
Standardowa zacieraczka zębata na ścianie pozostawia szczeliny powietrzne pomiędzy grzbietami zaprawy. Chociaż te grzbiety są wystarczające w przypadku lekkich płytek ceramicznych, stanowią one znaczne ryzyko panele z naturalnego kamienia ułożonego w stosy that weigh between 8 and 12 lbs/sqft. Back-buttering involves applying a thin, flat layer of mortar to the entire rear surface of the stone before pressing it into the wall. This action collapses the ridges and fills any natural surface irregularities in the slate or quartzite, ensuring every square inch of the material makes contact with the adhesive.
- Collapses mortar ridges to provide a solid, continuous bonding layer across the entire panel.
- Provides a consistent adhesive bed for panels with natural split-face or irregular textures.
- Increases initial “złapać” or suction, which prevents heavy panels from sagging during vertical installation.
Eliminating Voids and Moisture Pockets
Hollow spots behind a stone facade act as reservoirs for water. In exterior environments, this moisture undergoes freeze-thaw cycles, expanding and applying outward pressure that eventually pops the kamień ze ściany. By using the back-buttering technique, we remove the air pockets where water typically collects. This practice is essential for meeting modern durability standards in high-humidity or cold climates, as it also prevents the migration of salts that cause unsightly efflorescence on the stone face.
- Prevents water from pooling in the cavities behind the okleina kamienna, a primary cause of bond failure.
- Reduces the risk of efflorescence by removing the air pockets where moisture and minerals collect.
- Chroni wysokowytrzymałe kleje modyfikowane polimerami przed wpływem środowiska, uszczelniając je w stałej warstwie.
Zwiększanie siły wiązania strukturalnego
Trwałe wiązanie mechaniczne opiera się na penetracji zaprawy przez mikroskopijne pory Kamień naturalny. Połączenie „mokro na mokro” – w którym świeża zaprawa na kamieniu styka się ze świeżą zaprawą na ścianie – daje znacznie mocniejsze połączenie niż zwykłe dociśnięcie suchy kamień w półoskórowaną ścianę warstwa. Technika ta gwarantuje, że kamień i podłoże podczas rozszerzania cieplnego zachowują się jak pojedyncza jednostka konstrukcyjna. W przypadku projektów komercyjnych, w których liczy się długoterminowa odpowiedzialność, stosowanie masła jest standardem zapobiegającym odpadaniu kamieni i zapewniającym bezpieczeństwo publiczne.
- Wciska zaprawę głęboko w Kamień naturalny pory dla nieustępliwego klucza mechanicznego.
- Umożliwia płyta kamienna and substrate to move as a single unit during extreme temperature shifts.
- Minimizes the risk of stone fall-off, addressing the primary concern for long-term structural integrity.
How to Correctly Install Interlocking Z-shape Stone Panels?
Achieving a professional-grade finish with Z-shape panels requires a rigorous male-female interlocking strategy and a 100% mortar transfer rate to support the 8-13 lbs per square foot typical of natural stone.
Layout Strategy and Wall Preparation
Effective installation begins with a level baseline. Use a horizontal chalk line to establish a starting point, as any deviation at the base amplifies into visible gaps as the wall rises. Installers must verify that the substrate is structurally sound; for interior projects, use cement backer board over standard gypsum to handle the weight of natural slate or quartzite.
Dry-fitting panels on the floor before application allows you to blend variations from different crates. This process ensures the “Spójność kamieniołomu w tej samej partii” remains intact across the entire surface area. We recommend calculating full panel runs to avoid small, unstable slivers at the top or edges of the project.
Adhesive Application for High-Strength Bonding
High-performance projects require polymer-modified mortars like Mapei Ultralite or Type S masonry mortar. Use a 1/4-inch notched trowel to apply a uniform layer to the substrate. To prevent detachment, back-butter every panel by applying a thin layer of adhesive to the back of the stone. This ensures 100% coverage and eliminates voids that could trap moisture in exterior freeze-thaw environments.
| Funkcja | Standard Flat Panels | Top Source Z-Shape Panels |
|---|---|---|
| Connection System | Butt-joint (Straight Edge) | Male-Female Interlock |
| Wspólna widoczność | High (Visible vertical lines) | Seamless (Camouflaged joints) |
| Precyzja krawędzi | Manual / Hand-cut | CNC Diamond-Blade Finish |
Structural Alignment and Interlocking Techniques
Start installation at the bottom corner and work horizontally. Press the first panel into the mortar and tap it gently with a rubber mallet. This action collapses the mortar ridges and forms a solid mechanical bond. Slide subsequent panels together tightly, using the Z-shape to hide the substrate and eliminate visible vertical seams.
- Use a 4-foot level to check horizontal alignment every two rows.
- Tightly seat the male-female edges to maintain the visual flow of the Kamień naturalny texture.
- Clear any excess mortar from the face of the stone immediately with a damp sponge.
Corner Transitions and Seamless Joint Management
Finish the project with matching L-shaped corner pieces. These pre-fabricated units eliminate the need for difficult miter cuts on-site and ensure the texture remains synchronized at wall transitions. Stagger the vertical joints between courses to enhance structural integrity and create a more natural aesthetic.
For exterior installations, maintain a 1/16-inch gap between panels to accommodate thermal expansion. This is particularly vital in climates with extreme temperature swings, as it prevents the stone from cracking or buckling. Clean the stone surface thoroughly once the mortar reaches its initial set, ensuring no residue remains on the split-face texture.
Can You Achieve Perfect Corners Without On-site Miter Cutting?
Modern pre-fabricated L-shaped corner units eliminate the structural risks and labor intensity of manual miter cutting while ensuring a seamless aesthetic transition for ściany z kamienia naturalnego.
Traditional masonry often requires installers to spend hours at a wet saw, trying to align two separate stone pieces at a perfect 45-degree angle. This process is slow and often results in jagged edges or visible gaps that compromise the project’s premium look. Najlepszy kamień źródłowy addresses this by providing factory-made L-shaped corner units that provide two perpendicular faces in a single, solid unit.
Utilizing Pre-Fabricated L-Shaped Corner Units
These units use the same natural stone as our flat panels to ensure color and texture consistency across the entire 2026 project. By sourcing material from the same quarry vein, we maintain a 95% hue uniformity, preventing the patchy appearance common when mixing different batches. The units arrive ready to install, providing a structural transition that maintains a 100% prawdziwy kamień estetyka.
- Precision-manufactured pieces provide a structural wrap-around finish without the fragility of manual joints.
- The interlocking design allows the corner to blend into the wall, hiding vertical seams that typically appear with butt joints.
- Factory-controlled edges ensure that the corner piece texture matches the adjacent flat panels perfectly.
Reducing Labor Costs and Installation Timelines
Modern construction schedules demand faster turnarounds. Pre-cut corner solutions facilitate this by removing specialized masonry tasks. Contractors save significant time because they no longer need to measure, mark, and wet-saw every stone at the job site. This efficiency is a major driver for B2B buyers looking to maximize profit margins on large-scale developments.
- Simplified processes allow general installers to achieve professional results previously reserved for master stonemasons.
- On-site material waste is minimized by eliminating the breakage and dust associated with manual miter cutting.
- Standardized corner sizes allow for predictable logistics and faster inventory turnover for retailers.
Maintaining Visual Integrity with Interlocking Seams
The Z-shape or finger-jointed design of these corners ensures that the transition from corner to wall is nearly invisible. We use CNC diamond-blade equipment during manufacturing to ensure every piece interlocks tightly with our flat series. This “mężczyzna-kobieta” connection system camouflages the installation substrate and prevents the “wkroczył” gaps found in lower-quality okleina kamienna.
- Staggered joints prevent ‘stacking’ lines, which are a common failure point in manual stone aplikacje.
- Precise manufacturing maintains a uniform fit while preserving the unique natural variations of each stone piece.
- The seamless finish enhances the architectural value of the building by creating a solid, monolithic appearance.
Handling Non-Standard Angles and Custom Requirements
While 90-degree corners are standard for most residential and commercial projects, some architectural designs require manual adjustments for unique geometries. For angles that are not exactly 90 degrees, installers still use wet saws with diamond blades to create custom mitered joints. The natural durability of our slate and quartzite allows for clean cuts without excessive chipping during these adjustments.
- High-strength epoxy resin ensures that manual joints remain permanent and stable in custom applications.
- Diamond-blade tools are essential for maintaining clean lines when working with high-density materials like Sierra Blue or Glacier White.
- Proper planning and dry-fitting remain critical when transitioning from pre-fabricated corners to custom-cut sections.

How to Solve Common Installation Issues Like Efflorescence?
Efflorescence occurs when soluble salts migrate to the stone surface via moisture; prevention requires eliminating salt sources in the mortar and blocking water pathways through high-performance barriers.
Select Low-Salt Materials and Clean Water Sources
Controlling efflorescence begins with the chemical composition of your installation materials. In professional B2B applications, we prioritize Type N mortar over Type S or M for veneer work. Type N contains lower cement levels, which significantly reduces the internal reservoir of soluble salts while providing the flexibility needed for natural stone expansion. We exclusively use washed, well-graded sand to prevent the introduction of unrefined minerals that often trigger surface staining.
- Mix all mortars with filtered or potable water to avoid the high mineral content found in well water.
- Opt for dense natural stones like slate or granite, which have lower absorption rates than porous alternatives.
- Verify that all masonry components meet ASTM standards for low soluble salt content.
- Maintain same-batch quarry consistency to ensure uniform chemical properties across the entire project.
Implement Robust Moisture Barriers and Drainage
Since water is the primary vehicle for salt migration, moisture management is the most critical preventative factor. Install a high-quality waterproofing membrane on the substrate to isolate the stone veneer from the wall structure. This barrier prevents capillary rise and stops moisture from drawing salts out of the concrete or brick behind the stone. Every project must include integrated flashing around windows, doors, and rooflines to prevent water from seeping behind the panels.
Site-wide drainage also plays a role in protecting the stone. We ensure landscape grading and gutter systems direct water far away from the foundation. For concrete substrates, we mandate a full curing period before instalacja kamienia. Young concrete releases volatile compounds and high moisture levels; trapping these behind kamienne panele is a guaranteed recipe for immediate efflorescence.
Apply Sealing Protocols to Block Migration Pathways
Reducing the porosity of the overall installation limits the pathways water uses to reach the surface. Once the stone and mortar have fully dried, we apply a breathable, hydrophobic sealer. These silane-based impregnators allow water vapor to escape—preventing pressure buildup—while blocking liquid water from entering the stone from the outside.
- Use dense mortar application techniques and mechanical vibration to eliminate voids where moisture accumulates.
- Utilize Z-shape interlocking panels with CNC diamond-blade precision to create tight joints that shield the substrate.
- Establish a maintenance schedule to re-verify the integrity of the hydrophobic layer every 3 to 5 years.
Safe Removal Techniques for Surface Deposits
When white residue appears, mechanical removal is the first line of defense. We use a dry, stiff-bristle brush to sweep away surface salts before they can be re-dissolved. Avoid high-pressure washing at all costs; the extreme force often pushes dissolved salts deeper into the stone pores, causing the issue to recur with greater intensity once the wall dries.
For stubborn deposits, we recommend pH-neutral natural stone cleaners specifically formulated for masonry. Acidic solutions can react with certain minerals in natural stone—particularly in quartzite or limestone—leading to permanent discoloration or etching. Always test any cleaning agent on an inconspicuous area to ensure it preserves the stone’s natural texture and hue before applying it to the entire facade.
What Are the Post-Installation Sealing Protocols?
Effective sealing serves as the final structural defense, requiring a specific cure window and chemical compatibility to ensure the natural stone’s breathability and color integrity.
Wait for the adhesive or mortar bed to reach full structural maturity before introducing sealing agents. Applying chemicals too early traps moisture within the stone, which disrupts the hydration process of the cementitious bond and can lead to long-term failure. For projects involving grout, treating the stone with a sealer first acts as a release agent. This prevents the porous natural surface from absorbing grout pigments, which often causes permanent staining on lighter materials like Alaska Gray or Glacier White quartzite.
Before starting the application, remove all cement film, construction dust, and site residues using a pH-neutral cleaner. The stone surface must be bone-dry. Even trace amounts of trapped moisture can lead to “blushing”—mętny biały film, który tworzy się pod uszczelniaczem i jest trudny do usunięcia bez profesjonalnych środków do usuwania.
Wybór i zastosowanie uszczelniaczy penetrujących
Unikaj uszczelniaczy błonotwórczych, które tworzą na powierzchni powłokę przypominającą plastik. Zamiast tego należy stosować oddychające, penetrujące uszczelniacze na bazie silanów, które umożliwiają ucieczkę pary wodnej, blokując wnikanie ciekłej wody. Ta oddychalność jest niezbędna, aby zapobiec odpryskiwaniu i rozwarstwianiu podczas cykli zamrażania i rozmrażania w klimacie północnym. Nałożenie wielu lekkich warstw jest znacznie bardziej skuteczne niż pojedyncza, ciężka, nasycona aplikacja.
- Nałóż uszczelniacz za pomocą niskociśnieniowego pistoletu natryskowego lub niestrzępiącej się szmatki, aby zapewnić równomierne nasycenie na naturalnej powierzchni szczeliny.
- Work in small, manageable sections to prevent the sealer from drying on the surface before it can be buffed.
- Buff away any excess sealer with a clean cloth within 10 minutes of application to prevent a sticky residue or hazy finish.
Waterproofing Requirements for Exterior and Wet Zones
High-moisture environments, such as pool surrounds, water features, and exterior facades in high-humidity regions, demand the most rigorous sealing protocols. Porous materials like limestone, slate, and travertine require deep-penetrating protection to prevent internal iron oxidation, which often manifests as unsightly rust spotting. Sealers in these zones mitigate environmental degradation and prevent the stone from becoming a host for organic growth.
Note that a sealer is not a primary waterproofing agent. For exterior applications, the stone panel system must work in conjunction with a secondary moisture barrier and proper flashing. The sealer’s role is to protect the stone’s aesthetic and structural surface, while the underlying drainage plane manages bulk water penetration. Ensure all joints and edges receive thorough coverage to block water from migrating behind the panels.
Curing Schedules and Maintenance Testing
Protect the sealed surface from all contact for at least 2 hours post-application. The area should remain completely dry for a minimum of 12 hours, though the chemical bond typically requires a full 24-hour curing period to reach peak resistance against stains and water. Restricting access during this window prevents contaminants from becoming embedded in the fresh seal.
To maintain the installation, perform a water droplet test periodically. If water fails to bead on the surface and soaks into the stone within two hours, the sealer has likely worn down and requires reapplication. For routine cleaning, avoid acidic chemicals or high-pressure washers. These methods strip the sealer and can erode the delicate textures of natural stone, compromising both the look and the longevity of the wall.
Wniosek
Proper installation techniques like back-buttering and correct substrate preparation protect the structural integrity of ściany z kamienia naturalnego. Using precision-cut Z-shape panels and pre-fabricated corners reduces labor time while ensuring a seamless, high-end architectural finish. These standards prevent common issues like stone delamination or efflorescence, guaranteeing a long-lasting result for commercial and residential clients.
Review your current project requirements and verify if your inventory includes the matching L-corners needed for a professional wrap-around finish. Contact Top Source Stone to request a technical catalog or discuss bulk sourcing options for your next installation.
Często zadawane pytania
Can you put stacked stone over existing brick without a lath?
Yes, you can install stacked stone directly over existing brick bez listwy metalowej, pod warunkiem, że cegła jest niepomalowana, czysta i ma solidną konstrukcję. Powierzchnia musi być wystarczająco porowata, aby wchłonąć wodę; jeśli cegła jest glazurowana lub malowana, należy albo wypiaskować powierzchnię, albo zamontować metalową listwę, aby zapewnić mechaniczne połączenie. Aby zapewnić maksymalną przyczepność do podłoża murowego, należy stosować wysokiej jakości zaprawę modyfikowaną polimerami, spełniającą normy ANSI A118.4.
Czy potrzebujesz listwy metalowej do forniru z kamienia naturalnego na płycie gipsowo-kartonowej?
Standardowa płyta gipsowo-kartonowa nie jest zalecanym podłożem konstrukcyjnym okleina z kamienia naturalnego due to its weight and susceptibility to moisture. For a professional installation, you should install a metal lath over a moisture barrier or, preferably, replace the drywall with a cement backer board. The metal lath provides the necessary mechanical key for the scratch coat to hang the heavy stone safely and prevents the drywall paper from delaminating under the load.
What is the best adhesive for heavy stacked stone on a fireplace?
The best adhesive for heavy stacked stone on a fireplace is a professional-grade, polymer-modified thin-set mortar that meets or exceeds ANSI A118.15 specifications. These “Duża i ciężka płytka” (LHT) mortars are specifically engineered to provide high-bond strength and superior sag resistance, which is critical for vertical aplikacje z kamienia. Additionally, these mortars are designed to withstand the thermal expansion and contraction cycles common in fireplace environments.
How do you cut natural stone panels without chipping or cracking?
To prevent chipping or cracking, use a high-quality wet saw equipped with a continuous-rim diamond blade designed specifically for natural stone. Maintain a slow, steady feed rate and ensure a constant flow of water to the cutting surface to reduce heat and vibration. For intricate cuts or edges that will be exposed, finishing the cut with a variable-speed angle grinder and a diamond polishing pad can further smooth any minor micro-chips.
How to fix loose or falling stone panels after years of use?
To repair loose panels, first remove any failing kamienie i zeskrobać starą zaprawę Odklej zarówno tył kamienia, jak i podłoże ściany, aż uzyskasz czystą, solidną powierzchnię. Następnie nałóż na podłoże środek wiążący “masło z powrotem” the płyta kamienna z wysokowydajną zaprawą modyfikowaną polimerami. Dociśnij kamień mocno do miejsca, zapewniając 100% pokrycia i w razie potrzeby podeprzyj go, aż zaprawa stwardnieje. Jeżeli przyczyną awarii była wilgoć, po utwardzeniu naprawy należy upewnić się, że obszar został prawidłowo uszczelniony.
Czy należy uszczelnić ułożony kamień przed czy po stwardnieniu zaprawy?
Ułożony kamień należy zawsze uszczelnić po zaprawie has fully cured, which typically takes between 72 hours and 28 days depending on environmental conditions. Sealing before the mortar cures can trap moisture and gases inside the wall system, leading to efflorescence (unsightly white salt deposits) or bond failure. For the best results, ensure the stone is completely dry and clean before applying a high-quality breathable penetrating sealer.
