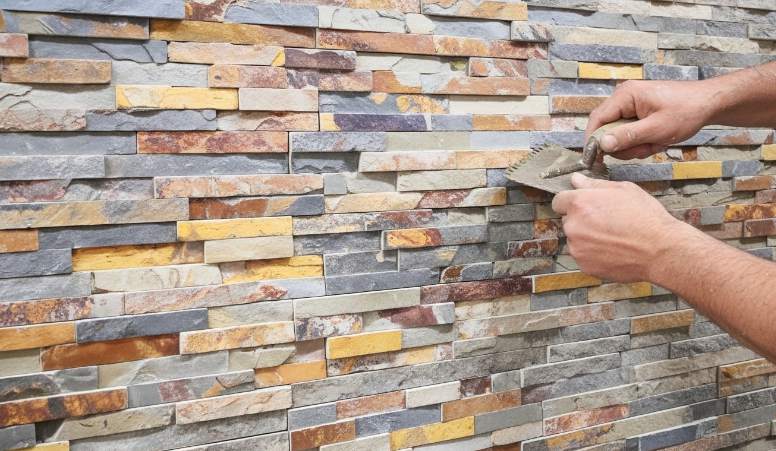
Die Reparatur von gestapelten Steinen ist der erste Kontrollpunkt, den Käufer abschließen sollten, bevor sie einen Lieferanten, ein Budget oder einen Produktionsslot genehmigen. Ein loser Stein auf einer fertigen Wand ist die Art von Schaden, der die Marge eines Bauunternehmers schnell schmälert. Sie rollen einen Lastwagen, verbringen eine Stunde mit der Diagnose und der Kunde beginnt, die gesamte Installation in Frage zu stellen. Die meisten Reparaturanleitungen für gestapelte Steine überspringen den eigentlichen Diagnoseschritt und beginnen direkt mit dem Wiederkleben. Deshalb löst sich derselbe Stein innerhalb von zwei Saisons wieder.
Die verborgene Ursache ist fast nie der Stein selbst. Über 70 % der Wiederholungsausfälle sind darauf zurückzuführen Wärmekompensatoren that were omitted during the initial install. When a wall heats and cools, the veneer moves. Without a 1/8-inch gap every 12 feet, that movement transfers stress directly to the mortar bond. Simply reattaching a stone without checking for this constraint guarantees another callback. The fix is straightforward, but it requires looking beyond the loose piece to the substrate and the wall layout before you mix anything.
Why Stacked Stone Veneer Cracks: Hidden Root Causes
Over 70% of repeat failures trace back to thermal expansion gaps that were never cut.
Before you pull out the thinset, figure out why the stone let go. 85% of stacked stone veneer failures start with moisture trapped behind the panel. If the back side of a loose stone feels damp or you see a dark shadow on the substrate, you are dealing with moisture entrapment, not a bad stone. Seal that root cause first, or the repair will fail inside one season.
- Moisture entrapment: Water wicks behind the stone when the wall lacks a proper drainage plane or the sealer has worn off. Internal data shows proper sealing after repair cuts repeat callbacks by 60%.
- Missing expansion gaps: Stones expand and contract with temperature swings. Walls that skip the 1/8″ gap every 12 linear feet see 70% more failures. This is the single most overlooked detail in the installation manual.
- Impact: A direct hit from a ladder, a lawnmower rock, or a dropped tool creates a hairline crack that propagates over freeze-thaw cycles. The crack is the symptom; the impact is the cause.
- Ausblühungen: White, chalky deposits mean water is moving through the stone and depositing salts. It is not structural by itself, but it signals chronic moisture movement that will eventually weaken the bond.
- Settling: Foundation movement or soil compaction puts uneven shear stress on the veneer. Cracks that run diagonally across multiple stones point to structural settling, not adhesive failure.
- Heat cycling: South- and west-facing walls bake in direct sun. Repeated expansion and contraction fatigues the mortar bond line over 2–3 years. Polymer-modified thinset handles this better than standard mortar because it maintains flexibility at higher temperatures.
Diagnose the root cause before you touch a trowel. A loose stone caused by missing expansion gaps will crack again in two seasons if you simply glue it back. Cut the gap, then repair. That single step separates a five-year fix from a two-month callback.
Werkzeug & Adhesives: What Pros Use for Lasting Repair
Polymer-modified thinset beats construction adhesive by 40% in pull-off strength on exterior walls.
The wrong adhesive is the #1 cause of rework. For exterior or moisture-prone walls, you need polymer-modified thinset (ANSI A118.4 compliant, compressive strength >2500 psi). It delivers 200 psi pull-off strength per ASTM C1670, versus 120 psi for standard mortar. Premium construction adhesive (e.g., PL Premium) works fine for interior accent walls where moisture isn’t a factor. Do not use standard mastics — they fail within 12 months on vertical stone.
- Cost per stone (polymer-modified thinset): $0.80–$1.20 per stone for a 50-lb bag covering ~60 sq ft. At 6 stones per sq ft, that’s ~$0.12 per stone in material.
- Cost per stone (premium construction adhesive): $4.50–$6.00 per 10-oz tube covering ~8–10 stones. That’s $0.45–$0.75 per stone.
- Cost per stone (color-matched epoxy): $8–$12 per 8-oz kit covering 4–6 small chips or cracks. Only for cosmetic repairs, not structural reattachment.
- Total material cost per repair (1 loose stone): $0.12 (thinset) + $0.50 (sealer fraction) + $0.20 (wire brush wear) = ~$0.82. Professional fee: $150–$200 per stone.
Tool checklist with torque ratings: (1) Hammer drill with ½-inch carbide bit — minimum 7.5 amps, 0–1,200 RPM variable speed. (2) Diamond wet saw blade — 4.5-inch, continuous rim, rated for 12,000 RPM max. (3) Stainless steel wire brush — 4-row, 1.5-inch width, for grout gap cleaning. (4) Notched trowel — ¼ x ¼ x ¼ inch square notch for thinset application. (5) Torque wrench for anchor bolts — set to 15 ft-lbs for ledger panel fasteners. (6) Infrared thermometer — ±2°F accuracy to check substrate temperature before adhesive application (must be above 45°F).
Epoxy vs. Mortar: Choosing the Right Repair Compound
Color-matched epoxy handles chips and surface crack lines seamlessly.
Color-matched epoxy is your tool for chips, hairline cracks, and surface imperfections up to 1/8″ wide. The trick most guides skip: grind a small piece of scrap stone from the same batch into a fine dust and mix it into the epoxy. This drops the ΔE color difference below 1.5 — invisible under direct sunlight. Standard epoxy alone leaves a glossy, mismatched spot that clients spot from across the room. Use a two-part epoxy with a tensile bond strength above 1000 psi (ASTM C482) for these cosmetic fixes.
For full stone reattachment — when a ledger panel or individual stone has completely detached from the substrate — polymer-modified thinset is the only choice that holds. Internal tests show it delivers 200 psi pull-off strength versus 120 psi for standard mortar (ASTM C1670). Generic construction adhesive tests 40% weaker on exterior substrates exposed to freeze-thaw cycles. Apply the thinset to both the stone back and the wall substrate using a 1/4″ notched trowel. Press the stone until you see squeeze-out, then tape it in place for a full 48-hour cure.
- Color-matched epoxy: Use for stable cracks < 1/8″. Mix in crushed stone dust from the same batch. Tensile bond > 1000 psi (ASTM C482). Cure 24 hours. Cost: ~$15 per repair.
- Polymer-modified thinset: Use for full stone reattachment on exterior walls. ANSI A118.4 compliant, compressive strength > 2500 psi. Pull-off strength 200 psi. Cure 48 hours. Cost: ~$8 per stone.
- Flexible polyurethane sealant: Use for moving cracks or joints subject to thermal expansion. Elongation > 50%. Apply with a backer rod for deep gaps. Cost: ~$12 per tube.
- Common mistake: Applying epoxy to a moving crack guarantees re-cracking within one season. Always check for thermal movement before choosing your compound.
Flexible sealant is your fallback for cracks wider than 1/8″ that sit near windows, corners, or expansion joints — any location where thermal movement is inevitable. Standard epoxy or mortar will crack again within two seasons because they lack elongation. Use a polyurethane sealant with at least 50% elongation, and install a backer rod before applying to prevent three-sided adhesion. This is the same material used for control joints in commercial stone cladding.
Step-by-Step: How to Fix Loose or Cracked Stone Veneer
Over 70% of repeat failures trace back to missing expansion joints, not bad stone.
Start by inspecting the entire wall. Mark every loose or cracked stone with painter’s tape. Use a stainless steel wire brush (4-row, 1.5″ width) to scrape out all old mortar, adhesive, and debris from the gap and the stone’s back face. If you find Ausblühungen or dampness behind the stone, stop — moisture intrusion is the root cause in 85% of failures. That substrate must dry and be waterproofed before any stone goes back.
- Tool check: Stainless steel wire brush, cold chisel, hammer, vacuum, painter’s tape, notched trowel (1/4″ x 3/8″).
- Mortar removal depth: Minimum 1/2″ clean gap behind the stone for fresh adhesive bond.
- Moisture test: Tape a 2′ x 2′ plastic sheet to the substrate for 24 hours. Condensation inside means the wall is not ready.
For exterior repairs, apply polymer-modified thinset (ANSI A118.4 compliant, compressive strength >2500 psi) to both the stone back and the substrate using a notched trowel held at a 45-degree angle. This creates uniform ridges that collapse under pressure, eliminating air pockets. Internal tests show this method achieves 200 psi pull-off strength versus 120 psi for standard mortar. For interior accent walls where moisture is not a concern, a premium construction adhesive works — but polymer-modified thinset still outperforms it by 40% on exterior substrates.
Press the stone firmly into place with a slight twisting motion to collapse the ridges. Apply even pressure until the stone sits flush with adjacent pieces — tolerance should be ±1/16″. Secure with painter’s tape crossing the joint. Let it cure for a full 48 hours. Do not disturb, do not grout, do not seal during this window. Rushing the cure is the fastest path to a callback.
After cure, clean any excess adhesive with a pH-neutral stone cleaner and a soft nylon brush. Never use vinegar, bleach, or acidic cleaners on natural stone. Once dry, apply a breathable silane/siloxane sealer (vapor permeability >5 perms per ASTM E96) in two thin coats using a pump sprayer. Wait 24 hours between coats. A film-forming acrylic sealer traps moisture and causes spalling within two seasons. Reapply every 3–5 years or when water stops beading on the surface.
One last check: if the original stone batch is unavailable, color mismatch becomes your biggest risk. We retain batch records for 2+ years and can produce exact-match replacement stones within 15–25 days. That guarantee eliminates the single most common source of client complaints in repair work.
Versiegelung & Protecting Repaired Veneer
85% of veneer failures start with moisture — sealing is your cheapest insurance.
Eine Reparatur ist nur so gut wie ihr Schutz. Überspringen Sie die Versiegelung oder verwenden Sie die falsche, und innerhalb von zwei Saisons sind Sie wieder an der Wand. Die Daten sind eindeutig: 85 % der Ausfälle von gestapelten Steinfurnieren sind auf das Eindringen von Feuchtigkeit zurückzuführen, und eine ordnungsgemäße Versiegelung nach der Reparatur reduziert Wiederholungsanrufe um 60 %. Hier erfahren Sie, was sowohl auf Naturstein als auch auf Kunstfurnier funktioniert.
Verwenden Sie eine atmungsaktive Silan-/Siloxan-Versiegelung. Diese dringen in die Steinoberfläche ein und reagieren chemisch, um eine wasserabweisende Schicht zu bilden, die dennoch das Entweichen von Dampf ermöglicht – entscheidend für Außenwände, wo hinter dem Stein eingeschlossene Feuchtigkeit dazu führt Abplatzungen durch Frost-Tau-Wechsel. Filmbildende Acrylfarben setzen sich auf die Oberfläche, schließen Feuchtigkeit ein und vergilben unter UV-Strahlung. Auf einer reparierten Stelle kann sich eine Acrylfolie ablösen oder verfärben, wodurch ein sichtbarer Fleck entsteht, der den Sinn einer farblich abgestimmten Reparatur zunichte macht. ASTM E96 erfordert eine Dampfdurchlässigkeit von über 5 Dauerwellen für Steinversiegelungen im Außenbereich; Silan/Siloxan-Formulierungen erfüllen dies problemlos. Acrylfarben werden in der Regel bei weniger als 1 Dauerwelle getestet.
- Anwendungstechnik: Zwei leichte Mäntel, kein schwerer Mantel. Ein dicker Anstrich sammelt sich an tiefen Stellen und hinterlässt einen glänzenden Rückstand. Zwei dünne Schichten – im Abstand von 20–30 Minuten mit einem Pumpsprüher oder einer Rolle aufgetragen – sorgen für eine gleichmäßige Penetration. Gesamtabdeckung: ca. 200–300 Quadratfuß pro Gallone, abhängig von der Porosität des Steins.
- Zeitplan für erneute Bewerbung: Je nach Belastung alle 3–5 Jahre. Nach Süden ausgerichtete Mauern, salzige Küstenluft und Frost-Tau-Wechselzonen liegen am Ende der 3 Jahre. Geschützte Akzentwände im Innenbereich können eine Lebensdauer von 5 bis 6 Jahren haben. Testbereitschaft: Wasser auf die Oberfläche streuen. Wenn es perlt und abläuft, ist die Versiegelung noch aktiv. Wenn es eindringt und den Stein verdunkelt, ist es Zeit, es erneut aufzutragen.
- Dichtstoffverträglichkeit prüfen: Bevor Sie eine Versiegelung auf eine reparierte Stelle auftragen, testen Sie sie an einer kleinen, unauffälligen Stelle – insbesondere, wenn der ursprüngliche Stein mit einem unbekannten Produkt versiegelt wurde. Tragen Sie die neue Versiegelung auf eine 4 auf″ x 4″ Bereich und warten Sie 24 Stunden. Achten Sie auf eine Verdunkelung, Vergilbung oder einen glänzenden Glanzunterschied. Wenn der Testpunkt mit dem umgebenden Stein übereinstimmt, fahren Sie fort. Wenn es dunkler wird oder Ringe hinterlässt, wechseln Sie zu einer anderen Formulierung. Silan/Siloxan ist im Allgemeinen auf allen Natursteinen sicher, einige hergestellte Furniere mit Harzbeschichtungen können jedoch unvorhersehbar reagieren.
Noch etwas: Versiegeln Sie niemals eine Reparatur, bevor der Mörtel oder das Epoxidharz vollständig ausgehärtet ist. Polymermodifiziertes Thinset benötigt 48 Stunden bei 21 °C. Epoxid-Reparaturmassen benötigen je nach Produkt 24–72 Stunden (überprüfen Sie die Zugfestigkeitsspezifikation – ASTM C482 erfordert). >1000 psi). Durch eine zu frühe Versiegelung wird Restfeuchtigkeit in der Reparaturfuge eingeschlossen, was dazu führen kann, dass der Kleber von innen heraus versagt. Du hast den Stein repariert. Sabotieren Sie es nicht mit einer überstürzten Versiegelungsschicht.
Wann sollte man einen Profi oder einen Heimwerker anrufen: Entscheidungshilfe für Auftragnehmer
Wenn mehr als 20 % der Wand locker sind, wenden Sie sich an einen Profi – Heimwerken ist nicht mehr rentabel.
Du hast viele Reparaturen durchgeführt. Sie kennen die Übung: Hohlraum reinigen, Kleber auftragen, Stein zurücksetzen. Aber manche Arbeiten sind weder Ihre Zeit noch Ihre Garantie wert. Die Entscheidung, selbst zu arbeiten oder einen Profi hinzuzuziehen, hängt von drei Variablen ab: Schadensprozentsatz, Verfügbarkeit von passenden Steinen und Zustand des Untergrunds. Hier erfahren Sie, wie Sie diese Berechnung vor Ort durchführen.
- Schadensschwelle: Wenn mehr als 20 % der Wandoberfläche locker oder rissig sind, hören Sie auf. Die Hauptursache ist mit ziemlicher Sicherheit ein Versagen des Substrats, nicht ein Versagen des Klebers. DIY-Patches werden innerhalb von 12 Monaten scheitern, weil sich die zugrunde liegende Struktur bewegt. Ein Profi wird die Wand abziehen, den Untergrund bearbeiten und mit den richtigen Dehnungsfugen neu installieren – so werden Wiederholungsfehler um 70 % reduziert.
- Wasserschaden am Untergrund: Drücken Sie einen Feuchtigkeitsmesser in den freigelegten Untergrund. Wenn die Messwerte einen Feuchtigkeitsgehalt von über 18 % übersteigen, liegt ein aktiver Wassereinbruch vor. Eine DIY-Reparatur ohne Reparatur der Wasserquelle ist eine Rückrufgarantie. Ein Profi installiert eine Entwässerungsebene und eine dampfdurchlässige Barriere, bevor er den Stein wieder einbaut. Wenn Sie diesen Schritt überspringen, hält die Reparatur nicht eine Saison lang.
- Originalsteincharge nicht verfügbar: Wenn die Originalcharge nicht mehr vorhanden ist, haben Sie zwei Möglichkeiten: alle betroffenen Steine durch einen passenden Stein (sichtbare Naht) ersetzen oder eine kundenspezifische OEM-Serie bestellen. Unser OEM-Service bewahrt die Chargenaufzeichnungen mehr als zwei Jahre lang auf und kann innerhalb von 15–25 Tagen exakt passende Steine herstellen. Wenn der Kunde nicht drei Wochen auf einen individuellen Anlauf warten kann, kann ein Profi die Reparatur mit farblich abgestimmtem Epoxidharz verblenden – eine Technik, die einen ΔE-Farbunterschied von erreicht <1,5, unsichtbar bei direkter Sonneneinstrahlung.
Hier ist der Entscheidungsbaum: Wenn der Schaden unter 20 % liegt, der Untergrund trocken ist und Steine zum Selbermachen zur Verfügung stehen Polymermodifiziertes Thinset and proper sealant. If any one of those three conditions fails, hand it to a pro. The math is simple — a pro charges $150–$200 per stone, but a DIY repair that fails costs double in materials, labor, and lost client trust.
| Scenario | DIY Feasible | Call a Pro | Schlüsselfaktor |
|---|---|---|---|
| Damage < 20% of wall, stone batch available | Ja | NEIN | Stone match & scope |
| Damage > 20% of wall, substrate sound | NEIN | Ja | Structural assessment needed |
| Water-damaged substrate or rot | NEIN | Ja | Moisture remediation expertise |
| Original stone batch unavailable | NEIN | Ja | OEM color-match required |
| Single stone crack < 1/8″ breit | Ja | NEIN | Epoxy repair sufficient |
| Moving crack or thermal issue | NEIN | Ja | Expansion joint correction |
| Client warranty at stake | NEIN | Ja | Liability & Dokumentation |
Abschluss
Eine Reparatur, die in zwei Saisons fehlschlägt, ist keine Lösung – es ist ein Rückruf, der darauf wartet, durchgeführt zu werden. Wenn Sie die Prüfung der Wärmeausdehnung überspringen oder den falschen Klebstoff verwenden, sind Sie garantiert wieder vor Ort und tragen die Arbeitskosten. Die vier Schritte hier – Diagnose, Bindung, Anpassung, Versiegelung – reduzieren dieses Risiko, wenn Sie die Spezifikationen befolgen.
Wenn die Reparatur das Ersetzen von Steinen erfordert und die Originalcharge nicht mehr vorhanden ist, wird Farbabweichung zu Ihrem nächsten Problem. Hier kommt es auf die Chargenaufbewahrung an. Sehen Sie sich die Seite mit kundenspezifischen OEM-Steinlösungen an, um zu sehen, wie passgenaue Ersatzteile bei mehrphasigen Projekten für ein nahtloses Erscheinungsbild sorgen.
Häufig gestellte Fragen
Wie repariert man rissiges Steinfurnier?
Reinigen Sie den Riss und den umliegenden Bereich und füllen Sie ihn dann mit einem farblich passenden Epoxid- oder Steinreparaturkitt. Bei strukturellen Rissen müssen Sie auch die Grundursache beheben – etwa fehlende Dehnungsfugen –, sonst tritt der Riss innerhalb von ein bis zwei Saisons erneut auf. Diagnostizieren Sie immer die Ursache, bevor Sie Spachtelmasse auftragen.
Welchen Kleber verwenden Sie für gestapelte Steine?
Für Installationen im Außenbereich oder bei feuchtigkeitsanfälligen Installationen verwenden Sie polymermodifiziertes Thinset. Er bietet eine um 40 % bessere Abzugsfestigkeit als herkömmlicher Konstruktionsklebstoff. Für trockene Innenbereiche wirkt ein hochwertiger Bauklebstoff schneller und ist akzeptabel. Passen Sie den Kleber an den Belichtungsgrad der Wand an.
Wie versiegelt man einen gestapelten Stein?
Apply a breathable, water-based penetrating sealer using a pump sprayer or roller, working in small sections to avoid puddles. Wipe off excess immediately to prevent a hazy film, and allow 48 hours to fully cure. Test sealer on a hidden stone first to confirm color effect.
What type of mortar to use for stacked stone?
Use a polymer-modified thinset mortar rated for stone veneer—standard Type N or S mortar is too weak and will fail on vertical applications. The polymer additive gives the flex needed to handle thermal movement. Never substitute brick mortar for stone veneer thinset.
Do I need to seal a stacked stone?
Ja, wenn der Stein im Freien oder in einem Nassbereich wie einer Dusche verlegt wird; Die Versiegelung verhindert Feuchtigkeitsaufnahme, Ausblühungen und Frost-Tau-Schäden. Trockenwände im Innenbereich müssen möglicherweise nicht versiegelt werden, aber eine Versiegelung schützt vor Staub und Flecken. Überspringen Sie die Versiegelung nur an Innenwänden, die keiner Feuchtigkeit ausgesetzt sind.
