Nauwkeurige Z-vormige paneeluitlijning is de enige manier om zichtbare verticale naden te vermijden die kostbare architecturale afkeuringen en vertragingen op de bouwplaats veroorzaken. Terwijl traditionele steenbekleding de arbeidsoverhead verhoogt, versnellen in elkaar grijpende modulaire systemen de installatie met 38% en beschermen ze de marges van aannemers tegen stijgende financieringskosten bij grootschalige ontwikkelingen.
Om een naadloze wandafwerking te bereiken zijn met diamanten gekalibreerde randen en een kleuruniformiteit van 95% afkomstig uit dezelfde steengroeve nodig. We vergelijken installatieprotocollen met het standaard modulaire precisiesysteem van 6 inch bij 24 inch om ervoor te zorgen dat de gezamenlijke toleranties onder de 2 mm blijven en het rastereffect elimineren dat typisch is voor goedkope materialen.
Wat maakt Z-vormige panelen de beste optie voor grote projecten?
Z-vorm panelen versnellen de installatie by 38% and use interlocking CNC-cut edges to eliminate visible seams, making them the most efficient choice for large-scale commercial facades.
Labor Efficiency and Rapid Scaling for Commercial Facades
Large-scale 2026 developments demand speed to keep financing costs manageable. Traditional stone cladding often bogs down projects due to the high labor intensity of manual alignment. Z-panel installation moves 38% faster because the modular interlocking geometry removes the guesswork. We supply these systems to wholesalers specifically to help their contractor clients cover expansive surfaces with smaller crews and less fatigue.
- Speed Advantage: Installation operates significantly faster than standard linear stone, cutting weeks off high-occupancy building timelines.
- Labor Intensity: Interlocking shapes simplify vertical and horizontal alignment, allowing teams to achieve professional results without specialized masonry skills.
- Financial Impact: Reduced construction downtime lowers interest on project financing and enables faster revenue generation through earlier occupancy.
Digital precision cutting and the Seamless Male-Female Connection
Visible vertical seams can ruin the aesthetic of a high-end commercial facade, creating a “grid” look that screams mass-produced. We solve this problem at the factory level. Our CNC diamond-blade edges create a precise male-female connection that camouflages joints and provides a tight seal against the elements. Sourcing from a single quarry vein ensures that even on a wall spanning hundreds of meters, the color remains consistent.
- Cutting Precision: CNC diamond blades ensure a consistent fit and clean lines across hundreds of square meters.
- Joint Camouflage: The male-female interlocking system hides vertical joints and protects the substrate from moisture exposure.
- Hue Uniformity: Sourcing from the same quarry vein per order ensures 95% color consistency, preventing patchy elevations on large walls.
The Geometry of a Seamless Wall: How Interlocking Logic Works
Z-shape geometry uses offset male-female connections to eliminate vertical seams, creating a continuous dry-stack appearance by disrupting linear patterns and hiding the installation substrate.
Visual Camouflage Through Z-Shape Geometry
Standard rectangular panels create a predictable grid that highlights every joint. We use Z-shape geometry to replace these straight vertical lines with staggered edges. These staggered “fingers” nest into adjacent panels, preventing the human eye from tracking repetitive seams across a large facade or commercial interior.
- Pattern Disruption: Staggered interlocking edges break up the visual flow, making it difficult to spot individual panel borders compared to rectangular “fragmentarisch” layouts.
- Substrate Protection: The interlocking overlap ensures the installation substrate remains completely hidden, even if minor settling occurs.
- Textural Masking: Natural cleft finishes provide organic depth and shadow, which naturally masks the transition points between modular interlocking pieces.
CNC Diamond-Blade Precision and Male-Female Connections
A seamless fit depends on manufacturing tolerances. We utilize CNC diamond-blade cutting to maintain razor-thin edge precision and 95% hue uniformity across a single batch. This allows our male-female connection system to function without the “stapte” gaps common in hand-cut products.
- Standardized Dimensions: Modular 6-inch by 24-inch (150x600mm) dimensions ensure consistent installation speed and geometric alignment.
- Quarry Control: We source stone from the same quarry vein per order to ensure that color tones and mineral patterns align across the interlocking joints.
- Precision Engineering: CNC-cut edges allow stones to align tightly, creating a high-end dry-stack finish without the need for visible mortar or grout.
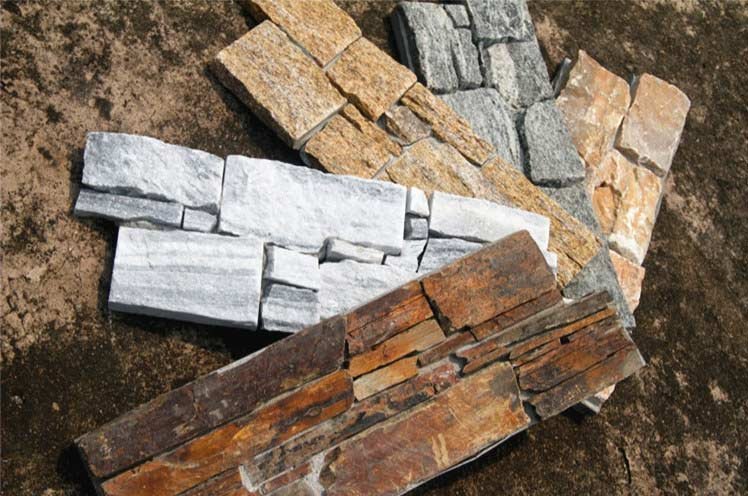
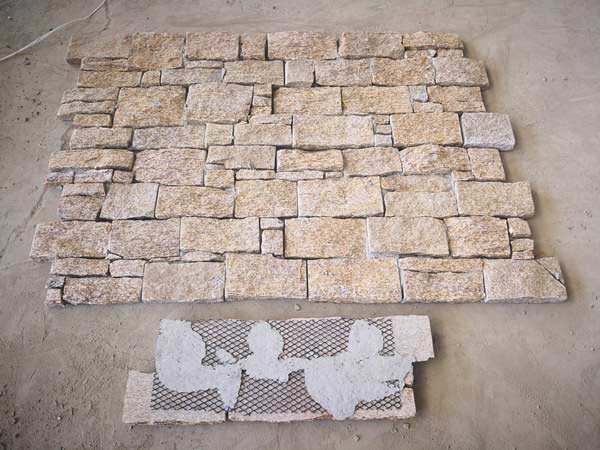
Premium Natural Stone for Professional Projects

Where to Start? Managing the First Row and Staggering Patterns
Centering the first row ensures visual symmetry while Z-shape interlocking and calculated staggering eliminate the “Zipper -effect” for a seamless, professional architectural finish.
The Foundation of Alignment: Centering and Leveling the Starter Row
The first course dictates the success of the entire facade. Before applying adhesive, installers must verify the layout to ensure the wall ends with a full or half-panel rather than an unbalanced sliver at the top. This level of planning separates professional B2B installations from amateur efforts.
- Visual Symmetry: Center the first panel on the keyway for even course counts, or the half-panel unit for odd counts.
- Level Reference: Snap a chalk line along the top edge of the first row to prevent cumulative alignment errors that drift as you stack.
- Structural Anchoring: Align trimmed ends directly over framing studs to support the 30-40kg/m² load of natuursteen.
- Trim Calculation: Cut the first course panels so the final row at the peak results in a balanced element.
Staggering Patterns and the Z-Shape Interlocking Logic
Top Source Stone Z-shape panels utilize a precision male-female connection to camouflage the substrate and hide vertical joints. Achieving a seamless look requires breaking the visual grid through strategic horizontal staggering. This prevents the eye from catching repetitive patterns that signal a modular product rather than custom masonry.
- Course Offsets: Remove 16 to 24 inches (equivalent to one or two stud cavities) from the starting panel of each new course.
- Zipper Effect Prevention: Ensure vertical seams never align diagonally across the facade by varying the starting panel lengths.
- CNC-precisie: Leverage the CNC diamond-blade edges to ensure tight fits that eliminate “staircase” patterns where seams align vertically.
- Connection Integrity: Maintain consistent contact at the “man-vrouw” joints to preserve the 95% hue uniformity across the batch.
How to Minimize Visible Vertical Seams Between Panels?
Achieve a seamless finish by staggering vertical joints and using CNC-precision interlocking Z-panels to keep connections under 2mm.
| Technical Factor | Seamless Performance Standard |
|---|---|
| Panel Geometry | Interlocking Z-Shape / S-Shape System |
| Edge Precision | CNC Diamond-Blade Calibration |
| Hue Consistency | 95% Uniformity (Same-Batch Quarry Vein) |
| Joint Tolerance | Tight Gaps controlled under 2.0mm |
Strategic Layout and Joint Staggering Techniques
Effective installers prevent visual interruptions by planning the layout before the adhesive hits the substrate. This manual phase eliminates the “Zipper -effect” where vertical seams align diagonally across the facade, a common mistake in low-end installations.
- Dry-fit panels: Lay pieces on the floor to randomize stone textures and blend color shades from different cartons.
- Stagger joints: Offset vertical joints by at least 2-3 inches between rows to break up linear patterns.
- Wet-bond adjustment: Tap neighboring panels together with a rubber mallet while the adhesive is wet to minimize visible lines.
- Full coverage: Apply adhesive to both the wall and the panel back to ensure the stone presses firmly into place without voids.
CNC Precision and Interlocking Modular Geometry
Factory engineering removes the guesswork from on-site labor. We utilize CNC diamond-blade edges to ensure every panel meets strict modular specifications, providing a flush finish that camouflages the installation substrate entirely.
- Male-female connections: Use Z-shape interlocking systems that hide the vertical path of the joint.
- Quarry consistency: Bron panels from the same quarry vein per order to maintain 95% hue uniformity across large-scale projects.
- Precision edges: Rely on CNC-cut lines to maintain the industry standard of less than 2mm for visible gaps during curing.
- Matching L-corners: Use pre-fabricated 90-degree corners to sync texture and color at wall transitions, avoiding awkward miter cuts.
Can You Trim Z-panels Without Losing the Interlock Connection?
Trimming Z-panels removes the mechanical interlock on the cut side. Smart installers hide these edges at perimeters or use matching L-corners to maintain a seamless architectural finish.
Field Cutting Strategies and the Interlock Border
Cutting through the Z-profile eliminates the male-female connection required for a seamless overlap. When you remove those “teeth,” you lose the geometric puzzle fit that hides the substrate. Professional installers manage this by planning the layout so that any cut edges only occur where the stone meets a door frame, window, or wall corner.
To maintain the structural and visual integrity of the wall, follow these field-cutting protocols:
- Strategic Placement: Reserve vertical cuts for the start or end of a horizontal row to keep the interlock active across the main surface.
- Tool Selection: Use a wet saw with a diamond blade to ensure clean edges that align flush against trim or molding.
- Staggering Pattern: Maintain horizontal staggering so that trimmed panels do not align their seams vertically, avoiding the “rits-effect.”
- Dry-Fitting: Lay panels out on the floor to identify where trimming will occur before applying adhesive.
Precision Manufacturing and L-Corner Integration
Topbron Stone uses CNC diamond-blade precision to ensure every Z-shape panel fits tightly, which reduces the need for aggressive site adjustments. By relying on factory-controlled dimensions, you minimize the risk of gaps that often plague hand-cut stone. For 90-degree transitions, we recommend using pre-fabricated L-corners rather than attempting to miter cut interlocking panels in the field.
- Matching L-Corners: We provide pre-made corners for every model to navigate turns without destroying the interlocking fingers of the flat panels.
- Naadloze technologie: Our interlocking series camouflages the installation substrate even if a panel requires a minor perimeter trim.
- Hue Uniformity: We source from the same quarry vein per order, ensuring that cut pieces used at the edges still match the color profile of the central wall.
- Batchconsistentie: We maintain 95% hue uniformity within a single batch to prevent “fragmentarisch” looks when panels are cut and rearranged.
Best Practices for Leveling and Shimming Modular Stone
Effective shimming for stone projects involves using moisture-resistant plastic shims and limiting stacks to four pieces per foot to maintain plumb alignment and structural stability.
Natuurstenen panelen are heavy, typically weighing 30-40kg per square meter. If the first row isn’t perfectly level, cumulative alignment errors will ruin the facade. Installers often make the mistake of using wood shims that rot or compress, leading to wall failure over time.
Load-Bearing Shim Selection and Placement Logic
Selecting the right material is the difference between a permanent installation and a liability. High-density plastic shims are non-negotiable for modular stone because they do not absorb moisture or decay.
- Materiaal: Use high-density plastic shims instead of wood to prevent compression and moisture-related rot.
- Stack Limit: Limit shim packs to four pre-cut pieces to maintain load-bearing integrity under the weight of standard panelen.
- Orientation: Position shims in opposite directions to create a flat, even surface when adjusting for uneven substrates.
- Trimming: Cut away excess shim material with a utility knife after tightening anchor bolts for a clean, professional finish.
CNC Diamond-Blade Precision for Alignment Control
Precision manufacturing at the source reduces the need for aggressive shimming. Our Z-shape panels feature CNC diamond-blade edges that ensure a tight “man-vrouw” interlock, camouflaging vertical joints and speeding up the installation process.
- Edge Quality: CNC diamond-blade edges provide a consistent fit, reducing the need for shimming between vertical joints.
- Benchmarks: Establish level lines using pre-fabricated L-corners at wall transitions to synchronize texture and color.
- Securing: Tighten anchor bolts to specific torque requirements once the shim pack achieves plumb alignment.
- Layering: Sandwich thinner shims between thicker ones within the pack to protect them from damage under extreme loads.
Once the shim pack is positioned and the anchor bolts are secured, verify the alignment with a level one final time. A stable, plumb foundation ensures the rest of the modular stenen panelen lock together without visible gaps or structural shifting.
Het vermijden van de “Grid Look”: The Horizontal Staggering Secret
Offsetting panels horizontally prevents vertical joint alignment. Interlocking Z-shape panels automate this process, using CNC precision to hide seams across the wall face naturally.
The Visual Impact of Offset Joint Placement
Aligning vertical seams creates a visible “grid” that makes natuursteen look like artificial wallpaper. This repetition breaks the illusion of a solid stone structure and highlights the modular nature of the installation rather than the material itself.
- Visual Disruption: Staggering panels horizontally disrupts the eye’s path and mimics the random layout of traditional dry-stack masonry.
- De “Zipper” Prevention: We recommend starting every second or third row with a cut panel to ensure no two vertical joints line up directly above each other.
- Standard Offset: Professional installers typically use a 33% or 50% staggered layout to avoid “staircase” patterns where seams align diagonally across the facade.
Precision Interlocking Design for a Seamless Wall
Topbronsteen Z-Shape and S-Shape models utilize a male-female interlocking system to camouflage vertical connections. This geometry provides a “built-in” stagger that reduces the need for complex manual measurements while maintaining high architectural standards.
- CNC-precisie: Diamond-blade cutting ensures that even when staggered, the 8″ x 22″ panels fit tightly to eliminate visible substrate gaps.
- Batch Control: We source stone from the same quarry vein per order to maintain 95% hue uniformity, preventing “fragmentarisch” color blocks that make joints more obvious.
- Modular Efficiency: The interlocking edges allow for 38% faster installation than standard rectangular panels by simplifying alignment on large commercial surfaces.
By combining strategic offset placement with precision-engineered panel shapes, dealers can provide clients with a finish that hides the mechanical reality of the installation. This technical approach ensures the wall appears as a singular, hand-crafted stone surface.
Veelgestelde vragen
How do I install Z-shaped interlocking panels for large-scale commercial projects?
Commercial installers use two primary methods: a combination of high-strength stone adhesive with Z-clips for mechanical support, or a pure Z-clip fastening system. For our modular Z-shape panels, dry-fit the pieces first to verify pattern consistency. Apply mortar to the substrate and slide the male-female connections together to hide the installation surface and ensure a tight fit.
Why are the vertical seams visible on some stacked stone installations?
Visible seams usually result from light stone colors, improper adhesive matching, or imprecise manual cuts. To prevent this, we use CNC diamond-blade precision cutting on all Z-shape edges to ensure a tighter fit. Using a color-matched epoxy instead of generic caulk also helps the joint blend into the natural variations of the slate or quartzite.
Do I need to stagger the panels, and what is the recommended offset?
Staggering is essential to avoid an artificial grid look. Offset your vertical joints by at least 2 to 3 inches from the row below. For the most natural appearance, start every other row with a panel cut to a different length. This creates a random masonry pattern that conceals the modular nature of the stone.
What tools should I use to cut the ends of Z-panels for wall transitions?
A wet saw with a diamond blade is the standard tool for 2026 stenen metselwerk to ensure clean, chip-free edges. Cut slowly and support the panel fully to avoid vibration damage. Do not use routers or spiral cutters, as these tools lack the torque and blade type required for 100% natuursteen materials.
Should the installation move from the bottom up or top down?
Always install heavy natural stone panels from the bottom up. This allows the first row to rest on the floor or a leveled starter strip, providing the structural support for subsequent courses. This method prevents the panels from sliding or sagging before the adhesive fully cures.
Are these natural stone panels suitable for fireplace surrounds?
Ja, natuursteen like our Quartzite and Slate is non-combustible and withstands high heat. Because these panels are freeze-thaw resistant and UV stable, they maintain their structural integrity and color in both high-temperature interior environments and extreme outdoor climates.
Laatste gedachten
Cheap stacked stone often forces contractors to waste hours on manual sorting and grinding just to hide visible substrate gaps. We eliminate this labor bottleneck by using CNC diamond-blade edges and same-quarry vein sourcing to guarantee 95% hue uniformity. Choosing precision-engineered Z-panels secures 38% faster installation for your clients while protecting your reputation from costly “raster-look” complaints.
Stop relying on digital photos and verify the interlocking precision for yourself. We recommend ordering a sample kit from our stone cladding to test the fitment and natural cleft depth firsthand. Contact our B2B team today to discuss your trial order and secure territory protection for your wholesale region.
