Effectieve buitenafdichting voorkomt de verborgen vochtvangers die leiden tot structureel verval en dure claims voor schimmelsanering. Veel defecten aan steenfineer treden op omdat installateurs de steen behandelen als een ondoordringbare barrière in plaats van als een poreus materiaal dat op natuurlijke wijze water absorbeert. Deze fout creëert een risicovolle omgeving waarin opgesloten water de gebouwschil doet rotten, wat leidt tot structurele instabiliteit en aanzienlijke financiële aansprakelijkheid voor aannemers en ontwikkelaars.
Dit gids biedt de technische normen for a high-performance drainage system, focusing on the precise layering of water-resistive barriers and the strategic placement of kick-out flashing. We break down the requirements for integrating weep holes without compromising the design and explain why a 3/8-inch air gap serves as a vital rain screen in wet climates. These protocols provide a reliable framework for managing water intrusion and protecting the building’s long-term integrity.
Why Do Most Exterior Stone Failures Start Behind the Surface?
Most catastrophic stone veneer failures result from moisture trapped within the wall assembly, where hydrostatic pressure and thermal cycling compromise structural integrity before damage ever appears on the surface.
Moisture Intrusion and Hydrostatic Pressure
Water penetrates through micro-fissures in mortar joints or porous stone faces and accumulates within the wall cavity. When this water has no clear exit path, it creates hydrostatic pressure against the back of the panels. This pressure serves as a primary driver for deterioration, eventually forcing the stone to separate from the substrate. Improper drainage management prevents the assembly from drying, leading to persistent moisture saturation that weakens the entire system.
Freeze-Thaw Cycles and Internal Spalling
In 2026, environmental shifts continue to make thermal expansion and contraction a critical factor in structural steen mislukking. Trapped moisture expands when it freezes, exerting immense outward pressure on the internal structure of the material. This mechanical stress causes granular fracturing and micro-cracks that start deep within the stone before appearing on the surface.
- Natuurlijk grootboek stenen panelen installed without secondary moisture barriers are particularly vulnerable to this type of mechanical weathering.
- Repeated cycles cause the face of the stone to flake off, a process known as spalling, which compromises the architectural finish.
- Topbronsteen utilizes direct quarry sourcing to select high-density materials with low absorption rates, specifically to mitigate these freeze-thaw risks in Northern climates.
Subsurface Mineral Crystallization and Efflorescence
Zout- en mineraalafzettingen hopen zich vaak op achter het oppervlak, waardoor onzichtbaar structureel verval ontstaat. Oplosbare zouten reizen via vocht door de steen en kristalliseren onder het oppervlak in een proces dat bekend staat als subflorescentie. De groei van deze kristallen creëert interne spanning die leidt tot het afbrokkelen en afbrokkelen van de kristallen natuursteen lagen. Hoewel witte vlekken op het oppervlak vaak wijzen op een probleem, is dit meestal een teken van een ernstiger, verborgen ophoping van mineralen in de huid. muurmontage die de steen bedreigt stabiliteit op lange termijn.
Corrosie van ankers en afbraak van lijm
Aanhoudend vocht in de ondergrond veroorzaakt oxidatie in metalen verbindingen en ankers, waardoor hun draagvermogen aanzienlijk wordt verminderd. Deze chemische en fysieke afbraak van bevestigingssystemen brengt de veiligheid van de gehele installatie in gevaar. Standaardlijmen kunnen ook verzwakken of opnieuw emulgeren wanneer ze worden blootgesteld aan constante vochtigheid of alkalische omgevingen achter de stenen gevel.
- Geoxideerd metaal zet uit, waardoor extra interne druk kan ontstaan en de omringende metselwerkverbindingen kunnen barsten.
- Zeer sterke epoxyharsen en CNC-precisieranden met diamantbladen kwaliteit grootboekpanelen helpen het falen van de verbinding te verminderen door te zorgen voor een strakkere, meer permanente pasvorm.
- Door te zorgen voor een schoon drainagevlak achter de steen worden deze kritische mechanische en chemische verbindingen beschermd tegen door vocht veroorzaakte degradatie.
Is Your WRB (Water Resistive Barrier) Installed Correctly for Stone?
Moisture trapped behind stenen fineer accounts for nearly 90% of subsurface structural failures; a dual-layer WRB system is the only proven method to decouple the mortar bed from the drainage plane.
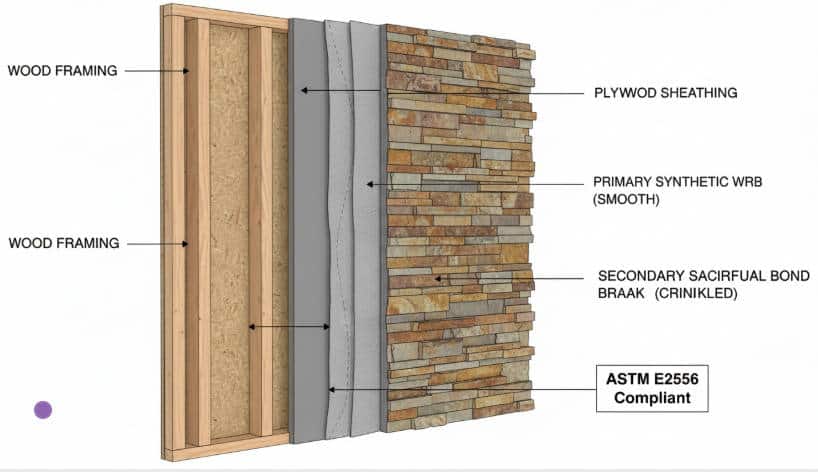
Building codes for 2026 mandate a dual-barrier strategy to manage moisture behind stenen fineer on light-frame structures. We install the primary WRB directly against the sheathing to act as the permanent drainage plane. The second layer serves as a sacrificial bond break. This prevents wet mortar from adhering to the primary barrier and clogging the drainage path, which would otherwise lead to wood rot and mold growth.
| Barrier Component | ASTM / Code Standard | Critical Function |
|---|---|---|
| Primary Layer (Inner) | ASTM D226 Type 1 / E2556 | Protects sheathing; serves as the final drainage plane. |
| Sacrificial Layer (Outer) | Grade D Paper or No. 15 Felt | Separates mortar from primary WRB to maintain air gap. |
| Foundation Weep Screed | ICC-ES Evaluated | Channels bulk water out of the system at the wall base. |
Mandatory Two-Layer Protection for Wood Frames
Standard house wraps often fail when used as a single layer behind masonry because the mortar creates a chemical bond with the fabric. This “mortared-in” effect kills the drainage potential of the wall. By using two separate layers, we ensure the inner layer remains clean and functional.
- Install two separate layers of WRB in shingle fashion starting from the bottom of the wall.
- Use the inner layer as the primary drainage plane against the sheathing.
- Verify the secondary layer prevents wet mortar from sticking to the primary WRB.
Precise Lapping and Corner Wrapping Rules
Incorrect overlapping at joints and corners remains a leading cause of localized water damage in masonry walls. Water naturally finds the path of least resistance, and poorly lapped seams act as funnels into the wall cavity. We enforce strict dimensional overlaps to block wind-driven rain.
- Overlap upper WRB sheets over lower layers by at least 2 inches at horizontal seams.
- Stagger vertical joints and ensure a minimum 6-inch overlap.
- Wrap both the WRB and the metal lath at least 16 inches around all inside and outside corners.
Essential Clearances for Drainage and Ventilation
Proper termination of the WRB system at the base of the wall prevents capillary suction and allows trapped water to escape. If the stenen fineer terminates too close to the soil or pavement, it will wick moisture upward into the structure. This leads to efflorescence and freeze-thaw spalling.
- Integrate a foundation weep screed at the base of the Stenen bekleding systeem.
- Maintain a 4-inch clearance between the stone edge and finished grade.
- Ensure the WRB overlaps the vertical attachment flange of the weep screed to direct water outward.
Selecting Approved ASTM-Compliant Materials
Only specific weather-resistant materials provide the durability required for heavy natural stone applications. Using substandard materials can lead to membrane degradation under the high alkalinity of the mortar. For 2026 projects, we recommend high-performance synthetics or traditional heavy-duty felts that meet updated durability normen.
- Utilize No. 15 felt that complies with ASTM D226 Type 1 or wraps meeting ASTM E2556.
- Confirm all materials carry ICC-ES evaluation reports for current building code compliance.
- Add a 3/8-inch rainscreen mat to accelerate drying in high-moisture climates.
Boost Project Value with Premium Ledger Panels

How to Integrate Weep Holes Without Ruining the Aesthetic
Precision drainage depends on the strategic placement of exit points at the foundation line and the use of color-matched hardware to maintain the visual integrity of natuursteen gevels.
Strategic Placement for Natural Concealment
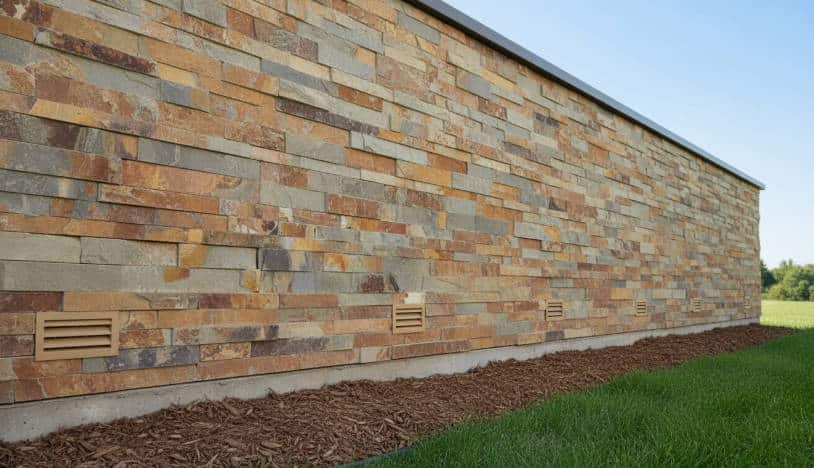
Architects minimize the visual impact of weep holes by positioning them at the foundation line where the wall meets the grade or patio. This placement naturally obscures the drainage points from typical viewing angles. To ensure performance without aesthetic clutter, we recommend the following placement standards:
- Space weep holes 16 to 36 inches apart directly above the flashing to ensure optimal moisture release without clustering.
- Align drainage gaps with the natural vertical joints of the gestapelde stenen panelen to maintain a continuous visual pattern across the facade.
- Utilize the deep shadows created by the Top Source Stone Rough Series textures to mask functional openings within the relief of the stone.
Color-Matched Vents and Mesh Inserts
Modern hardware allows weep holes to blend into the mortar or stone palette rather than appearing as dark voids. By selecting components that mirror the natural hues of the stone, the drainage system becomes an integrated architectural detail rather than an eyesore.
- Install louvered plastic vents in colors that match specific stone series, such as Arctic White or Slate Grey, to maintain color continuity.
- Use open-weave mesh inserts to prevent debris and pests from entering while keeping the drainage point looking clean and professional.
- Select stainless steel covers for high-end commercial facades where a metallic accent complements a modern, industrial aesthetic.
Corrugated Channels for Low-Profile Drainage
Corrugated plastic channels offer a nearly invisible alternative to traditional tubes or ropes. These components sit at the very bottom of the mortar bed, creating a wide, flat path for water to exit without requiring a large vertical gap in the masonry.
- Embed corrugated channels into the bottom mortar bed joint to create a flat, wide path for water exit that stays flush with the joint.
- Reduce the height of the weep opening to make it flush with the mortar line, significantly decreasing its visual profile.
- Combine these channels with high-strength epoxy adhesives to ensure the drainage path remains unobstructed during the 2026 installation season.
Architectural Transitions and Landscaping Integration
Designers use the surrounding environment and structural transitions to draw the eye away from necessary drainage points. By integrating the wall base with the landscape, the technical requirements of the building envelope disappear into the overall site design.
- Incorporate low-profile landscaping or decorative river rock at the base of the wall to obscure the weep hole line naturally.
- Use high-performance water-resistive barriers and proper flashing to manage flow efficiently, allowing for fewer, more strategically placed weep holes.
- Coördineer de hoogte van het treurgat met zijspoorovergangen of sierplanken om ze achter architecturale lagen te verbergen.
De cruciale rol van kick-out-flitsen in steenmetselwerk
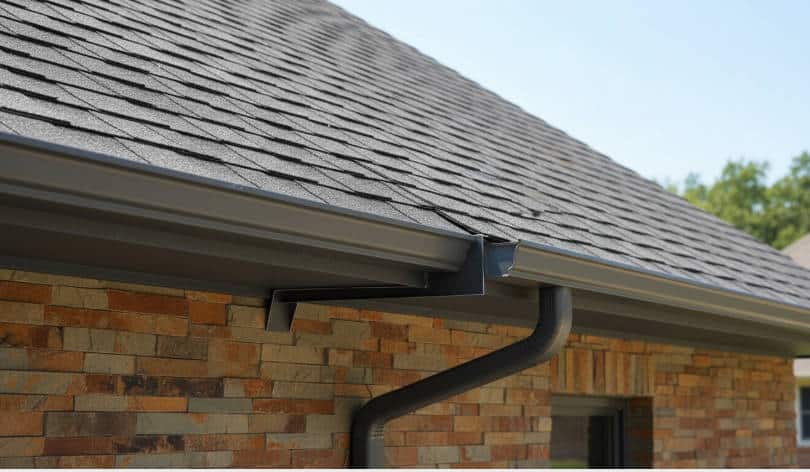
Kick-out-flitsen fungeert als de primaire mechanische omleider op kruispunten van dak tot muur, waardoor wordt voorkomen dat geconcentreerd water de waterafvoer omzeilt. stenen fineer en het verzadigen van de structurele omhulling.
Standaard dak-muurovergangen worden vaak het meest kwetsbare punt in een stenen metselwerkgevel. Zonder een speciale kick-out-omleider raakt water dat langs een dakhelling stroomt de verticaal muur en sporen achter de stenen panelen. Door dit knipperen wordt het dakafvoer rechtstreeks in het dakgootsysteem gedwongen. Door een fysieke pauze te creëren, zorgt het ervoor dat vocht nooit de opening tussen de ruimtes bereikt natuursteen en de binnenmuur holte.
De waterstroom wegleiden van muuraansluitingen
De strategische plaatsing van deze omleiders voorkomt dat water de overgang van muur naar dak overweldigt tijdens hevige regenval. Goed gehoekte componenten zorgen ervoor dat de hogesnelheidsafwatering buiten het bekledingssysteem blijft. In regio's met frequente stormen, zoals de Amerikaanse Golfkust of Zuidoost-Azië, kunnen deze knipperende componenten de zware hydraulische belasting aan die standaard getrapte flitsen niet alleen aankunnen.
- Zorgt ervoor dat het dak in de goot terechtkomt, in plaats van dat het achter het fineer doorsijpelt.
- Protects the vulnerable junction where horizontal roofing meets vertical masonry.
- Eliminates the risk of concentrated water “tracking” down the interior of the stone facade.
| Technical Parameter | 2026 Industry Standard | Performance Impact |
|---|---|---|
| Material Thickness | 0.019-inch (Minimum) | Resists corrosion in high-alkaline mortar environments. |
| Sidewall Extension | 4-inch Vertical Height | Prevents wind-driven rain from splashing over the flashing. |
| Diverter Angle | 110 – 120 Degrees | Optimizes drainage velocity into the gutter system. |
Adhering to 2026 Building Code Mandates
Modern construction standards strictly enforce the use of kick-out flashing to maintain building envelope integrity. The International Residential Code (IRC) Section R903.2.1 requires specific flashing at wall and roof intersections to prevent interior leaks. In 2026, building inspectors and insurance providers prioritize these components as mandatory safety features for stone masonry projects. Failure to install compliant flashing often results in failed inspections and the immediate loss of structural warranties.
Standardizing Installation Dimensions and Material Quality
Contractors must use corrosion-resistant metals like galvanized steel or aluminum. The alkaline nature of stone mortar can quickly degrade inferior materials, leading to flashing failure within years. Standardizing on a 4-inch sidewall extension and a 110-degree diverter angle ensures consistent drainage. We recommend pre-manufactured flashing units over field-cut solutions to eliminate human error and ensure a seamless fit against the substrate.
Preventing Hidden Structural Decay Behind the Stone Veneer
Uncontrolled water entry causes wood rot and mold growth within the wall cavity, often going unnoticed until significant damage occurs. Because stone veneer is a reservoir cladding, it holds moisture; if the substrate remains wet, the bond between the stone and the wall weakens. Keeping the substrate dry preserves the adhesion of the stenen panelen and prevents long-term delamination. Preventive installation during the initial masonry phase avoids the massive costs associated with future structural remediation and full stone removal.

Why a 3/8″ Air Gap (Rain Screen) is a Life-Saver in Wet Climates
Incorporating a 3/8-inch air gap transforms a stenen muur from a moisture-trapping “reservoir” into a high-performance ventilated assembly that prevents structural rot and facade delamination.
Breaking Capillary Action to Prevent Moisture Wicking
Natuursteen and mortar are inherently porous materials that act as a reservoir cladding. During rain events, these materials absorb liquid water and pull it inward through capillary suction. Without a physical break, this moisture migrates directly into the inner wall assembly, saturating the sheathing and framing.
- The 3/8-inch gap serves as a hard stop for capillary wicking, ensuring water cannot bridge the distance between the buitenkant steen and the water-resistive barrier (WRB).
- By 2026, building codes in high-rainfall regions emphasize this break to prevent long-term degradation of structural wood components.
- A dedicated gap protects the primary WRB from surfactant degradation caused by constant contact with wet mortar and stone.
Facilitating Rapid Gravity Drainage
Water inevitably finds its way behind stone panels through micro-cracks in joints or at transition points. When this happens, the system must provide an immediate exit path. A 3/8-inch channel allows gravity to work efficiently, pulling liquid water straight down to the weep screed at the base of the wall.
| Drainage Configuration | Moisture Mechanism | System Reliability |
|---|---|---|
| Direct Attachment | Capillary Suction | Low (High risk of rot) |
| Thin Gap (< 3/16″)) | Limited Drainage | Moderate (Risk of debris clogging) |
| Engineered 3/8″ Gap | Gravity & Ventilation | High (Proven Performance) |
Promoting Constant Airflow and Ventilation Drying
Liquid drainage is only half the battle; water vapor must also be managed. The stack effect—where cool air enters at the bottom and warm, moist air exhausts at the top—drives continuous airflow through the 3/8-inch cavity. This movement dries the back of the natuurstenen panelen and the WRB simultaneously, preventing the stagnant, humid conditions where mold and mildew thrive.
- Proper ventilation allows the wall system to “ademen” out incidental moisture that accumulates from interior vapor pressure.
- Constant drying cycles protect the high-strength epoxy used in modern ledger stone systems from hydrolytic degradation.
- Airflow mitigates efflorescence by reducing the time minerals spend in a saturated state.
Reducing Freeze-Thaw Stress on Stone Bonds
In noordelijke natte klimaten vormt opgesloten water een structureel gevaar. Wanneer er vocht achterblijft a stenen paneel tijdens een bevriezingscyclus zet het met ongeveer 9% uit, waardoor een enorme hydrostatische druk ontstaat. Deze druk is de voornaamste oorzaak van stenen panelen “knallen” of delamineren van het substraat.
Een luchtspleet van 3/8 inch zorgt ervoor dat de achterkant van de steen droog genoeg blijft om snelle temperatuurschommelingen op te vangen. Door het waterreservoir achter de gevel te elimineren, verlengt het systeem de levensduur van de installatie aanzienlijk. Voor B2B-leveranciers en -aannemers vermindert dit garantieclaims en zorgt ervoor dat de 100% natuursteen behoudt decennialang zijn structurele integriteit.
Conclusie
Beheer van vocht achter natuurlijke gestapelde steen bepaalt de structurele integriteit en veiligheid op de lange termijn of the facade. Integrating a functional air gap with correct flashing prevents water from becoming trapped, protecting the substrate from rot and mineral staining. These technical standards ensure that natural stone veneer installations remain durable and aesthetically consistent across varying climates.
Review your current exterior specifications to ensure they meet these drainage requirements for natuursteen. You can contact our technical team to request specific data sheets or order a sample of our precision-cut natuurstenen panelen for your next project.
Veelgestelde vragen
Do I need a vapor barrier behind exterior stone?
Yes, a water-resistive barrier (WRB) is essential. Modern B2B standards require at least two layers of protection—often two layers of Grade D building paper or a specialized drainage mat—behind buitenkant steen. This setup prevents moisture from reaching the structural sheathing and creates a critical bond break, which mitigates the risk of rot and subsurface failure caused by moisture intrusion.
How to install weep holes in a stacked stone wall?
Weep holes should be installed at the base of the wall, typically using a weep screed for thin veneer or by leaving open vertical head joints in the first course of full-bed stone. For stacked stone applications, place plastic weep tubes or specialized drainage vents every 24 to 32 inches. This ensures that any water trapped behind the facade can escape, preventing the internal pressure buildup and freeze-thaw cycles that lead to spalling.
Why is there water leaking behind my stone veneer?
Leakage is typically caused by inadequate flashing at transition points (windows, doors, or rooflines) or the failure of the joint sealing system. Without a proper drainage plane, moisture is absorbed by the stone and mortar—acting as a reservoir—which then forces water inward via capillary action. Faulty sealers and directional expansion under thermal cycling can also create micro-fractures that allow wind-driven rain to bypass the surface.
Is stone veneer breathable or does it trap moisture?
Steen fineer is a reservoir cladding that tends to trap moisture if not installed with a dedicated air space or rainscreen system. While natuursteen heeft verschillende niveaus van doorlaatbaarheid, de mortels en afdichtingsmiddelen met hoge dichtheid die tijdens de installatie worden gebruikt, creëren vaak een dampondoorlatende barrière. Opgesloten vocht veroorzaakt minerale kristallisatie en corrosie van metalen ankers, waardoor vochtbeheer onder de grond van cruciaal belang is voor duurzaamheid op de lange termijn.
Hoe de bovenkant van een stenen beschot laten flitsen?
Om een stenen beschot te laten flitsen, installeert u een corrosiebestendig “Z-knipperend” of lekdop bij de bovenste overgang. Het verticale been van het flitswerk moet minimaal 5 cm achter het bovenste gedeelte uitsteken gevelbekleding en zijn waterbestendige barrière. De horizontale poot moet iets naar buiten hellen om water van het stenen oppervlak af te voeren. Hierdoor wordt voorkomen dat er water in de kamer komt bovenkant van de steen assemblage, wat een primaire oorzaak is van het falen van de verbinding en het breken van interne korrels.
